Media consumption has become a significant part of our everyday lives. Digital media, in particular, has taken its toll on the world. Images have been deeply incorporated into our lives. Much appealing as it may be, the digital world faces its problems now and then.
In this article, we shall be conferring a commonly occurring error on Windows, i.e., JPEG error #53. Here, we will be looking at its causes and efficient methods to get rid of the problem once and for all. Let's commence the discussion!
In this article
What is JPEG Error #53?
Users may have experienced the JPEG error #53 when trying to preview an image on their Windows. This error can arise due to several reasons and prevents the user from accessing the specific image file on the device. Due to this error, photos cannot be opened and viewed.
When a JPEG image faces such an error, it is usually inaccessible, cannot be read and viewed. The computer may also display an unknown file format error. The error can prove to be a minor inconvenience for some people during a big nightmare for others. Nevertheless, it is vital to get rid of the issue and to prevent it from arising in the future.
What May Cause JPEG Error #53?
There are several potential reasons which may cause JPEG error #53 to arise. Some of them are listed below.
1. Not Enough Memory Storage
One of the most common reasons due to which the JPEG error occurs is when there is not enough storage space available on your disk. Insufficient storage can prevent a viewer from gaining access to the file.
2. Incompatible Viewer
If the file format is not supported by the viewer, it will likely face an error and will not be opened. A program that is not compatible with the file extension will not be viewed. It is necessary for the file to be compatible with the program to be perceived.
3. Problems in Drive
If the drive is corrupted or driver software is not updated, Windows will display the JPEG error #53. A lack of codecs or mishandling of drive can also cause the error to occur and can fail to open the JPEG file.
4. Virus Attack
Files that are prone to attack by virus or malware are likely to face corruption and damage. If the JPEG file is infected by a virus, it is expected to face error #53.
5. Hardware Failures
In instances where the hardware is facing issues, if a bad sector exists in the card or it is mishandled, or there is a broken or invalid registry, error #53 will arise.
6. Wrong file extension
When saving the JPEG file in a different extension wrongly, which will destroy the file format, and the error #53 will occur when attempting to open the file.
7. Errors occur in the metadata of the JGEG file.
The matadata of the JPEG image is corrupted due to various reasons like hardware failure, improper data transfer, hardware errors, etc., error #53 will arise.
4 Proven Methods to Fix JPEG Error #53
After knowing the potential causes of JPEG error #53, it is now time to learn how to fix the issue once and for all. Below are 4 effective methods by which you can troubleshoot the error.
Method 1: Execute a Clean Boot on Windows
In order to make the JPEG error go away, you can perform a clean boot on your Windows. Here are the steps to do that.
1. Press 'Windows+R' simultaneously.
2. In the search box, type 'msconfig' and hit enter.
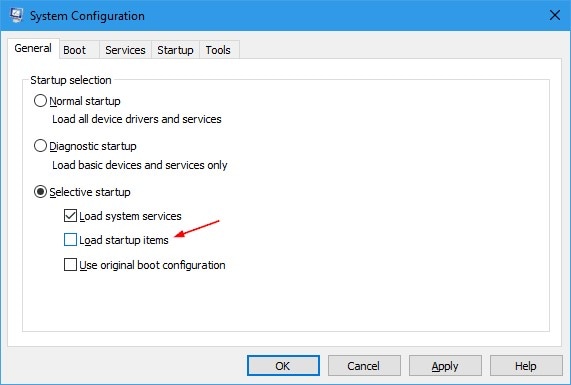
3. From the "System Startup Utility," go to the "General" tab.
4. In the "Selective Startup" option, uncheck the box that reads as "Load Startup Items."
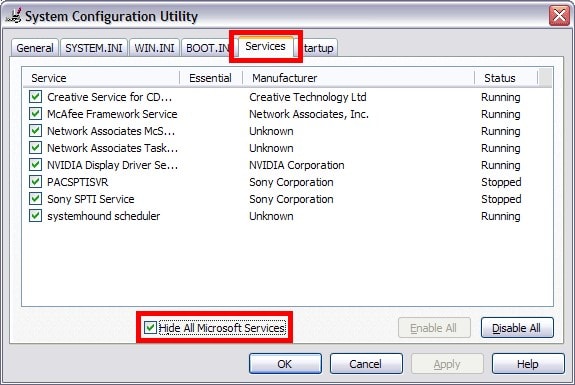
5. Then go to the "Services" tab and select the option "Hide All Microsoft Services."
6. Click on the 'Disable all' button.
7. Now go to the Startup Tab.
8. Enable all the startup items and click "Disable."
9. Click on "Ok."
10. Restart your computer.
Method 2: Change the File Extension
Changing the file extension can make the error go away. To do this, you just need to follow a few simple steps, as follows.
1. Open your file in Adobe Photoshop.
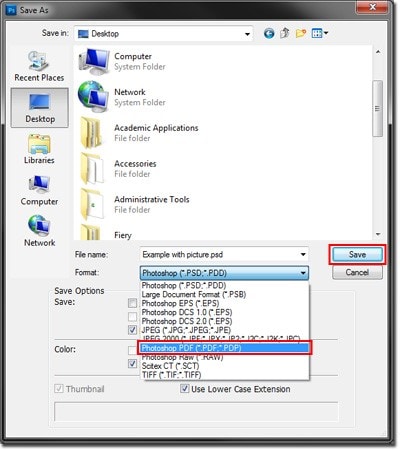
2. Click on the "File" tab and choose "Save As."
3. From the dialogue box that appears, type the name of the image file.
4. Choose a suitable location for the file.
5. Navigate to the 'Format' menu.
6. Choose a new file format extension such as .png or .tiff.
7. Click the 'Save' button.
8. Now check if you can view the image or not.
Method 3: Restore System
Another alternative to get rid of the JPEG error is by restoring the system to a previous version. This can prove to help remove any recently made changes in the system. Here is a step-by-step guide to know how to do that.
1. Reboot your system and login as Administrator.
2. Press the Windows button and type 'System Restore' in the search box.
3. Click on the 'Create a Restore Point' option.
4. Go to the 'System Protection' tab.
5. Select the 'Configure' button.
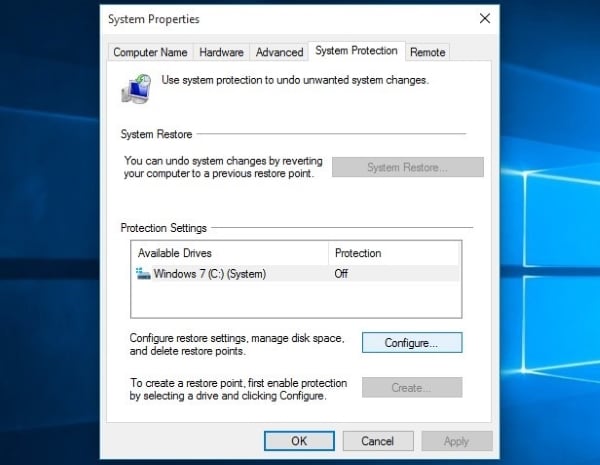
6. From the pop-up window, check the 'Turn on System Protection' option.
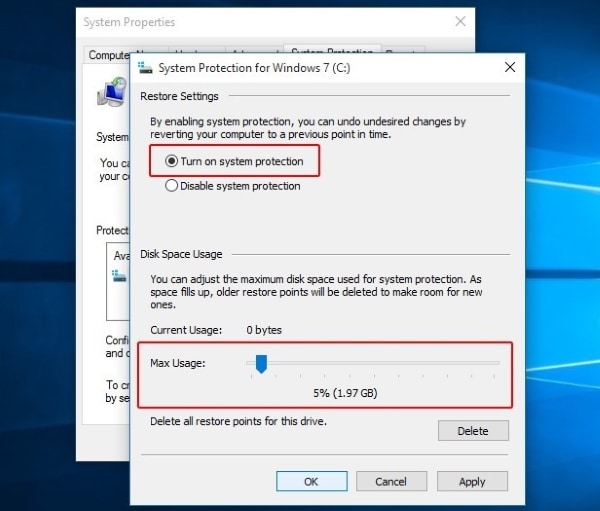
7. Click on "Ok."
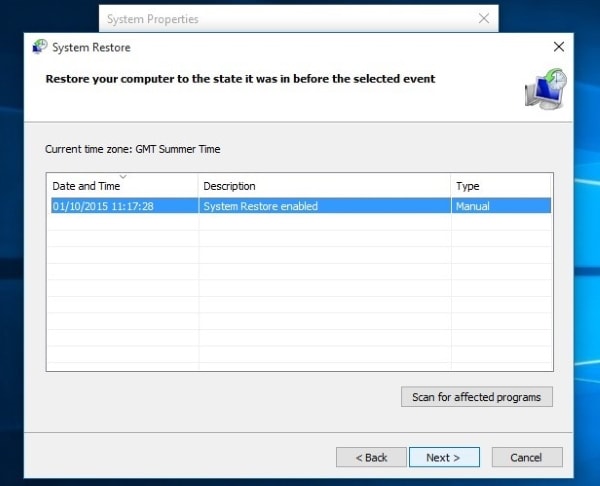
8. Follow the instructions on the screen and choose a specific particular restore point.
9. Click on 'Next' and wait for the process to conclude.
Method 4: Repair Corrupted Images by Using Wondershare Repairit Photo Repair Tool
If none of the above-mentioned methods work, the JPEG image file has likely gone corrupted. You will need to repair the image file in order to view it. Several photo repair tools are available to assist you in this regard. You can also do so by using the Wondershare Repairit Photo Repair Tool.
Wondershare Repairit Photo Repair is an excellent tool to repair damaged or corrupted photos of various formats, including JPG, JPEG, PNG, NRW, etc. It fixes almost all photo-related issues, such as photo not opening, photo pixelated, photo header missing, etc., and it also enables the users to repair multiple files at once, with an easy-to-use interface.
To repair corrupted JPEG images using Wondershare Repairit Photo Repair, follow the steps given below.
Step 1 Add damaged or corrupt photos
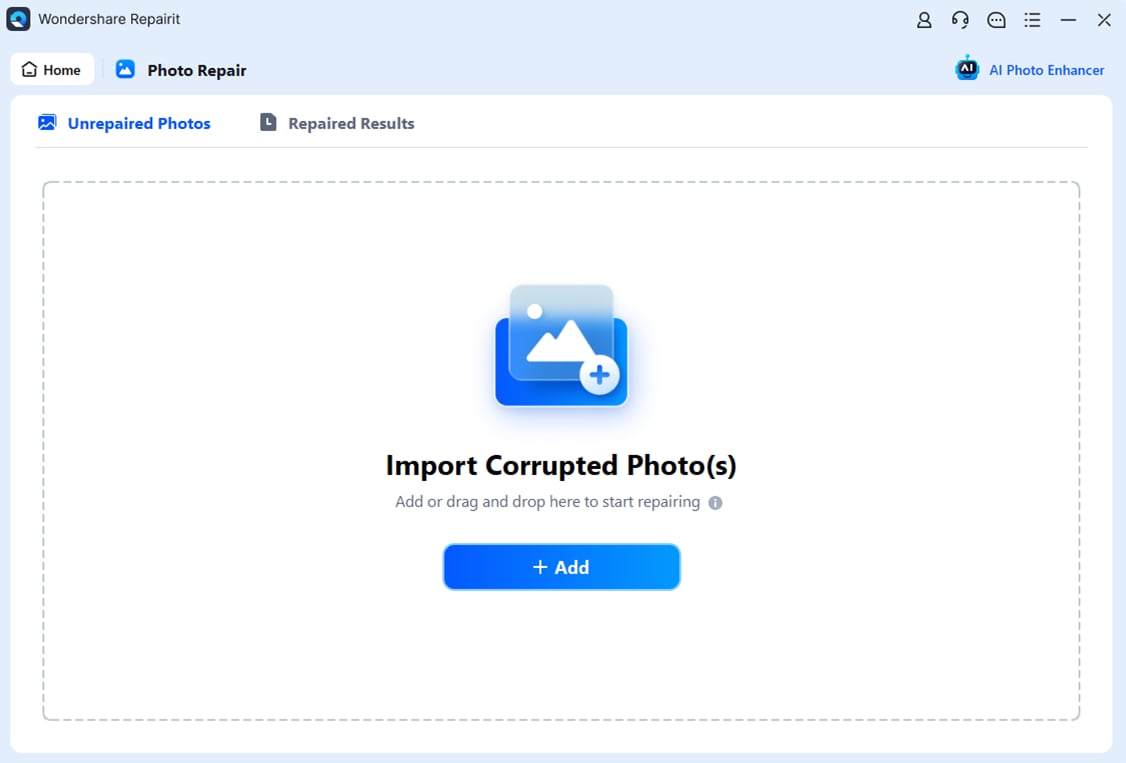
Simply launch Wondershare Repairit on your Windows PC and go to the “Photo Repair” feature from the sidebar "More Types Repair".
Now, click on the "Add" button that would load a browser window. You can now go to the location where your corrupt photos are saved and load them on the application.
Step 2 Repair and preview your photos
Click on the “Repair” button and wait as the application would implement its unique algorithm to fix the loaded photos. When the repairing process would be completed, the application will let you know about the result.
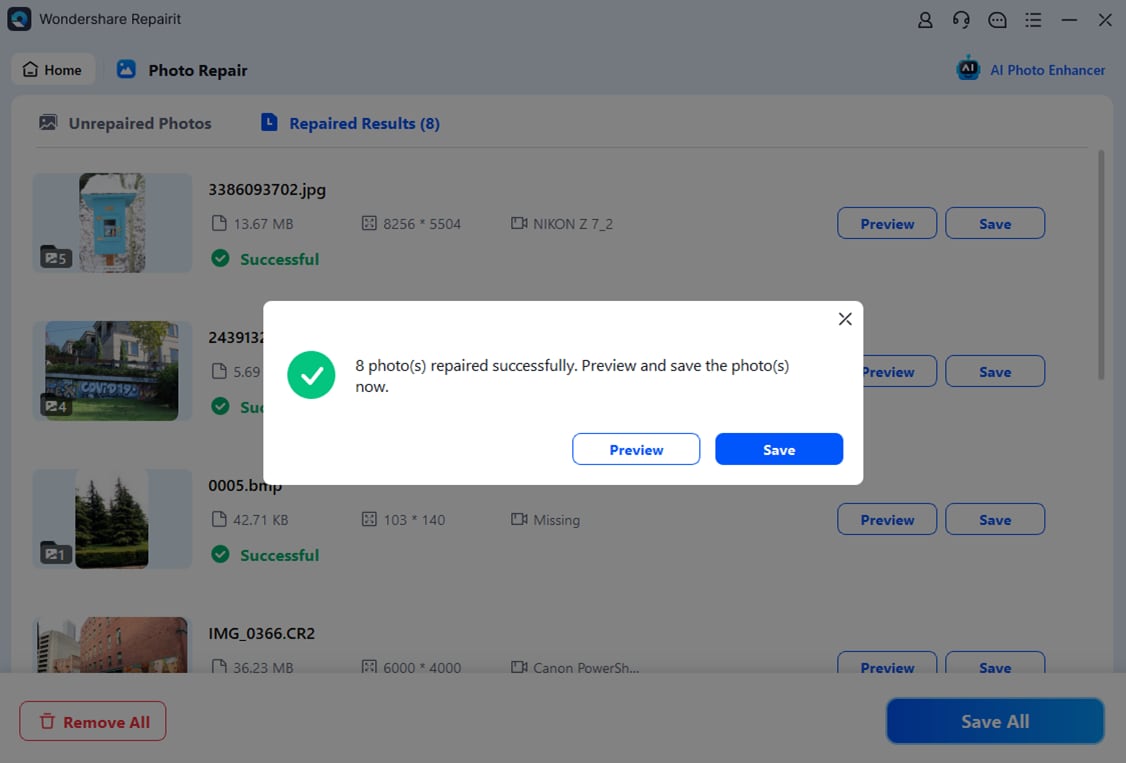
You can also just click on the thumbnail of the image to open its preview window. This will let you view the results, and you can check if the standard repairing process was successful or not.
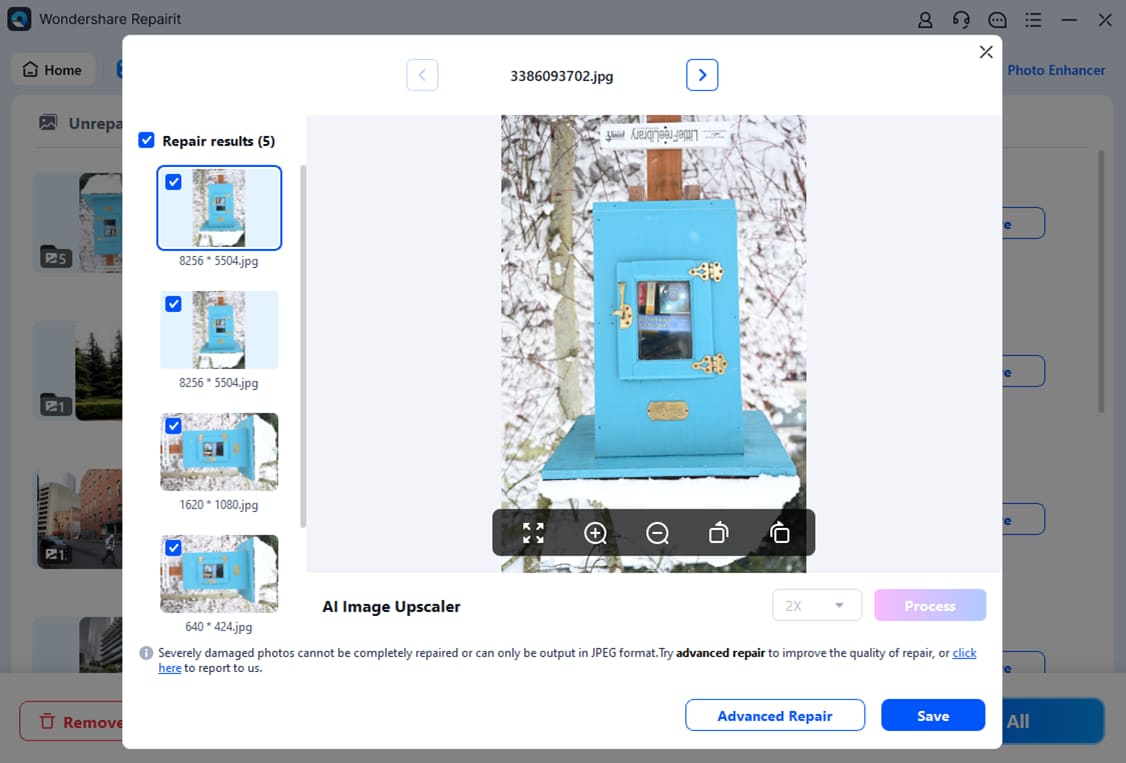
Step 3 Save the repaired photos
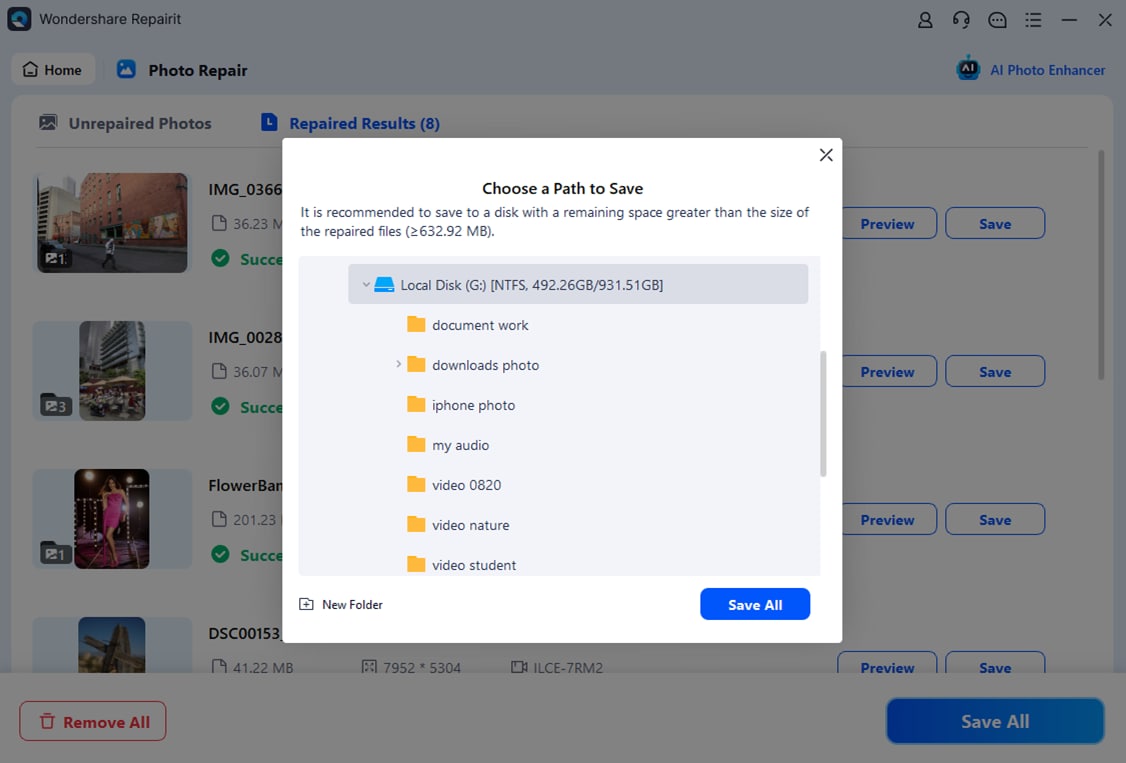
Lastly, you can simply click on the “Save” button on the preview panel to export your photo. You can also go back, select multiple pictures, and click on the “Save All” button.
Advanced Photo Repair
If the corrupt photos failed to be repaired, they must be severely damaged. In the case, you need to choose "Advanced Repair". Adding photo template with the same data structure, it will help to repair severely damaged photos.
Related:
Here are the useful articles to help you.
1. Repair Corrupted JPEG Photos.
2. Common Digital Camera Errors.
3. Fix Overexposed Photos.
Conclusion:
The JPEG file format is one of the most commonly used formats in programs and files. The format is supported by several software and devices. By using the above-mentioned methods, you can quickly get rid of JPEG error #53 in case you are faced with it. In instances when all methods fail, it indicates that your file has gone corrupt. You can fix it by using the Wondershare Repairit - Photo Repair Tool.
People Also Ask
-
1. How do I open unsupported JPEG files?
An unsupported JPEG image file can be opened using several different ways, namely changing the file format, using another viewer, or third-party software. -
2. How do I unlock a JPEG in Windows 10?
To unlock a JPEG in Windows 10, right-click on the file, and from the appearing menu, select "Unlock File." -
3. How can I convert JPG to JPEG?
You can convert a JPG format to JPEG by using various converter tools available online or with the aid of third-party software. -
4. What's the difference between JPEG and JPG?
There isn't much notable difference between the JPG and JPEG file formats. Both are commonly used. The JPG was available on earlier versions of Windows, which did not allow the four-letter format; hence the extension of .jpeg was shortened to .jpg.


