Let's paint a picture. You're trying to take a picture of beautiful scenery, but when you look at the photo you took, it's all black. Maybe your photos always come out dark or shadowy, even though there's enough light in the room. Camera taking black pictures is a common issue for many people. This informative article will assist you in figuring out what happens and how you can avoid it and fix the problem.
Fix Camera Taking Black Pictures Issues Now

Part 1: Why Are Your Pictures Coming Out Black?
If your pictures come out black, there are many reasons why that could be happening. There are many cameras like Nikon, Canon, and smartphone cameras that go through these issues. Some of the reasons are common to all cameras, while some are peculiar. Below are some of the common problems:
Let's check them out.
1. Exposure
If you have the camera taking black pictures, it could be because of the wrong exposure. Exposure is the amount of light that seeps into your camera. It also produces the picture on the image sensor. The chances are that if you want to fix underexposed photos or overexposed photos, simply click them and we can help you.
By the way, it is a common issue with cameras and could be the reason your pictures are turning out that way. The camera usually calculates the ideal exposure through the shutter speed and aperture. Therefore, if either part is not functioning perfectly, you could end up with a picture with incorrect exposure. The result is usually a completely black or white photo. This factor might explain your problem with the camera taking black pictures.
2. Expired Film
Another reason why your photos could be coming up black is that you're using expired film. As our camera film ages, the chemicals make it less stable. The images you take deviate from the norm due to this. It means you could end up with pictures that are very black or white. You have to deal with many defects when it comes to expired film; a camera taking black pictures is one of them.
3. Fast Shutter Speed
Shutter speed deals with when the camera shutter stays open for light to seep into the image sensor. When it is slow, the light gets in more, but when it is fast, little light gets in. If your camera's shutter speed is too quick, then the chances are that there would not be enough time for light to seep through. Most times, fast shutter speed is a result of the camera's automatic setting. Sony Mirrorless Camera also encounters such a problem. It means the manual setting is usually the best option to let more light into your camera.
4. Corrupt Files
Sometimes, it is not the camera's fault that your photos are black. There are times when the files are corrupt, and this has led to the pictures becoming black. Corrupt files are a common occurrence, and there are many ways malware could gain access to your photographs. It could be a corrupt SD card, computer, or any other material. If you find the camera taking black pictures and you can't find a reason for it, maybe it needs fixing due to corruption. Also, if you face black screen while playing video, the website is a good place for you.
Part 2: 9 Common Methods to Fix "Camera Taking Black or Dark Photos"
Now that we know why you might be having the issue of the camera taking black pictures, the next step is finding a solution. Luckily for you, you don't have to do it alone. We've compiled different methods to fix cameras taking black or dark photos; let's check them out.
Check These Methods
- 01 Method 1: Set your camera to Monochrome mode
- 02 Method 2: Look for light in unexpected places
- 03 Method 3: Check the LCD backlight
- 04 Method 4: Learn to see in grayscale
- 05 Method 5: Set aperture, shutter speed, and ISO to prevent dark pictures
- 06 Method 6: Use Photoshop to add a levels adjustment layer
- 07 Method 7: Choose the best lenses for black-and-white portraits
- 08 Method 8: Use clean image sensor option
- 09 Method 9: Seek the camera service center for help
Method 1: Set your camera to Monochrome mode
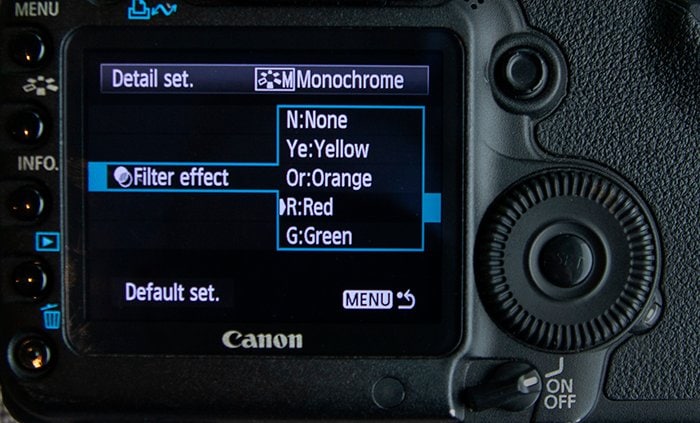
Monochrome mode is the ability to set your picture to black and white. We understand that learning how different scenes you usually see in black and white is complex. However, it might be the best solution to your camera taking black pictures issue. When you set your camera to Monochrome mode, it displays your photo in black on white on the LCD screen. You can even add a color tint will different colors available to choose from. The best part is that many cameras today also allow you to shoot in Monochrome. Below are the steps to set your camera to monochrome.
- In your camera settings, you are sure to see the label Monochrome. Click on it to select and customize.
- Most cameras, like the Canon camera, come with four parameters you can adjust in monochrome mode.
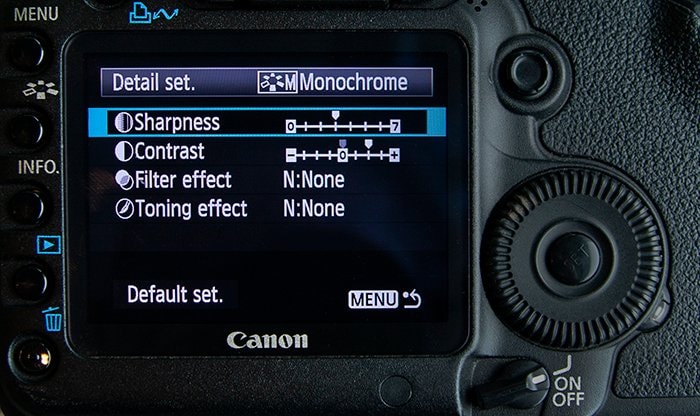
- You can also add a color tint like green, red, orange, and many more to your photos.
Method 2: Look for light in unexpected places
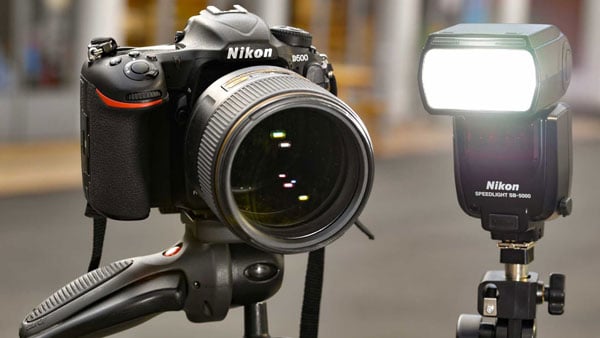
Cameras sometimes need lots of light. It could be because of low film speed or small apertures. Whatever it is, extra light could be the solution to your camera taking black pictures. You could use your flash, which comes with your camera, or an external light to give the scene extra lighting. Another option to add light to your scene is using a white reflector. It will bounce the light back into a scene when you shoot. Choosing to shoot in a bright outdoor lighting condition is another option you can explore.
Method 3: Check the LCD backlight
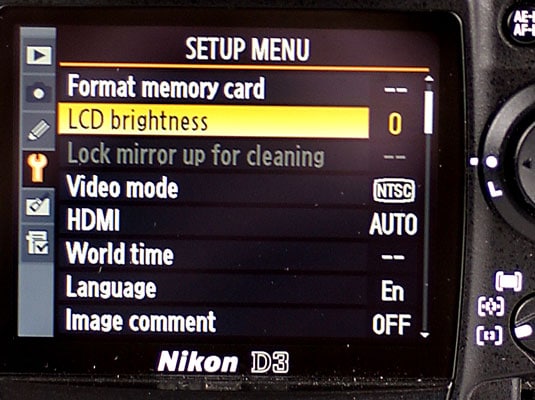
Sometimes, the reason your camera is taking black pictures is because of the LCD backlight. There are times when the image appears fine on your computer, but the pictures are black on the LCD camera. A common reason for this could be the LCD backlight. To find out if the issue of the camera taking black pictures is actually due to the LCD backlight, you could check to ensure your camera is on when you are viewing the image.
Also, ensure that the lens cap is off while taking the picture. To check if your LCD backlight works, press the FINDER/LCD/Display button on your camera. Press it more than once to find out if the LCD still works perfectly. However, there are times when none of this would work, and you have to factory reset the camera.
Method 4: Learn to see in grayscale
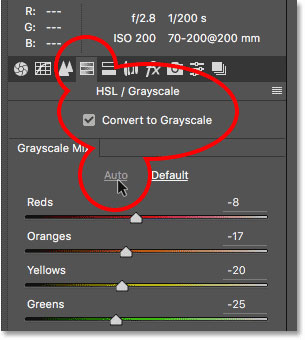
Another option for you is to try and see in grayscale. Every camera comes with a light meter that measures the amount of light you have in a scene. The software adjusts the exposure based on the light meter information. While this works most of the time, there are times when it causes the camera to take black pictures. Every picture you take is already 18% gray based on the cameras algorithm, so why not go all gray. Learning to see in grayscale is a great way to overcome the issue of the camera taking black pictures. It allows you to see the scene that would otherwise be black or very dark in full colors.
Method 5: Set aperture, shutter speed, and ISO to prevent dark pictures
Another reason you could be having the issue of the camera taking black pictures is the wrong settings. Sometimes, you need to work on your aperture, ISO, and shutter speed to prevent dark images. When you work on your settings, it will ensure you have perfect exposures to your pictures. To help you understand how to set aperture, shutter speed, and ISO, below is a breakdown of the three settings.
Aperture
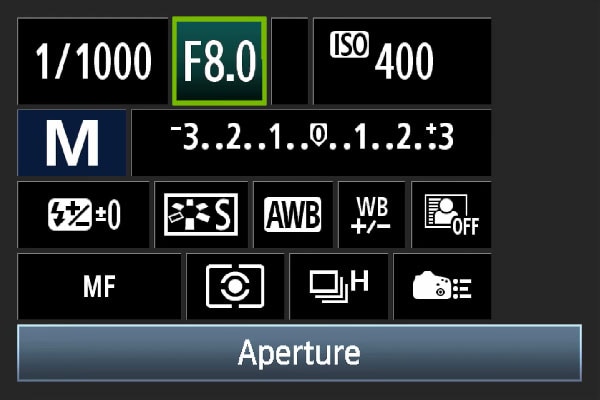
It is a hole that allows light to enter your camera. When the aperture is broader, more light enters your camera sensor. The aperture's measurement is through a focal ratio like f/4.0, f/5.0, and more. When the focal number is larger, the aperture becomes smaller. The result is less light passing through the camera sensors. So, the aperture should be wider so the pictures don't look black.
Shutter speed
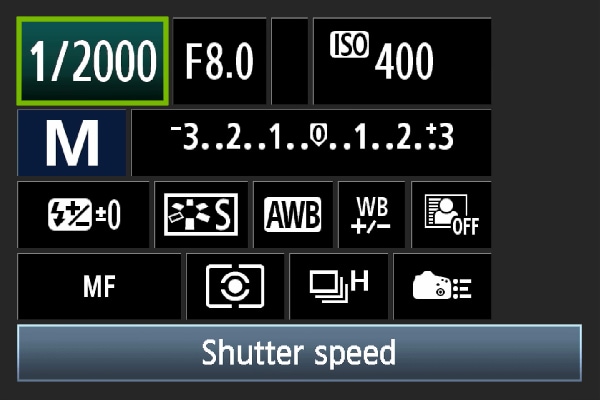
It is the duration of the shutter speed remaining open. Its measurement is in fractions of seconds like 1//10, 1/40, and higher. When the shutter speed is slower, more light passes into the camera. So, when taking pictures in low-light conditions, you should keep the shutter speed slow. It also affects the picture sharpness when taking motion pictures. To take care of the camera taking black pictures, set the shutter speed according to the camera's focal length.
ISO
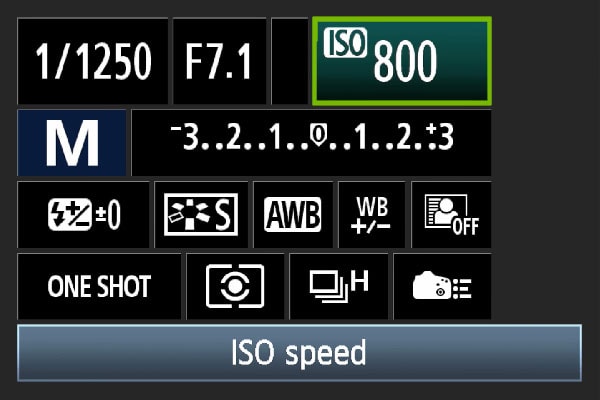
This feature is the sensitivity of the camera sensor to light. When the ISO is lower, the result is darker photos. When you want to brighten a picture, you should increase the ISO number. The numbers usually begin from 100 and go all the way up to 6400. If you're shooting in low-light conditions, you should keep the value higher.
Method 6: Use Photoshop to add a levels adjustment layer
Another option to fix the camera taking black pictures is using Photoshop to add a levels adjustment layer. Adding a levels adjustment layer is relatively easy, and your photos will be back to normal. Adding a levels adjustment layer with the use of screen blend mode makes the darkness go away.
-
To get started, download and launch the Photoshop software.
-
Go to layers, and from the options, click the new adjustment layer.
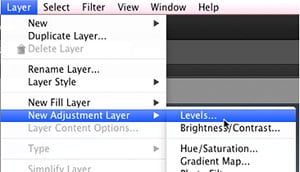
- Click on levels to continue, and from the dialogue box, click the screen.
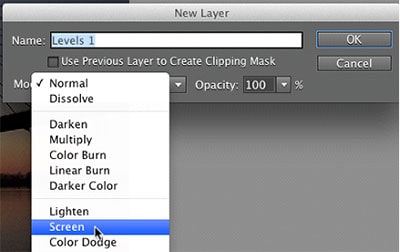
This method would help to increase the light on your photo and fix the darkness issue.
Method 7: Choose the best lenses for black-and-white portraits
Sometimes, the problem is the lens you're using. When taking black-and-white images, the wrong lenses can make your pictures turn out completely black. Lenses might be the cause of the camera taking black pictures. Therefore, before taking black and white portraits, ensure you choose the best lenses for the scene.
Method 8: Use clean image sensor option
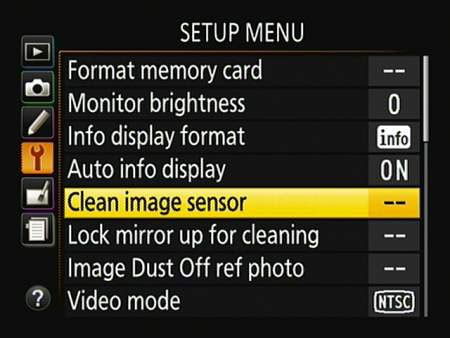
Another way to fix the issue is by using the clean image sensor option. This option is easily accessible on the menu. When you use the Clean Image sensor option a couple of times, it could quickly fix the issue with your camera and avoid black pictures.
Method 9: Seek the camera service center for help
If you tried all of these options, then maybe it's a hardware issue. In situations like this, your best option is to seek the camera service center for help. Visit the repair center, and a professional will attend to you and help you fix the issue. Even if it isn't a hardware issue, the professionals would figure out the issue and effectively deal with it.
Part 3: Fix "Camera Taking Black or Dark Photos" Caused by Photo Corruption
Tips: Repair corrupt black pictures with Wondershare Repairit
If you shoot a perfect photo with the lighting and the settings are correct, maybe it's corrupt. Images are usually stored in memory cards, hard drives, SSDs, and more. It could get corrupted because of virus infection, improper file transfer, and many other reasons. However, you could repair the images using photo repair software. Below are the steps to repairing corrupt black pictures with Wondershare Repairit.
Step 1: Add photos
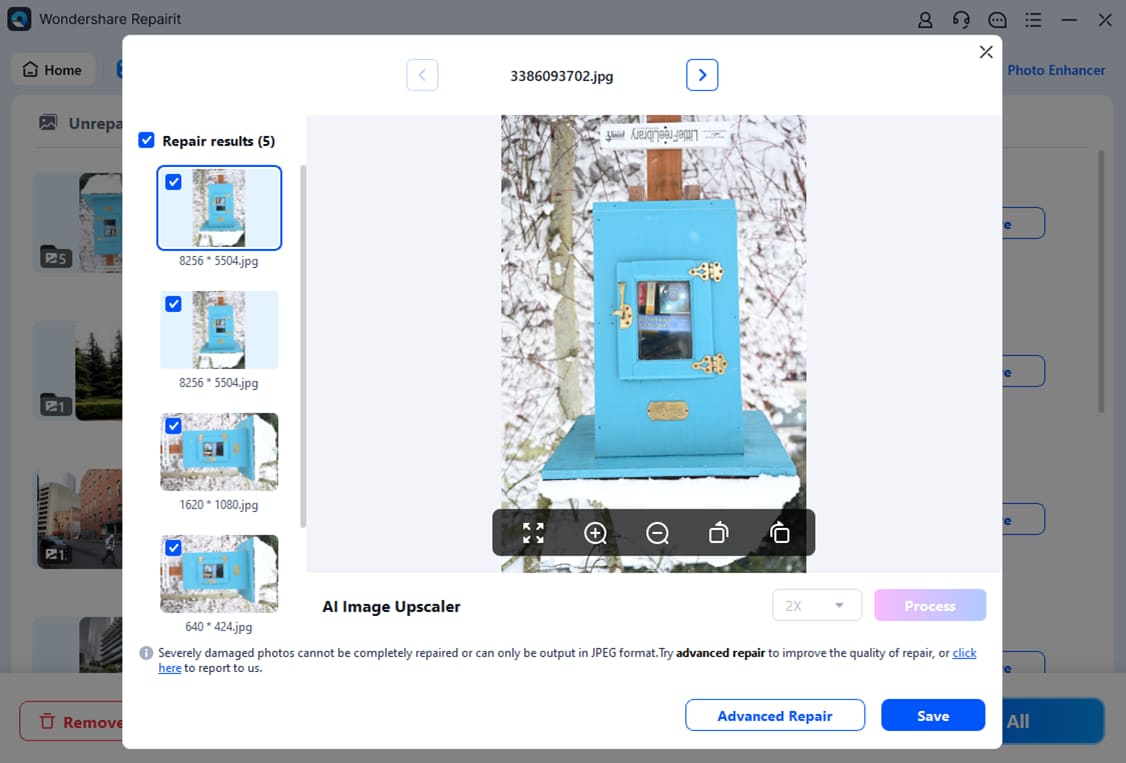
Visit the Wondershare website on your PC. Choose "Photo Repair" from the "More Types Repair" section, then click "+Add" to pick the black photos.

Step 2: Repair photos
After adding files, click on repair photos. This action would immediately start the repair process. You could also choose advanced repair for images that are damaged.

Step 3: Save photos
After the repair, click on save and choose your preferred location to save your photos.
Here is a video to help you learn how to repair corrupted videos and photos on Windows.
Attention:
If you just want to repair photos on your phone and the damaged photo is no more than 300MB, please try the online version of Wondershare Repairit - Online Photo Repair. Repairit Online supports repairing your corrupted photos freely within minutes and also provides a nice photo repair experience for you.
Further Reading:
Here are the useful articles to help you.
1. Repair RAF Files of Fuji Camera.
2. Repair Corrupted Nikon Photos.
3. How to Fix Corrupted Canon Videos and Photos.
Time to Conclude
When you like shooting amazing pictures, it can be annoying when the problem of the camera taking black pictures occurs. Luckily, we've outlined some of the reasons why this could be happening above. We also provide ten methods to fix the issue. You could try several of them before the last method of visiting a repair center. Remember to try Wondershare Repairit to fix the camera taking black pictures. If it's a corruption issue, then the repair center can help you save time and stress. We hope you find a solution from the methods above and start shooting amazing pictures once again.
FAQs
-
Why are my pictures white on Canon?
It could be due to overexposure or a defective camera. It could also be a result of user error or the wrong manual setting. One easy way to deal with this issue is to reset the exposure. -
Why is my Canon Rebel not taking pictures?
A possible reason why your Canon Rebel is not taking photos is that it is in AF mode. In this AF mode, the camera will only take a shot if there is a focus. If it cannot focus, then it won't take the picture. -
Why is my Nikon / Canon camera taking black pictures?
There could be multiple reasons, such as incorrect camera settings (like shutter speed or ISO), lens cap being left on, or hardware issues. However, if your photos appear black or blank even when taken under normal conditions, they might be corrupted. -
How do I view my images on my digital camera?
There are many ways you could do this. You could view it right on the camera by pressing the playback button. It is a small button with a play icon. When you press this playback button, it will present you with your pictures, and you can utilize the arrow buttons to navigate back and forth. You could also connect the camera to your PC and view it right on the PC.


 ChatGPT
 Perplexity
 Google AI Mode
 Grok
Grok
