

Photography often comes with its challenges, and one of the most common issues is low lighting. An underexposed photo is where the image appears too dark, which reduces the value of the picture. This usually happens due to improper lighting without proper adjustments or incorrect camera settings. While the artistic use of shadows can sometimes add mood to a photo, unintentional underexposure can make the image look flat.
In contrast, properly corrected photos can reveal hidden details and ensure that your shots leave a lasting impression. Therefore, beginners in the photography industry must understand and gain expertise in the skill of managing underexposed images. This article is your starting point for mastering exposure adjustments with different tools.
In this article
Part 1. What Are the Major Reasons Behind Underexposed Photos?
Moving on from understanding what exactly the underexposed images are, let us dive into the main reasons that cause such images. This section will help you ensure that you avoid such reasons so that you get the perfect picture next time.
| Reasons | Description |
| Low ISO Settings | Keeping the ISO setting too low reduces the sensor’s sensitivity to light. While this helps avoid noise, it can make photos appear too dark in low-light situations. |
| Incorrect Metering Mode | The camera's metering mode might inaccurately assess the exposure and concentrate on an unintended part of the frame. This leads to an underexposed photo that fails to correspond with the true lighting of the setting. |
| Incorrect Aperture Size | The aperture is the gap in the camera lens that regulates the amount of light that can enter the camera. A large number could limit light from hitting the camera sensor, resulting in underexposed pictures. |
| Wrong Shutter Speed | Choosing the wrong shutter speed rate may result in dark photos in low-light settings. Employing a faster shutter speed restricts the quantity of light that comes into the camera. |
| Inadequate Lighting | Lacking sufficient illumination, the cameras may find it challenging to record the complete array of details in a scene. Images captured in low-light situations typically yield darker photographs lacking detail clarity. |
Part 2. Two Professional Ways to Fix Underexposed Photos
Now that we are clear on the reasons why such dark images might appear, let us look into the 2 professional ways to fix underexposed photos. These fixes will brighten your image, enhance the details, and ensure the final image looks natural and balanced. With the right software, you can transform a dull image into one that grabs the attention of viewers.
Way 1. Adobe Photoshop
This powerful tool is used to fix the underexposed photo since it offers a variety of features to enhance the brightness and reveal hidden details. The Shadows/Highlights tool is particularly effective for balancing exposure as it selectively targets the darkest spots.
Moreover, with the help of this tool’s Exposure feature, you can raise the intensity of the light across the image. Track the steps below to get a better understanding of the procedure:
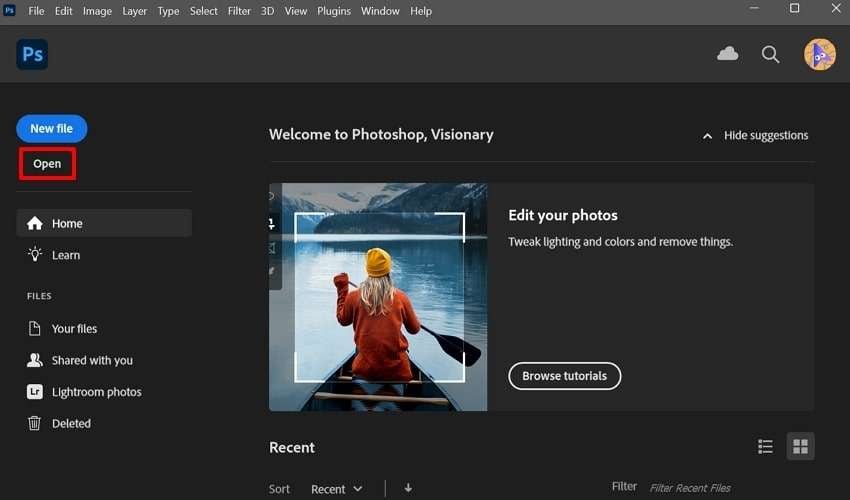
Step 1. Initiate the process by installing Adobe Photoshop onto your desktop device and log in with your credentials. Then, click the “Open” button at the main interface to add your dark image.
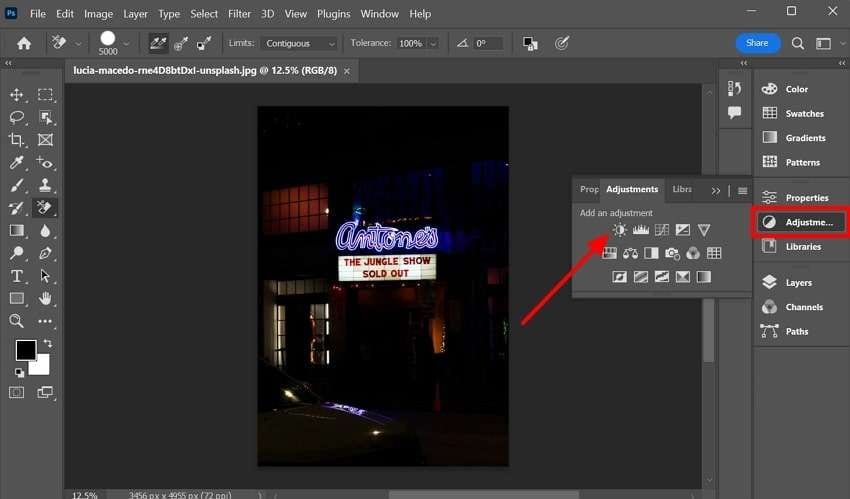
Step 2. From the right navigation bar, pick the “Adjustment” tab and choose the “Brightness” option represented by a sun.
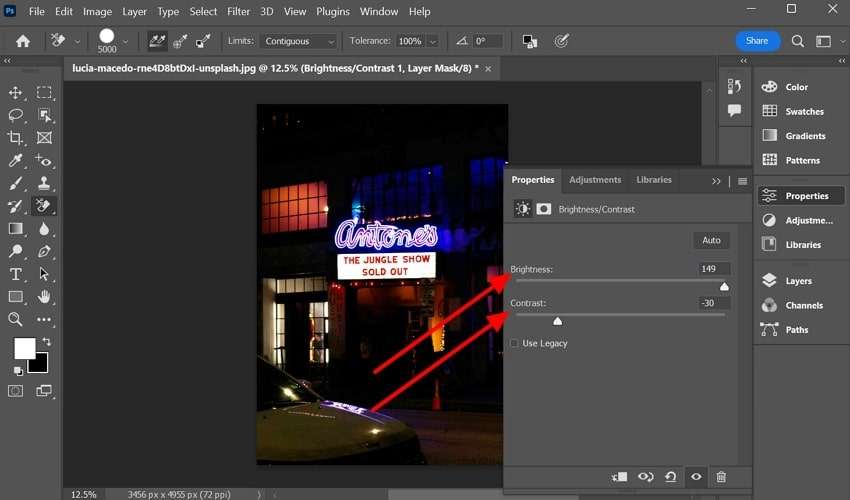
Step 3. As the Brightness/Contrast panel opens up, “Increase the Brightness” and “Reduce the Contrast” of the picture, revealing the hidden aspects of the picture.
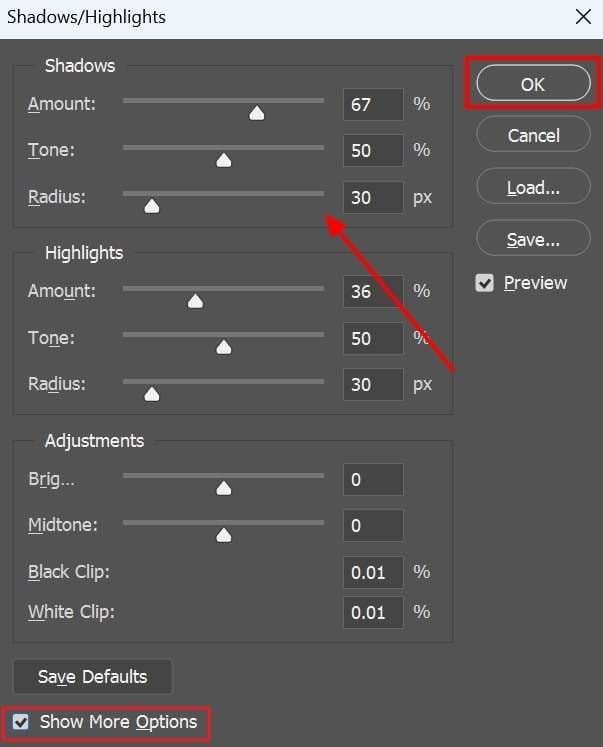
Step 4. Next, navigate to the “Shadows/Highlights” section from the Adjustment tab. Here, tick the “Show More Options” button to get an extended menu. Then, adjust the Shadows, Highlights, and Adjustments as per your liking. Once these values are adjusted, hit the “OK” button to save the settings.
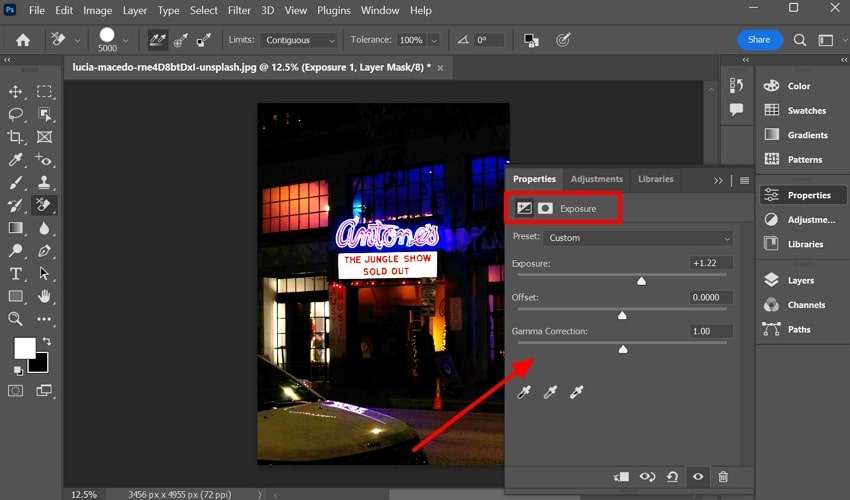
Step 5. Locate the “Exposure” section from the “Adjustments” tab and fine-tune its properties. Finally, you can hit the “File” tab from the top menu bar and save the brightened image to your device.
Way 2. Adobe Lightroom
Another method to enhance and increase exposure to your underexposed photo is using Adobe Lightroom. Its Exposure slider allows you to brighten the entire image in one go. Meanwhile, the Shadows slider specifically lifts the dark areas in the picture without affecting the highlights.
Lightroom has an easy-to-follow interface, making it easy to navigate throughout the process. Follow the steps below to ensure the tool improves your underexposed photographs:
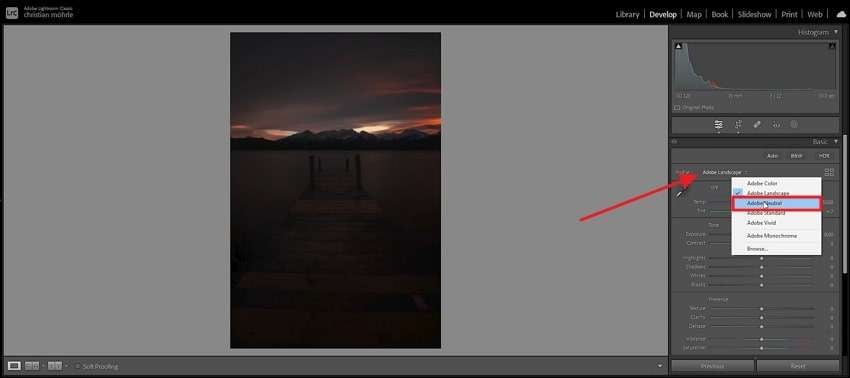
Step 1. Upon adding the dark image to Adobe Lightroom, change the “Profile” to “Adobe Natural” from the right editor panel. This will slightly brighten up the picture and allow you to move to the next steps.
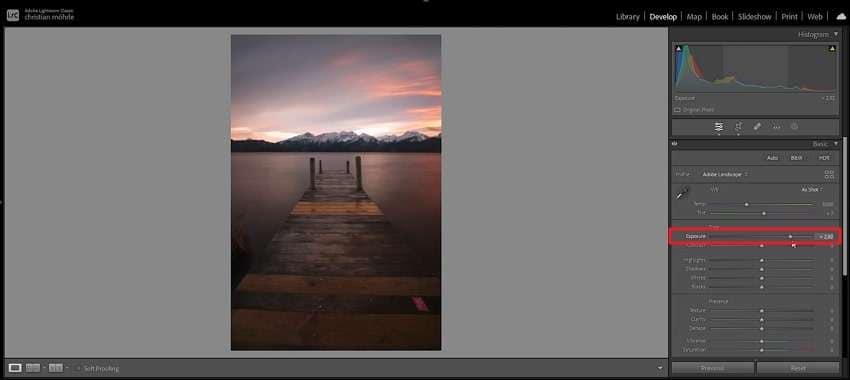
Step 2. Now, locate the “Exposure” option and increase it by moving the scroll bar towards the right.
Step 3. Next, navigate to the “Highlights” section and reduce it by moving the arrow towards the left. This reduces the dark areas in the pictures and turns the focus on the main elements.

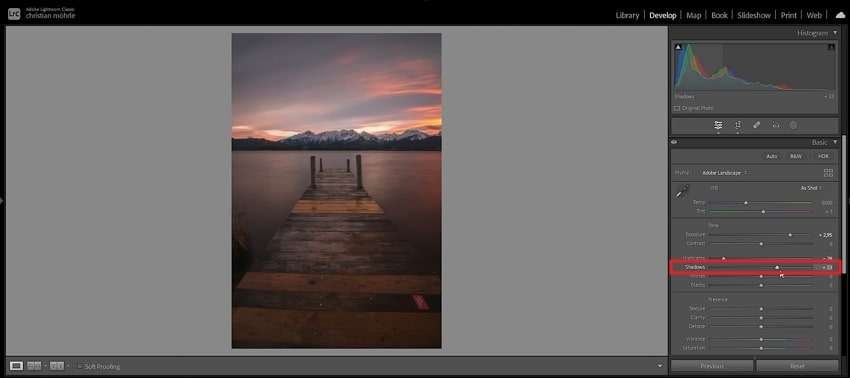
Step 4. Lastly, the "Shadows" are adjusted to enhance the image by brightening it. In the end, you can download the picture to your desktop device once everything seems perfect.
Part 3. The Most Simplified Solution to Fix Underexposed Photos in a Single Click
Apart from the above Adobe tools discussed, let us learn about the simpler solution to the underexposed photo fix procedure. Introducing Repairit, a tool that helps users repair damaged images with a single click. Unlike the ones discussed above, it is an effortless and instant tool with a user-friendly interface. Besides, it increases the picture's resolution by over 8 times the original quality.
Besides brightening and enhancing pictures, users can restore old photographs. Repairit also ensures that you get the ability to add color to dull black-and-white images to relive old memories. This tool is compatible with various devices, which makes it practical and accessible. What’s more, it not only provides support for pictures but can also handle damaged audio, video, and document files.
Key Features of Repairit Photo Repair
- Batch Repairing Process: Repairit allows you to process multiple images and fix them in one go, saving significant time.
- Preview Repaired Results: During the fixing procedure for your images, you can look at the preview before you download the pictures.
- Extracts Thumbnails: With the help of this AI tool, you can easily extract thumbnails from images and use them further for social media as it focuses on precision.
- Supports Various Image File Formats: Repairit does not limit itself to specific image file formats and lets users restore any file format.

-
Repair damaged photos with all levels of corruption, such as grainy photos, dark photos, pixelated photos, faded photos, etc.
-
Repair images of diverse formats, such as JPG, JPEG, PNG, CR3, CR2, NEF, NRW, etc.
-
Repair critically damaged or corrupted photos available on SD cards, phones, cameras, USB flash drives, and more.
-
Repairit has a quick and advanced repair mode. You can use either depending on the level of corruption the photos have undergone.
-
The "AI Image Upscaler" feature can enlarge the repaired photos to 2X, 4X, and 8X.
-
Intelligently restore old/scratched photos and colorize black and white photos with various AI effects.
-
No limit to the number and size of the repairable photos compared with the online version of Repairit.
-
Support Windows 11/10/8/7/Vista, Windows Server 2003/2008/2012/2016/2019/2022, and macOS 10.12~macOS 13.
Simple Step-by-Step Tutorial to Fix Underexposed Pictures with Repairit
Let us now look into the walkthrough of the simple procedure below to understand how easily Repairit operates.
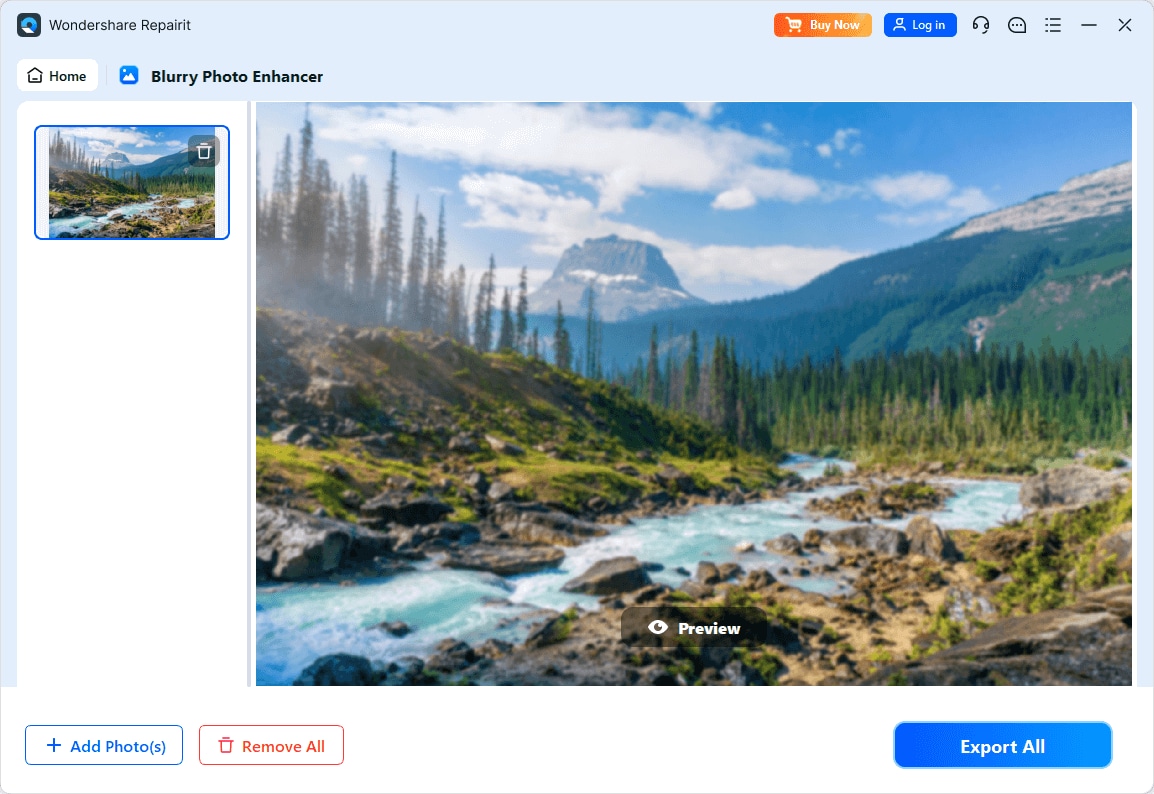
Step 1. Download Repairit and Pick AI Photo Enhancer
Initiate the process by downloading the Wondershare Repairit to your Windows or macOS device. To access the main interface, click the “AI Photo Enhancer” tool within the “More Types Repair” tab.

Step 2. Fix the Underexposed Photo in a Single-Click
Here, you need to add the underexposed image by pressing the "Add" button and then proceed with the "General Model" option from the right panel. Afterward, select the desired output resolution and click the "Start Enhancing" button to fix your underexposed picture.
Repair Underexposed Pictures Now
 Security Verified. Over 7,302,189 people have downloaded it.
Part 4. Helpful and Tested Tips to Avoid Underexposed Photos in the First Place
Before we conclude this discussion, here is a set of tips to keep in mind to avoid underexposed pictures. These practical suggestions will help ensure your images are properly lit, even in challenging conditions.
| Tips | Description |
| Check Your Lighting | While planning your location, look into areas where there is natural lighting. You can also add artificial lights to prevent shadows from overpowering your images. |
| Elevate ISO | Boost your camera's ISO levels when capturing images in low-light settings. This will enable the sensor to gather additional light and enhance the image's brightness. |
| Opt for a Larger Aperture | Users can select a smaller f-stop number to widen the aperture. It will allow more light in dim conditions to assist you in capturing clearer details. |
| Modify Shutter Speed | You must reduce the shutter speed to manage motion blur effectively. In doing so, you can ensure that the image outcomes are vivid. |
| Activate Manual Mode | Change to this mode to manage the camera’s exposure settings yourself. It can assist you in adjusting the aperture and ISO to find the ideal light balance. |
Conclusion
In conclusion, this article has explored the top reasons for underexposed photos. With the help of the two ways discussed, you can easily fix the images since they have extensive editing features. We also looked into the simplest and one-click solution to repair the images, Wondershare Repairit. In the end, it is suggested that you download this tool to your desktop today and enhance your images in one go.
FAQ
-
Q1. Will fixing underexposure reduce image quality?
Fixing underexposure can introduce noise in shadow areas, especially if the exposure is increased too much. However, with careful adjustments, you can brighten the image without major quality loss. -
Q2. How to fix a photo with too much backlight?
To fix the backlight, adjust the exposure to brighten the subject and use the Shadows tool to lighten dark areas. On the other hand, the Highlight tool can reduce the background brightness. -
Q3. How can a photo repair tool help fix underexposed photos?
A photo repair tool like Repairit can enhance underexposed images as it restores lost details and improves overall brightness. It uses advanced AI to fix lighting issues and recover shadow details for a balanced image.
