
The desire for flawless portraits usually leads many to retouch skin in their photos after a shoot. Even for beginners or someone who loves editing, clean and smooth skin can make any photo stand out. The problem is, not everyone knows how to retouch skin naturally without making it look overdone. At this particular time, Lightroom skin smoothing becomes very useful, as many individuals opt for it to improve pictures.
You can also reduce blemishes, soften rough areas, and keep the skin looking real with the right tools in this editor. So, this article will help you explore the top methods used to smooth skin easily and safely in Lightroom. Besides, it will share a dedicated alternative as a tip in case Lightroom feels too slow or complex for your needs.
In this article
Part 1. A Quick Overview of Lightroom and Why Prefer It for Skin Smoothing
It is a photo editing software developed by Adobe in 2007 to help users improve and manage images easily. Lightroom offers both basic and advanced tools like color correction, cropping, and skin retouching. Plus, its clean layout and powerful features make it a top choice for photo lovers and professionals alike. Below, we will explore a few reasons why many individuals prefer this editing tool for skin smoothing needs:
Safe Editing: Changes in it don’t damage or replace your original photo, and all edits are saved separately. This means you can try different skin smoothing settings without worrying about losing your actual picture.
Control Tools: It also allows you to fine-tune areas of the skin using adjustment sliders like clarity and texture. Ultimately, you can effortlessly achieve a natural appearance without affecting other important parts of the face or photo.
Skin Preset: Lightroom includes a premade skin softening preset for quick results without needing to create effects manually. Additionally, this preset gently smooths skin, which is perfect when you are short on time or want quick results.
Simple Interface: This advanced tool comes with a simple layout that’s easy to understand, even for people new to photo editing. Thus, you don’t need any special skills to start using Lightroom skin softening tools and improve your photos right away.
Masking Feature: It uses smart AI to detect faces and skin areas automatically for faster and accurate edits. Hence, editors can select the right skin area effortlessly, so they don’t waste time masking manually.
Part 2. [Tutorials] How to Achieve Smooth Skin in Lightroom? Advanced Techniques
Upon knowing why people prefer it, this section covers 3 different approaches to help you overcome the smooth skin Lightroom needs:
Approach 1. Spot Removal Tool for Blemish Removal
The Spot Removal Tool in Lightroom is helpful for fixing small marks, pimples, or skin spots quickly and effortlessly. Besides, it works by copying clear skin areas and covering the problem spots. This method is simple to use by letting you control the size and strength for more natural results. So, follow the quick Lightroom skin smoothing approach by opting for the spot removal tool:
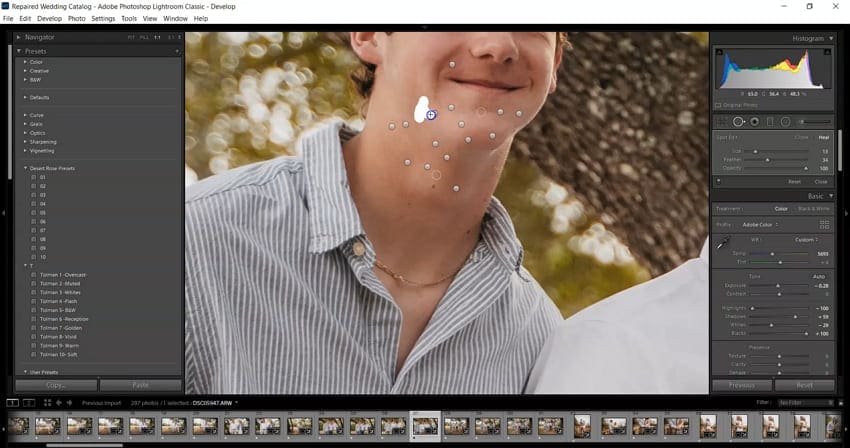
Step 1. Initially, access the “Develop” module and click the “Spot Removal” icon under the “Histogram” section. Then, choose the “Heal” option and start highlighting the area to be altered.
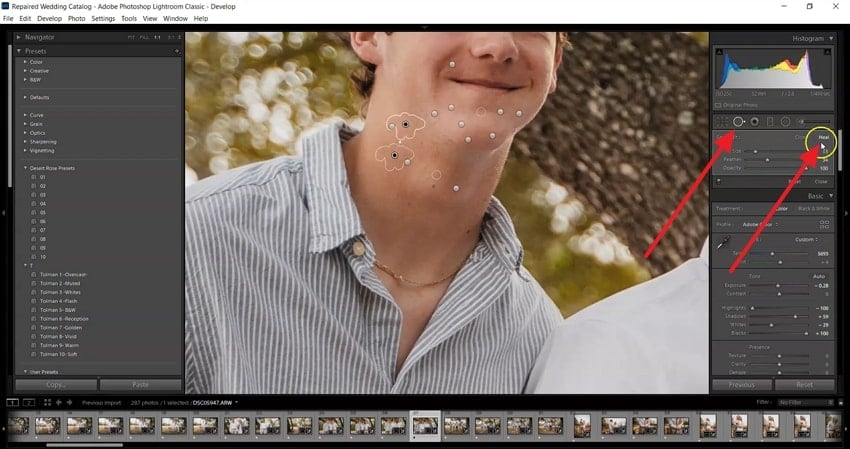
Step 2. Subsequently, when you click on the spot you want to fix, Lightroom will auto-select a clean source area. In case the selected area doesn’t match well, you can drag it manually to a smoother part of the skin.
Approach 2. Adjustment Brush for Skin Smoothing (Texture, Clarity & Sharpness)
The Adjustment Brush in Lightroom lets you apply skin smoothing only to selected areas without affecting the whole photo. It offers easy sliders for texture and clarity, which help soften rough skin patches and bring a more natural look. Furthermore, this feature gives you better control over Lightroom skin softening and makes it easier to reduce harsh details. Let’s explore how you can perform this task effortlessly:
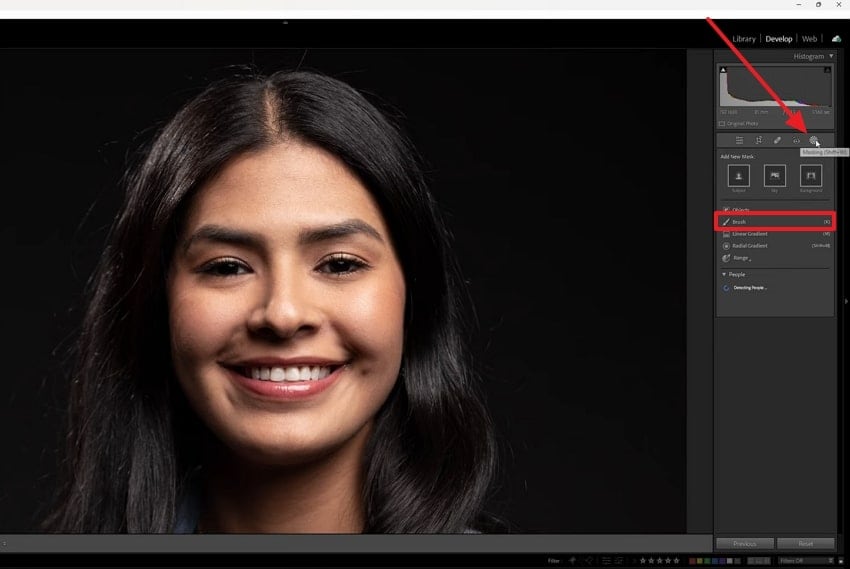
Step 1. As you import the image, press the “Masking” icon from the right settings panel and click the “Brush” option.
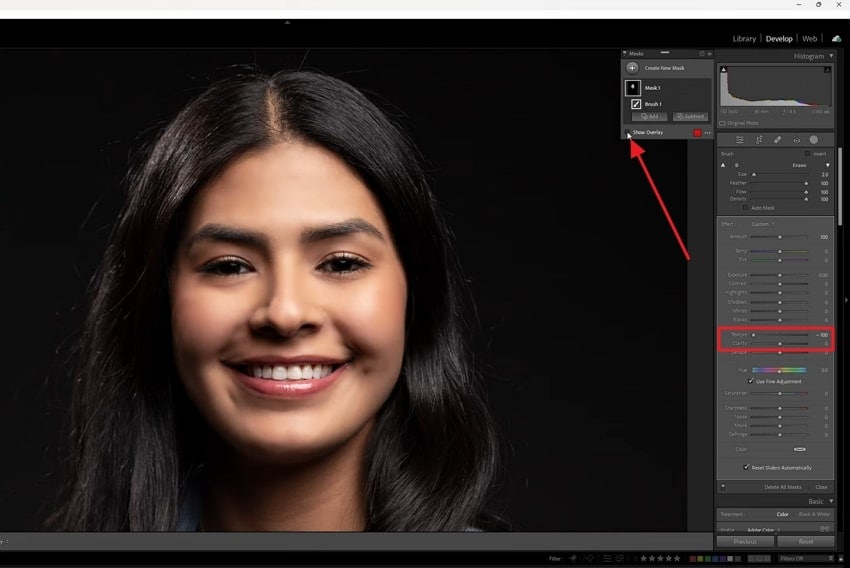
Step 2. Drag the “Texture” slider to the far left as “-100” and keep clarity as the default. Here, click the “Show Overlay” box to uncheck it, and your photo’s skin will get smooth.
Approach 3. AI Masking & “Soften Skin” Preset
Lastly, the “Soften Skin” preset in this software makes skin editing faster and easier than ever before. Through simple processes, Lightroom detects the face and applies gentle edits automatically. In addition, this smart feature saves time and improves accuracy, which is ultimately a perfect way to smooth skin Lightroom style. Anyhow, take guidance from the given guide to find out how to use the soften skin preset feature:
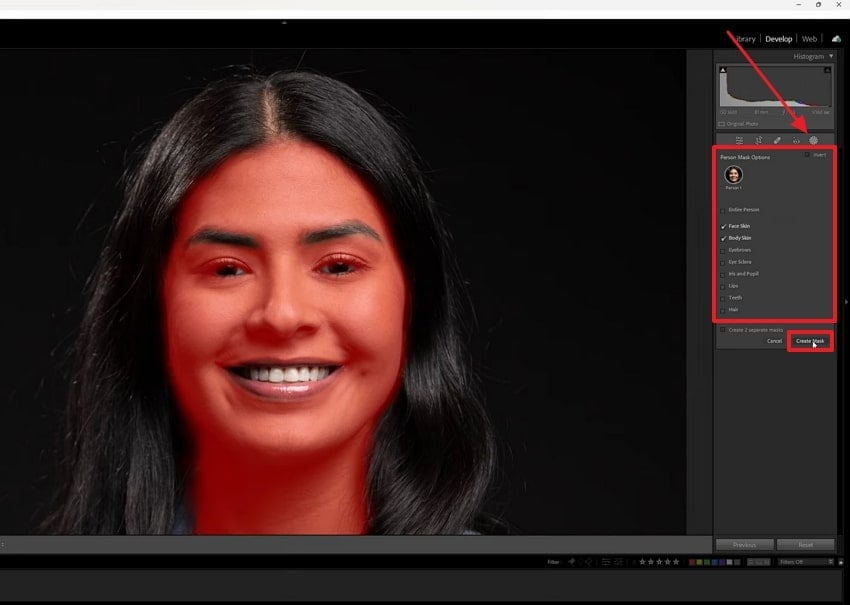
Step 1. Upon clicking the “Mask” icon, choose the profile under “Person Mask Options.” After that, tick the “Face Skin” and “Body Skin” boxes or others according to your need and hit the “Create Mask” button.
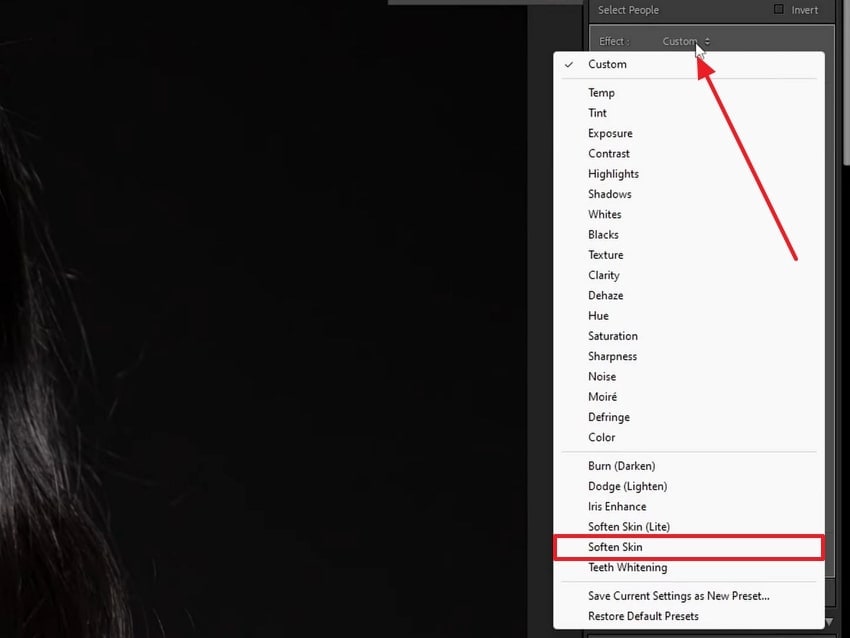
Step 2. Moving ahead, click the “Custom” section under “Effect” and choose the “Soften Skin” option from the dropdown.
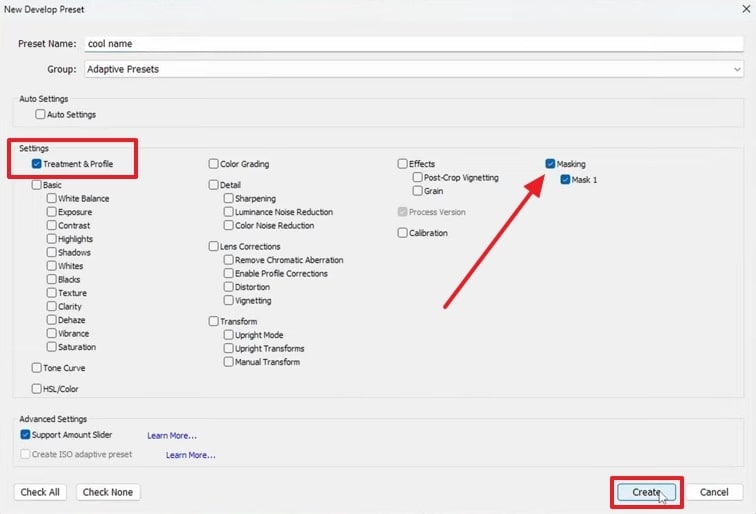
Step 3. After that, press the “Preset” button from the left settings panel and opt for the “Create Preset…” option. Then, tick the “Treatment & Profile” and “Masking” boxes and hit “Create.” Now, select “Smooth Skin” under the “Preset” section to automatically apply the effect.
Pro Tip. Looking for an Effortless Way to Smoothen Skin Than Lightroom? Try Repairit
Many times, using Lightroom can feel a bit time-consuming, especially if you are new to editing or just want faster results. Besides, many individuals even find the steps for Lightroom skin softening helpful, but still too detailed or complex for quick touch-ups. This is where an effortless and AI-powered solution like Repairit becomes a great option. It uses smart AI to automatically smooth skin and adjust lighting with great accuracy.
Along with that, its dedicated Portrait Enhancer feature focuses on improving facial details and softening skin while keeping it natural. Editors can enhance their multiple photos simultaneously and don’t even need to manually brush or mask anything. Furthermore, it supports both Windows and Mac for those who prefer editing directly on their computers. You can also see changes before downloading, so you only save results that truly satisfy you.
Key Features

-
Format Support: This dedicated photo enhancer tool works with all the famous photo formats like JPG, PNG, BMP, JPEG, and WEBP.
-
Photo Denoise: While enhancing, it removes grain and noise from low-light or old photos to make them look professional.
-
Resolution Upgrading: You will also be able to enhance clarity and smooth skin by selecting your desired resolution of up to 800%.
Detailed Step-by-Step Guide to Smooth Skin with the Help of Repairit
Go through the comprehensive guide to find out how you can enhance your photos by using this advanced software:
Step 1. Run the Tool to Smooth Skin in Your Photos
Go to the “AI Media Enhancer” section and click the “AI Photo Enhancer” tab. Here, choose the “Facial Detail Enhancer” feature and hit the “+Add” button to import photos.

Step 2. Select Enhancing Settings to Upscale Your Photos
Opt for the “Portrait Enhancer” feature and select your desired “Output Resolution.” Once done, you need to hit the “Start Enhancing” button to initiate the task.

Step 3. Download Your Upscale Photos to Your PC/Mac
As your photos are enhanced, simply press the “Save All” button to export them to your device.

Repair Corrupted RAR Files
 Security Verified. Over 7,302,189 people have downloaded it.
Conclusion
In summary, Lightroom skin smoothing helps make your portraits soft and clean with just a few easy steps. This article has explored several approaches, such as the spot tool or preset, that you can try to perform this task.
Besides, if editing photos on Lightroom seems complex for you, we highly recommend using Repairit. Its AI Photo Enhancer feature smooths skin automatically and gives an effortless result without manual editing.
FAQ
-
Q1. Can I use Lightroom skin smoothing on group photos?
You can apply the Lightroom skin smoothing to group photos, but it requires more manual work. Since each face may differ in lighting and skin texture, you will likely need to adjust face masks manually. Here, the AI Masking feature helps detect multiple faces, but it still needs to review each area for better results. -
Q2. Does skin smoothing affect image quality in Lightroom?
It generally maintains good image quality when done in moderation. In case you lower the texture and clarity slider too much, the photo’s skin may appear fake or blurry. To avoid this, you can use presets, which help maintain the fine-tune details in skin while reducing blemishes and harsh lines. -
Q3. What if Lightroom is too slow or confusing for quick edits?
When Lightroom feels slow or complex, you can try Repairit, which uses AI to enhance portraits automatically. Notably, it removes skin imperfections effortlessly without needing to brush or mask manually. You can also use Repairit to enhance multiple photos at once and review the edits before exporting them to your PC/Mac.
