
Imagine how much work it takes for a photographer to take intricate and decent-looking shots with a polished finish. Moreover, think about how they’ll feel if the colors come out flat with uneven lighting, and the overall mood is off slightly. That’s the situation DaVinci is here to resolve for you and transform your raw footage into a visually stunning piece.
Even social creators can learn more about Davinci Resolve color grading to make their content engaging and vibrant. This article provides an in-depth understanding of this feature, essential concepts, and comprehensive steps.
Table of Contents
Part 1. Understanding the DaVinci Resolve Color Grading Workspace
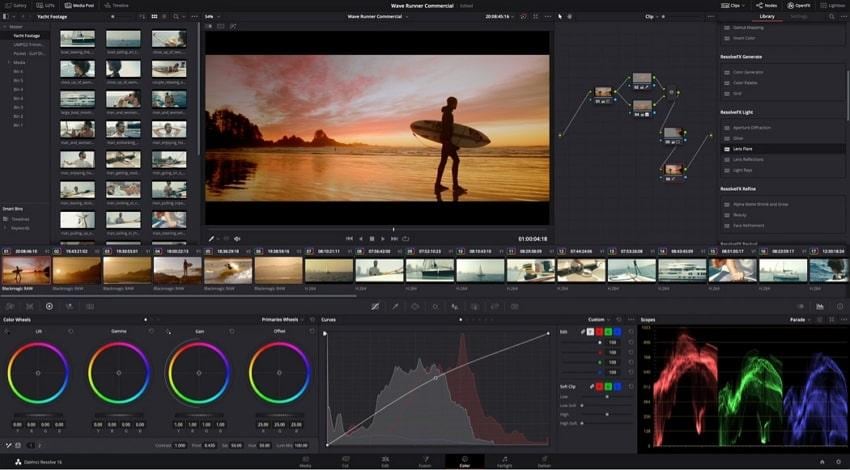
For creators and artists, the DaVinci Resolve Color page is a dedicated workspace where they find the most advanced color correction and creative grading tools. The layout is divided into two halves, with the upper part containing the viewer and thumbnail. In comparison, the lower portion holds the color tonal adjustment, color wheels, and more. There are custom curves that you can color-adjust and make your footage pop out.
Along with the primary adjustment control panel, users can access the log grading and primary bars, which let you control lift and more. Moreover, the node system allows users to organize different color effects in layers and ensure professional results. You can learn more about Davinci Resolve color grading, each with its own role in shaping your footage, in the following:
Primary Tools
Nodes: In DaVinci, nodes are the building blocks of color correction, used for image balancing and creative color inputs. You can separately color correct different elements, like setting the first node for primary correction, the second improves the sky, and so on.
- Scopes: Users can access over 5 scopes, like parade, vectorscope, histogram, and CIE chromaticity, each tackling various aspects of the video or image colors. It lets you check tonal ranges, skin tones, and balance footage, while also letting you adjust them.
- Color Wheels: This feature contains four wheels, such as the lift, gamma, gain, and offset, handling shadows, midtones, highlights, and brightness. Using these wheels, you can make your footage pop out as you drag the center to different points or use the slider to set the right tone.
- Curves: Users can sculpt the color and contrast of a footage using different options of this feature, with much finer results. There are five curves that allow you to select one aspect, such as hue, and adjust the others, such as saturation or luminance.
- Color Warper: With this advanced feature, set a Hue vs. Hue color grade for specific saturations, or let you wrap colors, based on brightness and more. On the palette, drag the colors on the web display and change the hues, saturation, and more for a stunning result.
Why Resolve is More Powerful Than Other Editors For Grading
The following are the key points of the color grading in the Davinci Resolve feature, which makes it more powerful than other editors:
- Color Management: The color control panel helps you achieve a consistent decoding of the camera images and display across formats and monitors. Moreover, you can access color science, timeline, output color space, as well as analysis tuning, tone mapping, and more.
- Group Pre-Clip: Users can speed up their color grading by organizing their clips into pre, clip mode, and post groups to get similar lighting. This method saves time because any changes made to the group automatically affect all clips.
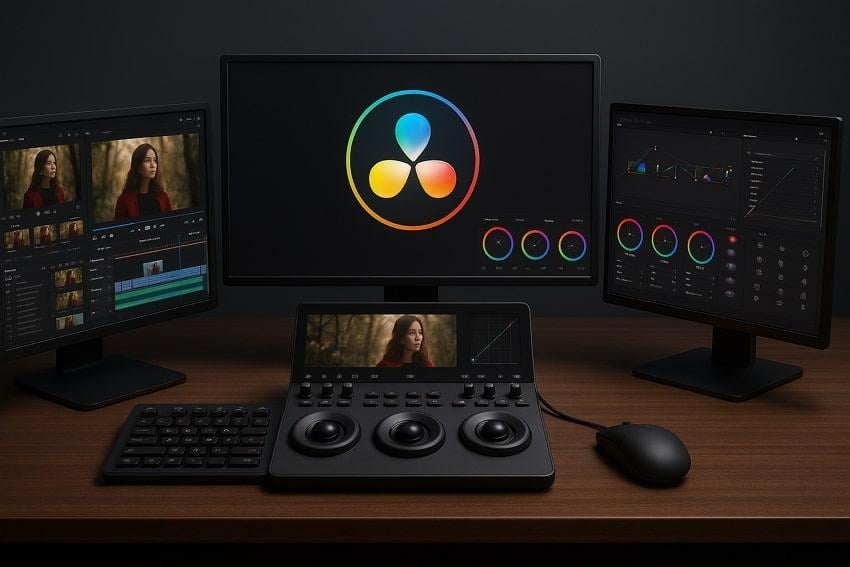
- Color Control Panels: It features three high-quality trackballs that correspond to the color wheels, knobs for primary adjustment controls, and buttons for playback and navigation. A colorist or professional editor can choose a micro, mini, or advanced panel according to their needs and demands.
- User Collaboration: This software is built on a robust multi-user database, where you can get a universal timeline that lets colorists start grading. Also, it consists of multiple features, like timeline locking, shared markers, customizable user monitoring, and so much more for seamless collaboration.
- 32-bit Image Processing: DaVinci operates on a powerful processing unit, supporting a wide color gamut and HDR formats, and offers next-generation grading palettes. You get Dolby Vision, HDR10+, and new HDR Vivid metadata palettes that let you customize and take total control over HDR grades.
Part 2. Essential Color Grading Concepts in DaVinci Resolve
It is essential to get a better grasp of the color grading concept before you start color correcting your footage. Here’s the thing: this part will help you understand the difference between fixing, styling, realism, and cinematic creativity:
Difference Between Color Correction and Color Grading
Regarding color grading in Resolve and color correction, both terms appear identical yet are entirely distinct. Go through the following table to understand better what each term means and is used for:

| Aspects | Color Correction | Color Grading |
| Purpose | Resolve color imbalance | Applies creative style and mood |
| Key Adjustments | White balance, exposure, contrast, and saturation | LUTs, hues, color curves, and more |
| Outcome | Natural and realistic | Cinematic and emotional |
| Tools and Techniques | Scopes, color wheels, sliders for technical fixes | LUT application, masking, secondary color grading |
| Example | Fixing the yellow tint from mixed lighting | Adding a calm blue tone for a sci-fi look |
Understanding Color Spaces
The Resolve color grading tool has a set of colors, such as Rec. 709 and more, depending on format and cameras. Furthermore, through its color space transform, you can also alter the gamma and color space of the footage to match your project. This program also provides ways for you to translate between color spaces, such as luminance mapping and saturation mapping.
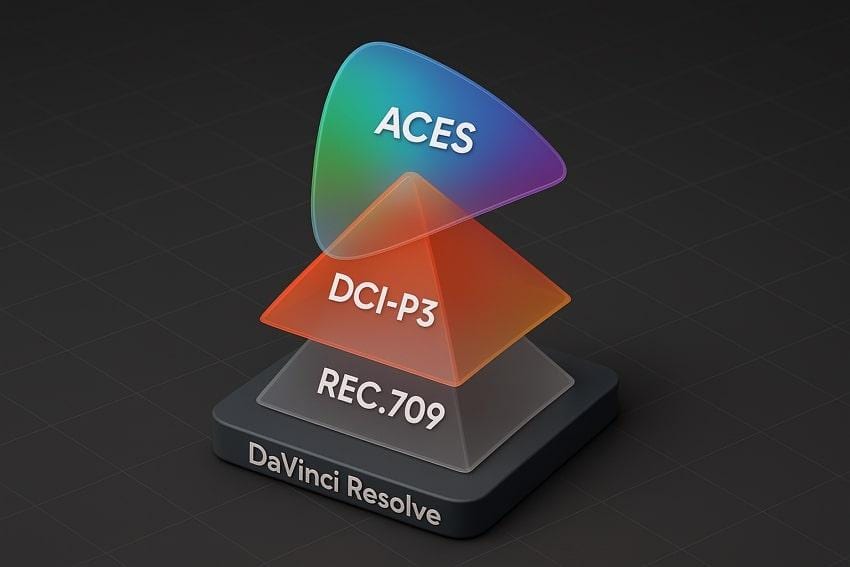
With DaVinci Resolve, knowledge of color spaces makes your video look the same on devices. Moreover, selecting the correct input, timeline, and output color spaces allows you to make sure that your video looks natural.
Understanding Project Color Management
Resolve enables users to automatically input, timeline, and output the entire project's color spaces. You can gather your clips into a single-color space, which you have complete freedom to fine-tune. Furthermore, this feature can handle complex mechanisms behind the color transformation, ensuring all the clips have a similar color throughout.
With this feature, you can eliminate the need for manual LUTs and ensure consistent results. This will also assist you in viewing how your video will look so that it will be simpler to coordinate clips across various sources.
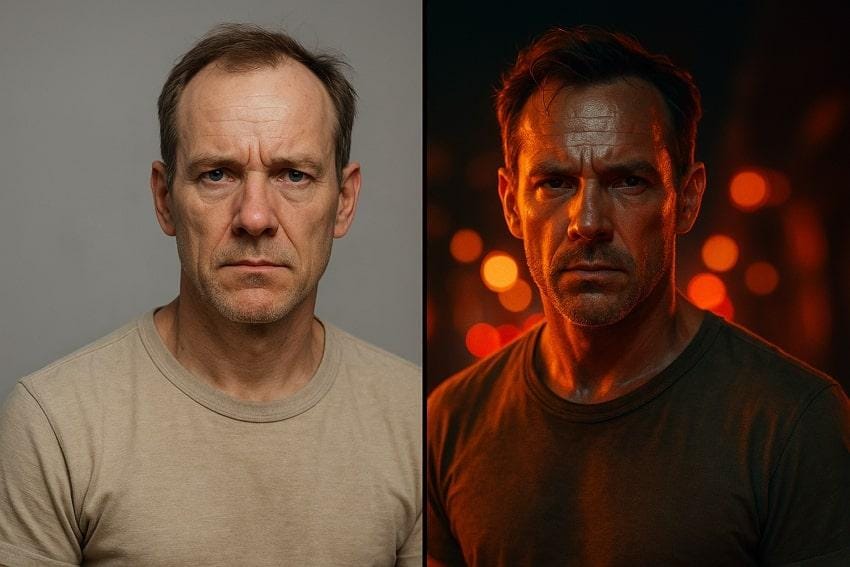
What Makes a Great Grade? Balancing Realism Vs. Cinematic Creativity
There’s a clear difference between realism and cinematic creativity when it comes to Davinci Resolve color grading. By understanding both terms, you can create images with an unbelievable visual feel, so learn about them in the following comparison table:
| Aspects | Balancing Realism | Cinematic Creativity |
| Goal | Achieve lifelike images | Evoke emotion and narrative impact |
| Tools | White balance, exposure, contrast, and saturation | Color curves, split toning, vignettes, and color isolation |
| Focus Areas | Accurate skin tones and color balance | Color harmony and mood creation |
| Use Cases | Documentaries, news, and projects | Films, music, commercials, and more |
| Workflow | Fix exposure, white balance, and tone | Stylize, shift hues, adjust, and contrast creatively |
Part 3. Step-by-Step Color Grading Workflow in DaVinci Resolve
You can understand how you can use DaVinci color grading to enhance your footage using the following steps:
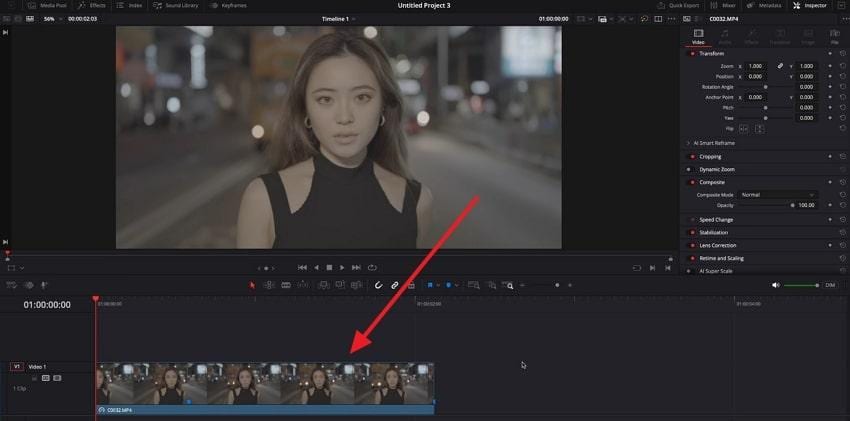
Step 1. Enter the DaVinci Resolve workspace, press the “New Project” button, and insert the desired image or video for color grading. When the media is added, drag it over to the “Timeline” section, and hit the “Settings” icon at the bottom.
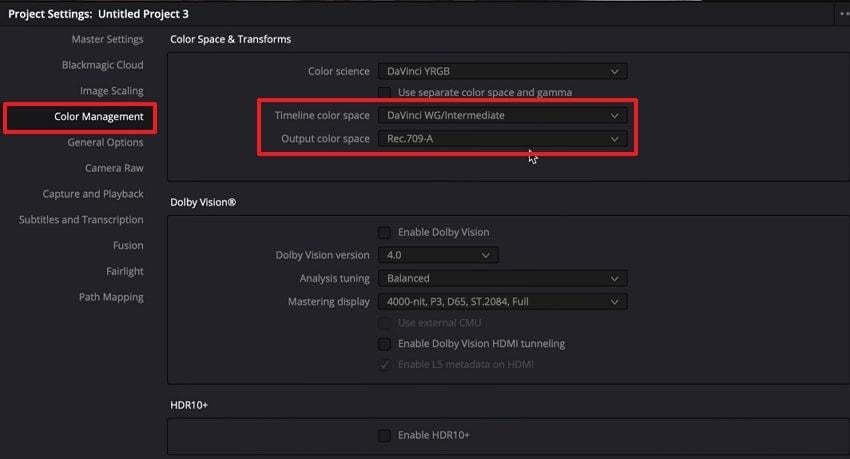
Step 2. Access the “Color Management” tab, open the “Color Space and Transform” section, and set the “DaVinci WG/Intermediate” as the timeline color space. Then, select the option "Output Color Space” to be “Rec.709.”
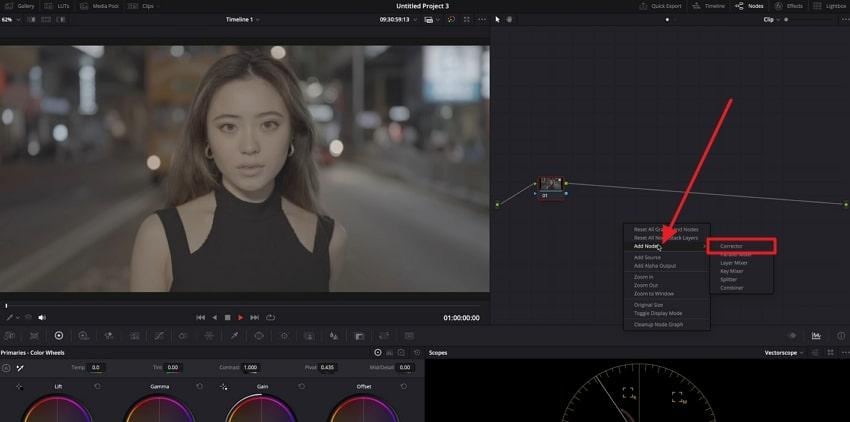
Step 3. After that, head to the “Color Page” tab, and from the “Node Graph” panel, right-click the “Empty Node Tree.” Now, hover over “Add Node,” and select the “Corrector” to add a node, which you can drag after the original node timeline.
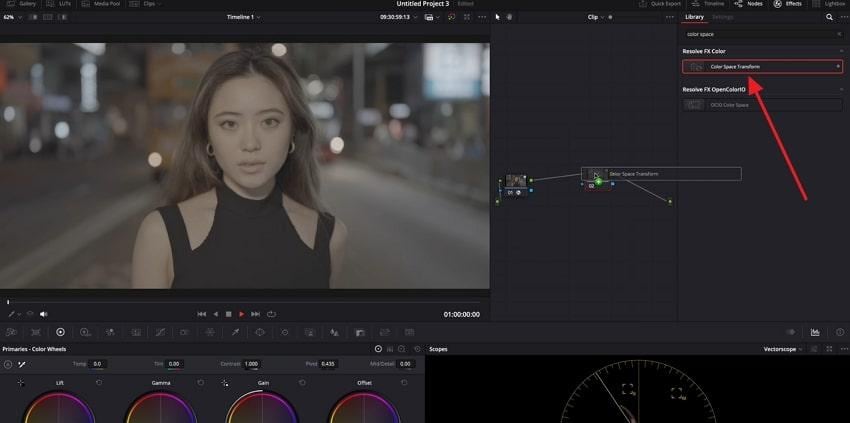
Step 4. Next, go to the “Effects” panel on the “Node Graph,” and search for “Color Space Transform.” Once found, drag it on the original and the inserted node on the panel to access its various options.
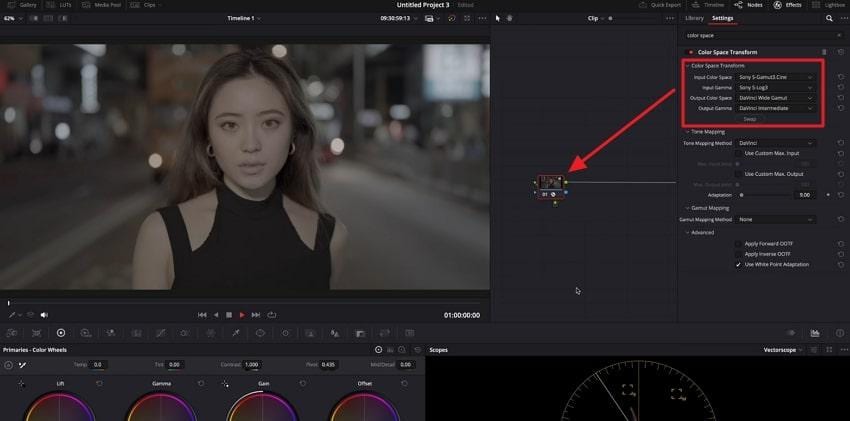
Step 5. Here, click the first node, and under the “Color Space Transform” options, select the specific camera under the “Input Color Space” section. Additionally, specify all other specifications as shown in the screenshot below.
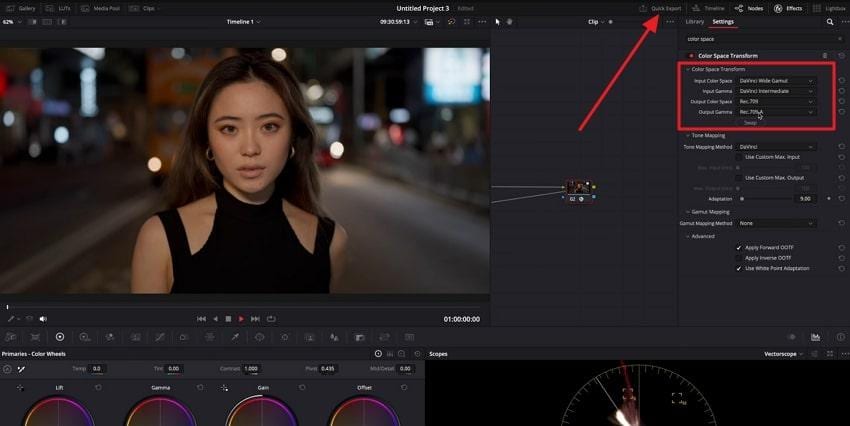
Step 6. Subsequently, select the node added to the timeline and choose the provided settings for each option as shown below. Once convinced of the results, press the “Quick Export” button and save the footage.
Part 4. Enhance Reference Images with Repairit Photo Enhancer
Although Davinci Resolve color grading provides a vast variety of color grading options, it can be very confusing for beginners, let alone the manual effort. Thus, in case you think that your pictures are too dull, low-quality, and contain noise, apply Repairit Photo Enhancer. Its innovative AI technology is capable of enhancing the image in terms of clarity, color balance, and details within a few seconds.
The program can automatically sharpen edges, remove noise, and clear photos without texture loss. It also corrects the brightness and contrast of the pictures, hence restoring their natural look. Moreover, when it comes to portraits, the tool can make the faces lighter and keep the right skin colors, which are perfect in the posts on social media. It can be done in 3 easy steps to achieve 99.5 percent accurate and quality results.
Key Features
- Supported Image Formats: The software supports many image formats, including JPG, WEBP, and others.
- Overexposure Fix: Balances overly bright areas to restore lost highlights and realistic lighting in photos.
- Smart AI Precision: Its AI boosts the image quality and integrity to the perfect colors, without any blur or noise, without any manual effect.
Users can follow the given steps and learn how this seamless AI photo enhancer can improve their dull images into vibrant colors:
Step 1. Open the “More Types Repair” tab, head to the “AI Photo Enhancer” section, and click the “Blurry Photo Enhancer” option. Press “+Add” to import the dull images from your device.

Step 2. When the images are imported, hit the “Start Enhancing” button and begin enhancing the uploaded photos.

Step 3. After the process, preview the enhanced results and click the “Export All” button to get them on your device.

Part 5. Tips and Best Practices for Color Grading in Resolve
You did learn to color grade your footage with Davinci Resolve color grading, but why not follow these tips and tricks:
- Start with Color Correction: You should always begin with footage balancing for accurate exposure and color consistency. This will help you add stylistic looks after you create a neutral base to ensure natural skin tones and consistent lighting.
- Use Nodes: DaVinci Resolve allows you to add nodes to separate different grading tasks within your footage. Moreover, use one node for basic corrections, another for creative looks, and be flexible with adjustments.
- Utilize Scopes: When correcting the color, continue to monitor the waveform, vectorscope, and histogram to maintain the values to be balanced. These visual aids will prevent you from cutting out shadows and preserve the skin tones naturally.
- Employ Secondary Grading: With the help of qualifiers and masks, you can target specific colors within the footage. This enables precise adjustments to skin tones, and you can selectively color without affecting the whole frame.
- Apply LUTs Carefully: LUTs can speed up your grade and add cinematic styles to the footage, but use them as a starting point. It is essential that you always tweak them to fit your specific footage color needs.
Conclusion
In the end, this article lets users explore the meaning of Davinci Resolve color grading, its features, and its distinguishing options. Moreover, you looked at the difference between its color space, color management, and simple steps to achieve high-quality colored footage. However, with such an extended manual, color adjustment is not for beginners, so the alternative recommended choice is Repairit.
Frequently Asked Questions
-
Q1. Can I do professional color grading in the free version of Resolve?
The answer is yes, one can do color grading in the free version of DaVinci that provides the user with access to primary color wheels, curves, etc. In addition, it allows making accurate and detailed color corrections that transform your footage into a colorful masterpiece. -
Q2. How do I match shots with different lighting conditions?
You can start by balancing color and exposure by using scopes to achieve consistent luminance and skin tones. Also, primary corrections balance the brightness, and secondary corrections can be made with masks to correct certain color casts or objects. -
Q3. What are the best LUTs for cinematic color grading?
There is no best choice, but you can find various popular ones, like Teal & Orange, which looks for high contrast, and Film Emulation LUTs. Moreover, for cinematic color grading, the choice of LUTs depends on the desired look, which adds to the mood.
