
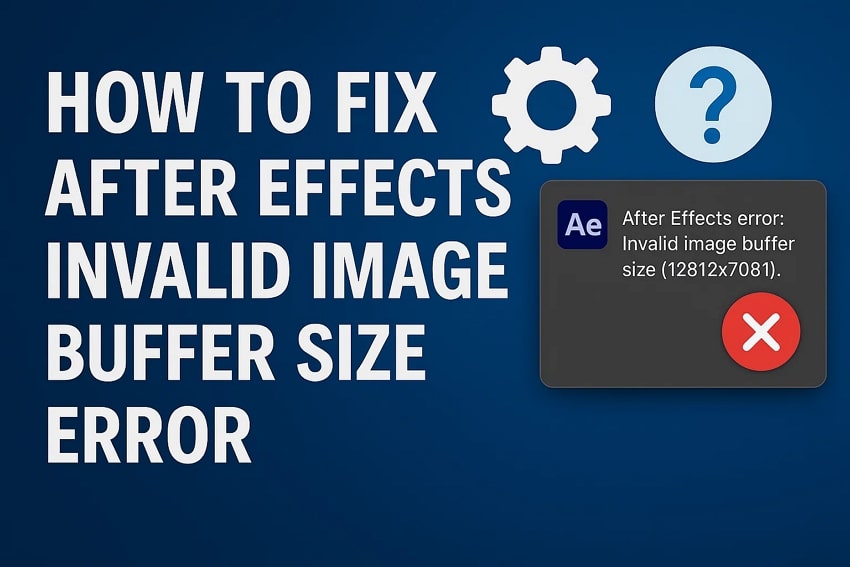
The creative process in After Effects involves pushing visuals to their limits, such as powerful effects and detailed compositions. However, many users face an issue showing “After Effects invalid image buffer size” just when their timeline looks perfect. It’s a technical message, but the impact is very real as it stops your rendering and momentum.
Multiple reasons exist that can cause this problem, including large images and too many effects. The good news is that you can fix this issue by just applying a few tips and tricks. Therefore, this article breaks down the causes of this dilemma and offers simple solutions to resolve it. When you’re working with heavy compositions or external plugins, these fixes will help you get back to rendering.
In this article
- Fix 1. Resize Large Images
- Fix 2. Adjust Effect Settings
- Fix 3. Pre-compose Layers
- Fix 4. Modify Layer Transformations
- Fix 5. Check for Improper Effect Applications
- Fix 6. Update or Remove Problematic Plugins
- Fix 7. Enable "Mercury Software Only" Mode
- Fix 8. Clear Cache and Memory Settings
- Fix 9. Update Your GPU Drivers
Part 1. Why Do You See the Invalid Image Buffer Size Error in After Effects?
As explored above, this error usually occurs when After Effects cannot handle specific image or effect parameters. Below, we will discover some key reasons that triggered this issue on your side:
- Imported Images: The tool has a maximum image dimension limit, typically around 30,000 pixels in width or height. When you import an image beyond this size, the software may fail to allocate enough memory.
- Effects Dimension: Some layer effects, like Motion Tile or Glow, can unintentionally expand the boundaries of a layer. Hence, the tool will generate the invalid image buffer size After Effects error when the resulting size exceeds the buffer limit.
- Composition Usage: Without pre-composition, the software treats each layer individually and increases memory demands. If effects or transformations are applied across many layers, this becomes more problematic.
- GPU Limitations: The editing software depends heavily on your graphics card for previewing and rendering. Thus, you can see a buffer size limit error if your GPU lacks the required memory or power.
- Unreadable Images: Sometimes, it’s not the size of the image but the file itself. That’s why the software may attempt to buffer it but fail because of corrupted image files, resulting in this error.
Part 2. Quick 9 Solutions to Fix the Invalid Image Buffer Size After Effects Problem
When you know what causes the After Effects invalid image buffer size error, it’s easy to find and apply the right fix. Therefore, the following solutions are quick and tested to help you resolve this issue and get back to smooth rendering:
Fix 1. Resize Large Images
The most common cause of the invalid image buffer size After Effects error is using oversized images. You should know that this software supports a maximum resolution of 30,00.30,000 pixels for both compositions and imported files. Plus, the actual size you can work with may depend on your computer’s available physical RAM. In case an image exceeds this limit, the tool may fail to render it properly.
To avoid this, always check your image dimensions before importing them. When you find that they’re too large, resize them using online tools like Pixlr or iLoveIMG. Upon reducing the size of the images, you can prevent crashes and maintain smooth performance.
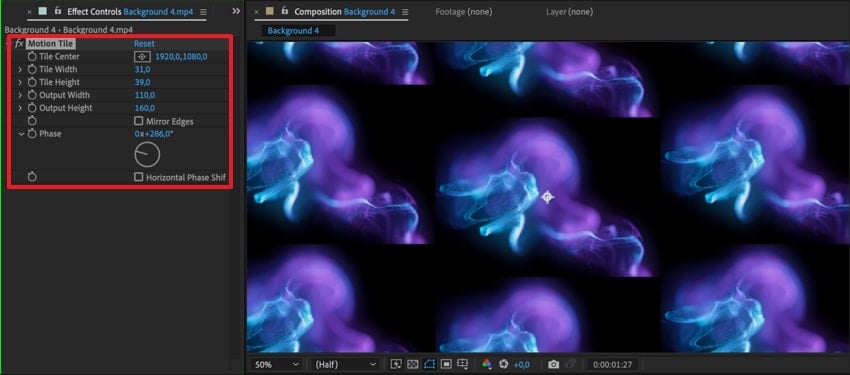
Fix 2. Adjust Effect Settings
Some visual effects can also unintentionally increase your layer dimensions beyond safe limits. Moreover, effects like Motion Tile or Deep Glow usually expand the canvas. This can overload memory and trigger the After Effects invalid image buffer size error.
To cater to this issue, you need to reduce the output width and height settings inside the effect controls. For this, adhere to the following steps to perform this action and resolve this problem:
Instruction. To adjust the output width and height settings of effects like “Motion Title,” access it through the “Effects and Presets” tab. Upon seeing the effect control panel, alter the “Output Width” and “Output Height” and resolve the buffer size issue.
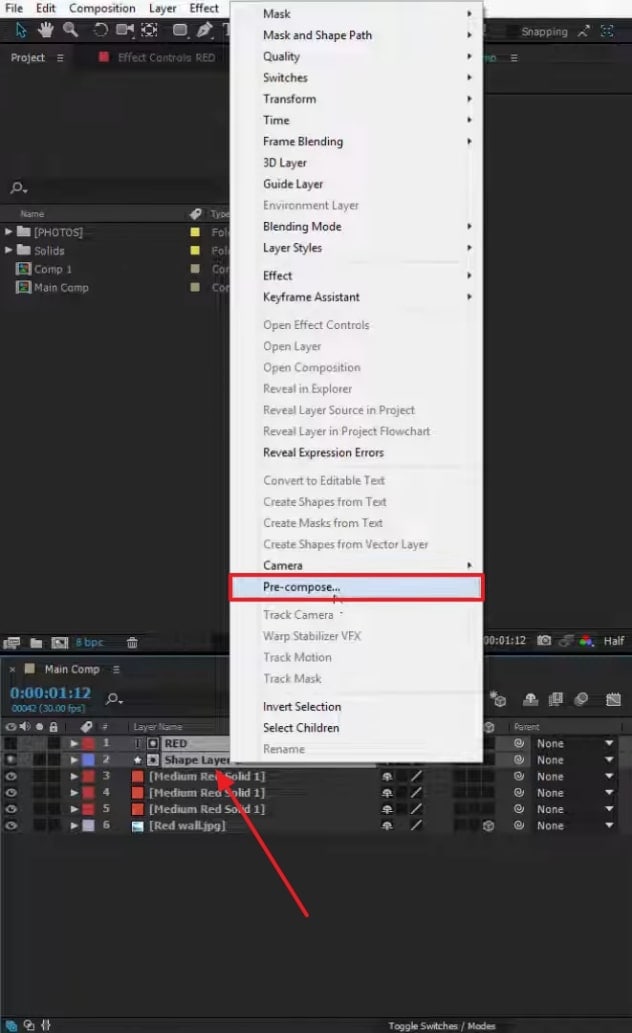
Fix 3. Pre-compose Layers
In addition, working with multiple effects or transformations on a single layer can also strain system memory. Instead of applying everything at once, use pre-compositions to group complex elements. This helps the tool limit how much each composition needs to process.
Plus, it reduces the chance of triggering the invalid image buffer size After Effects error. Follow the guide below to learn how you can apply precompose layers:
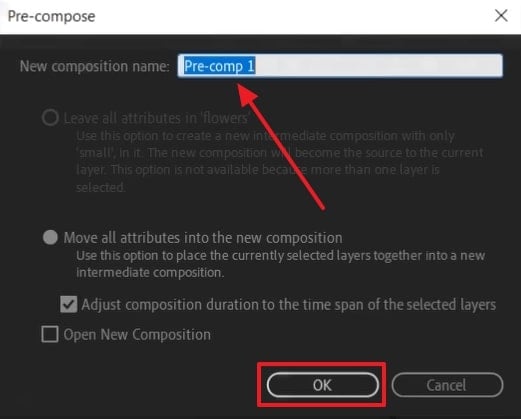
Step 1. Upon adding the layers to the "Timeline” section, opt for more than one layer by pressing the “Ctrl+Shift+C (Windows)” and “Command+Shift+C (macOS).” Besides, you can click the right mouse button and select the “Pre-compose” choice.
Step 2. Following that, add a new name in the “New Composition Name” section and hit the “OK” button.
Fix 4. Modify Layer Transformations
Remember, scaling layers too much inside After Effects can sometimes unintentionally enlarge their buffer size. In this case, resizing large assets before importing them into your project is highly recommended. You can also use null objects to manage complex movements without directly transforming layers.
These steps maintain better control over layer dimensions during animation. Let's see how to reset the layers to prevent the After Effects invalid image buffer size error:
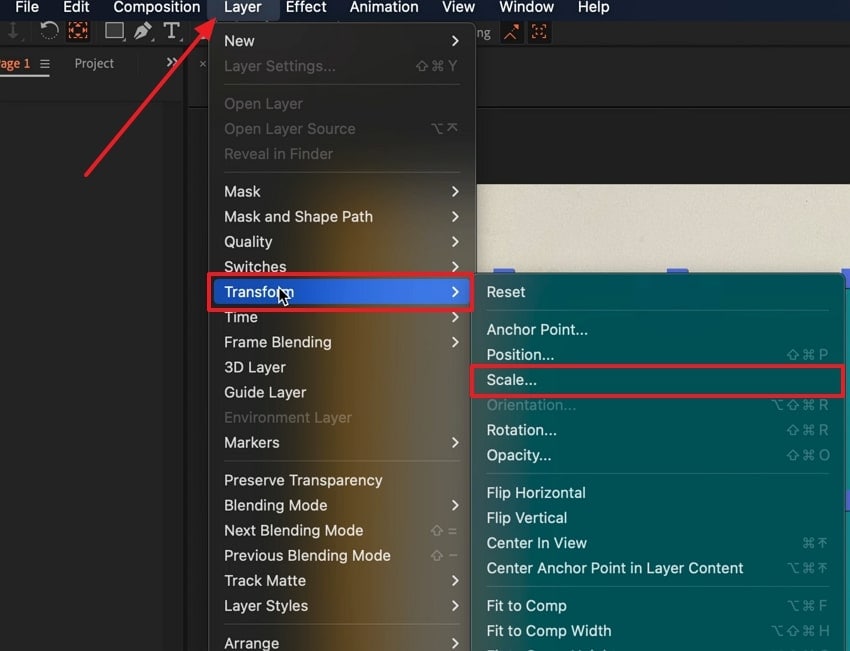
Step 1. To inaugurate the task, click the “Layer” tab and opt for the “Transform” choice. After seeing the new list of options, choose “Scale…” to access the layer transformation dialog box.
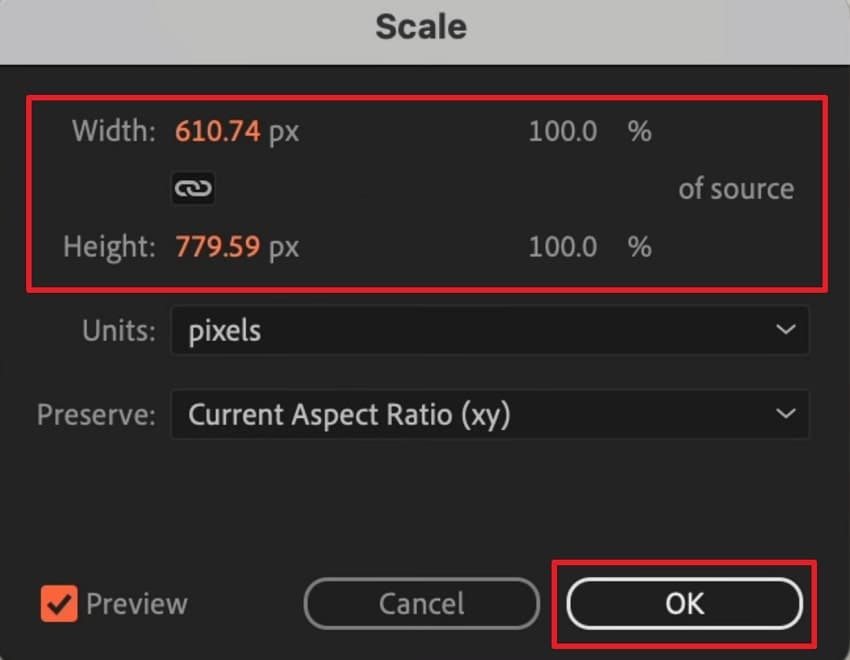
Step 2. Upon doing this, simply adjust the “Width” and “Height” of your working layer and then press the “OK” button.
Fix 5. Check for Improper Effect Applications
Sometimes, applying visual effects to incompatible layers can also create serious rendering issues. For example, placing video effects on an audio-only layer confuses the rendering engine. This misapplication can overload memory and result in errors, such as an invalid image buffer size After Effects. To overcome this problem, always double-check that effects are used on the correct layer types.
Moreover, you should avoid stacking effects without purpose, especially on complex or high-resolution assets. When you're experimenting, isolate the layer and preview it separately, which allows you to catch and fix issues early. Thus, properly applied effects reduce strain and keep your composition within safe rendering limits.
Fix 6. Update or Remove Problematic Plugins
As we all know, plugins can enhance the workflow, but outdated ones can also cause conflicts. Plus, a few plugins fail to follow After Effects' rendering limits, which results in the After Effects invalid image buffer size error. Thus, you should always keep your plugins updated to their latest versions. When you still face the issue, try removing those plugins by following the steps below:
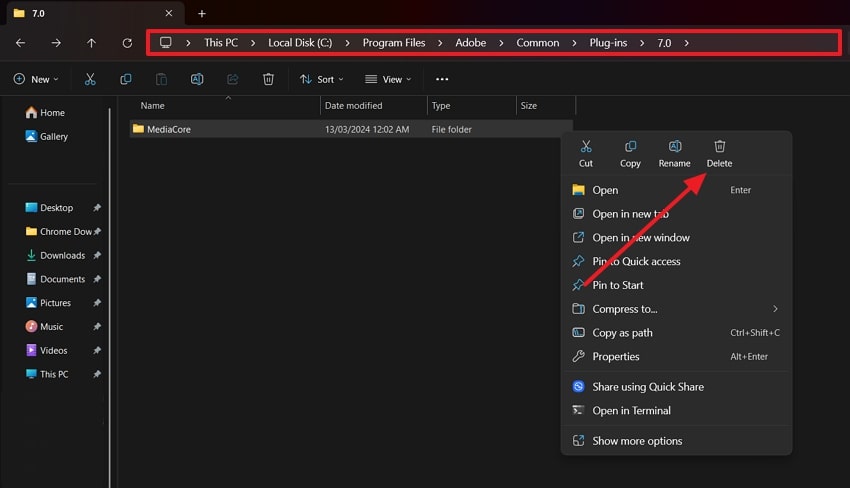
Instruction. Run the “File Explorer” and head to this path: “C:\Program Files\Adobe\Common\Plug-ins\7.0\MediaCore.” Following this location, right-click the plugin’s folder and opt for the “Delete” option.
Fix 7. Enable "Mercury Software Only" Mode
Aside from the above, some GPU-related issues can also trigger an error in the invalid image buffer size After Effects. This is especially likely to happen due to the unsupported graphics cards. In this case, switching to Mercury Software Only mode forces After Effects to rely on CPU rendering. This not only resolves the buffer size problem but also improves stability, which you can witness after following this guide:
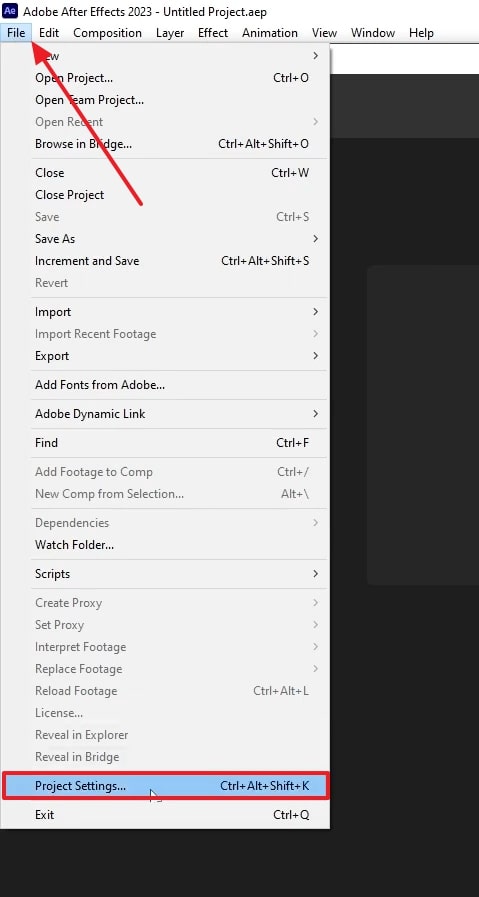
Step 1. Initiate the procedure by pressing the “File” tab and selecting the “Project Settings…” choice.
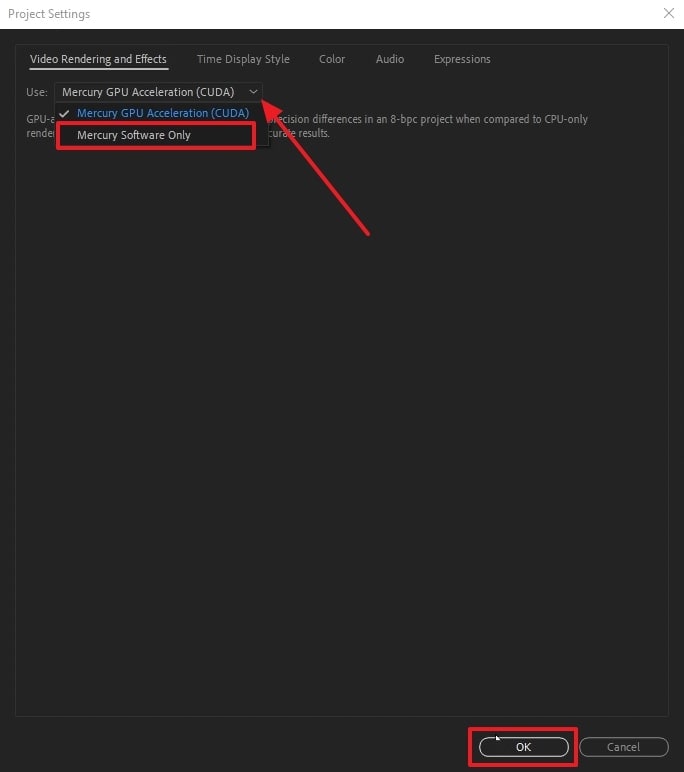
Step 2. When you access the “Video Rendering and Effects” section, click the “Use” drop-down and choose “Mercury Software Only.”
Fix 8. Clear Cache and Memory Settings
When the above solutions can't help, the overloaded cache and memory settings could be the culprit. If temporary files build up, they may trigger the After Effects invalid image buffer size issue. That’s where you have to regularly clear the disk cache, which helps the tool run smoothly. You should also review memory settings to ensure they’re optimized. Therefore, review the instructions below to clear the tool’s cache effortlessly:
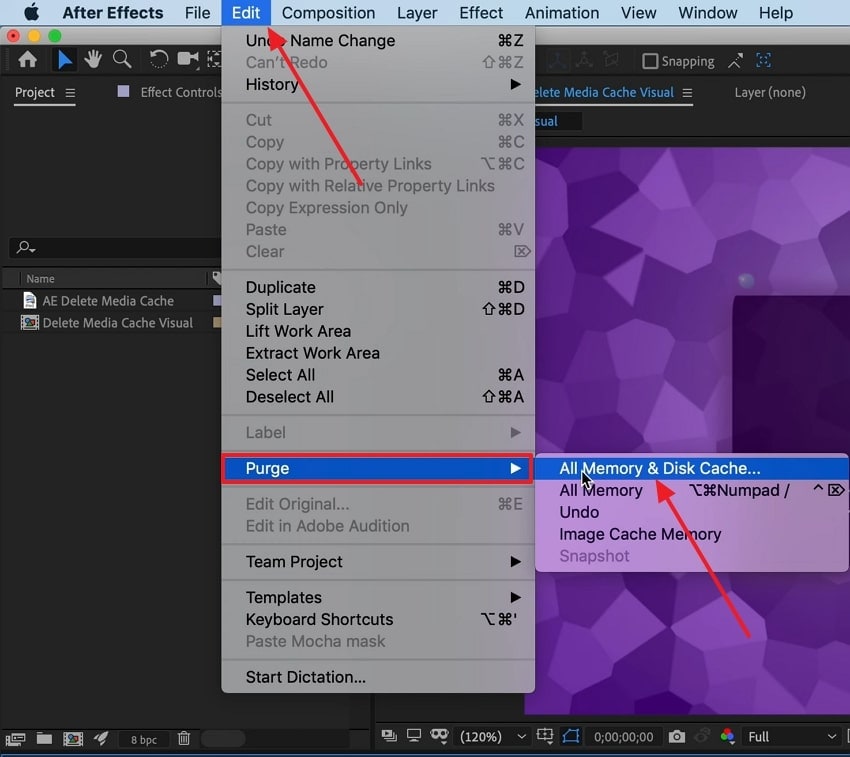
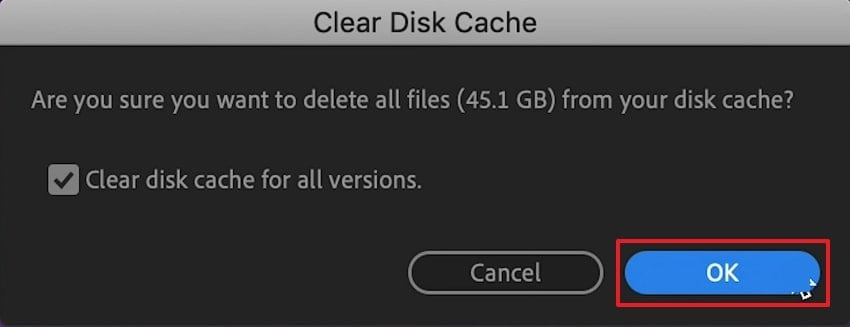
Step 1. Upon reaching the tool’s main display, head to the “Edit” tab and click the “Purge” option. From the extended panel, opt for the “All Memory & Disk Cache…” choice to move further.
Step 2. Once you access the Clear Disk Cache pop-up, hit the “OK” button to clear the cache successfully.
Fix 9. Update Your GPU Drivers
Last but not least, outdated drivers can even cause compatibility problems with After Effects' rendering engine. These issues can lead to invalid image buffer size After Effects errors during complex projects. Here, updating GPU drivers can fix bugs and improve the overall performance of your device. Therefore, go through the following steps to update your GPU drivers with ease:
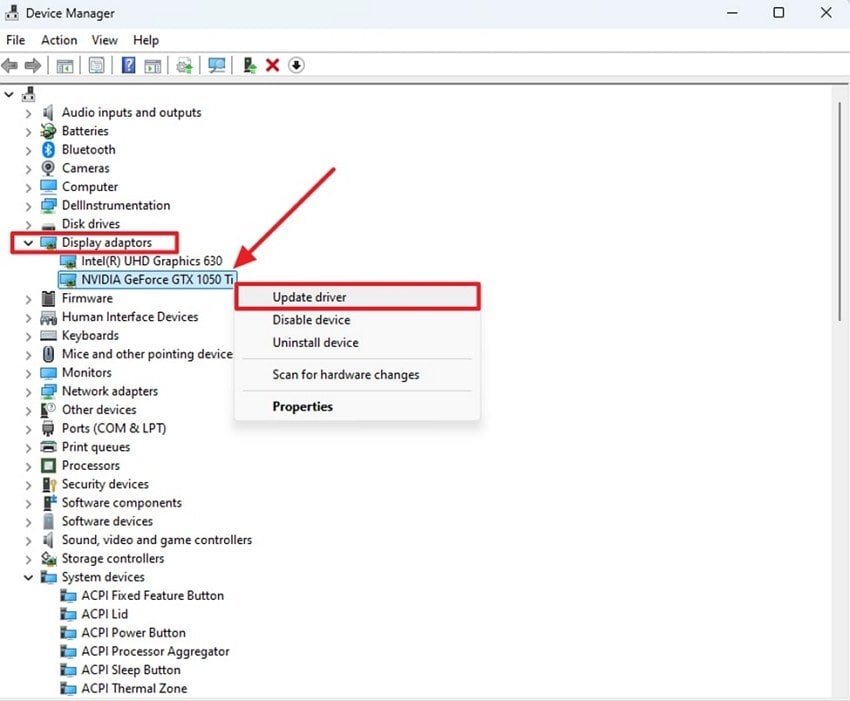
Step 1. To initiate, launch the “Device Manager” on your PC and click the “Display Drivers” option to expand it. Once you see your system’s GPU driver, right-click on it to select “Update Driver” from the list.
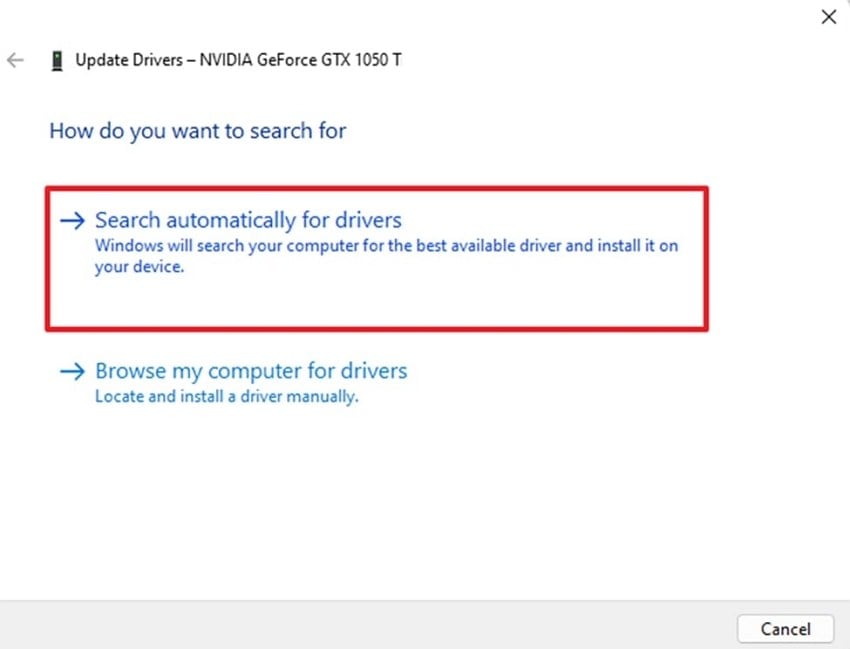
Step 2. Afterward, opt for the “Search Automatically for Drivers” choice to run the scan and update it effortlessly.
Pro Tip. Facing Corrupted Image Files? Repair Them Now
After learning about the After Effects invalid image buffer size error, many professionals face a problem where their project images get corrupted. In such cases, repairing the image files is the only way forward. That’s where Repairit Photo Repair comes in, which has an AI-powered photo repair tool built to restore damaged photos in seconds. Plus, you can fix any image formats, like JPEG or PNG, and even rare ones like GPR and NRW.
This dedicated program also lets you fix pixelated or unopenable photos without any technical skills. Alongside that, it enhances images by upscaling them up to 800% by improving resolution and clarity. Whether you’re working on a desktop or need a quick online fix, Repairit is accessible everywhere. Plus, you can even batch-repair multiple images at once and get quality previews before saving the final version.
Key Features
- Thumbnail Extraction: It intelligently extracts thumbnails from corrupt images and offers a quick preview even if the main file fails.
- Grayed-Out Photos: Users can also restore missing content in images that appear grey and see previously hidden elements like faces and backgrounds.
- Fixes Blank Images: Repairit can rebuild images that open completely white or blank by recovering lost data using deep repair techniques.
As explored above, repairing corrupted images is incredibly simple with Repairit, beyond resolving After Effects invalid image buffer size error. Hence, the following detailed guide shows how you can fix your damaged photos effortlessly:
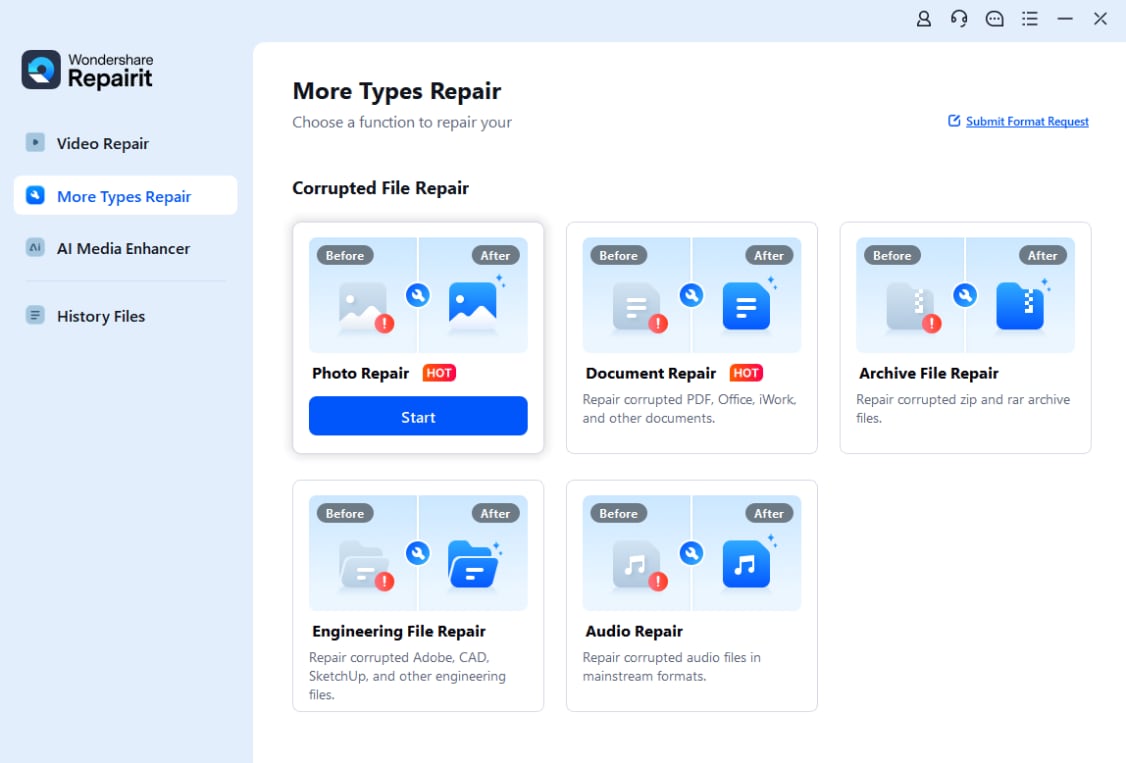
Step 1. Inaugurate the task by heading to the “More Types Repair” module. Next, opt for the “Photo Repair” feature by pressing the “Start” button.
Step 2. Going ahead to the new display, hit the “+Add” button to import the corrupted images from your device.

Step 3. Upon seeing all your damaged photos in the “Unrepaired Photos” tab, hit the “Repair” button to commence this task.

Step 4. When the process is complete, check the result by pressing "Preview” next to each photo. Following that, simply press the “Save All” and then “Save” buttons to export your fixed images.

Repair Corrupted Image Files
 Security Verified. Over 7,302,189 people have downloaded it.
Conclusion
In conclusion, facing the “After Effects invalid image buffer size" error can lead to project delays. This article explored 9 best solutions that help you resolve the issue in any case. Beyond that, many users find a dilemma in that their important project images have suddenly been corrupted. In this situation, you should consider using an image repair tool like Repairit to fix such persistent problems effortlessly.
FAQ
Q1. What is the maximum image size that After Effects can handle?
The maximum image size this editing tool can handle is 30,000 by 30,000 pixels for both import and export tasks. Yet, performance depends heavily on your system's available RAM. If a file exceeds these limits or uses too many resources, it can trigger an error in the invalid image buffer size After Effects.Q2. Does pre-composing layers always solve the buffer size issue?
These layers do not always solve the buffer size issue, but they help in reducing the overall complexity. It groups layers into a single composition, which can ease rendering. However, if the source image is still too large, the invalid image buffer size error might persist.Q3. Should I downgrade the quality of my project to fix the issue?
This can help temporarily resolve the error, especially on systems with limited RAM or GPU power. However, you should remember that it's not a permanent solution. Hence, always try other optimization steps first before lowering quality unless speed or stability is your main priority during editing.
