

Have you been noticing the photos fading recently? With time, the images start losing their natural color. There's nothing sadder than that. After all, these images hold so many memories. Most of the hard copies lose their essence with time.
When these photos are kept in the album for too long, they eventually fade. Therefore, this fading can take away the original look of the image. To resolve this, you may use an image hue shifter. The image hue shifter will help adjust the image and ensure all the colors are protected.
You can maintain visual consistency by bringing an artistic appeal when choosing color-shifting images. This ensures that even the faded image doesn't look that bad. If you're struggling with the problem of faded images, go through this guide to understand how you can fix your fading photos.
In this article
Part 1. Why Do Digital Photos Fade?
The exact reason for digital photos fading isn't known. One of the most common reasons for digital photos fading is the exposure of dyes to sunlight. Furthermore, air exposure can also be a common reason. If you have exposed the digital image to humidity, it can lead to photos fading. You must store the digital images correctly if you have physical copies. If not, the images could get wet and eventually fade.
Part 2. Why Use Image Hue Shifter?
Using an image hue shifter can play an important role in adjusting the image's color by changing the lightness, hue, and saturation. It can create specific effects and match the color schemes. Hue shifting can help the color appear more natural. If there's any unwanted tint in the image, you can easily get rid of it with the image hue shifter.
When you consider the hue shift image, it also plays a crucial role in matching the color palette to the theme. Therefore, this helps to create consistent visuals across all platforms and projects.
Part 3. Difference Between Color Adjusting and Color Shift Image?
Color adjusting and color shift images have often been used interchangeably, but differ completely. While color adjusting means modifying the color of an image to make it visually appealing, color shift image aims at changing the overall color tone to match consistent visuals.
Color adjusting corrects and enhances the color of the image. On the other hand, using an image color shifter helps to create an artistic effect according to the mood. Color shift plays an essential role in offering more stylized and distorted color tones. Color adjusting, on the other hand, brings a more natural and real-life-like appearance.
Color adjusting is used across different spaces for product photography, portraits, and photo retouching. However, color image shifters are used significantly to create a vintage effect, film color grading, and creative photography. Various tools are essential in creating color shift image effects like Photoshop, filters, and different video editors like DaVinci and Premiere Pro.
Part 4. Top Tools to Hue Shift Image
When you want the perfect color shift image, it is essential to use the right tools. This is because restoring the hue of the faded image same as that of the original can be slightly complex. You can use a wide range of online tools to fix this problem.
The top tools to maintain the hue shift image can help maintain brightness, pigments, alignment, color, and contrast to fix the image. However, you must take a digital scan of these images before you fix these images. It is advisable to use a high-quality digital scanner to maintain the high resolution of the images.
Below are the top tools that can act as the best image color shifters and restore faded images like the original ones.
Method 1: Repairit
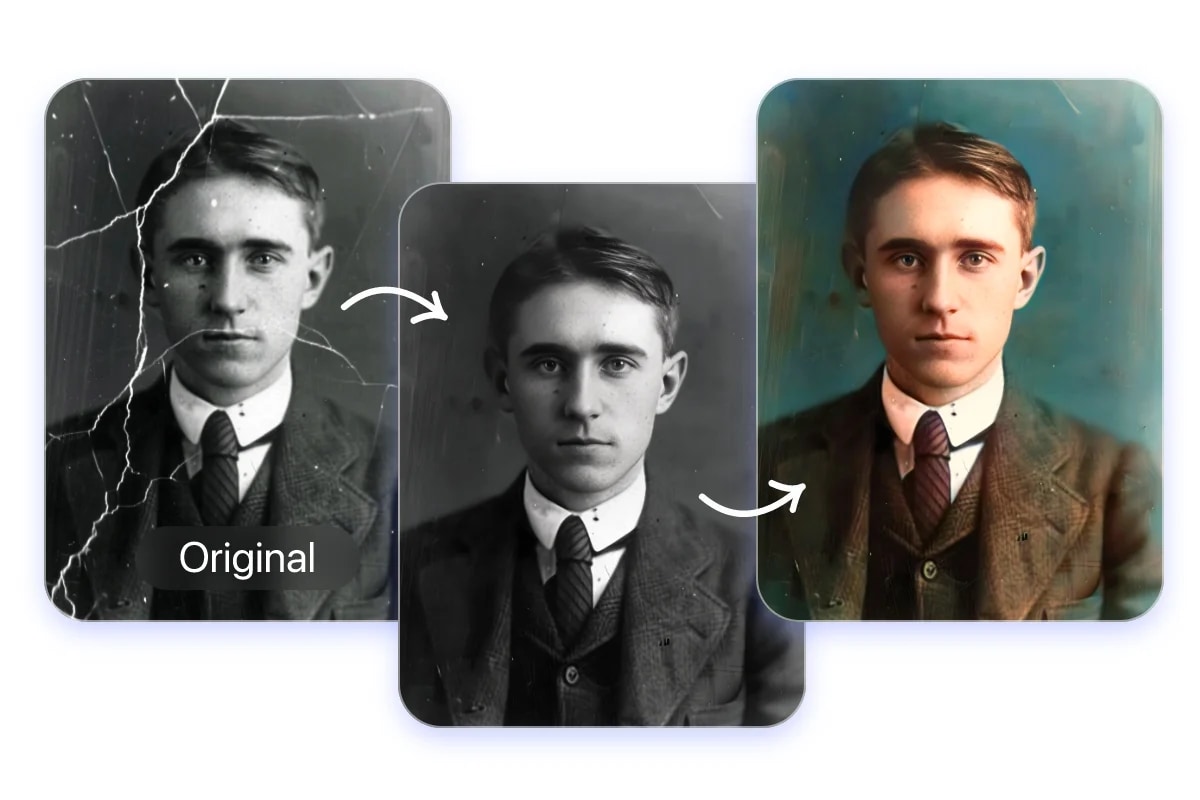
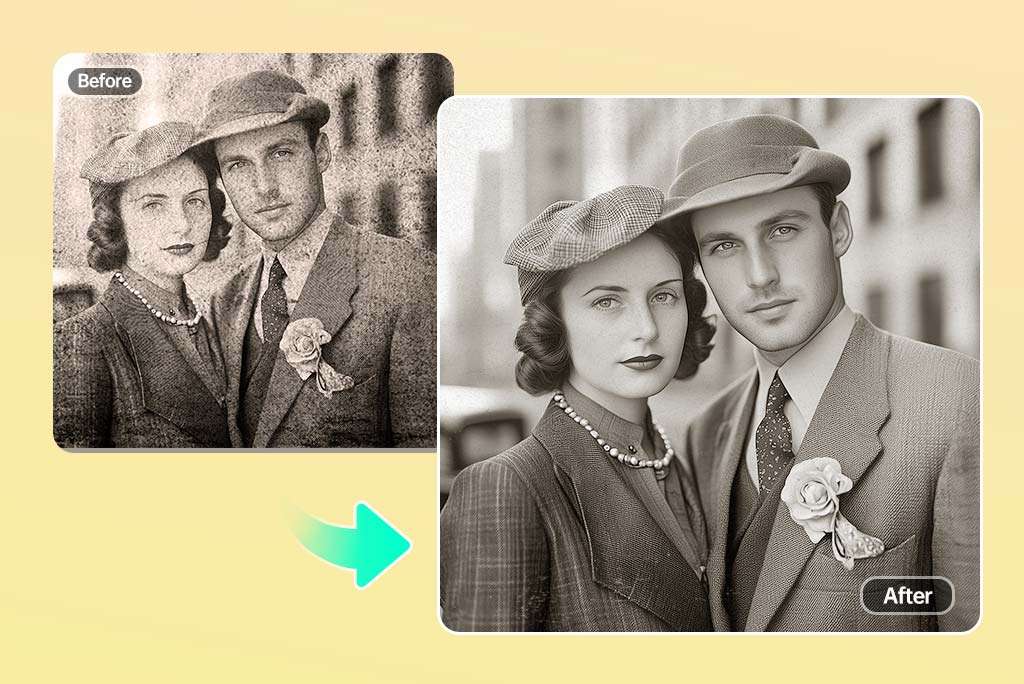
If you have faded photos and want them restored to their original result, choose Repairit. This effective image color shifter can help you colorize all the faded images. Repairit uses advanced AI algorithms to adjust the colors.
You must download Repairit on your Mac OS or Windows OS, as it is compatible with both. It can support various file formats, ensuring you achieve your desired results. Repairit can also play an essential role in saving up extra storage. You can either use the online version or the desktop version.
Some of the key features of Repairit for the hue shift image are as follows:

Wondershare Repairit - Image Hue Shifter
1,010,994 people have downloaded it.
-
Repairit uses advanced AI technology to repair and colorize faded images within seconds.
-
Repairit online version has no limits for the number or the size of the images it can repair.
-
Repairit comes with an AI Image Upscaler feature that allows you to enlarge the photos from 2x to 8x to get a better view to shift.
-
Repairit supports various image formats like JPG, JPEG, PNG, NRW, and more.
-
Repairit can restore photos from devices like USB flash drives, cameras, and phones.
Once you have downloaded and installed Repairit in your system, you can follow the steps below to use its AI Photo Enhancer feature to color shift images:
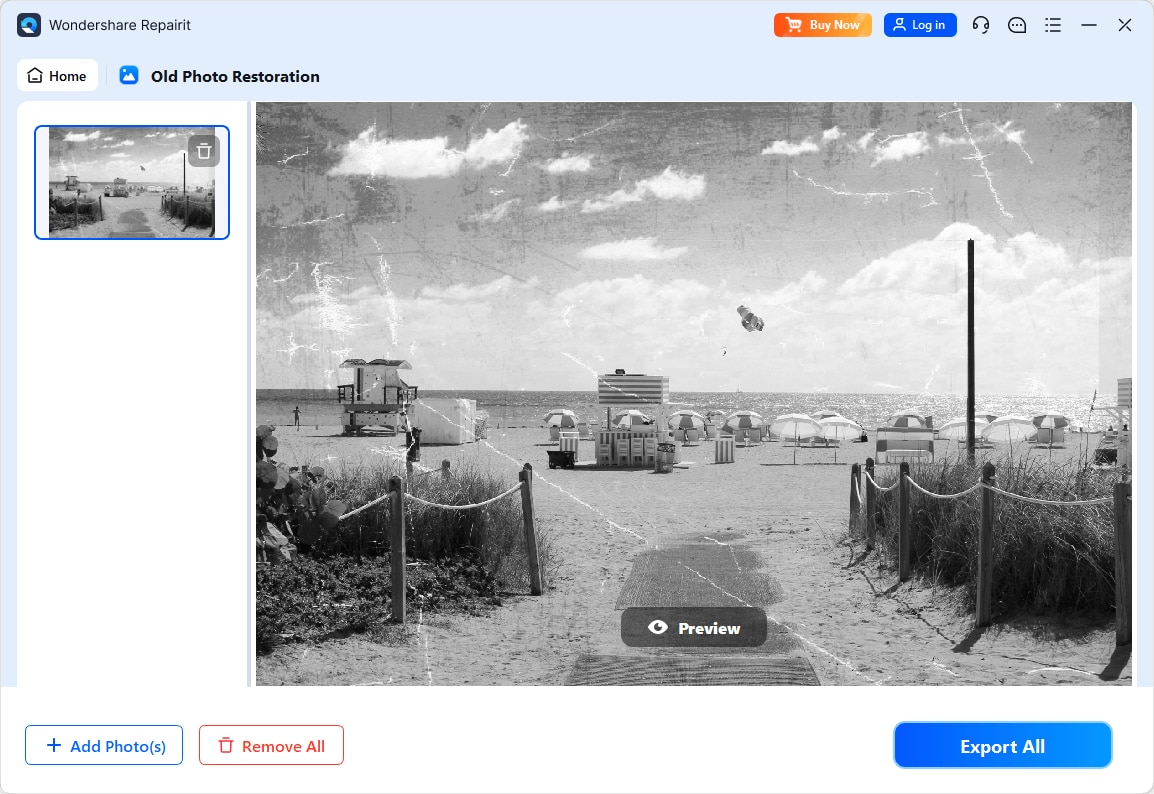
Step 1. Launch Repairit on your system and select the AI Photo Enhancer feature.

Step 2. Click on the “+Add” button in the Import Photos section to add the images.

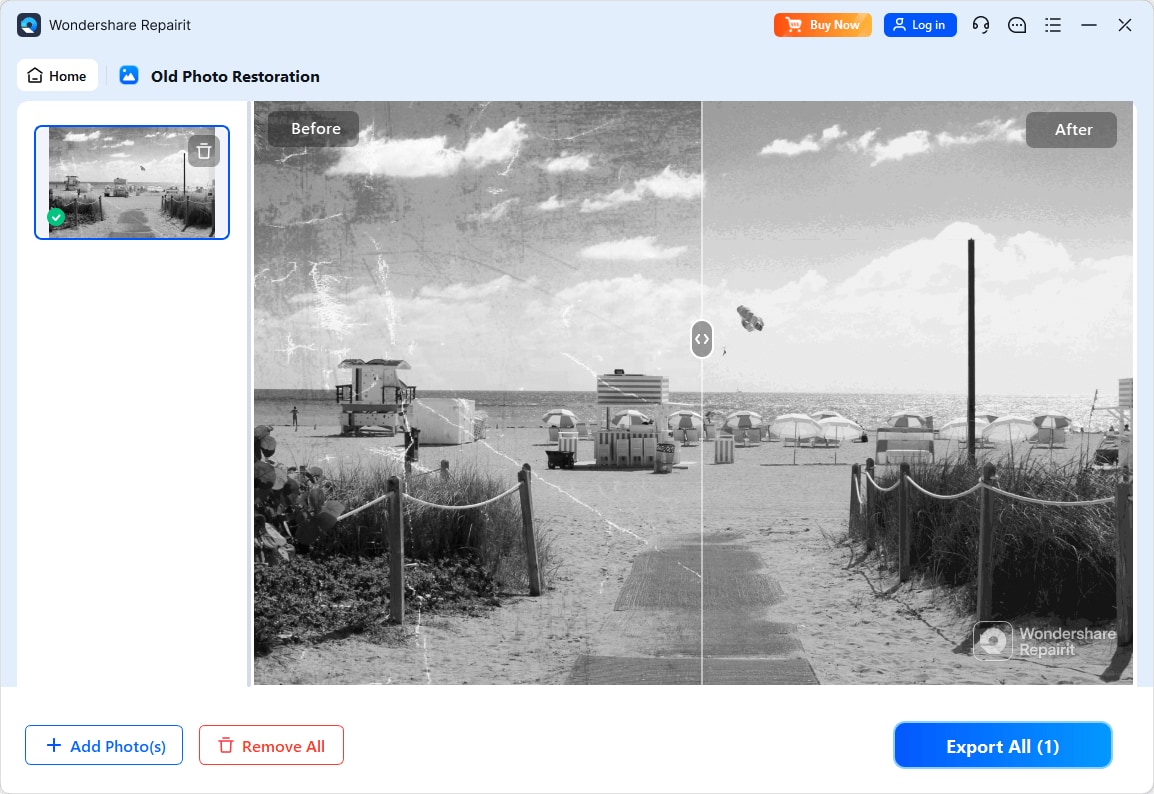
Step 3. Restore and colorize the pictures
Step 4. Save the final results.
Shift Image Hue Now
 Security Verified. Over 7,302,189 people have downloaded it.
Method 2: Adobe Photoshop
Adobe Photoshop is one of the most popular photo editing tools. This can play an essential role in hue-shifting images and clearing out zones, thereby repairing the old photos.
Follow the steps given below to use Adobe Photoshop as an image color shifter to repair the faded photos:
Step 1. Open Adobe Photoshop
- Create two layers so that you can track the progress.
- Adobe Photoshop allows you to switch between the layers.
- If required, you can create multiple layers so that you can edit various aspects of the photos.
Step 2. Create Layers and Make the Adjustments
- After creating the layers, select the auto-color option.
- In the auto-color option, you can use the sliders to switch across hue and saturation and make the required adjustments accordingly.
- Make sure to touch up the sliders so that you can get the appearance of the faded photos.
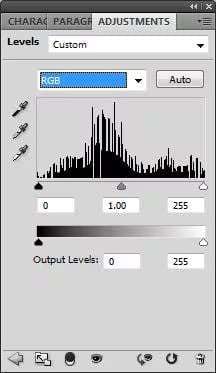
Step 3. Adjust the Theme
- You can then use the levels to adjust the colors and reach the image's black point.
- You can mark the areas for adjustments.
- After highlighting the parts, ensure the software will make the base black for the selected point.
- You can then adjust the sliders to achieve the tone you want.
Step 4. View and Save
- If required, you may adjust the highlights and shadows of the images.
- Adjust it appropriately to achieve the original color of the faded photo's choice.
- In Adobe Photoshop, you must keep experimenting to achieve the result through image hue shift successfully.
- Use different techniques if you're an expert to find the best results.
Method 3: Paintshop Pro
Paintshop Pro is also an efficient image color shifter to restore faded images to their original status. It can restore the original color with only a few clicks. Therefore, you won't have to face much struggle as a beginner.
You need to follow the steps given below to use Paintshop Pro:
Step 1. Open Paintshop Pro
- Download Paintshop Pro on your PC. It is compatible with Windows and Mac operating systems.
- After the software is downloaded, launch it on your system.
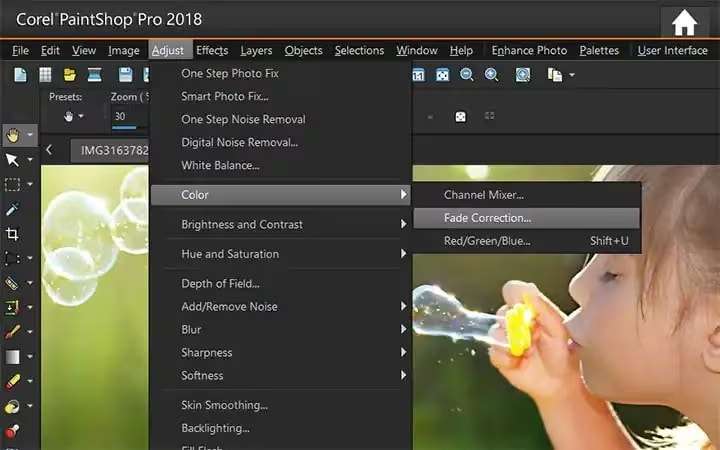
Step 2. Check all Color Options
- Click on the menu and choose the adjust option.
- Scroll to the color options and select the fade correction option from the menu.
Step 3. Adjust Color Correction Settings
- It is an automatic process that will help fix the fade by default.
- Make sure to adjust the color correction settings as per your preference.
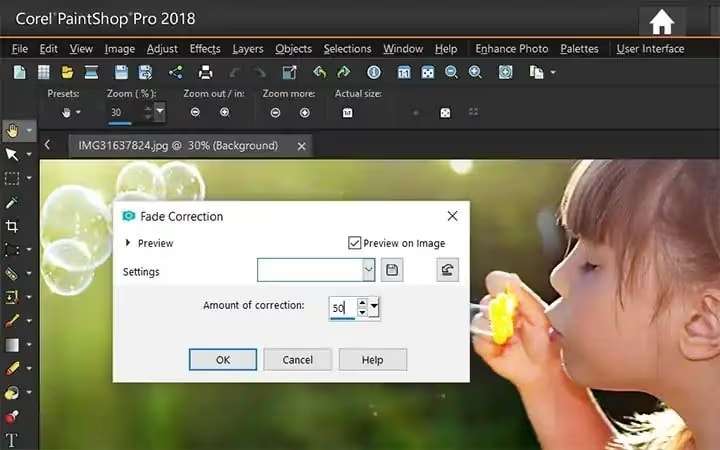
After the original photo has been restored, you can save the image.
Method 4: Lightroom
Lightroom is an efficient image hue shifter that can help you organize photos. Lightroom lets you easily view, manage, and even touch the images. It usually deals with highlights, colors, and times. You need to spend some extra time, but it will be worth it.
Lightroom can play an efficient role in restoring old photos while dealing with color defects. Follow the steps given below to fix the faded photos using the color image shifter:
Step 1. Open Lightroom
- Launch the Lightroom software on your system and import the photo.
- Once you have imported the image, click on Develop.
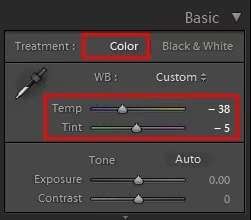
- Different color options will be available; choose the one with a white balance.
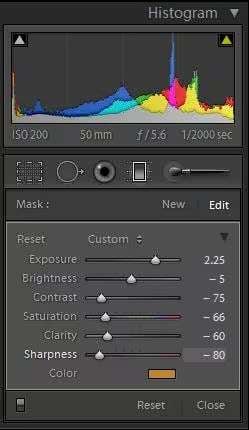
Step 2. Adjust Image Temp and Tint
- Click on the Color and adjust the temp and tint.
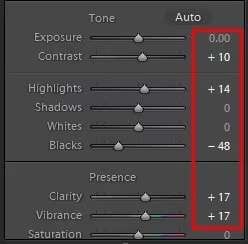
Step 3. Adjust Contrast and Clarity
- Now, you must set the contrast, clarity, vibrance, and saturation per your preference.
- You can slide across the panels until you get the perfect choice.
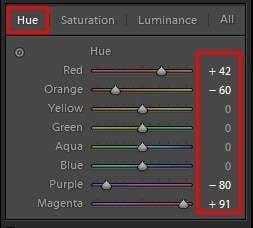
Step 4. Change Split Toning and Luminance
- Next, navigate to the hue panel and shift the hue to make your perfect choice.
- Make sure to split toning and luminance to track the changing numbers.
- If the picture is overcolored, you can undo the change.
Part 5. Tips to Prevent Digital Photos from Fading
If you have digital photos you don't want to fade, it is essential to start protecting them. Here are some of the key tips you must follow to prevent the digital photos from fading:
- Store away from sunlight: When digital photos are exposed to sunlight, it starts fading. You must store the images away from sunlight, ensuring the tones and dyes aren't affected. Moreover, it also keeps it away from air exposure, smoke, and moisture.
- Use high-quality albums: If you store the photos in albums, make sure to use high-quality ones. These high-quality albums play an essential role in preventing damage to the images. Make sure that you store the album too away from sunlight and moisture.
- Scan your photos: Keeping a scanned copy of the digital images can be highly beneficial. You can save the pictures on your PC or cloud after scanning them successfully.
- Create backups: Consider creating multiple backups of your photo. If you have a digital version of the image, create various backups so that the other is still intact even when one version is destroyed.
Conclusion
Using the right image hue shifter is extremely crucial so that you can retain the original vibe of the photo. As the image color fades, it might feel like your memories are fading too. However, that is not the case. You can use various tools like Repairit, Photoshop, and more to retain the original feel of the image. These tools help in restoring the original appearance of the photo, which can be extremely efficient in the long run to retain memories.
FAQ
-
Can faded photos be repaired?
Yes, fading photos can be repaired using an image hue shifter. The shifter will align the image color, ensuring a consistent visual impact. -
Why use an image hue shifter?
Using an image hue shifter can play an essential role in keeping everything intact, especially for the image. It will help ensure the image has a visual and artistic appeal. -
Can I use an image color shifter to restore the original color of the faded photos?
Yes, you may use a high-quality color shifter to restore the original color of the faded photos. Software like Repairit can play a key role in helping you repair the images effectively.
