

Are you a photographer or designer? Want to create high-quality prints or crisp digital images? Learning how to increase DPI of image for your profession is essential. That’s because DPI is a key factor that tells you how detailed an image looks after printing. It means “dots per inch.” So, more dots per inch means the image is of better quality. That’s why we want to increase DPI of picture. This is what we’ll explain in this blog.
Keep in mind that DPI isn’t the same thing as image quality. So, changing DPI won’t magically improve your pictures. We’ll also explain how to enhance the quality of your images after making DPI adjustments. For this purpose, we’ll use Repairit. You’ll learn practical steps, especially how to increase DPI in Photoshop, and discover when to use AI-powered tools to get the best results. So, let’s start learning more about DPI, shall we?
In this article
Part 1. What is DPI and Why Does It Matter?
DPI means dots per inch. DPI tells your printer how many ink dots go in every inch of a pic. It's easy to check the DPI of an image using Windows Explorer. Remember that the higher the DPI, the more detail and sharpness you get in print.
But don’t confuse DPI with PPI (pixels per inch). While DPI refers to print resolution, PPI refers to the pixel density of a digital image. Both affect image quality, but in different ways.
- When preparing images for printing, ensure they are sharp and clear.
- When enlarging images without losing detail.
- When improving image quality for professional use.
- When your image has a low DPI but you want to print it at 300 DPI.
Simply changing the DPI value without increasing pixel dimensions won’t improve quality.

Part 2. Understanding DPI and Image Resolution
Here’s what you need to understand about DPI.
DPI vs. PPI
DPI is about print quality, i.e., the number of ink dots per inch. PPI is about digital image size, i.e., the number of pixels per inch on your screen or file.
How DPI Affects Print Size and Quality?
Higher DPI means more dots per inch, resulting in smaller print size but better detail. Lower DPI means fewer dots per inch, resulting in a larger print size but less detail.
For example, a 3000x2400 pixel image at 300 DPI prints at 1.8 inches with high detail. The same image at 72 DPI prints at 41.6.33.33 inches but looks blurry or pixelated. Now, you can see how DPI can affect the size of your printed photo, but not its quality.
Image Resolution (Pixel Dimensions)
Your image’s pixel dimensions (width x height) determine how much detail it contains. Increasing DPI without increasing the number of pixels only changes the print size, not the quality.

Part 3. How to Increase DPI in Photoshop (and Its Limitations)
Photoshop is a powerful tool to increase DPI of image or picture, but it has some limitations. It is important to remember this:
Changing DPI Without Resampling
Here’s how you can change DPI without resampling:
- Open your image in Photoshop.
- Go to Image > Image Size.
- Uncheck Resample.
- Change the Resolution (DPI) value to 300 or your desired DPI.
- Click OK.
This method changes the DPI but keeps the pixel dimensions the same. It changes the size of the printed image. It does not improve image quality or sharpness.
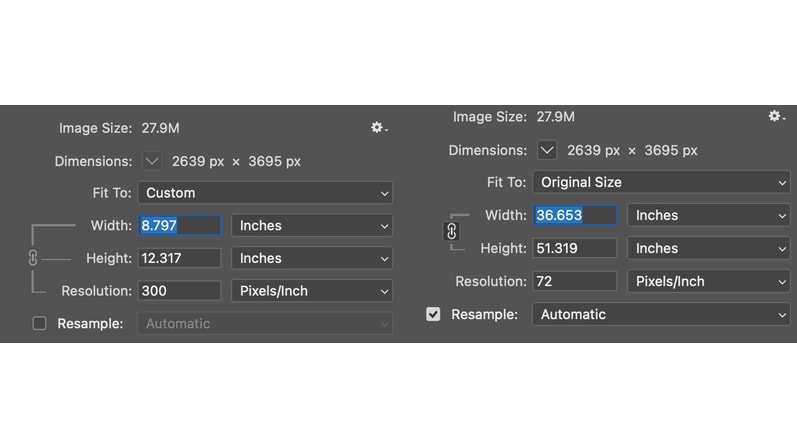
Increasing DPI With Resampling
You can increase an image’s DPI with resampling in this manner:
- Open your image in Photoshop.
- Go to Image > Image Size.
- Check Resample.
- Choose a resampling method, such as the Bicubic Smoother, for enlargement.
- Increase the Resolution (DPI) or Dimensions (Width/Height).
- Click OK.
This method adds pixels to an image, increasing resolution. However, it can introduce pixelation or blurriness if increased too much. Photoshop’s upscaling has limits, and results depend on the original image quality.
Limitations
Upscaling can cause loss of sharpness and introduce artifacts. Photoshop can only do so much; starting with a high-resolution image is best. Over-enlarging will degrade image quality.
Part 4. How Do I Increase the DPI of an Image Without Photoshop: Using Repairit Photo Enhancer
Increasing DPI or image size often reveals flaws like noise, blur, or pixelation. That’s why AI-powered enhancement tools are valuable. This tool uses AI to boost image quality after DPI adjustments. It can:
- Upscale images intelligently
- Reduce noise and grain
- Sharpen details for crispness
- Enhance colors and contrast
Using Repairit after increasing DPI helps maintain image clarity and professional quality. So, this is what you can do:
Step 1. After opening Repairit, select the “AI Media Enhancer” tool.

Step 2. Click on a blue “+ Add” button to import a picture.
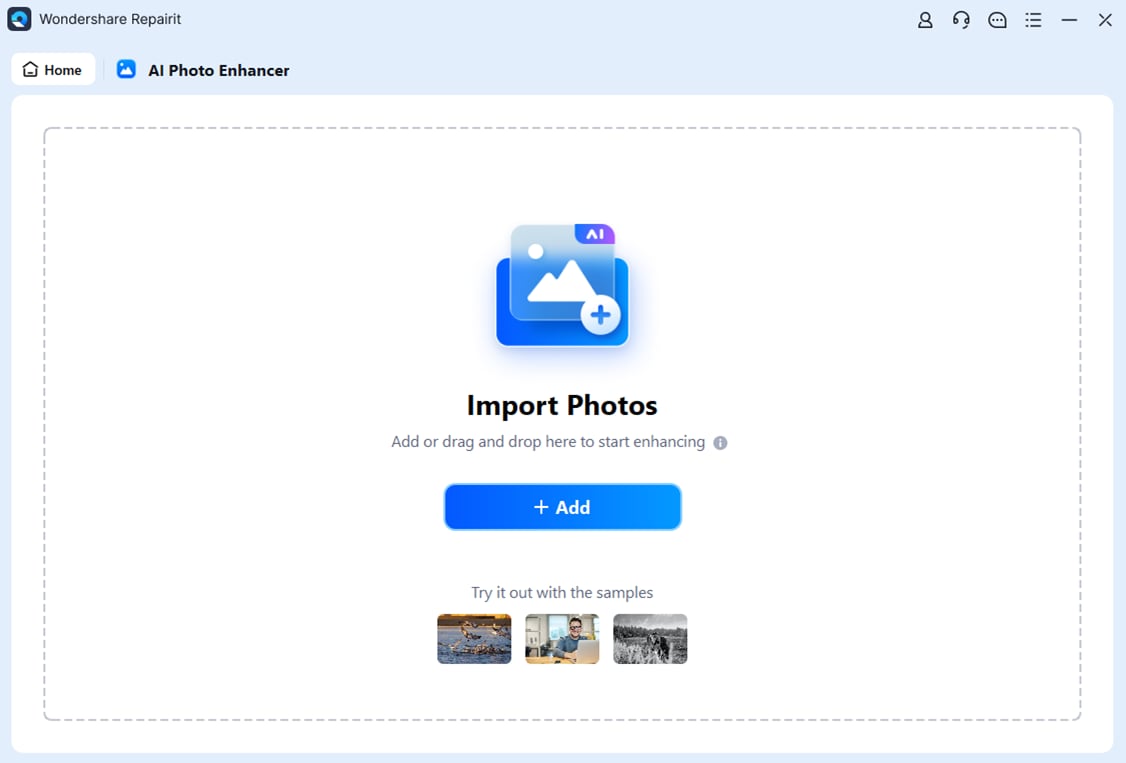
Step 3. Initiate the process by clicking “Start Enhancing.”

Step 4. Save your enhanced image for safekeeping on your PC.

Increase DPI of Your Photo Now
 Security Verified. Over 7,302,189 people have downloaded it.
Part 5. Pro tips to Improve DPI to Image?
While Photoshop offers tools to increase photo DPI, there are some practical tips to keep in mind:
- Always work on a copy of your original image to avoid irreversible changes.
- Avoid increasing DPI drastically in one step; try gradual increments.
- If your image is low resolution, consider reshooting or sourcing a higher-quality original.
- Use sharpening tools after increasing DPI to regain lost details.
- When working online, remember that increase photo DPI online tools can be easy but may have limitations compared to desktop software.
Part 6. How to Increase DPI of Picture for Best Results
For the best results when you increase DPI of picture, always combine DPI changes with image enhancement. This trick ensures a pic remains crisp and clear, ready for professional printing or display. Also, check out this table if you are still confused regarding the concepts discussed in this blog:
| Basic Concept | Explaining the Concept | Best Practices |
| DPI (Dots Per Inch) | Number of ink dots printed per inch on paper. Higher DPI means more detail in print. | Aim for 300 DPI for high-quality prints. |
| PPI (Pixels Per Inch) | Number of pixels displayed per inch on a digital screen or image file. | Higher PPI means better digital image clarity. |
| Changing DPI Without Resampling | Adjusts print size without changing pixel dimensions or image quality. | Use to set print size only; does not improve sharpness. |
| Increasing DPI With Resampling | Adds pixels to increase resolution, potentially improving print quality, but may cause blur. | Use Bicubic Smoother in Photoshop; avoid excessive enlargement. |
| AI Photo Enhancement | Uses artificial intelligence to upscale, sharpen, and reduce noise after DPI increase. | Use tools like Repairit Photo Enhancer for the best results. |
| Optimal DPI for Printing | Standard DPI value for crisp and clear printed images. | 300 DPI is recommended for most print jobs. |
| Optimal DPI for Web | DPI value suitable for displaying on digital screens. | 72 DPI is sufficient for web images. |
| Starting Image Resolution | The original pixel dimensions of your image before DPI changes. | Always start with the highest resolution available. |
| Avoiding Quality Loss | Risks of pixelation and blurriness when increasing DPI or image size. | Increase DPI gradually and enhance with AI tools to maintain quality. |

Conclusion
This blog is a must-read if you want to produce sharp prints and crisp images! You need to learn how to increase the DPI of a picture properly. Yes, you can easily change DPI via Photoshop. You can also resample your images with it. But Adobe Photoshop has its limitations.
Changing the DPI doesn’t improve quality; resampling can degrade images if done too much. That’s why you should always use a high-res image and other tools to improve sharpness. With Repairit, you can easily reduce noise and upscale your images intelligently after increasing the DPI. That’s how you transform your blurry images into sharp, professional-looking photos. Make them ready for print or web. Now you know how to increase DPI of image successfully.
Ready to increase the DPI of your pictures and enhance their quality? Download Repairit Photo Enhancer today and bring your images to life!
FAQ
-
Q1. What DPI should I use for printing photos?
300 DPI is generally recommended for printing photos to ensure sharpness and detail. -
Q2. Can I increase DPI without losing quality?
You can’t add detail that wasn’t originally there. Increasing DPI without resampling only changes print size. Resampling can introduce artifacts, but Repairit can help minimize quality loss. -
Q3. Is it better to increase DPI or image size?
For larger prints, you need to increase both DPI and image size. Increasing size without DPI will result in a blurry image. Use Repairit to improve quality after resizing.
