
 TL;DR:
⚡ Quick Fix: Remove Glasses from a Photo
Use an AI Photo Eraser: Upload the photo, brush over the glasses area, and let AI remove the glasses while filling the face naturally.
Adjust the Brush Precisely: Zoom in and resize the brush to mark only the glasses, frames, or glare so the eyes and facial details stay realistic.
Preview Before Saving: Compare the edited image with the original to make sure the eyes, skin texture, and expression still look natural.
Try Online or Mobile Tools: Use browser-based tools for quick edits or mobile apps like YouCam Perfect, FaceApp, MeituPic, or Fotor for on-the-go glasses removal.
Ask AI for a summary
 ChatGPT
 Perplexity
 Gemini
 Claude
 Grok
Grok
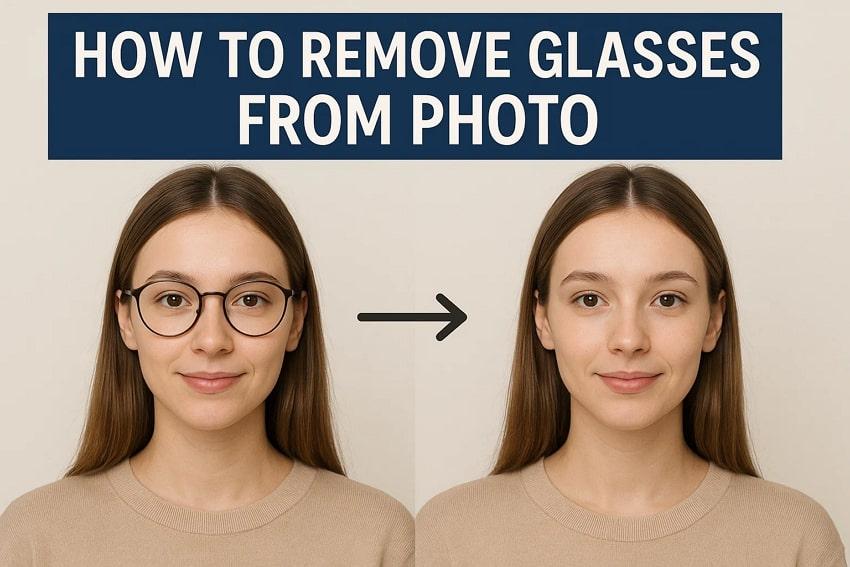
Many people wear glasses to improve their eyesight and enhance their appearance. Yet, it causes the camera to capture the glare when a picture is captured with glasses. Mostly, people use different ways to remove the glasses afterward but end up making the image look unnatural.
Luckily, many AI-powered tools now solve this problem by allowing the removal of objects from images. These tools are accessible through browsers and mobile phones, which will be discussed in the article below. Here, you will explore one of the most used tools to remove glasses from the photo, which provides unmatched AI features.
Table of Contents
Part 1. [AI-Powered] The Quickest Way to Remove Glasses from a Photo Online
Among all the available tools, Repairit Online - Photo Eraser stands out due to its unique features. This tool works by providing you with a brush tool that allows you to select the object you want to remove. You can also adjust the brush size up to 160px according to the size of the glasses. It also enables you to zoom in or out up to 500% to mark the object with full precision.
This platform also offers a preview option, allowing you to review it before downloading. It even allows you to import multiple photos at once, which will help you to edit a bulk of images in no time. You can upload pictures in various file formats, including JPG and PNG. However, users of the free version can only repair 3 pictures through this AI glasses remover.
Key Features
- Video Enhancer: This tool allows you to enhance the video, correcting issues such as low light and resolution.
- Photo Upscale: You can upscale the image resolution and make it sharper after removing the glasses to improve the image quality.
- Generative AI: Once you erase the sunglasses, you can fill the empty part using generative AI by providing a prompt according to your requirements.
After knowing about the features provided by this tool, remove glasses from the photo through the steps given below:
Step 1. Open the AI Photo Eraser and Upload the Image
First, access Repairit Online, head toward the "AI Photo Eraser" tab, and upload the image using the "Add Photo" button.

Step 2. Highlight the Area and Start the Photo Eraser Process
After uploading the image, mark the area you want to remove and press the "Start" button to erase glasses from your photo.
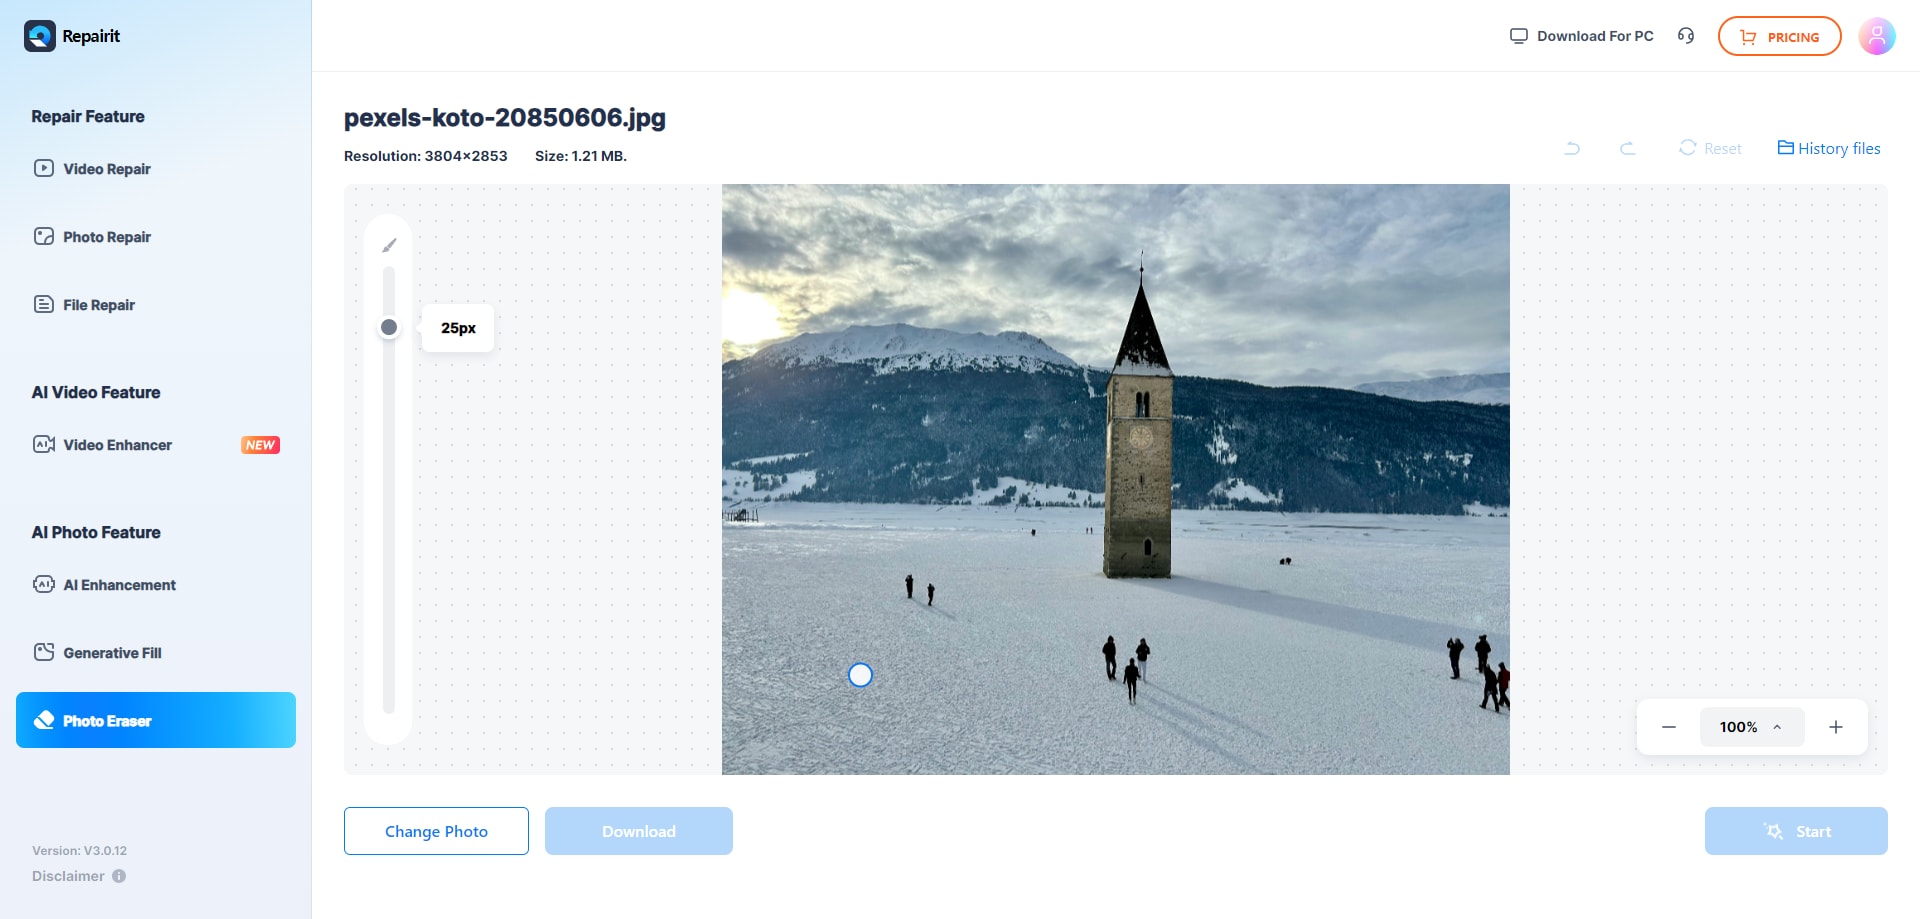
Step 3. Preview and Save the Photo After Finalization
Once done, save the final picture without glasses by pressing the "Download" button.
Part 2. 4 Other Online Ways to Remove Glasses from Photo
Despite Repairit Online, here are some solutions that you can try to remove glasses from photos online with ease:
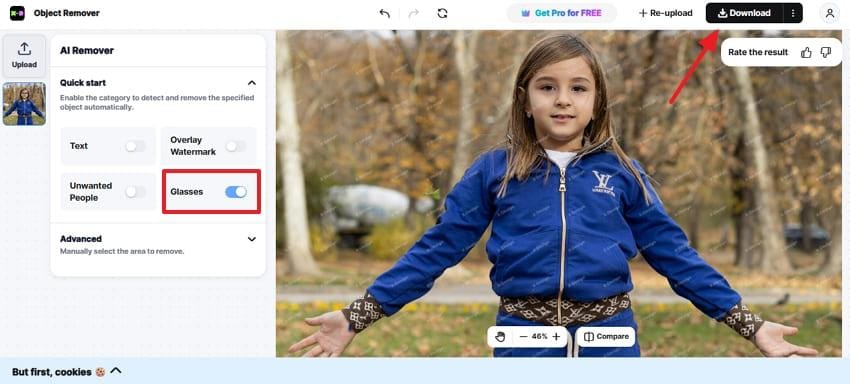
1. X-Design Remove Glasses
Offering you automatic and manual selection to remove photos, X-Design allows you to eliminate glasses from images without affecting picture quality. For that, within its Advanced Settings, users can make use of the Brush tool that can be resized for precise selection. It also lets you compare the results to determine if the results are worth considering. While following these steps, the tool creates a watermark to avoid free use:
Step 1. Access this AI remove glasses from photo tool page, and hit the "Upload Image" button to upload an image.
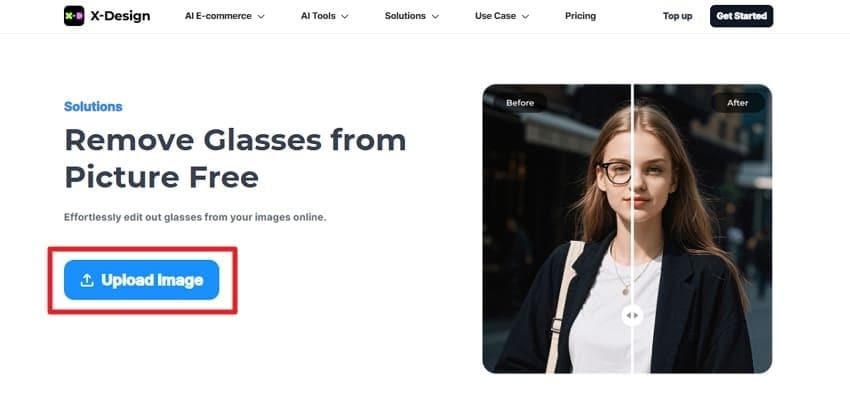
Step 2. The tool will automatically remove the specs if the "Glasses" option is already enabled in the "Quick Start" menu. Once done, hit the "Download" button to export the image to the device.
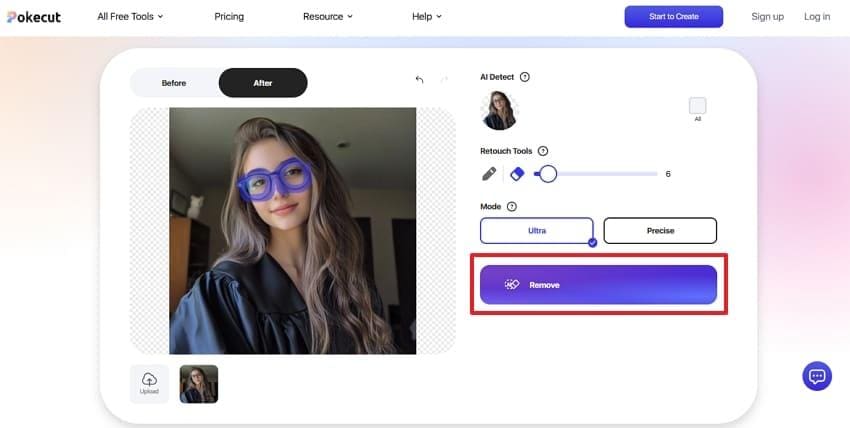
2. Pokecut AI Remove Glasses
For removing glasses, Pokecut allows you to upload photos in 5 different file formats, such as JPG and PNG. Besides, it offers two modes, Ultra and Precise, letting you highlight the details precisely. Additionally, users can use AI Detect mode to spot objects in the photo automatically. Anyhow, to know how AI glasses remover works for your image, here is the step-by-step guide below:
Step 1. Upon uploading the image, select the "Modes" and "Pencil" from Retouch Tools to start highlighting the glasses area. Hit the "Remove" button to start the glasses extraction process from the picture.
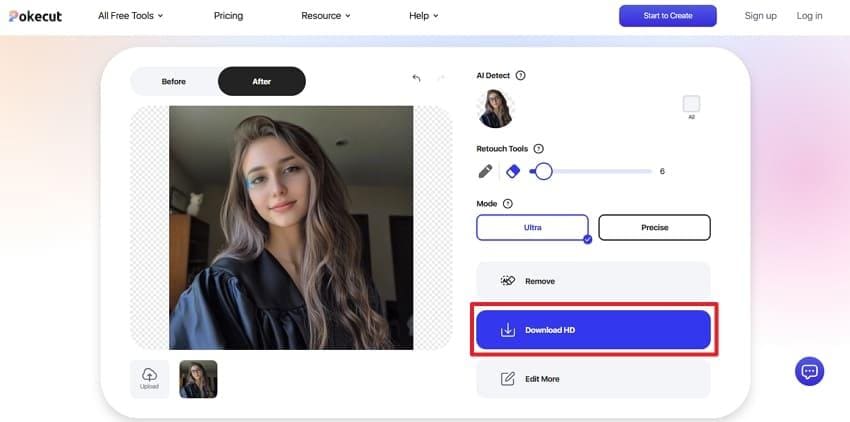
Step 2. As the process completes, press the "Download HD" button to save the results.
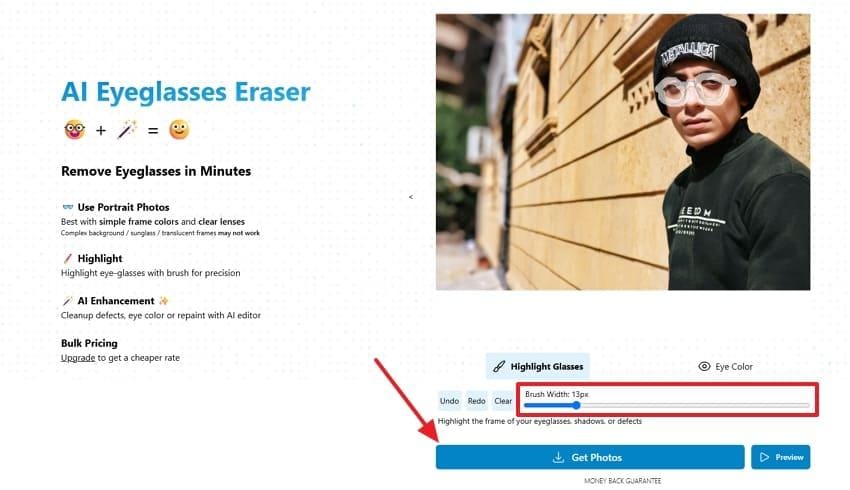
3. GlassGone AI Glasses Remover
Offering you the preview facility, GlassGone AI glasses remover allows you to remove spectacles from the image using the Brush tool. Unlike other tools, users can import the image to WebP, where they can undo and redo the results while working on it. The foremost aspect is that one can tailor the Brush size from 3px to 60px for precise extraction. While fulfilling the requirements to enter email, here is how you can create the image:
Step 1. Start by entering the email and hit the "Choose File" option to fetch the image.
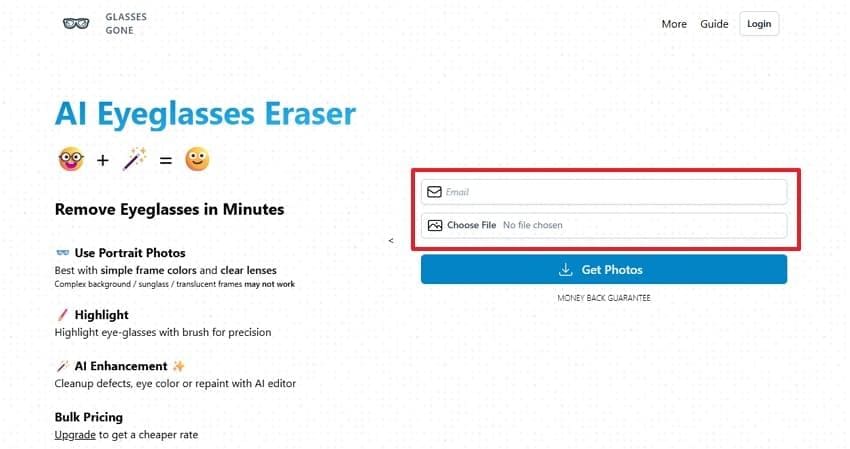
Step 2. From the "Highlight Glasses" section, adjust the "Brush" size and highlight the glasses area. Then, pick the "Get Photo" option to get the enhanced and clear outcome in no time.
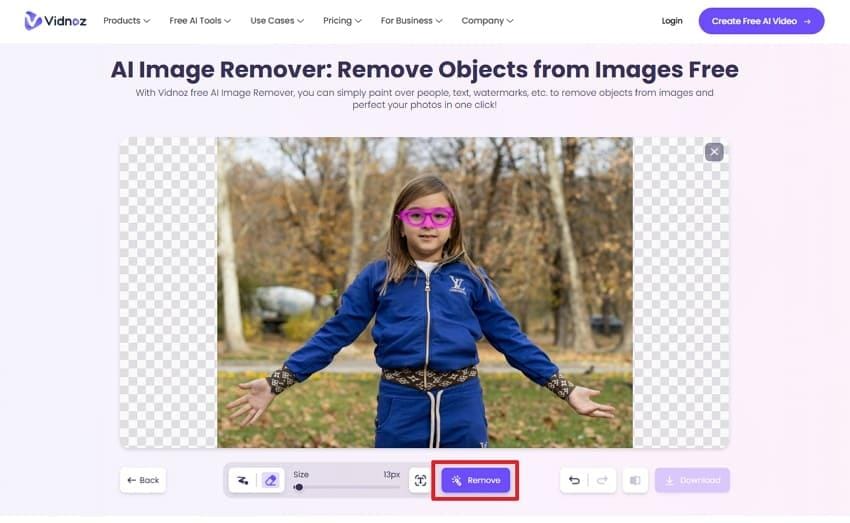
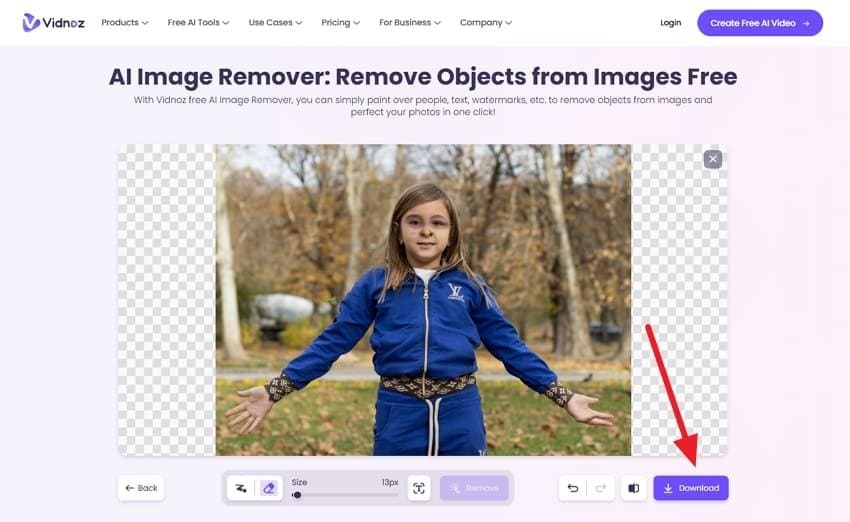
4. Vidnoz AI Glasses Remover
Vidnoz AI Glasses Remover offers you a brush tool that is adjustable up to 200px for detailed highlighting. While doing so, users can undo and redo the results to make new changes accordingly. Moreover, the eraser is there if you seek to eliminate the unwanted highlighted part from the reference image. So, once you have polished the image by following the given guide, you can seamlessly compare them later with the original ones:
Step 1. Access the tool to upload images and adjust the brush size to highlight the glasses. After that, hit the "Remove" button to start the extraction process.
Step 2. Then, press the "Download" button, after which you will be directed to a new screen to tap the "Download" icon to save the image.
Part 3. 4 AI Glasses Remover Mobile Apps for You
While online tools can be used through a web browser for greater flexibility and control, you can use the AI-powered mobile app to remove glasses from photos.
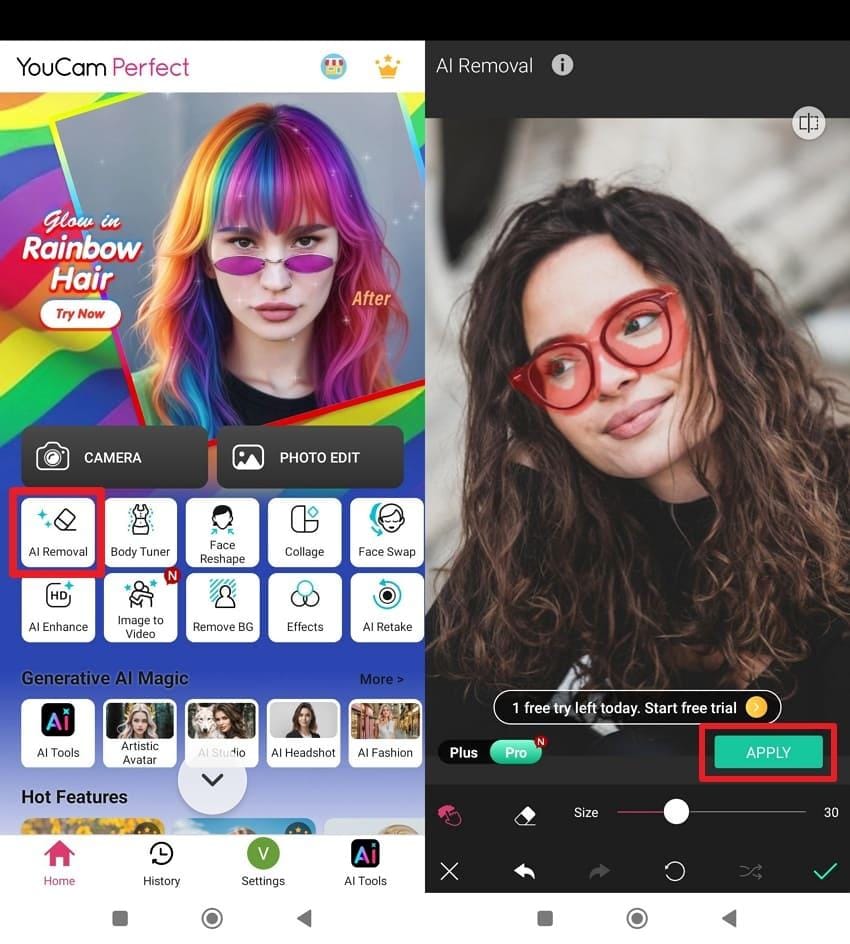
1. YouCam Perfect (Android | iOS)
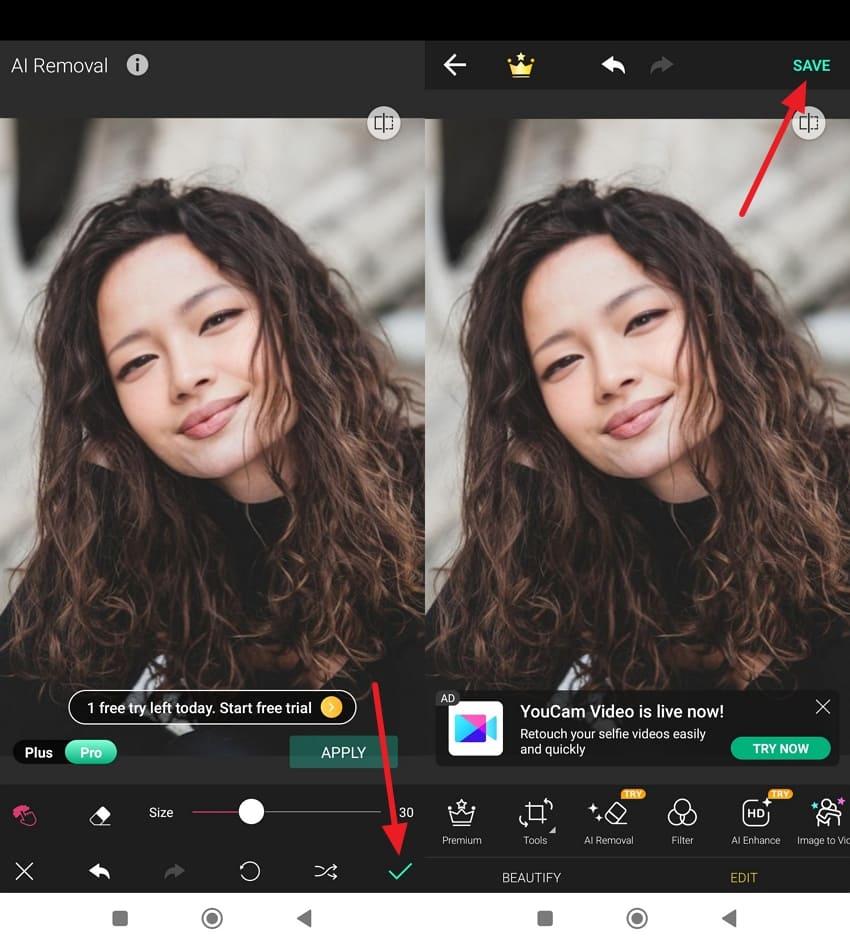
YouCam Perfect is a comprehensive AI-powered photo editing tool with a dedicated object removal feature. The tool provides a Plus mode for small-area selections and a Pro mode when you need to maintain the details. The user can view the changes made after the process by tapping the Compare button. Here are a few steps to use this tool’s AI remove glasses from a photo and understand its working:
Step 1. Log in to the app and select the "AI Removal" option from the given features. It will open the "Gallery" from where you can choose your image. Afterward, use the "Brush" tool to mark the glasses from the photo and press the "Apply" button.
Step 2. Once done, press the "Tick Mark" on the bottom right and then press the "Save" button to save the photo to your phone.
2. FaceApp (Android | iOS)
Although the app’s dedicated feature primarily provides many glasses options, it can also be used to automatically remove them from the photos. Along with that, you can compare the picture after making the change. It also allows you to highlight again by using the redo and undo tools. Anyhow, users can remove glasses from a photo by using this app according to the steps below:
Instructions. Upon opening the app after installing it, you will be able to select the pictures directly. Once you choose the image with glasses, tap the "Glasses" feature. Afterward, select "No Glasses" and press the "Apply" button and then the "Save" button to end the process.

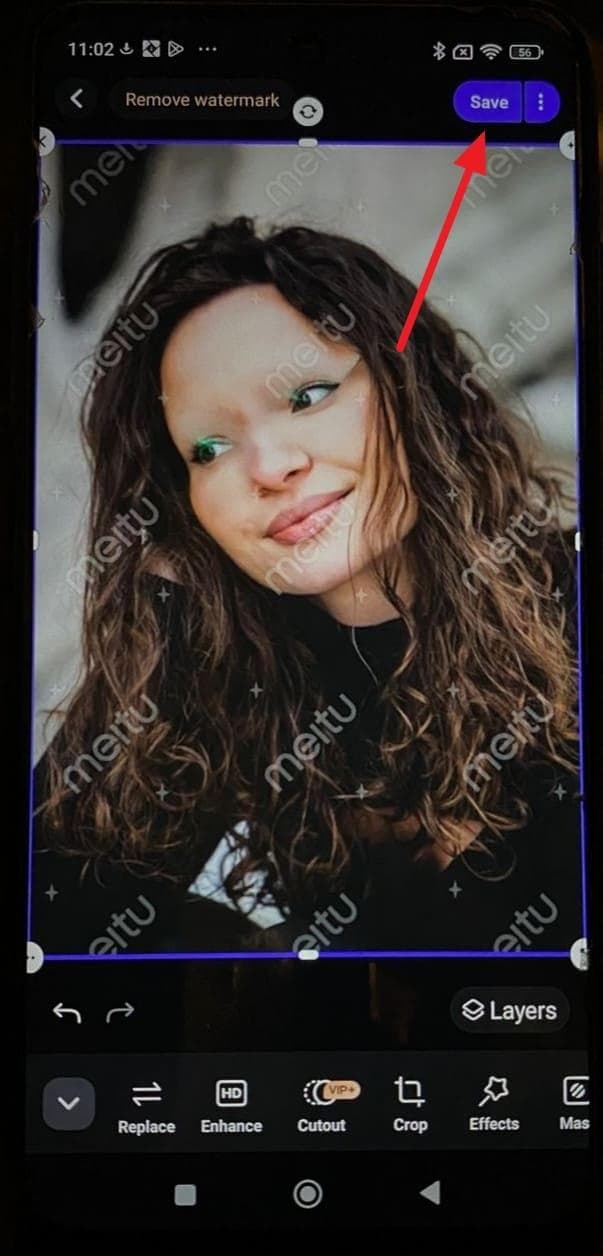
3. MeituPic (Android | iOS)
To achieve stunning photos, users can use MeituPic, as it provides both manual and automatic removers that detect facial features. It offers 3 different ways of marking the glasses, such as a Box and Swipe option. Apart from the manual selection, its Auto selection tab uses AI to find and select passersby and objects. So, here are a few steps that can help you remove glasses from a photo using AI:
Step 1. After opening the app, select the "AI Removal" feature and choose the image with glasses from "Gallery." Afterward, use the "Swipe" tool to mark the glasses you want to remove, and press the "Start" button.
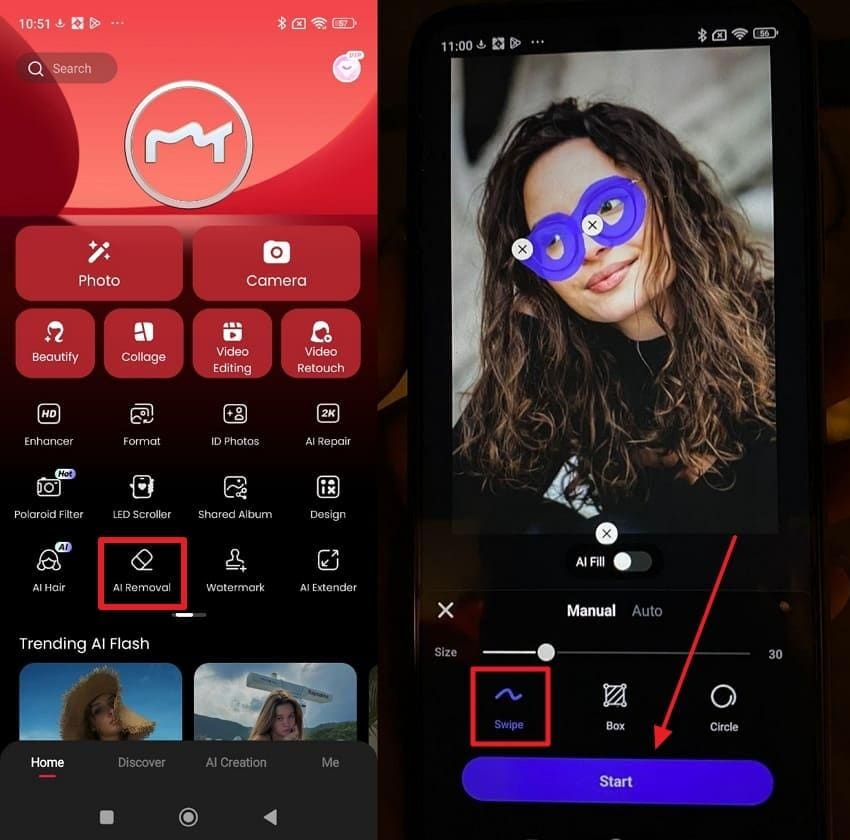
Step 2. Then, press the "Tick" mark after the glasses are removed. Moving forward, tap the "Save" button to preserve the image on your device
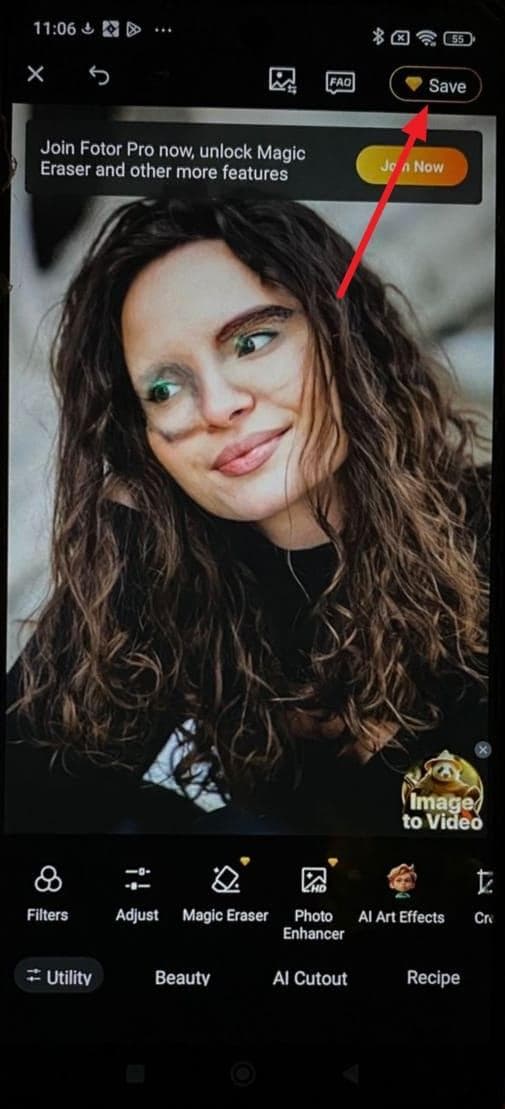
4. Fotor (Android | iOS)
Apart from the above apps, Fotor enables removing glasses and other objects from the photos by providing two different modes. Depending on the size of the glasses, you can resize the brush tool or use the AI-powered auto-selection option. The Standard and Advanced modes further help users make selections based on the details. You can use the following steps to remove glasses from photos online with this application:
Step 1. Commence by launching the app and accessing the "Magic Eraser" feature from the tools. Next, it will allow you to choose the image with the glasses from the gallery.
Step 2. Moving forward, use the "Add" button to highlight the part you want to remove. Afterward, press the "Start to Remove" button and tap the "Tick" mark.
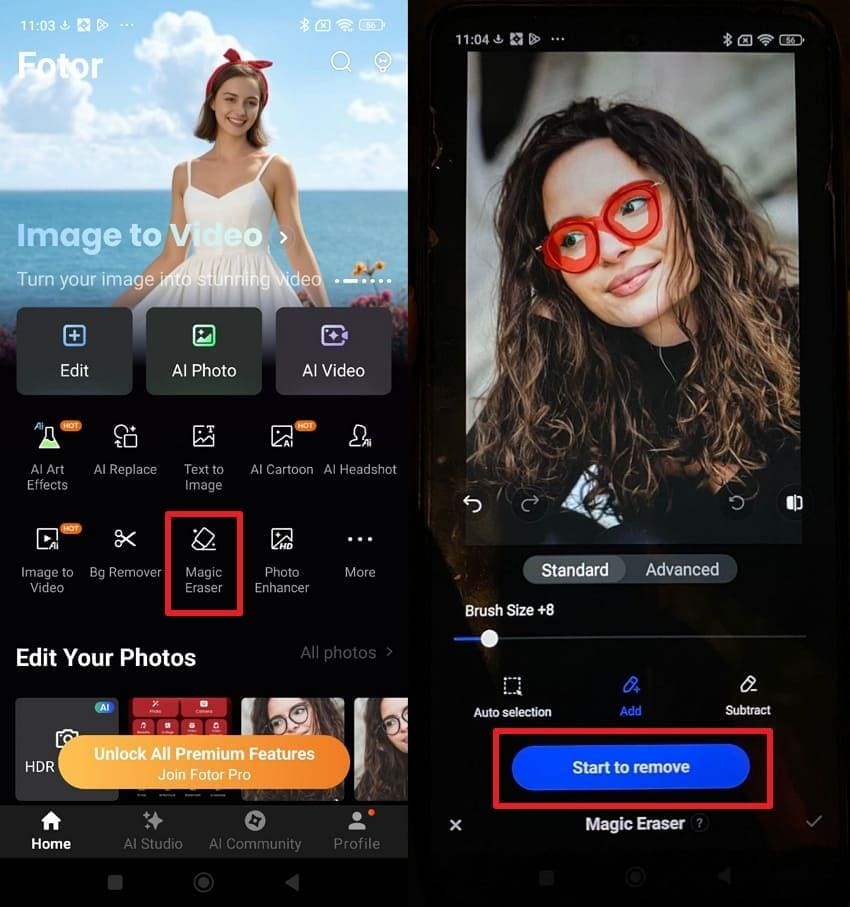
Step 3. In the end, tap the "Save" button in the top right corner to download the image.
Conclusion
To conclude, the AI tools accessed by both the web browser and mobile app allow you to remove glasses from a photo without compromising the photo quality and facial appearance. Users can edit images with one-click and brush-based tools, assisted by AI, by following easy steps. Among the tools, Repairit Online stands out as it offers built-in advanced tools to remove glasses from the photo and enhance its visual appearance.
Frequently Asked Questions
-
Q 1. Can AI glasses removal tools work on group photos where multiple people are wearing glasses?
Yes, many AI-powered tools can detect and remove glasses from a group photo of multiple faces. The final image's result depends on the lighting and photo quality. -
Q 2. Will removing glasses from a photo affect the facial expressions or eye details?
Most AI tools maintain facial features, such as expressions and eye details, but in some cases, slight changes may occur. This occurs due to the large size of the glasses, which cover most of the face. However, when you use Repairit Online, you will get precise results with no facial expressions and other details impacted. -
Q 3. Can I remove reflections or glare only without removing the glasses?
Yes, some tools that offer brush or selection options allow you to remove glare from the glasses. You should carefully select a specific part from the image, but still, only a few tools provide precise results.
