
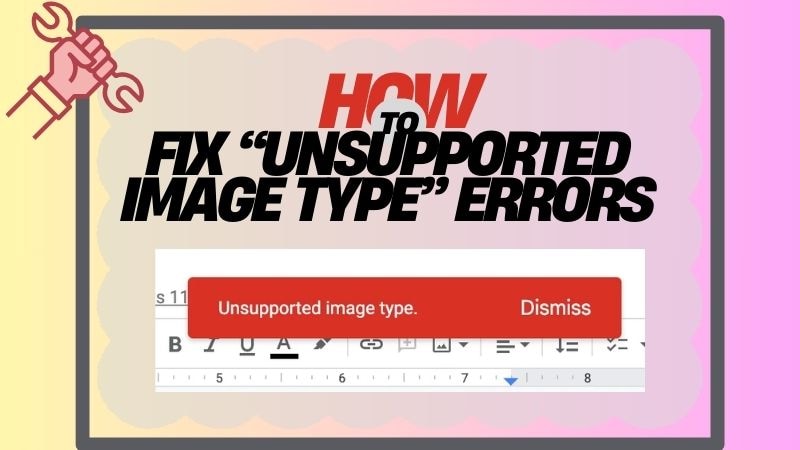
Quick Answer: How to Fix "Unsupported Image Type" Error
The "Unsupported Image Type" error in Google Docs occurs when your image format isn't supported (TIFF, WebP, HEIC), the file is too large, or the image is corrupted. Here are 4 proven fixes:
Can't open the image anywhere? It's likely corrupted!
Try Repairit Photo Repair (Free Trial)“Help please. I have to insert an image into my Google Doc but it keeps saying unsupported image type even though I tried PNG, JPEG, PDF, SVG, and others. How can I fix this?” - Reddit user
Seeing an "Unsupported Image Type" or "Unsupported Image Format" error can be frustrating when you just want to upload a picture to Google Docs, Slack, or other apps. But don't worry—this common issue has simple fixes. This guide covers 4 proven methods to solve the unsupported image type error, including format conversion, file compression, system troubleshooting, and repairing corrupted images with Wondershare Repairit.
Fix “Unsupported Image Type” Errors
 Security Verified. Over 7,302,189 people have downloaded it.
In this article
Part 1. What Does “Unsupported Image Type” Mean?
The “Unsupported Image Type” or “Unsupported Image Format” error means the app you’re using can’t open or show your image. This usually happens because the image file is in a format the app doesn’t recognize or support.
For example, apps like Google Docs only support common image formats like JPG, PNG, or GIF. If you upload an image in a format like TIFF, BMP, or WEBP, you might see the unsupported image type Google Docs message. These formats aren’t always compatible with every platform.
In short, some images don’t open because:
- The app doesn’t support the file type.
- The image might be too large or have special settings (like layers or transparency) that the app can’t handle.
- The image file is corrupted from incomplete downloads, sudden shutdowns, or virus attacks.
But don’t worry. You can easily fix this by converting your image to a supported format. We’ll show you how in the next section.
Google Docs Image Format Support: Complete Guide
| Supported | File Extensions | Best Use Case | Max File Size |
|---|---|---|---|
| JPEG/JPG | .jpg, .jpeg |
Photos, complex images, web graphics | 50MB per file |
| PNG | .png |
Logos, transparent backgrounds, screenshots | 50MB per file |
| GIF | .gif |
Animations, simple graphics, memes | 50MB per file |
| BMP | .bmp |
Uncompressed raster images (not recommended) | 50MB per file |
| SVG | .svg |
Vector graphics, scalable logos, diagrams | 50MB per file |
| Not Supported | File Extensions | Why Not Supported | How to Fix |
|---|---|---|---|
| TIFF | .tif, .tiff |
Large file sizes, used for professional printing/archiving | Convert to JPEG |
| WebP | .webp |
Modern web format, not universally compatible yet | Convert to PNG |
| HEIC/HEIF | .heic, .heif |
Apple's proprietary format (iPhone photos) | Convert to JPEG |
| RAW Formats | .cr2, .nef, .dng, .arw, .raf |
Unprocessed camera sensor data, requires specialized software | Convert to JPEG |
| PSD | .psd |
Adobe Photoshop format with layers | Export as PNG |
| Corrupted Files | Any extension | File data is damaged (incomplete download, virus, crash) | Repair with Repairit |
Pro Tip: Google Docs Total Document Limit
Google Docs allows up to 50MB per individual image and 102MB total for all images in one document. If you're inserting multiple large images, compress them with iLoveIMG to avoid hitting the limit.
Diagnose Your Error: Which Fix Do You Need?
Step 1: Check Your Image File Extension
| If Your File Is... | Root Cause | Solution |
|---|---|---|
| .tiff, .webp, .heic, .cr2, .nef | Unsupported format | Use Method 1: Convert to JPEG/PNG |
| .jpg, .png, .gif (supported format) | Proceed to Step 2 | Check file size next ↓ |
Step 2: Check Your Image File Size
| File Size | Issue | Solution |
|---|---|---|
| > 10MB (Very large) | Exceeds Google Docs limit | Use Method 2: Compress with iLoveIMG |
| < 10MB (Normal size) | Proceed to Step 3 | Test image integrity next ↓ |
Step 3: Test Image Integrity
Try opening the image in these apps:
- Windows Photos / Mac Preview
- Adobe Photoshop / GIMP
- Online viewer (e.g., Photopea.com)
| Test Result | Diagnosis | Solution |
|---|---|---|
| Opens normally in other apps | Browser/system cache issue | Use Method 3: Reboot system |
| Won't open / Shows grey box / Pixelated | FILE CORRUPTION DETECTED | Use Method 4: Repair with Wondershare Repairit |
Still Unsure? Start with the Universal Fix
If none of the above symptoms match, your image might have hidden corruption or metadata issues.
Try Repairit's Free Scan (Diagnoses 100+ Image Issues)Part 2. Fix “Unsupported Image Type” in Google Docs in 3 Ways
Are Google Docs not accepting your image format? Here are 3 effective ways to fix the “Unsupported Image Type” error and upload your picture smoothly.
4 Solutions Compared: Which Tool Fits Your Situation?
| Solution | Best For | Time | Cost | Pros | Cons |
|---|---|---|---|---|---|
| 1. CloudConvert Format Converter |
TIFF, WebP, HEIC, RAW files needing format change | 2 min | Free (25/day) | 200+ formats Batch conversion Quality control |
Can't fix corruption Daily limit |
| 2. iLoveIMG Image Compressor |
Large files (>10MB) exceeding upload limits | 1 min | Free (unlimited) | Fast compression Batch processing Maintains quality |
Can't fix corruption Limited to size reduction |
| 3. System Reboot Cache Clearing |
Random errors, image opens elsewhere but not in Google Docs | 3 min | Free | No tools needed Fixes cache issues Quick and easy |
Only fixes temporary glitches Won't help with format/corruption |
| 4. Wondershare Repairit AI Image Repair Tool |
Corrupted, damaged, unopenable images; grey/pixelated previews | 30 sec | Free trial | Fixes corruption Repairs 15+ formats Batch repair AI enhancement 800% upscaling |
Requires download Advanced features paid |
Our Recommendation
Try Methods 1-3 first for format and size issues (2-3 minutes total). If those don't work, the image is likely corrupted—skip to Method 4 (Repairit) for the fastest fix. Why waste time on 10+ conversion attempts when corruption is the real issue?
Download Repairit Free TrialWay 1. Convert The Image To Google Docs' Supported Format (JPEG, PNG, GIF)
One simple way to fix the “Unsupported Image Type” error in Google Docs is to change your image to a format it supports. Google Docs works with formats that balance image quality, file size, and special features like transparency. It supports JPEG/JPG, PNG, GIF, BMP, and SVG.
If your image isn’t in one of these formats, Google Docs might show the “Unsupported Image Type” error. In that case, you’ll need to convert your image to a supported format to fix the problem. The good news? You can do this easily with free online converters in just a few clicks.
A great tool you can use is CloudConvert. It’s an easy-to-use online converter that supports over 200 file formats, including images, videos, documents, and more. You don’t need to download anything. Just upload your image, choose a supported format like JPEG, PNG, or GIF, and convert it in a few clicks.
What makes CloudConvert even better:
- Your files stay private. CloudConvert is ISO 27001 certified and doesn’t sell your data.
- It offers top-notch conversions and lets you adjust settings like image quality if needed.
- Trusted by users since 2012, it’s perfect for both quick fixes and advanced needs.
Follow these steps for simple image format changes.
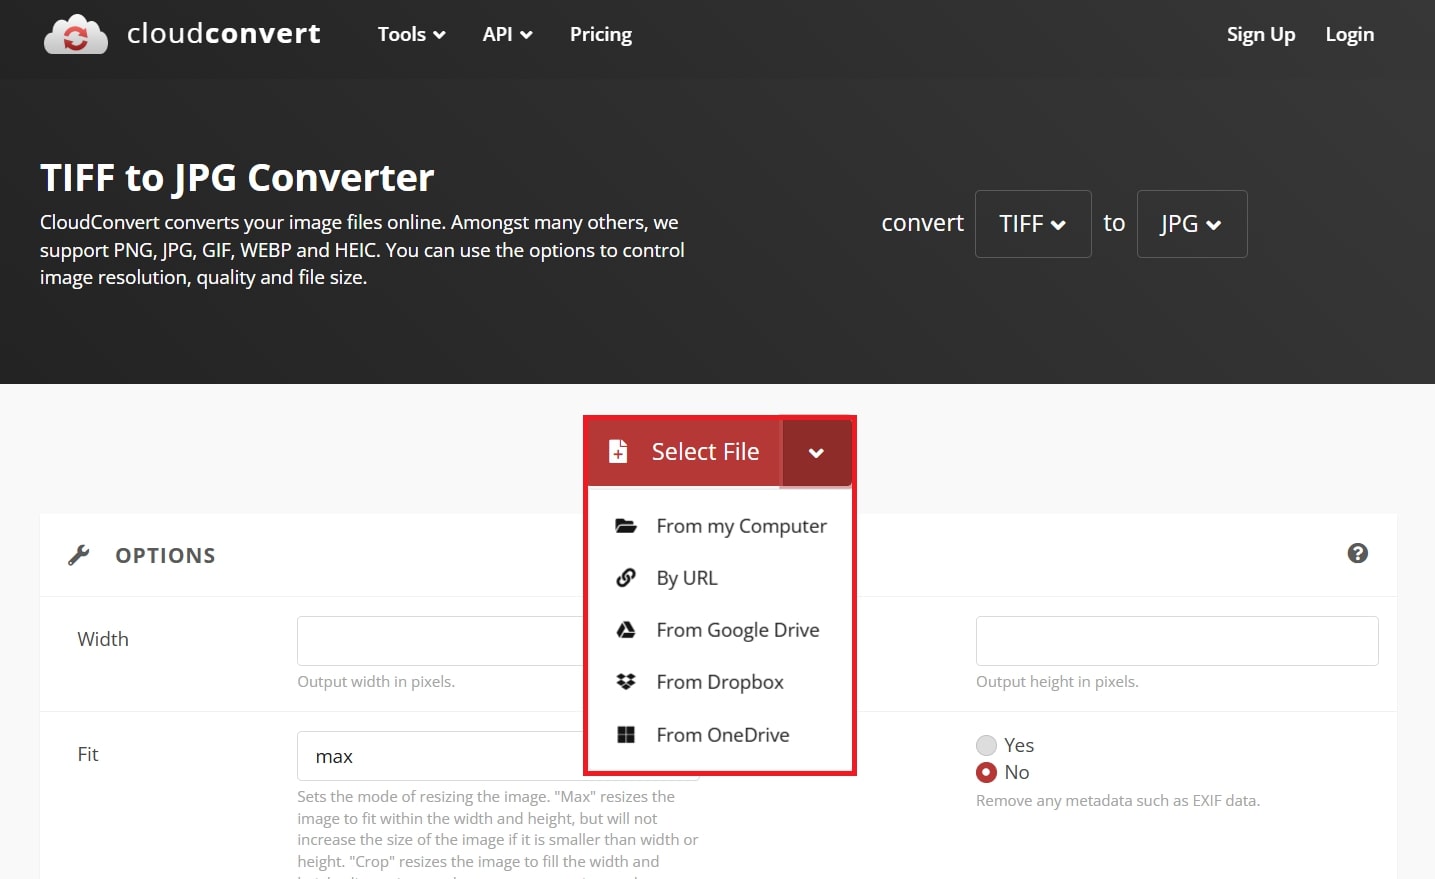
Step 1: Visit the CloudConvert site. This time, we got the TIFF image format, and we want it to convert to a Google Docs-supported format, which is JPG. Click Select File. Upload the image you will convert from your device, Google Drive, Dropbox, or by URL.
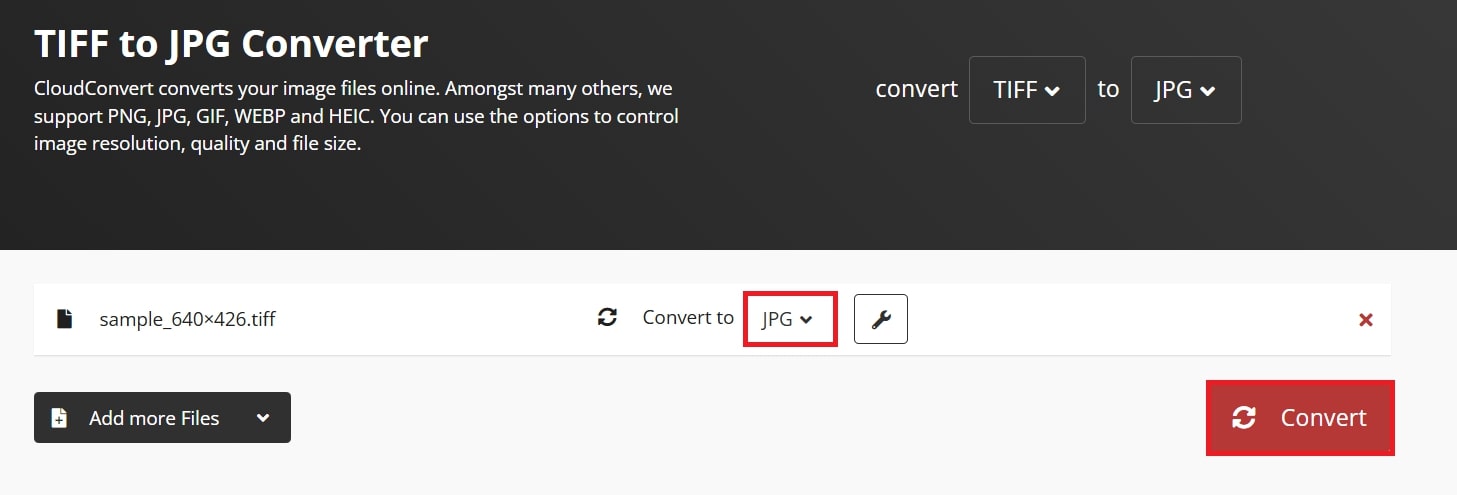
Step 2: In the format options, select a supported format like JPG, JPEG, PNG, or GIF.
Step 3: Click Convert. Wait a few seconds while CloudConvert processes your image.
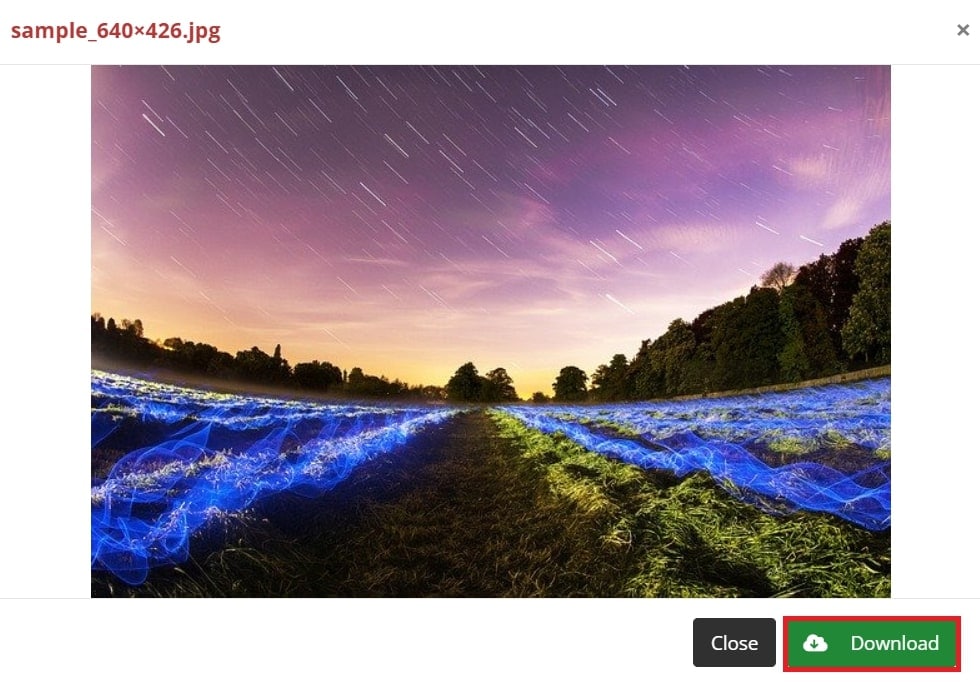
Step 4: Once done, click Download to keep the new image and upload it to Google Docs without any errors.
When Format Conversion Doesn't Work
If CloudConvert shows "Cannot process file" or the converted image still triggers the unsupported image type error, your original file is likely corrupted. Corruption prevents proper format conversion because the image data itself is damaged.
Next step: Skip to Method 4 and repair the image with Repairit before attempting conversion. Repairit's AI can reconstruct damaged JPEG, PNG, TIFF, and RAW files in seconds.
Way 2. Compress The Image File’s Size
Another easy way to fix the “Unsupported Image Type” error in Google Docs is by making your image file smaller. Even if your image is in the right format, it might not upload if the file is too big.
Large image files can slow down Google Docs or cause errors. By compressing the image, you help Google Docs load it faster and avoid issues. Plus, smaller images keep your document lighter and easier to open.
A great tool to quickly compress your images is iLoveIMG. It’s a free online tool that quickly reduces image file sizes without losing quality. You don’t need to download any software. Just upload your image and compress it in a few clicks.
Here’s why iLoveIMG is a good choice:
- Works with JPG, PNG, and GIF images.
- Compress multiple image formats at once to save time.
- Quick process with a clean, easy-to-understand interface.
- Your images are kept private and automatically deleted after processing.
- Offers resizing, cropping, and format conversion features if needed.
See the steps below for proper image compression:
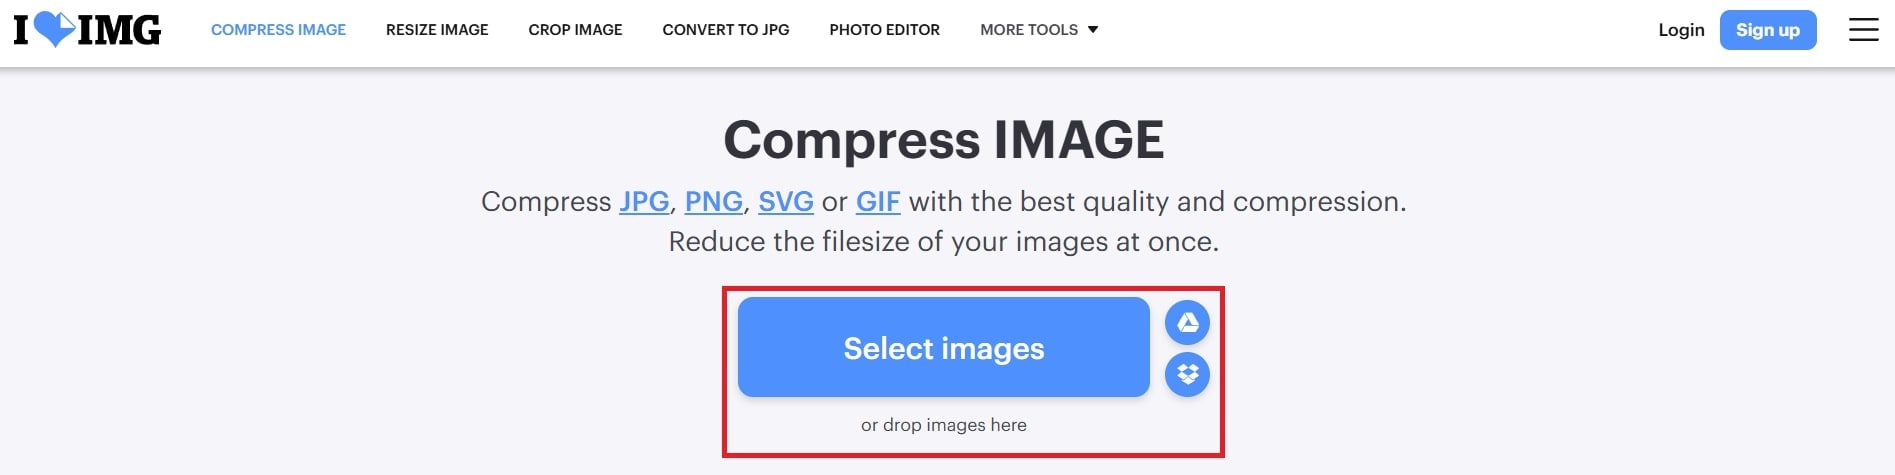
Step 1: Visit the iLoveIMG site.
Step 2: Click Select Images. Upload your image from your device, Google Drive, or Dropbox. If you want to compress multiple images, you can upload them all at once.
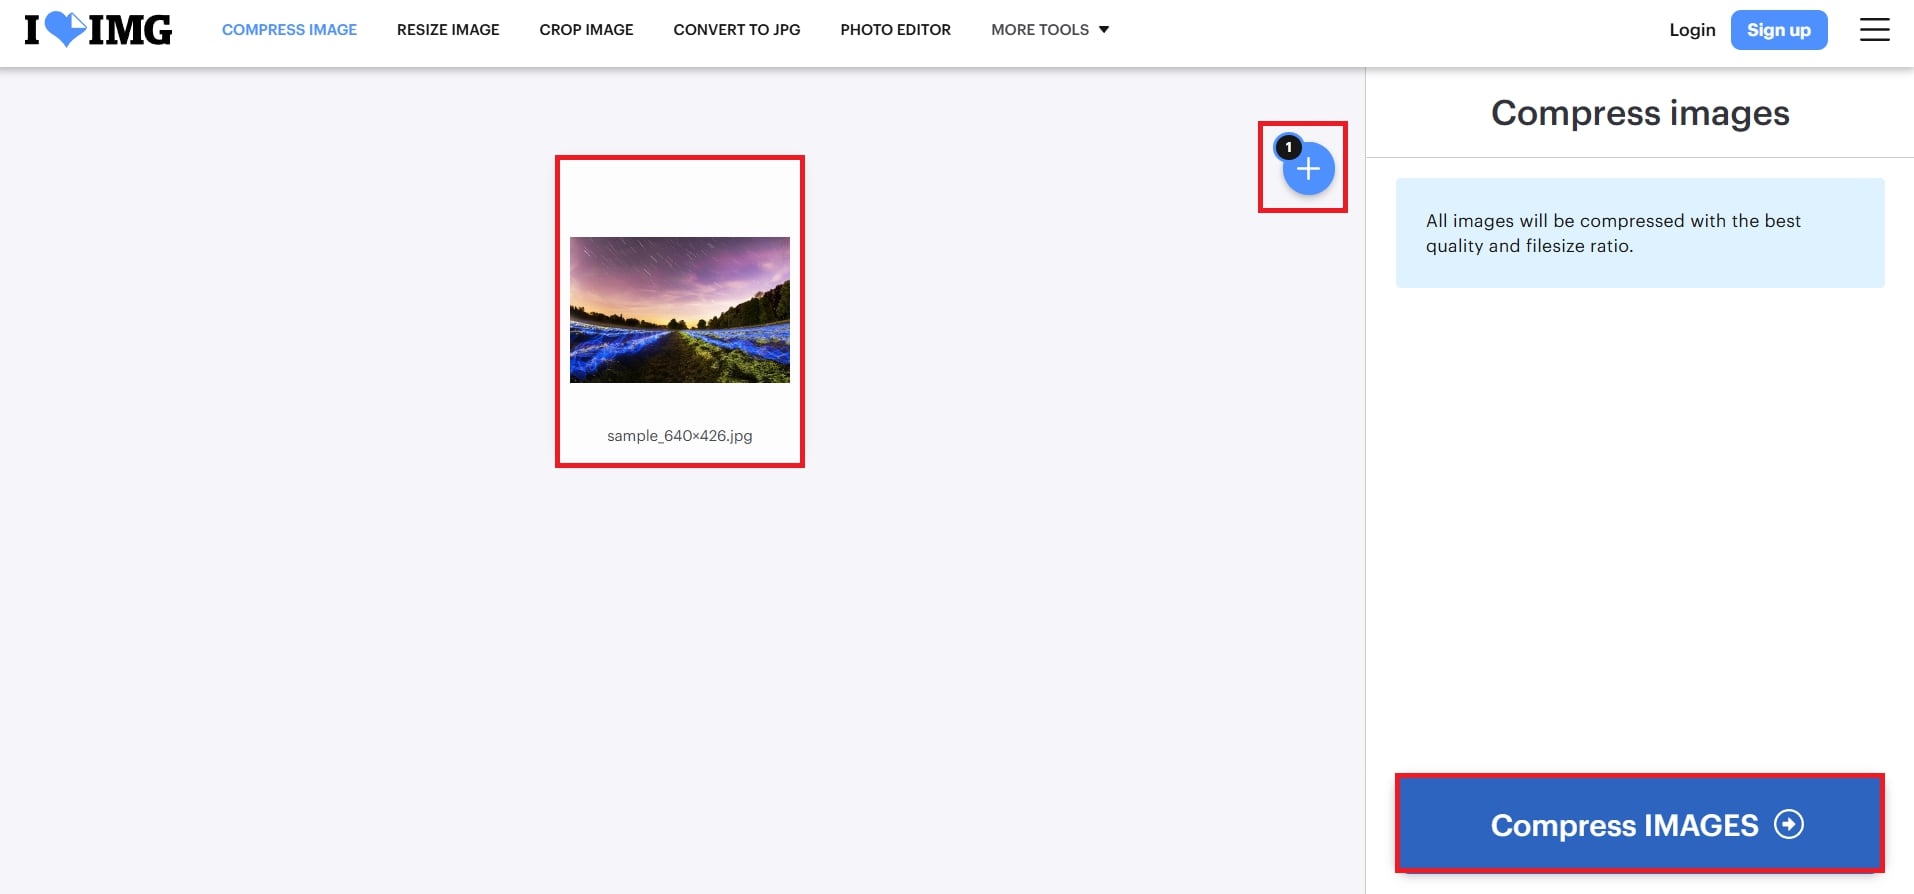
Step 3: Click Compress Images. iLoveIMG will automatically compress the file size while keeping the quality.
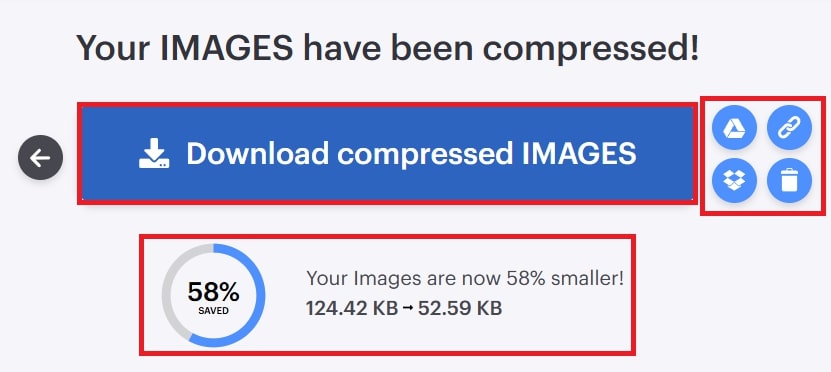
Step 4: Your image has been compressed now. Click Download compressed IMAGES to keep it. Below you can see how much your image file size became compressed. Also, at the side, you can save it to Google Drive DropBox, share the link or delete the image right away.
When Compression Makes Things Worse
If the compressed image becomes more pixelated, shows grey areas, or still won't upload, compression is amplifying existing corruption. Compressing a damaged file is like photocopying a torn document—it preserves the damage.
Next step: Use Repairit to repair the corruption first, then compress the fixed image. Repairit can restore pixelated areas, fix grey blocks, and enhance blurry regions before compression.
Way 3. Reboot Your System
Sometimes, the easiest fix for the “Unsupported Image Type” error in Google Docs is simply restarting your computer or device. Temporary glitches, memory issues, or software bugs can cause Google Docs to behave oddly and not load images correctly.
A quick reboot clears out these small problems, refreshes your system, and often solves the error. It’s a fast, no-fuss solution that’s always worth trying before more complicated steps.
How to reboot your system:
Step 1: Make sure to save any open files or documents to avoid losing changes.
Step 2: Shut down all running apps, including your browser and Google Docs.
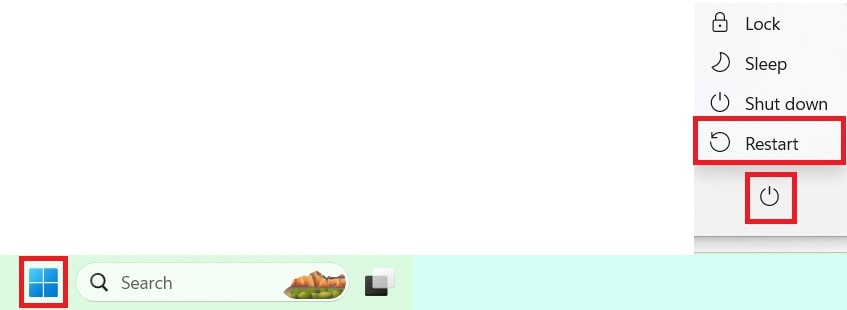
Step 3: Restart your device.
- On Windows: Click the Start Menu, select Power, then click Restart.
- On Mac: Find the Apple Menu and select Restart.
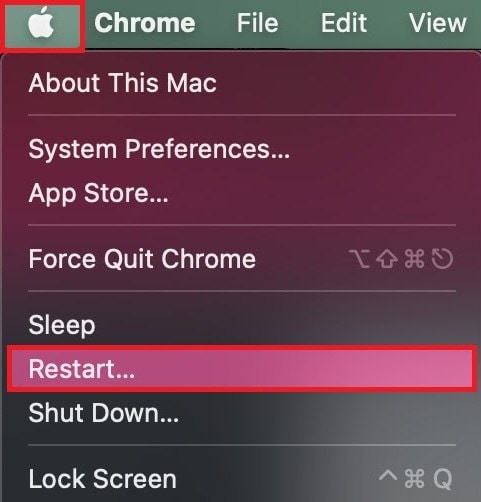
Step 4: Let your device fully restart before opening any apps.
Step 5: Try uploading or inserting your image once your system is back on. The issue might be gone.
When Reboot Doesn't Fix the Issue
If the unsupported image type error persists after restarting your system and trying different browsers (Chrome, Firefox, Edge), the problem isn't a temporary glitch. You're dealing with either:
- File corruption (most common—70% of persistent errors)
- Incorrect file extension (file labeled .jpg but actually .tiff)
- Advanced color profile issues (CMYK instead of RGB)
Next step: Use Repairit's diagnostic scan to identify the exact issue. Repairit detects corruption, color profile mismatches, and metadata errors that other tools miss.
Part 3. The Best Way to Repair Unsupported Image Type Error
Sometimes, the “Unsupported Image Type” error isn’t just about file formats or size. It happens because the image file is corrupted. But why does corruption occur?
It usually happens when:
- You suddenly lose the internet while downloading an image.
- Your device shuts down while saving or transferring photos.
- A virus or faulty storage device damages the image data.
So, even if you fix the format or size, a broken image file won’t upload or display properly. Maybe you’re wondering if there’s a solution for this. Fortunately, yes. The best fix is to use a reliable tool like Repairit Photo Repair. Repairit quickly fixes damaged or corrupted image file formats in just a few clicks.
Here’s why Repairit stands out:
- Fix corrupted JPEG, PNG, JPG, GIF, TIFF, BMP, HEIC, and RAW files (like CR3, CR2, NEF, DNG, ARW, RAF, etc.) easily.
- Uses advanced AI technology to repair corrupted images automatically with just one click. No tech skills are needed.
- Upscale blurry or low-resolution images by up to 800% for sharper, clearer images.
- Repairs greyed-out, pixelated, blurry, unopenable, and color-faded images.
- Fix multiple corrupted images at once to save time and effort.
- Available for both desktop (Mac & Windows) and online use.
- Keep your images private and secure with no data leaks.
- Removes scratches, enhances colors, sharpens blurry spots, and reconstructs damaged areas.
You can fix your damaged or corrupted images in just three simple steps:
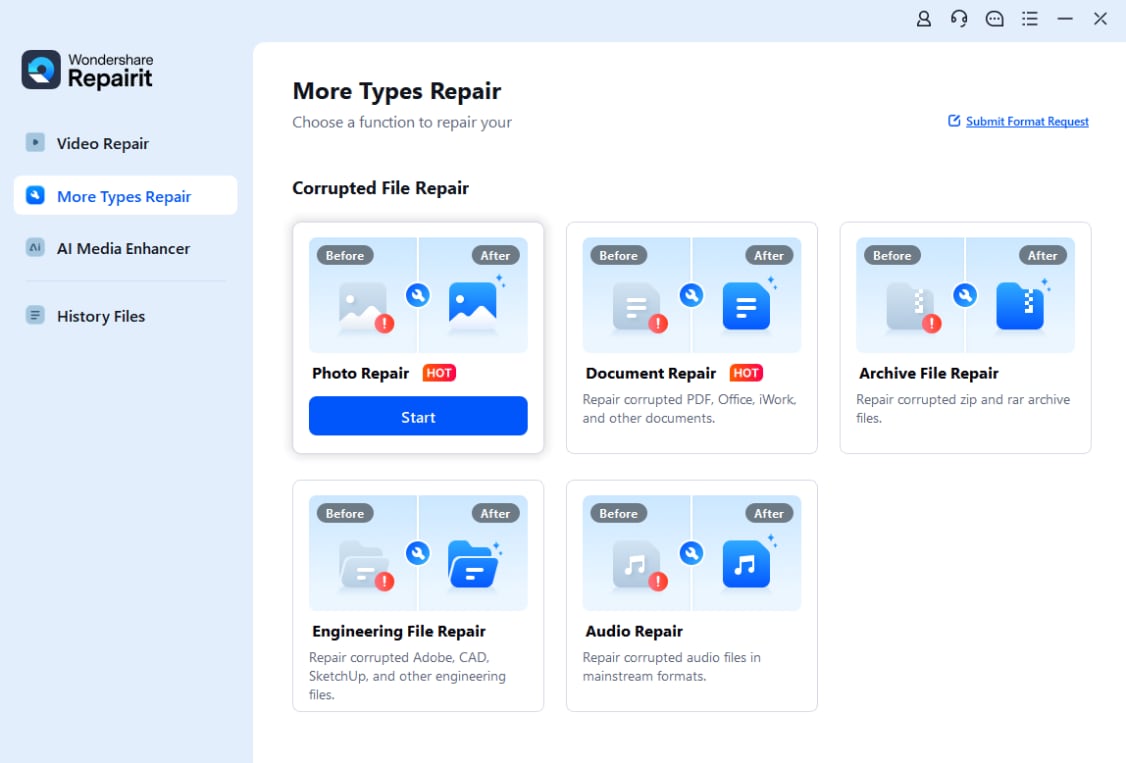
Step 1: Open Repairit Photo Repair. Go to More Types Repair in the sidebar and choose Photo Repair.
Click Add to upload the corrupted images you want to fix.

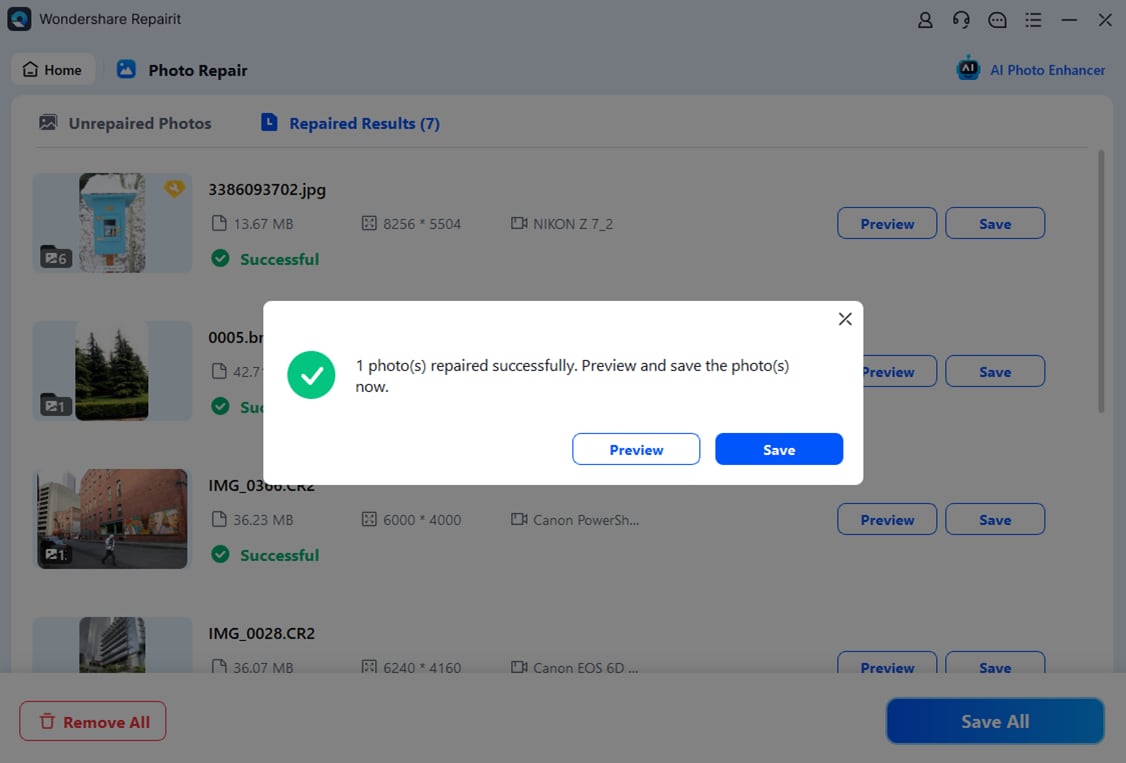
Step 2: Once uploaded, Repair it shows the image thumbnails and details like size and resolution. Click Repair to start the process.

After the image repair finishes, hit Preview to check the results.

Step 3: Once satisfied, click Save to export individual images. Or, click Save All to save multiple repaired images at once.
The Best Way to Fix “Unsupported Image Type” Errors
Security Verified. Over 7,302,189 people have downloaded it.
Conclusion
Getting an "Unsupported Image Type" or "Unsupported Image Format" error can be annoying, but it's easy to fix. You can solve the unsupported image type error by converting the image to a supported format, compressing the file size, restarting your device, or repairing the image with a tool like Repairit Photo Repair. With these quick fixes, your images will upload smoothly to Google Docs and other apps.
FAQ
-
Can browser extensions block image uploads?
Yes. Ad blockers, script blockers, or privacy extensions may interfere. Temporarily disabling them might fix the issue. -
Does image color profile affect compatibility?
Sometimes. Advanced color profiles like Adobe RGB or CMYK may cause issues. Converting to sRGB can improve compatibility. -
How do I check an image’s file type?
Right-click the image file and choose “Properties” (Windows) or “Get Info” (Mac). You’ll see the file format and extension details. -
What image formats does Google Docs support?
Google Docs supports JPEG/JPG, PNG, GIF, BMP, and SVG formats. Each file can be up to 50MB, with a 102MB total limit per document. It does NOT support TIFF, WebP, HEIC, RAW camera files (CR2, NEF, DNG), or PSD files. Convert unsupported formats to JPEG or PNG using CloudConvert. -
Can corrupted images cause "unsupported image type" errors?
Yes. Corrupted images are the #1 cause of persistent errors, even when the file format is correct. Corruption occurs from interrupted downloads, system crashes, virus attacks, or faulty storage devices. To identify corruption, try opening the image in Windows Photos or Mac Preview. If you see grey boxes, pixelation, or the file won't open, use Wondershare Repairit to repair it—fixes JPEG, PNG, GIF, TIFF, BMP, HEIC, and RAW formats with AI technology. -
How do I convert HEIC to JPEG for Google Docs?
HEIC is Apple's default iPhone photo format since iOS 11. Google Docs doesn't support it. Quick fix: Visit CloudConvert, upload your HEIC image, select "JPEG" as output, click "Convert", and download. Takes under 2 minutes. Prevent future issues: On iPhone, go to Settings > Camera > Formats > Select "Most Compatible" to save future photos as JPEG automatically.
