Many people face this problem where their images lose clarity and appear less detailed. This issue usually occurs when you try to resize an image beyond its original resolution or try to compress it. Pixels appear because the image loses enough data to display smooth edges and details on the screen. While it is a common issue, there are many tools that can restore and even enhance image quality.
So, this article will share these top tools that work online and offline to fix pixelated images. We will also provide detailed steps to help you use these tools to restore the image quality. In addition to that, you will learn about advanced photo-enhancing software that is also accessible online with its innovative features.
In this article
Part 1. How to Fix Pixelated Pictures Online | Top 3 Ways
Way 1. Repairit Online - AI Photo Enhancer
As the best option on this list, Repairit Online has a dedicated photo enhancer that is powered by artificial intelligence. You can upload photos of the lowest quality, and this tool will provide you with final results with enhanced colors and better clarity. Additionally, it allows users to upload black-and-white pictures to add colors to them. Users with pixelated images can use its online version to reveal details in their pictures.
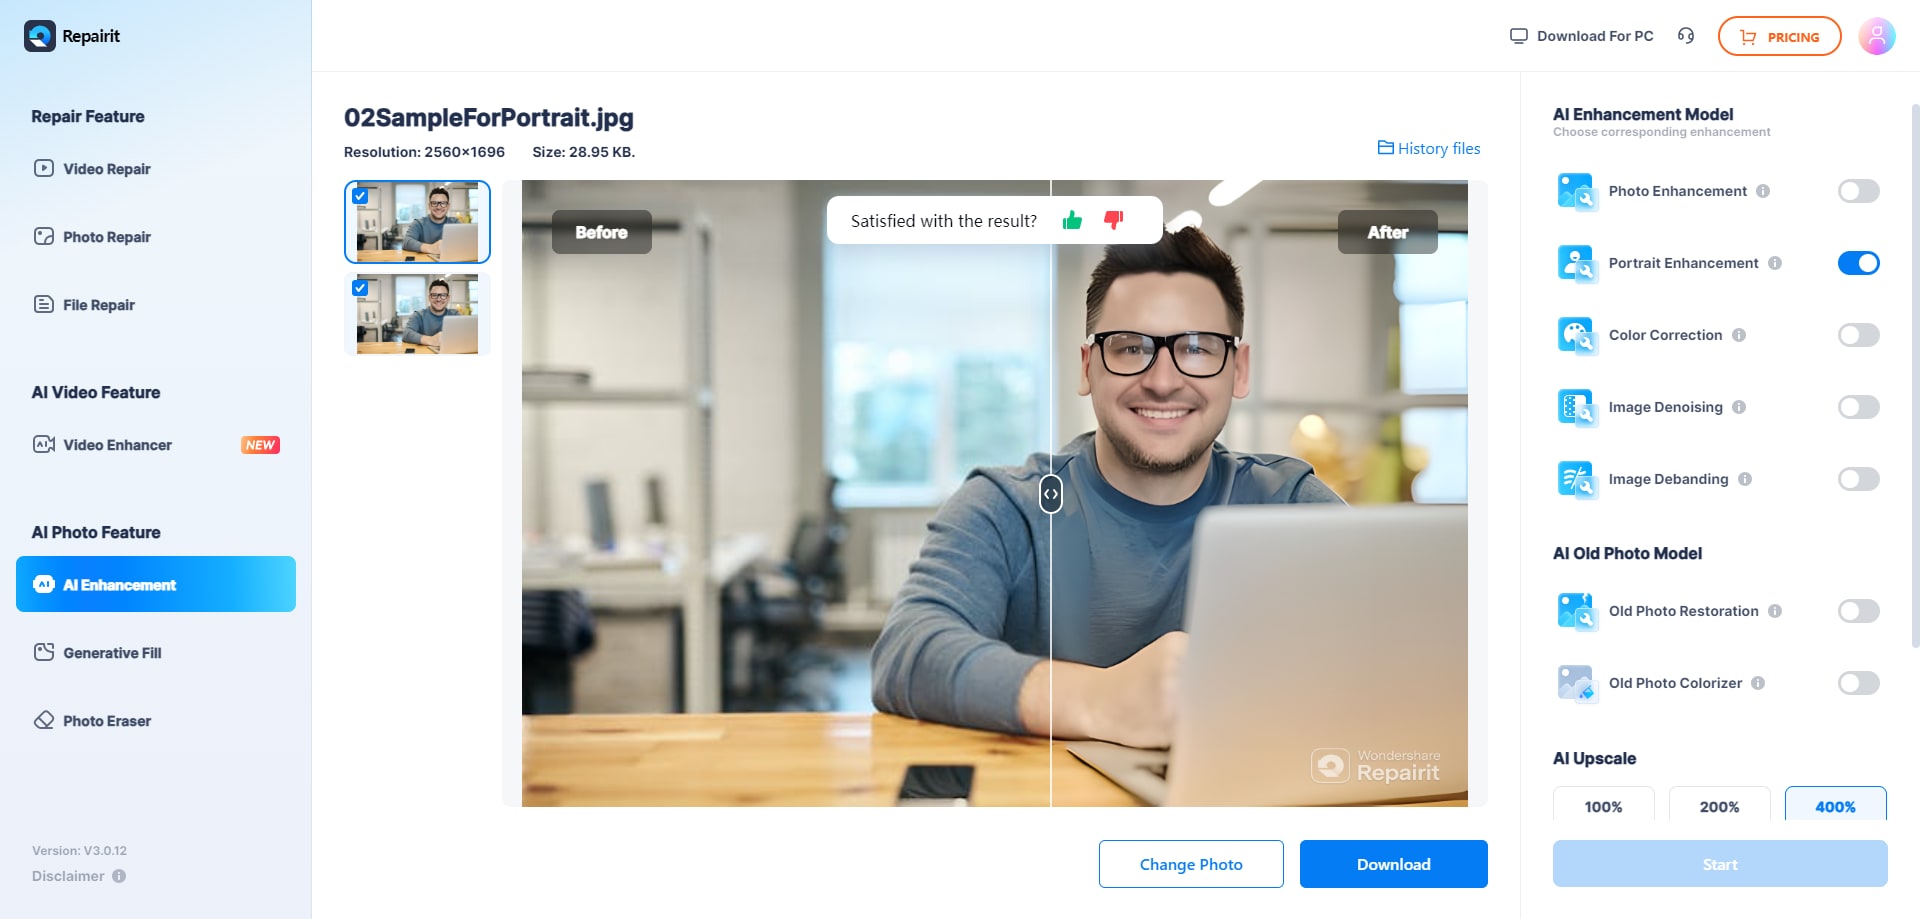
Its free version allows you to enhance 3 photos without cost and fix pixelated images online. Apart from that, it also allows you to preview images after enhancing them to approve the changes. With these features, you can use it for your social media campaigns and even for eCommerce purposes. In addition to that, the tool supports all major image formats for enhancement.
Detailed Guide to Enhance Your Low-Quality Photos Using Repairit Online
Upon learning about the innovative features of this online tool, follow the given steps to learn how to fix a pixelated image:
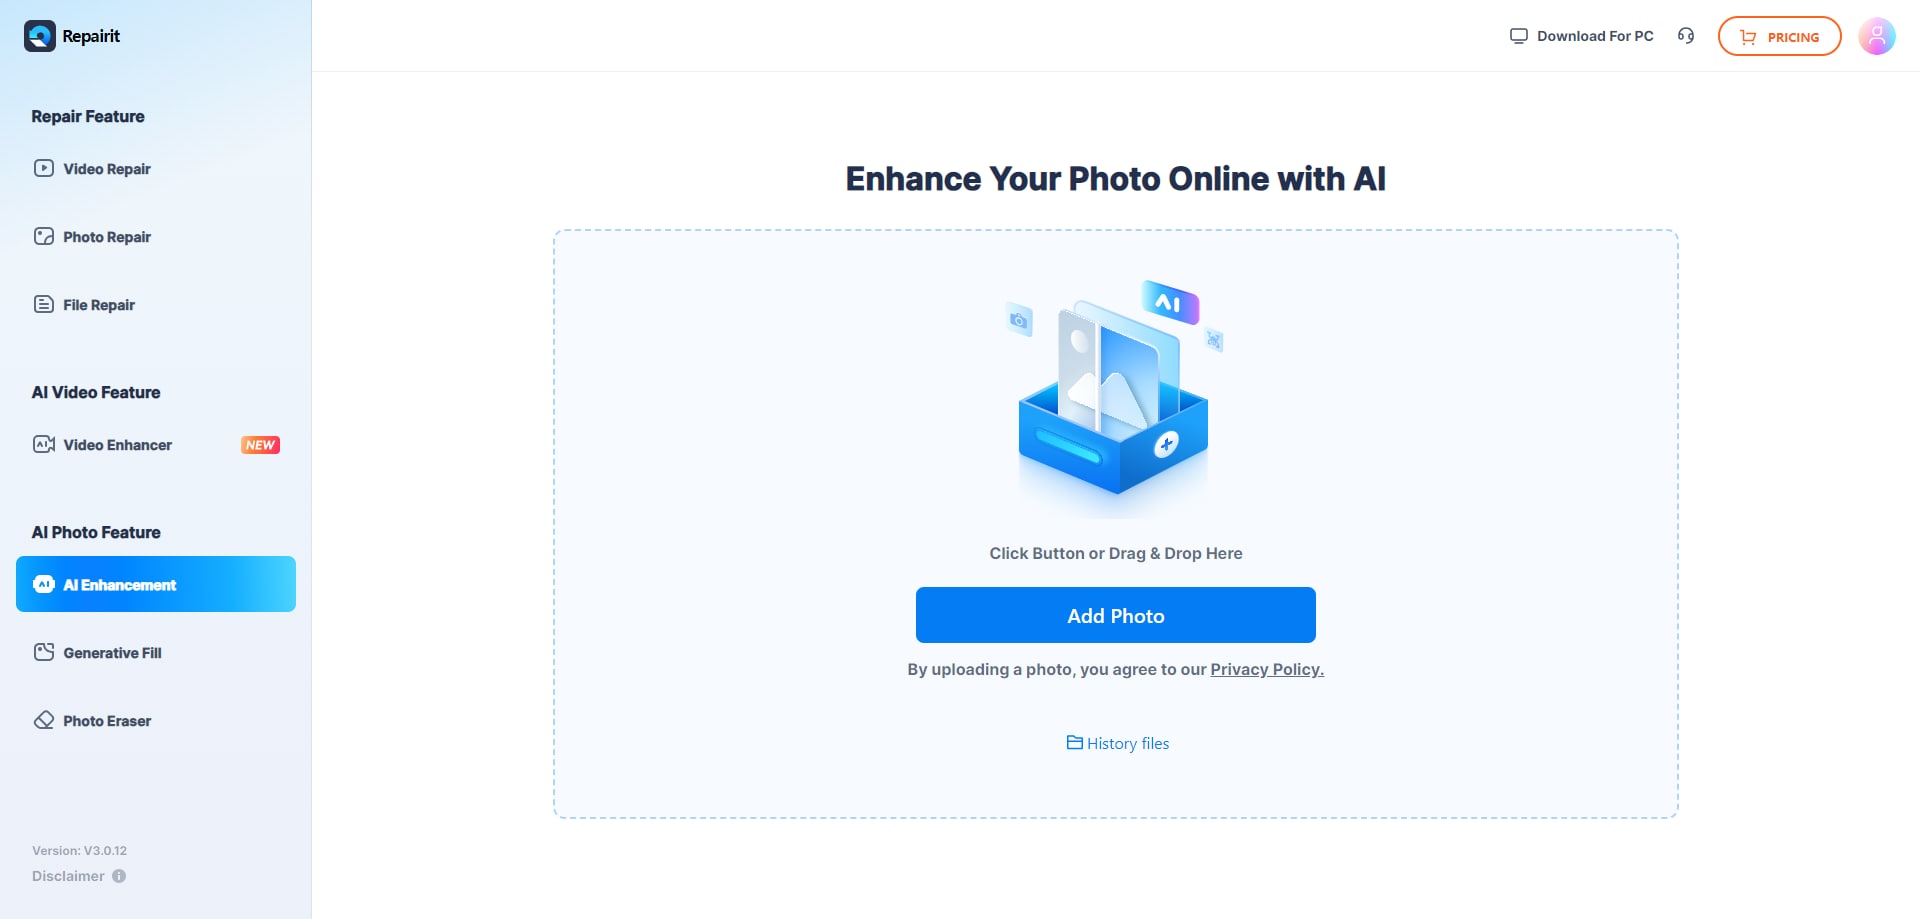
Step 1. Upload the pixelated photo to repair
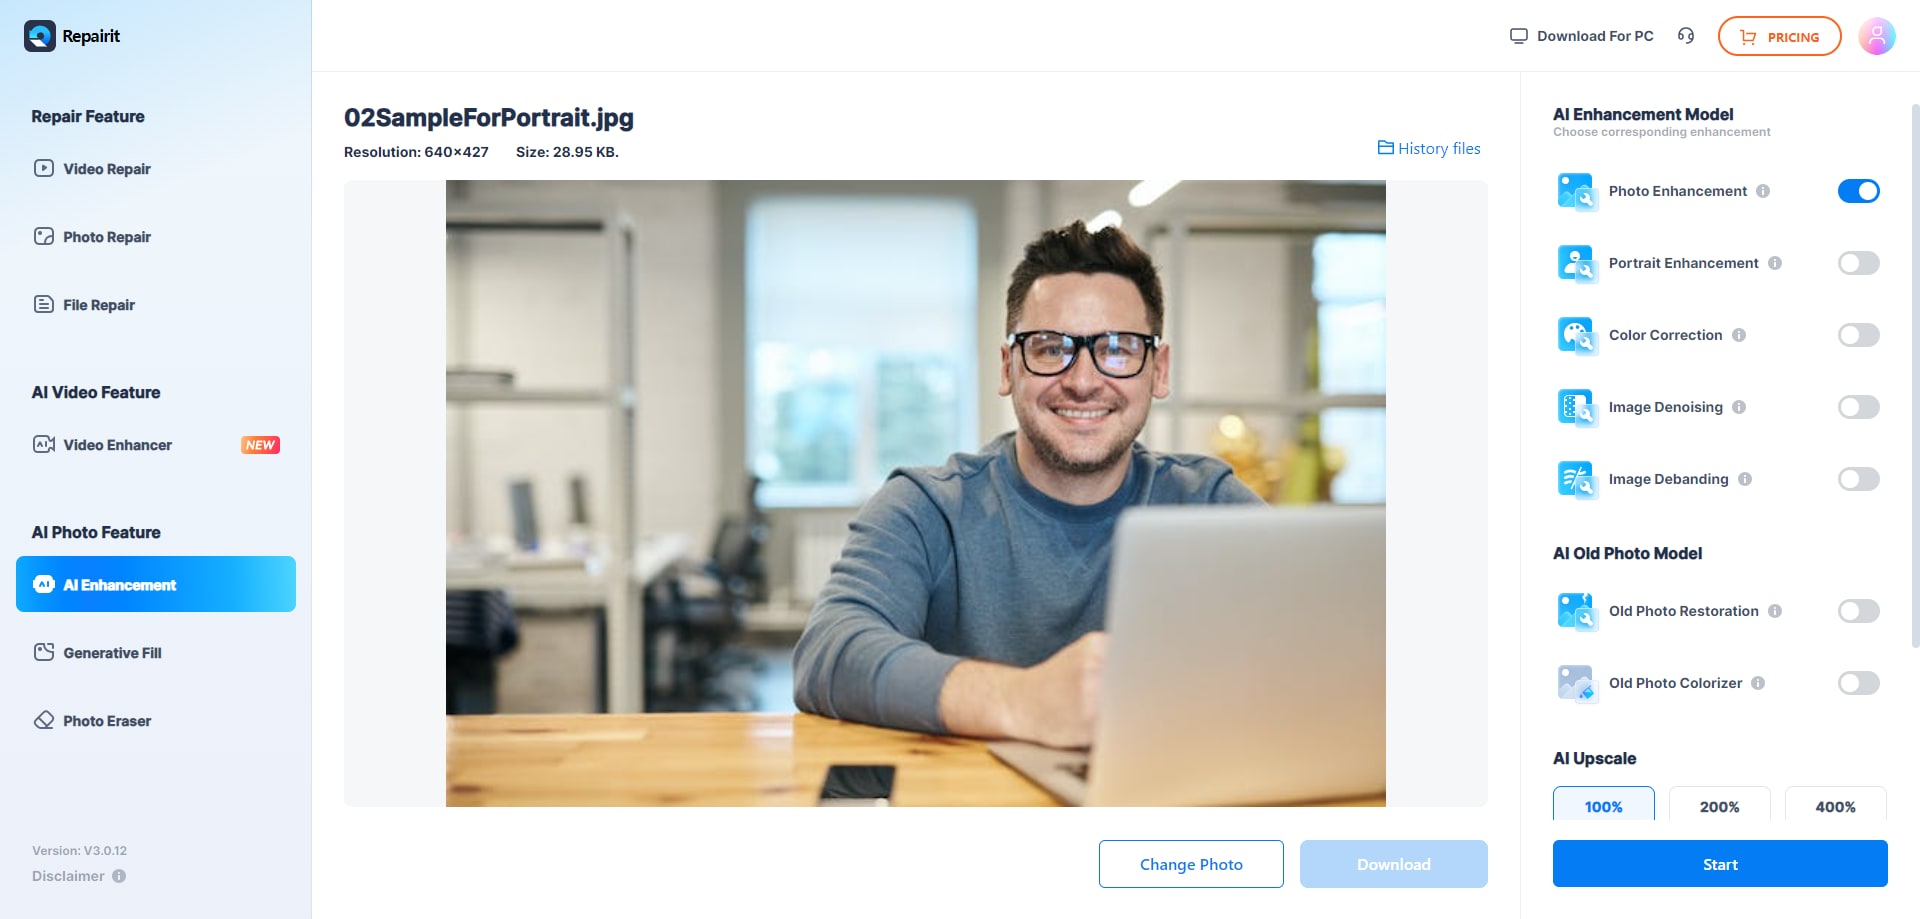
Step 2. Once the images load, toggle on the “Photo Enhancement” button from the right tab and press the “Start” button.
Step 3. Afterward, press the “Download” button to save the enhanced image on your desktop.
Way 2. PicWish
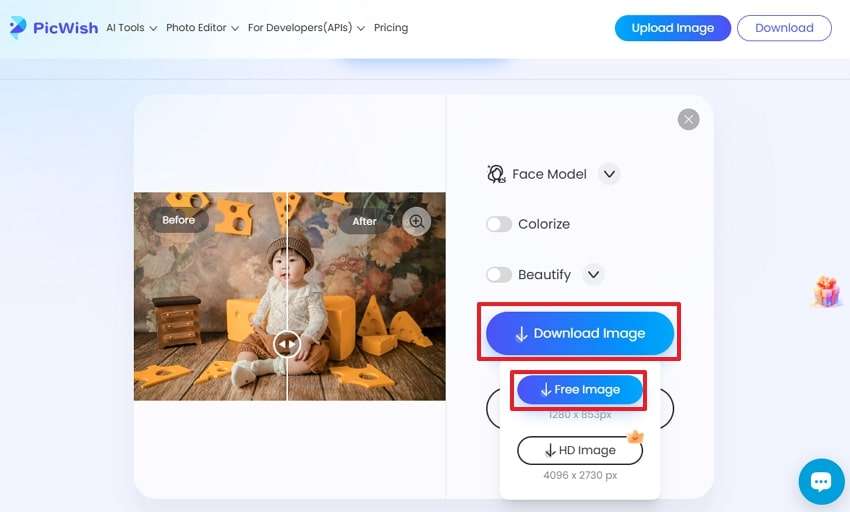
It is another excellent online tool that helps in restoring pixelated and blurry images. The tool uses AI technology to detect blurred sections in a photo and sharpen them to make them look clearer. You can use it for all types of photos, and even upload images by providing it their links. So, follow these steps to use its two-step functionality to clear images online:
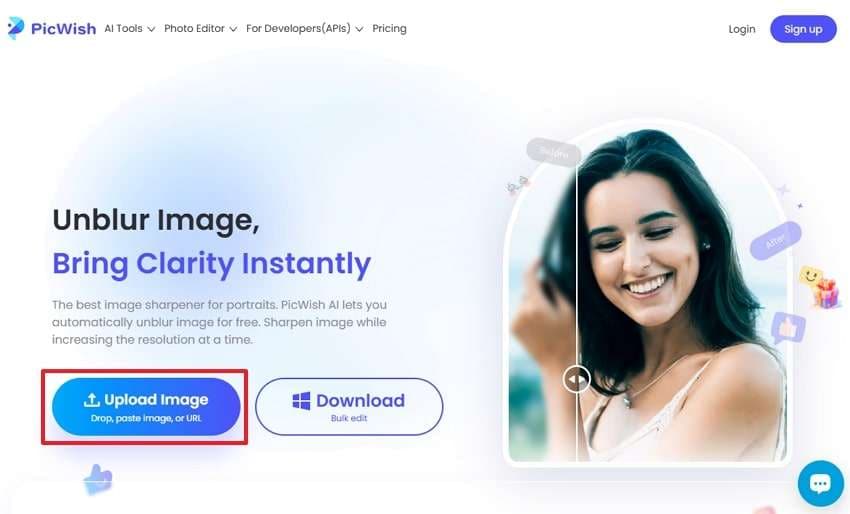
Step 1. Start by accessing the dedicated feature in PicWish and press the “Upload Image” button. Afterward, select the pixelated image from your device’s gallery to upload it.
Step 2. Once the image is uploaded, the tool will automatically enhance its quality, and you provide you the final result. So, you can save it by pressing the “Download Image” button and then selecting the “Free Image” option.
Way 3. AIEase
Apart from the above options, this is also an advanced enhancer that helps users fix pixelated images with just a few clicks. In addition to enhancing blur photos, the tool supports improving the quality of art images. You can also utilize its Colorize feature to add colors and life to your old photographs. To learn how to fix a pixelated photo using AIEase, follow the steps outlined below:
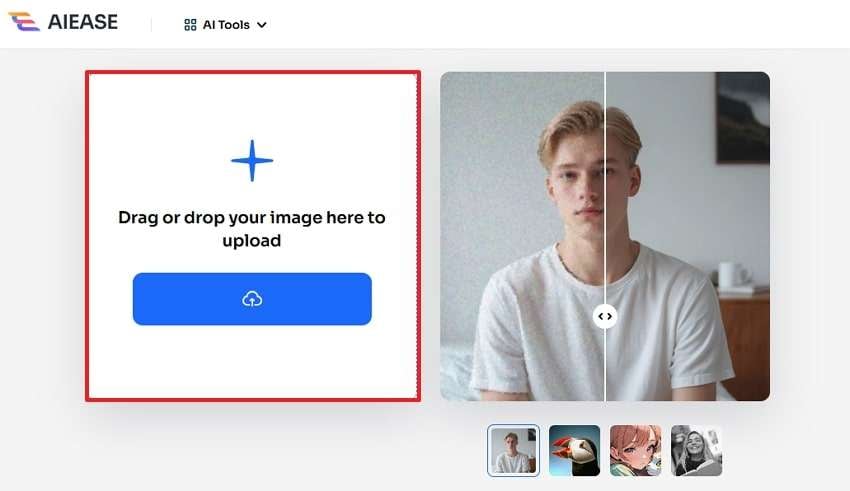
Step 1. Upon accessing the tool, press the “Unpixelate Image with AI” button to go to the editing screen. Then, you can drag your problematic photos into the tool or select them from your storage by clicking the “Upload” button.
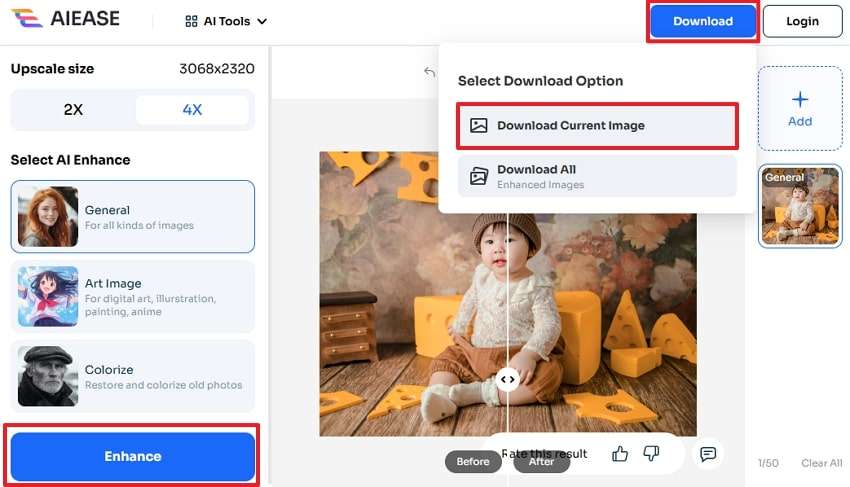
Step 2. The tool will automatically enhance your image after loading it. Additionally, you can press the “Enhance” button after selecting your desired model to make it even better. Finally, save the photo by pressing the “Download” and “Download Current Image” buttons.
Part 2. 3 Best Ways: How to Fix a Pixelated Image Offline
Although the above online tools provide a quick solution to enhance photos, they lack advanced features. For that, we have the following tools that will help you learn how to fix a pixelated photo:
Way 1. Repairit - AI Photo Enhancer
We have already discussed the online version of this advanced tool in the above sections. However, the browser version requires the internet to work and has size limitations. Therefore, the software version is better recommended, as it allows you to enhance unlimited images. In addition to this, there are no size restrictions in the software version of Repairit.
Unlike the online version, the software allows you to enhance multiple photos simultaneously. The tool detects your face in pictures and automatically adjusts brightness to make it look lighter. It also works on photos with lens blur that were taken on professional cameras. With the tool’s advanced features, you can take the quality of your 3D frames to up to 4K.
Key Features

Wondershare Repairit - AI Photo Enhancer
1,010,994 people have downloaded it.
-
Feature Recognition: Repairit can recognize multiple people in a photo and enhance their features individually.
-
Face Focus: It can also identify and sharpen your face to give a professional portrait look to your photos.
-
Motion Blur: This robust photo repair tool can identify moving objects in photos and remove blurriness caused by them.
-
The "AI Image Upscaler" feature can enlarge the repaired photos to 2X, 4X, and 8X.
-
Denoise Photos: You can improve your travel photos or drone shots by removing noise from them using this tool.
-
Increase Resolution: This tool removes the blurry areas and increases the contrast between pixels to improve the quality of the photo.
-
Increase Resolution: This tool removes the blurry areas and increases the contrast between pixels to improve the quality of the photo.
-
Gridlines: Users can use it for professional uses as it can remove grid signs from printed photos that were scanned in a scanner.
-
Support Windows 11/10/8/7/Vista, Windows Server 2003/2008/2012/2016/2019/2022, and macOS 10.12~macOS 13.
Let’s now go through the following instructions for fixing a pixelated image using the offline version of Repairit:
Step 1. To initiate the photo-enhancing process, go to the "More Types Repair” tab in the tool. Afterward, click on the “AI Photo Enhancer” feature to access its functions.
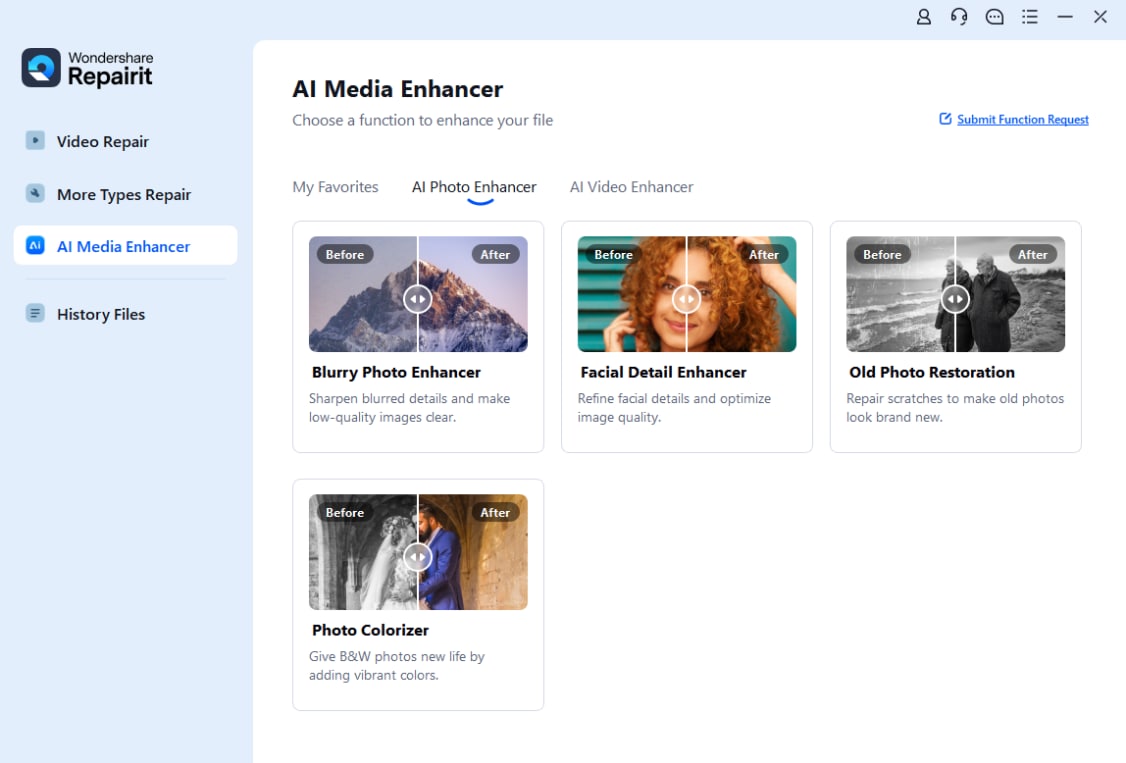
Step 2. Here, you need to click on the “+Add” button to select and import pixelated images in the tool.
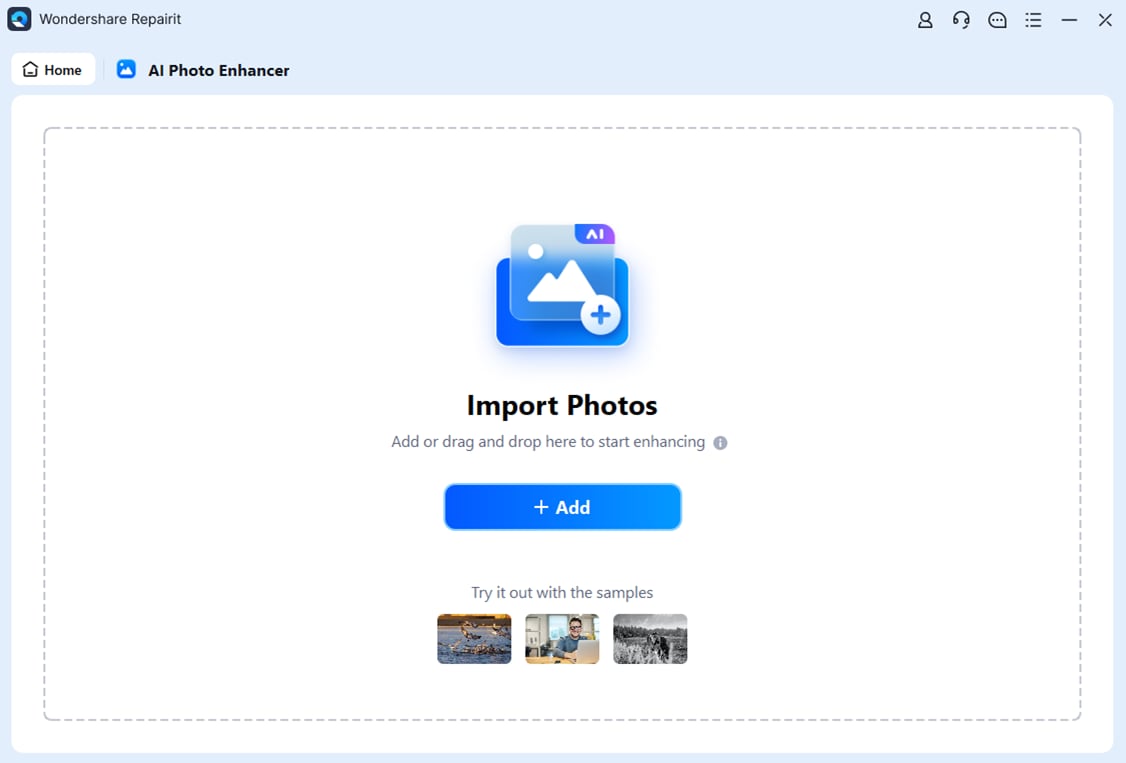
Step 3. Press the “Start Enhancing” button to continue with the process.
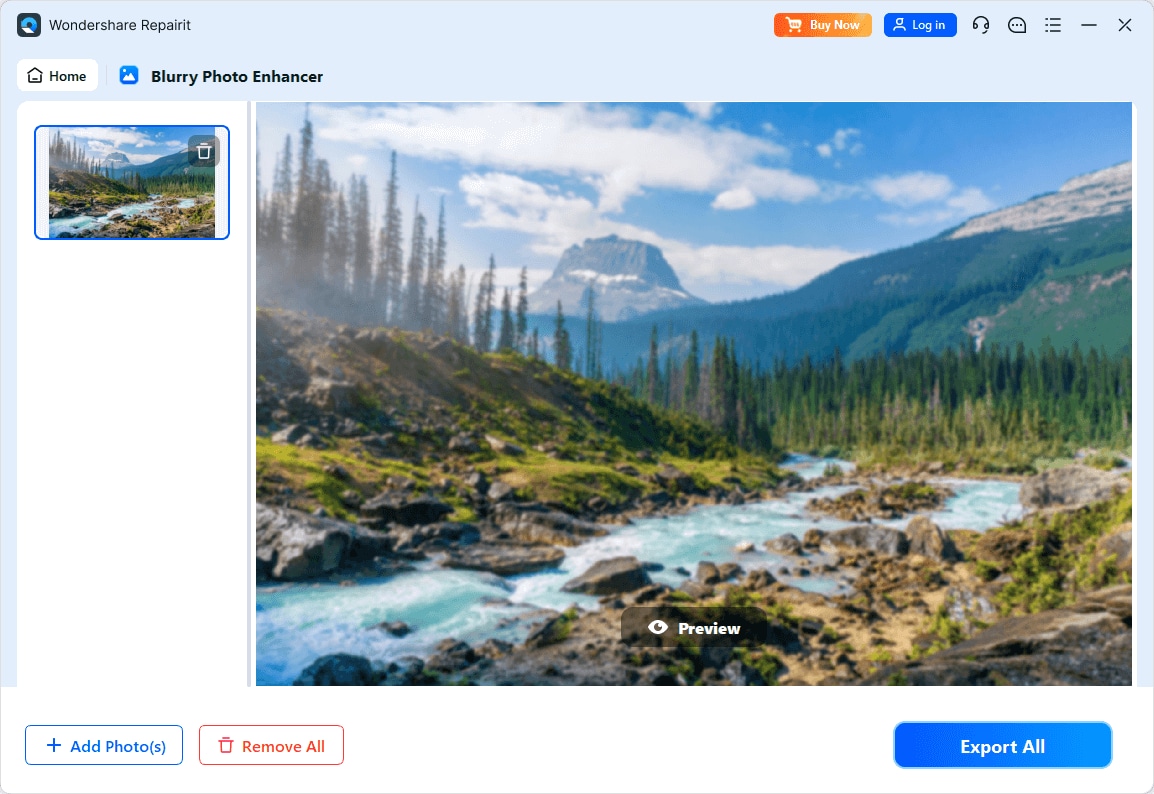
Step 4. Click the “Save All” button to export the enhanced picture to your device.
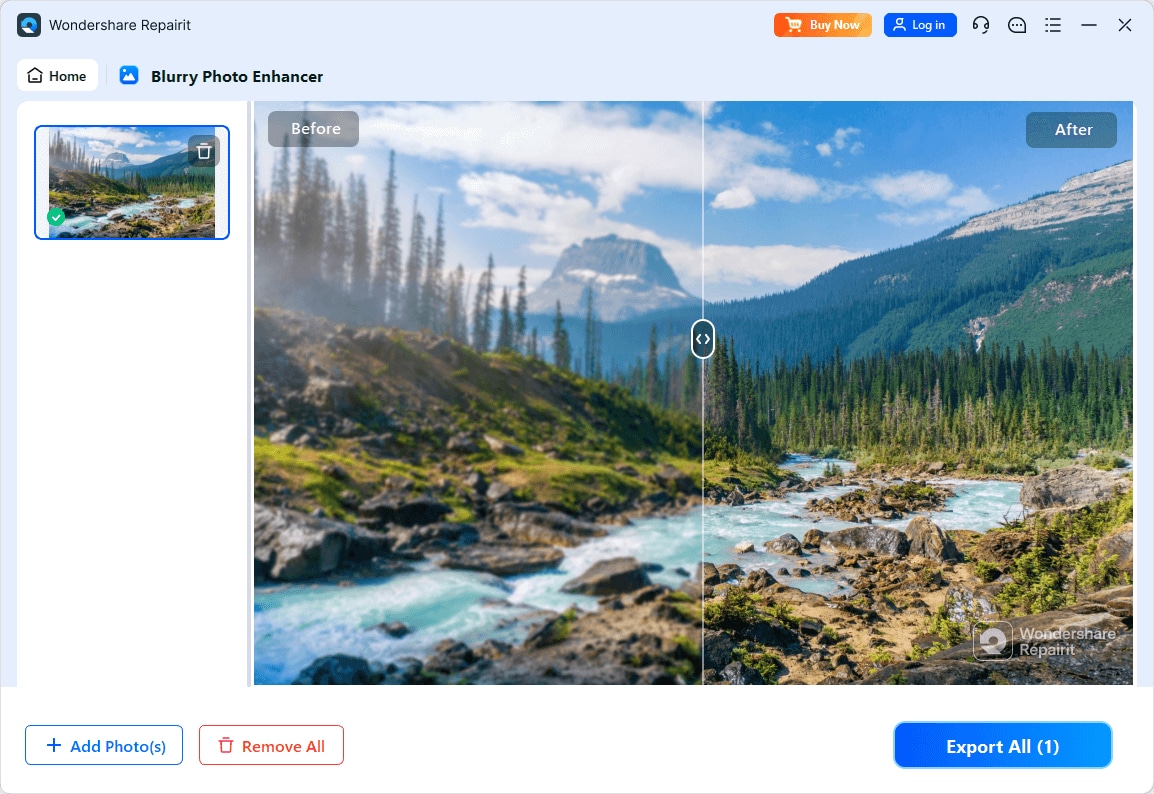
Enhance Your Pixelated Image Now

Way 2. Adobe Photoshop
Other than Repairit, professionals can also go for Photoshop as it offers comprehensive features to fix pixelated images. While the tool has hundreds of features for professional editing, users can use its Smart Sharpen and Reduce Noise filters to enhance their photos.
Additionally, it offers AI-powered tools, such as “Super Resolution”, to enhance image quality within seconds. Interested users can follow the steps outlined below to use it for photo enhancement:
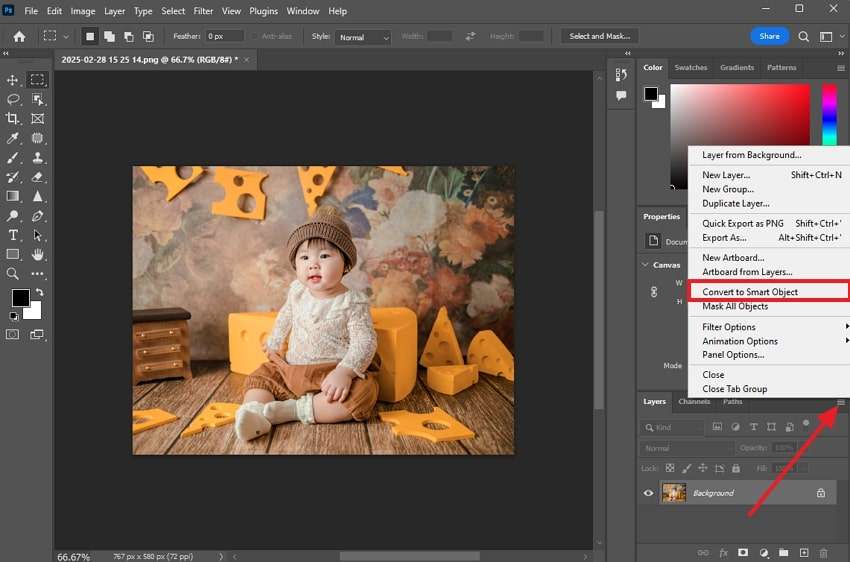
Step 1. Open the tool and open the pixelated image in it to start the enhancing work. Then, press the “Hamburger” icon in the “Layers” tab and select “Convert to Smart Object” from the new menu.
Step 2. Now, access the “Filter” tab and select the “Sharpen” option from the drop-down. When its options appear, click on “Unsharp Mask” to proceed ahead.
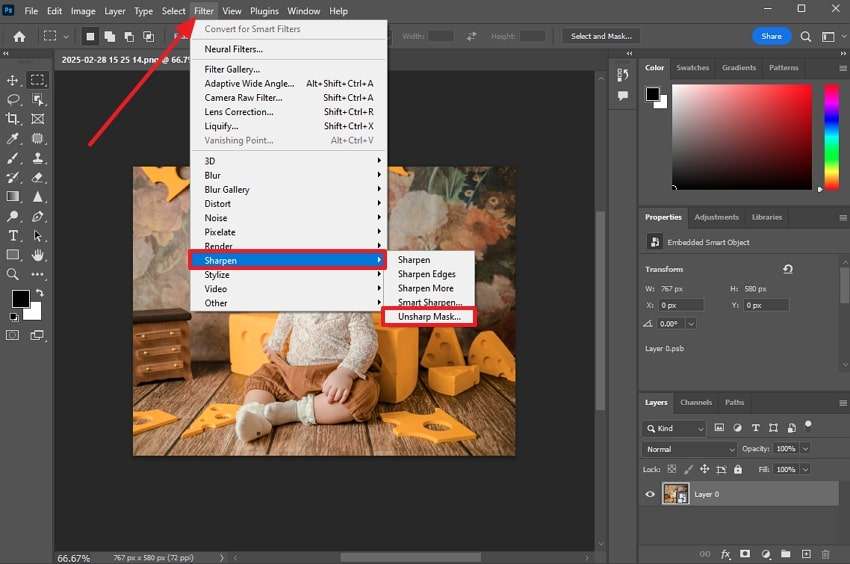
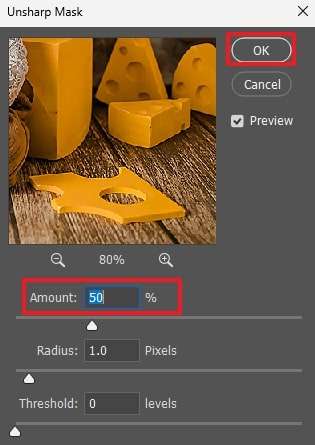
Step 3. Finally, edit the amount by adding your own value or by moving the slider until the desired results are achieved. Afterward, press “OK” and then export the image to your device.
Way 3. AVCLabs PhotoPro AI
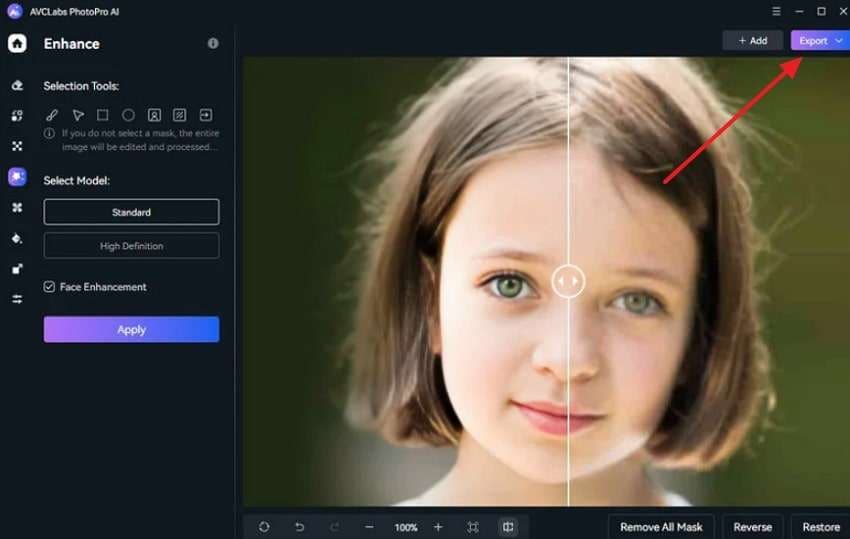
As an AI-powered editing tool, AVCLabs uses deep learning technology to analyze and reconstruct image details. The good thing about this tool is very easy to use and even beginners with no editing knowledge can use it. While enhancing the photo, you can choose from two models and turn on the Face Enhancement feature as well. To see how to fix a pixelated photo in this tool, follow the steps given below:
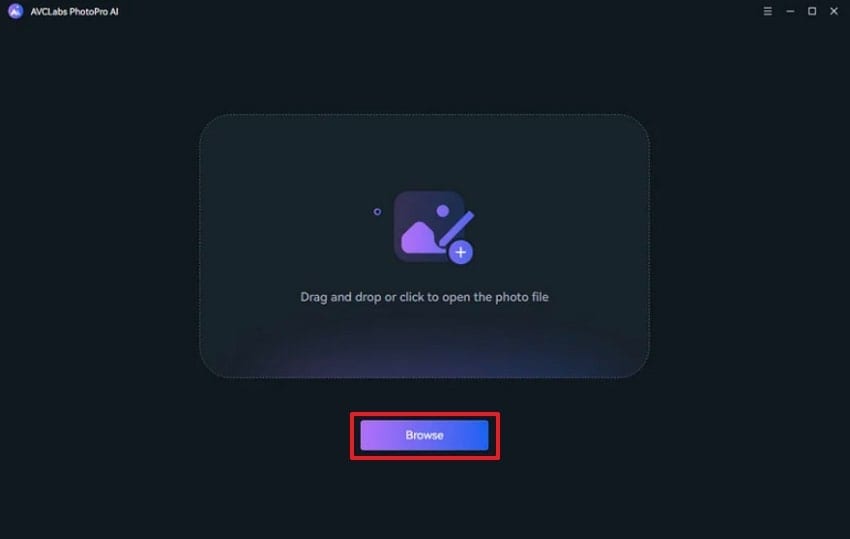
Step 1. Initiate the procedure by launching the tool and adding pixelated images in it by pressing the “Browse” button.
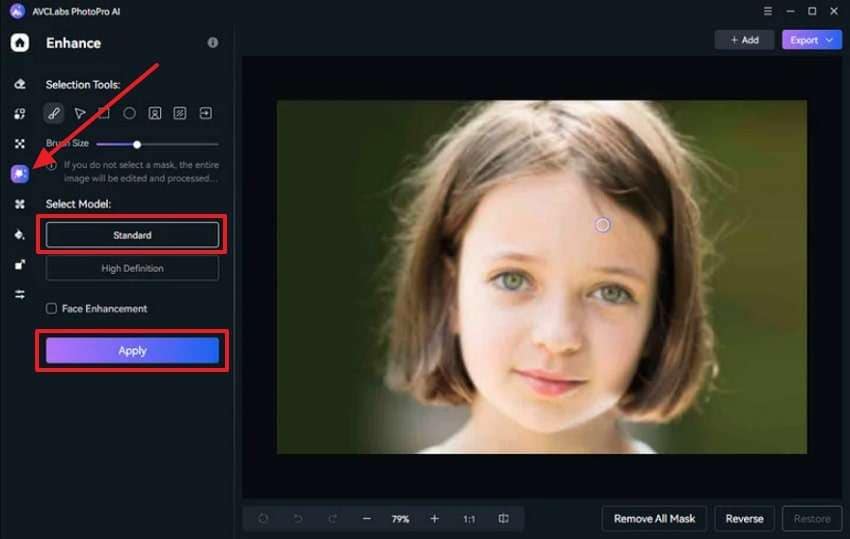
Step 2. Once the image appears in the tool, go to the “Enhance” menu from the left tab. Then, select the “Standard” model and follow up by clicking the “Apply” button.
Step 3. When the tool increases the photo’s quality, press the “Export” button and take the image to your desired storage location.
Part 3. How to Prevent Your Image from Getting Pixelated [Essential Tips]
While all the above options are quick solutions to the pixelation problem, they often consume your time. That’s why you should follow the given tips to protect your photos and avoid fixing a pixelated image:
- HD Images: Users should always start with a high-resolution photo when resizing a photo. That’s because low-quality images do not have enough pixels to maintain the quality after resizing.
- Avoid Compression: Since compressing images reduces their size, they also lose their data and become pixelated. That’s why we use formats like PNG as it supports more compression than JPEG.
- Resize Images: When resizing, use professional editing tools like Photoshop to maintain the aspect ratio. Additionally, avoid enlarging small images, as this stretches the pixels and makes them blurry.
- Right Format: Users should choose the appropriate file extension for their needs. For photos, use JPEG for smaller file sizes or PNG for higher quality with transparency.
- Image Enhancers: You should keep AI tools in your system as they automatically enhance images and prevent pixelation. These tools also analyze images and fill in missing details to restore clarity.
Conclusion
To conclude, your photos can get pixelated when you try to resize them beyond their capacity. When facing such issues, there are many tools that can help users enhance and fix pixelated images. Online tools like PicWish and AIEase are great options as they operate without any cost to improve your photos. On the other hand, Photoshop and AVCLabs are two offline solutions that make the whole process easier.
Yet, the better alternative for these options is Repairit, which is available as a software and an online tool. It has advanced features that even a beginner can use to produce professional results. With features like Portrait Enhancer and Photo Colorizer, it is the best solution for all types of image issues.
FAQ
-
Q1. Why do my images become pixelated when enlarged?
Your images can become pixelated when you try to resize them beyond their original resolution. When they cross their quality limits, the pixels lose enough data to maintain the sharpness. So, avoid enlarging low-quality images or use tools like Repairit to enhance their quality later on. -
Q2. Is it possible to fix pixelated images on a mobile device?
Yes, such images can be fixed on smartphones using various apps and online tools. Applications like PicsArt and tools like Repairit online provide these enhancing services on mobile phones. These tools analyze the image and restore details, improving clarity without requiring advanced editing skills. -
Q3. How can I make an old, low-quality image look clearer?
Doing so requires AI tools or editing software that improves resolution and reduces noise. Tools like Repairit can sharpen details and add colors to old photographs to enhance their quality.


 ChatGPT
 Perplexity
 Google AI Mode
 Grok
Grok

