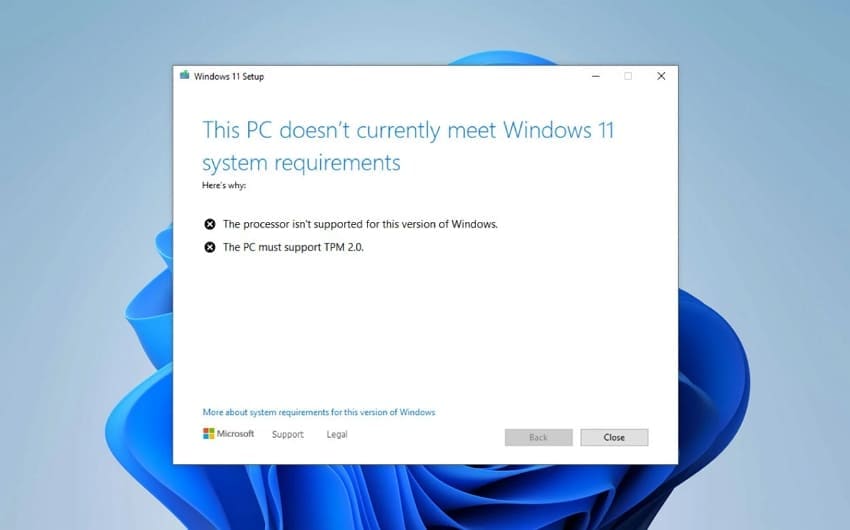
Have you tried installing Windows and encountered the frustrating message "The processor isn't supported for this version of Windows"? You are not alone, as this issue appears frequently when users attempt a Windows upgrade or clean installation. The error shows up when your CPU does not meet the hardware and security requirements of the Windows version.
This message is often caused by unsupported processor generations, missing TPM support, or outdated BIOS firmware. In this article, we explain why the problem happens and provide simple fixes to help you install Windows successfully.
Table of Contents
Part 1. Why Windows Says Your Processor Isn't Supported
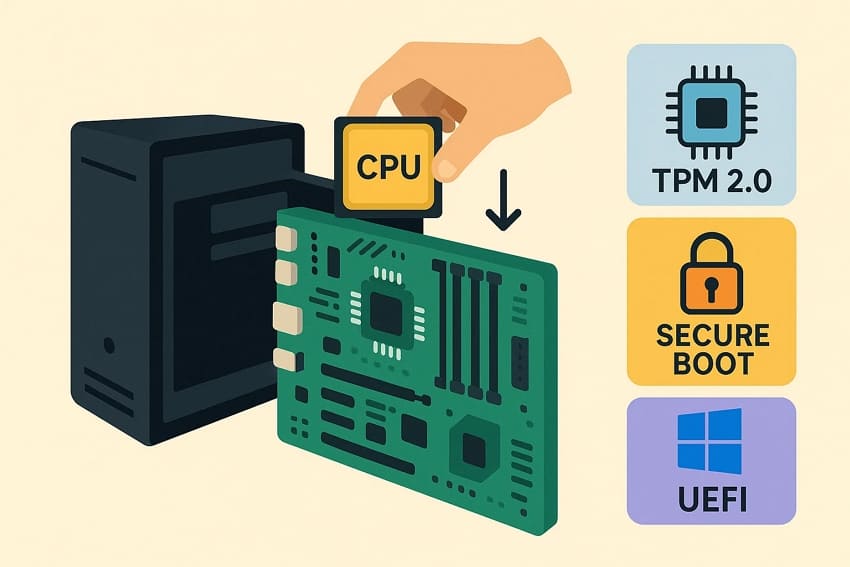
Before exploring solutions, it's important to understand why Windows shows "The processor isn't supported for this version of Windows." Let's review the key hardware requirements for Windows 11 and see what your system must meet to pass Microsoft's standards.
| Component | Minimum Requirement for Windows 11 |
| Processor | 1 GHz or faster, 2+ cores, compatible 64‑bit CPU or SoC |
| RAM | At least 4 GB system memory |
| Storage | 64 GB or larger storage device |
| Firmware | UEFI firmware, Secure Boot capable |
| TPM | TPM 2.0 required |
| Graphics | DirectX 12 compatible GPU with WDDM 2.0 driver |
| Display | 720p or higher, over 9″ diagonal, 8‑bit per color channel |
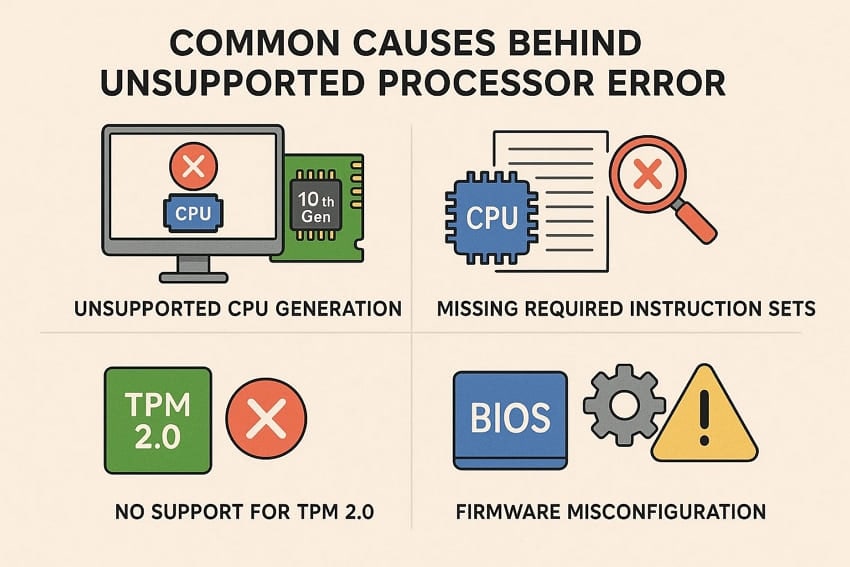
Common Causes Behind This Error
After reviewing the hardware requirements, let's understand the main causes behind the "The processor isn't supported for this version of Windows" error:
- Unsupported CPU Generation: This issue often occurs when the processor model predates Microsoft's official Windows 11 support list. Many older Intel and AMD chips lack the required certification, which triggers the processor unsupported message.
- Missing Required Instruction Sets: Some processors do not include modern instructions like SSE4.2 or certain security extensions. Windows uses these features heavily, so missing instructions can cause compatibility checks to fail entirely.
- No Support for TPM 2.0: When the CPU seems powerful enough, the platform may not expose TPM 2.0. Without this security module, Windows considers the hardware non‑compliant and blocks normal installation paths.
- Unsupported Secure Boot: Systems sometimes ship with legacy BIOS or have Secure Boot disabled within firmware settings. When Secure Boot is missing, Windows flags the platform as insecure and may block upgrades.
- Firmware Misconfiguration: Incorrect BIOS or UEFI settings can hide features Windows expects from modern processors. Options like virtualization and specific security flags being disabled often cause requirement checks to fail.
Part 2. What to Do When Your Processor Can't Run This Windows Version - Try 5 Fixes!
If you keep seeing the message "The processor isn't supported for this version of Windows," you have to figure out how to move forward. Let's explore the best methods to fix unsupported processor issues while upgrading your Windows OS.
Fix 1. Stay on Windows 10 (Fully Supported OS)
Windows 10 remains a supported OS and continues to receive important security and reliability updates. Users benefit from stable drivers and broad software compatibility with office suites and legacy peripherals. Many organizations continue standardizing on Windows 10, which simplifies deployment and long‑term support planning. Most people avoid dangerous registry changes by staying on Windows 10 rather than forcing unsupported upgrades.
Fix 2. Upgrade to a Supported CPU/Motherboard
A move to a supported CPU and motherboard gives full, official Windows 11 compatibility. Your new platform can provide TPM 2.0, Secure Boot, and UEFI, satisfying Microsoft's strict security requirements. For users who view hardware upgrades as long-term investments, this approach permanently eliminates "the processor isn't supported for this version of Windows" error.
This hardware route avoids unreliable registry hacks or modified installers that might break with future updates. You reduce installation errors, retain normal Windows Update behavior, and keep access to standard vendor support.
Fix 3. Use Microsoft's Registry Bypass for Unsupported CPUs
Many users choose Microsoft's registry bypass when "The processor isn't supported for this version of Windows" message blocks an otherwise stable system. This method relaxes Windows 11 hardware checks, allowing installation on certain unsupported CPUs. People typically use it to keep files, apps, and settings while gaining Windows 11 features without replacing hardware. Follow the simple steps below to fix the unsupported processor error using this method:
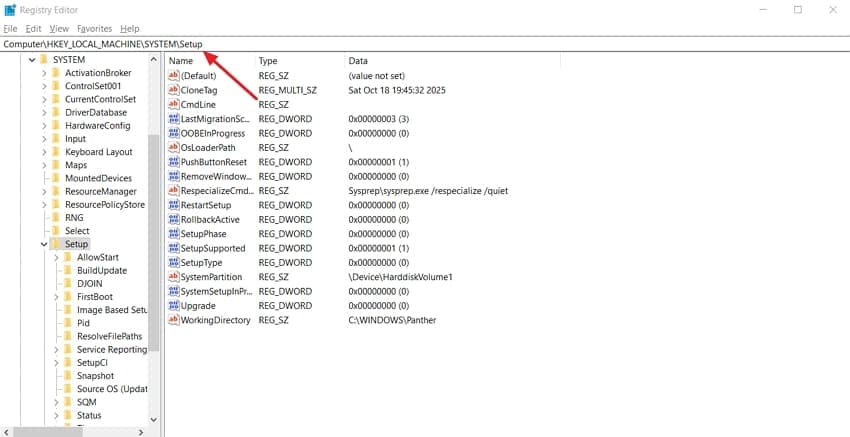
Step 1. Open the "Registry Editor" and type "Computer\HKEY_LOCAL_MACHINE\SYSTEM\Setup" in the address bar. Next, hit the "Enter" key to enter the Setup folder.
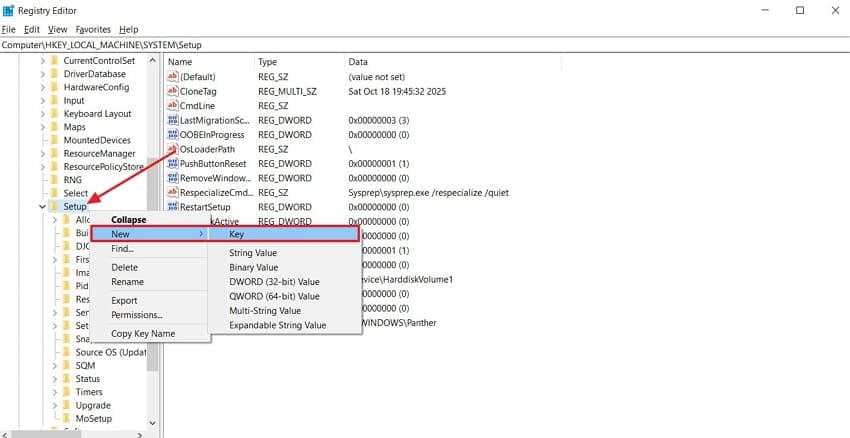
Step 2. Afterwards, right-click the "Setup" folder and hover your mouse over the "New" option. In the submenu, press the "Key" option and create a new key for upgrading Windows.
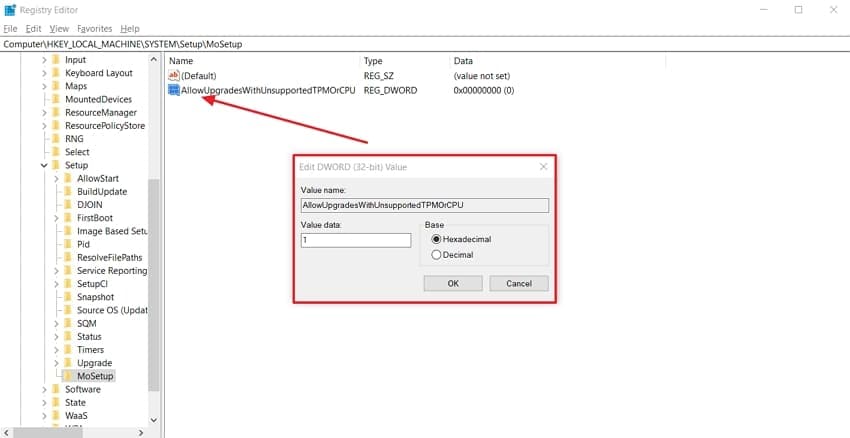
Step 3. Inside the new key, create a "DWORD (32-bit)" value and click on it to set its "Value Data" to 1. Next, restart your PC and try installing Windows 11 again.
Fix 4. Install Windows 11 via Modified USB Installer (Bypass Checks)
Some people use a modified Windows 11 USB installer when hardware checks block normal setup. This method disables CPU, TPM, or Secure Boot checks so installation continues on unsupported machines. People typically choose this Rufus‑based method to burn virtual hard drives and avoid buying new components. Follow the steps to create a customized installer that bypasses "the processor isn't supported for this version of Windows error:"
Step 1. First off, access the Disk Management interface, press the "Action" tab, and click the "Create VHD" option create a virtual hard drive.

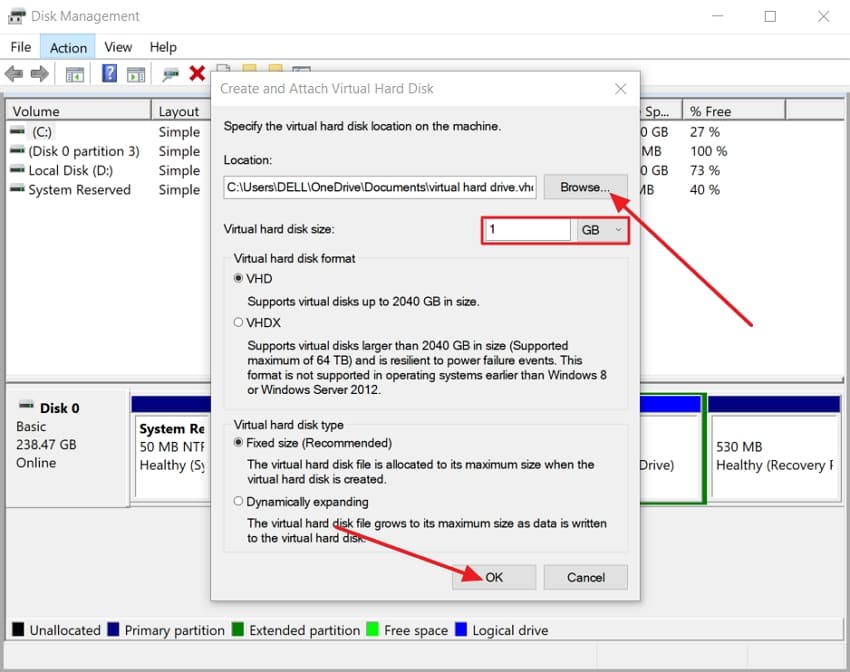
Step 2. Next, press the "Browse" option to choose the location of the virtual hard drive, select the VHD size, and click the "OK" button to proceed further.
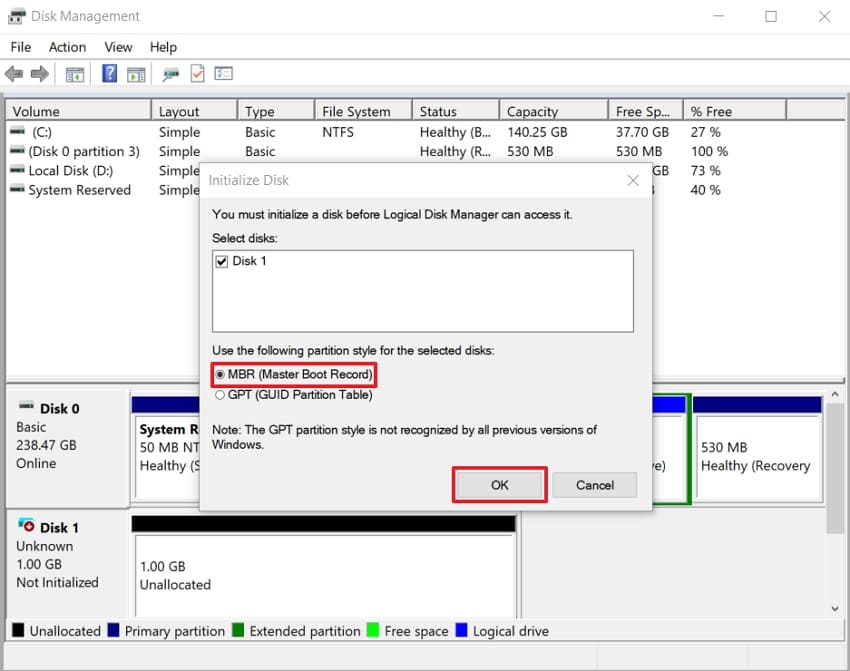
Step 3. Once you create a VHD, right-click the new disk and press the "Initialize Disk" option. Afterwards, select the "MBR (Master Boot Record)" option and click the "OK" button.
Step 4. Now, right-click the new partition and press the "New Simple Volume" option to create a drive.

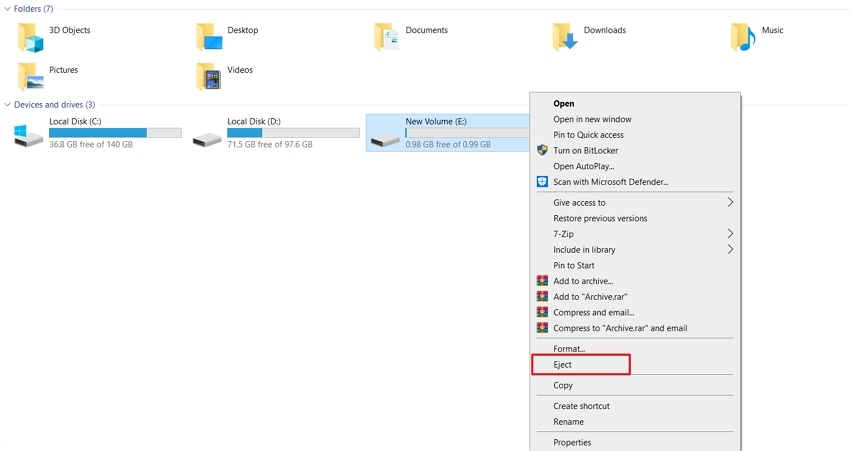
Step 6. Next, right-click the created drive and press the "Eject" option to eject the drive. Afterwards, move towards its original location and mount it again.
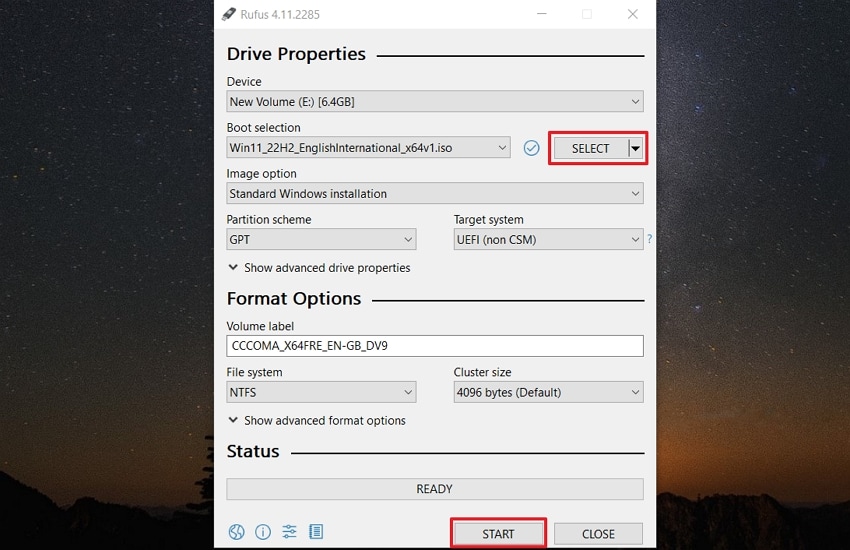
Step 7. Afterwards, open Rufus and press the "Select" button to choose the Windows 11 ISO file. Then, click the "Start" button to start the process.
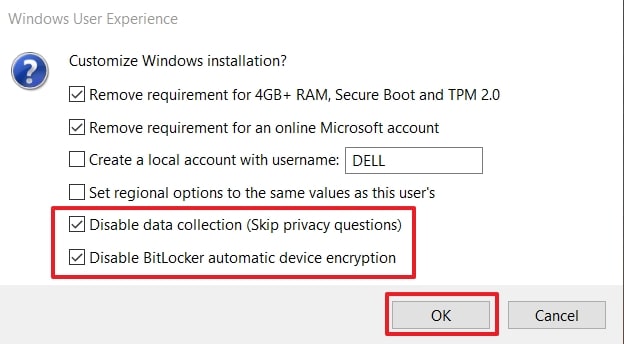
Step 8. Once you start the process, enable the "Disable Data Collection" and "Disable BitLocker Automation Device Encryption" options, and press the "OK" button to bypass all CPU and TPM checks.
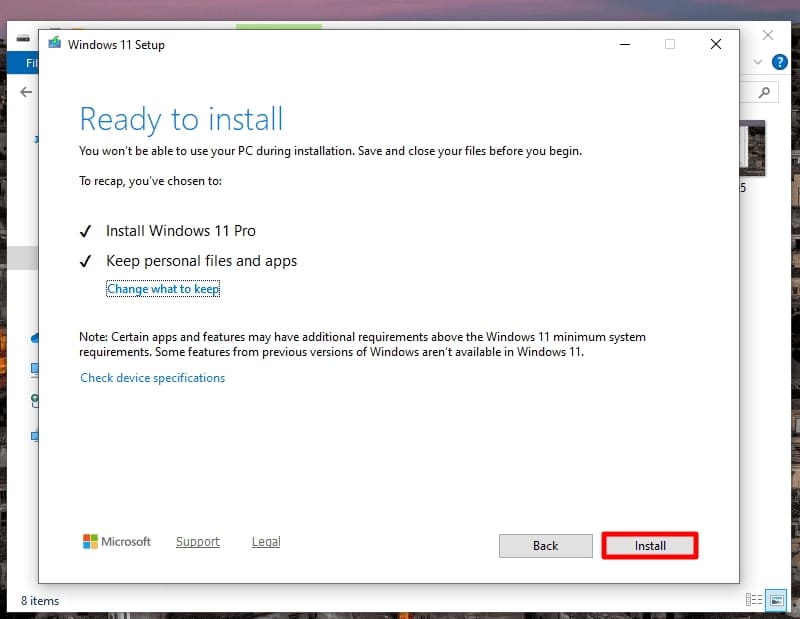
Step 9. After the drive is successfully burnt, launch the "Setup" file, follow the instructions, and lastly, press the "Install" button to install Windows 11 after bypassing all the checks.
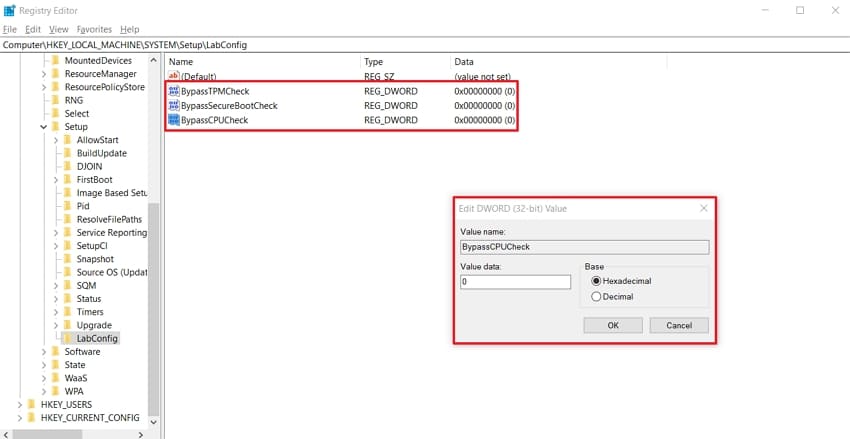
Fix 5. Use LabConfig Registry Key During Setup to Skip CPU/TPM Checks
Some users consider the LabConfig registry method when strict Windows 11 checks reject otherwise usable computers. The tweak instructs setup to ignore specific CPU and TPM requirements, allowing installation on unsupported hardware. Anyone using this method must accept the potential loss of security updates. Go through the steps below to fix the unsupported processor problem with this method:
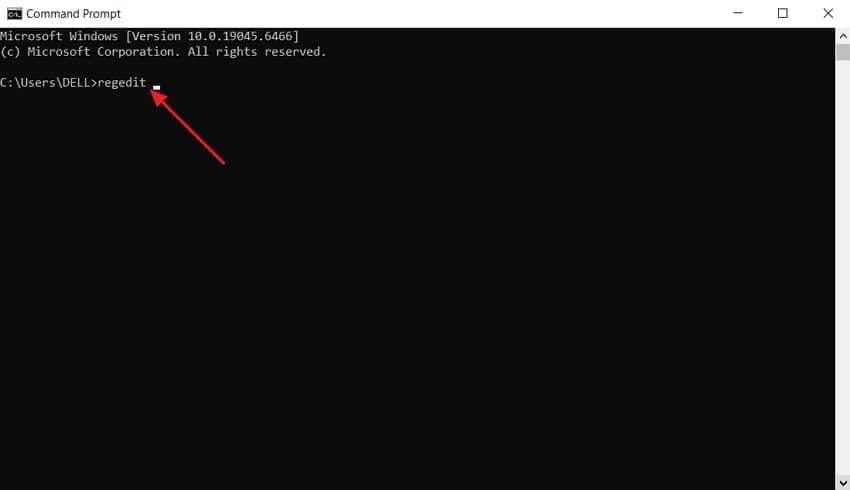
Step 1. During setup, press the "Shift + 10" keys to open Command Prompt and type "regedit" to enter the Registry Editor interface.
Step 2. Enter "HKEY_LOCAL_MACHINE\SYSTEM\Setup" in the address bar and create a new key with the name "LabConfig."
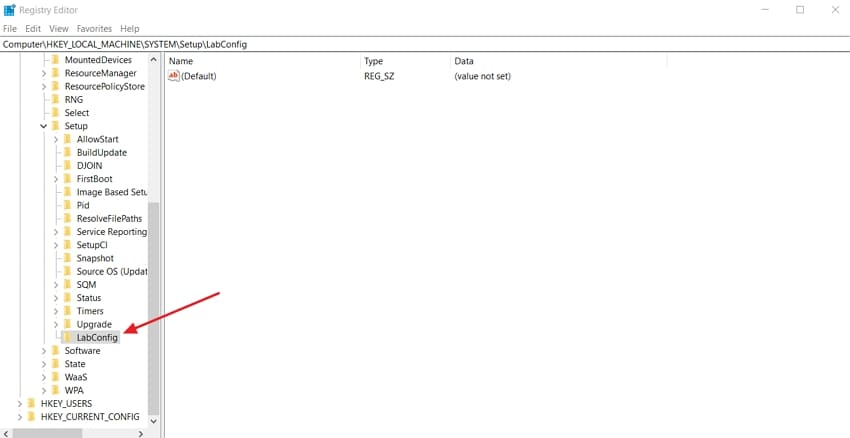
Step 3. Create 3 new DWORD (32‑bit) values named "BypassTPMCheck", "BypassSecureBootCheck", and "BypassCPUCheck". Afterwards, set all "Value Data" numbers to 1 and close the Registry Editor to continue the setup.
Pro Tip. Repair Corrupted System Files That Block Windows Installation
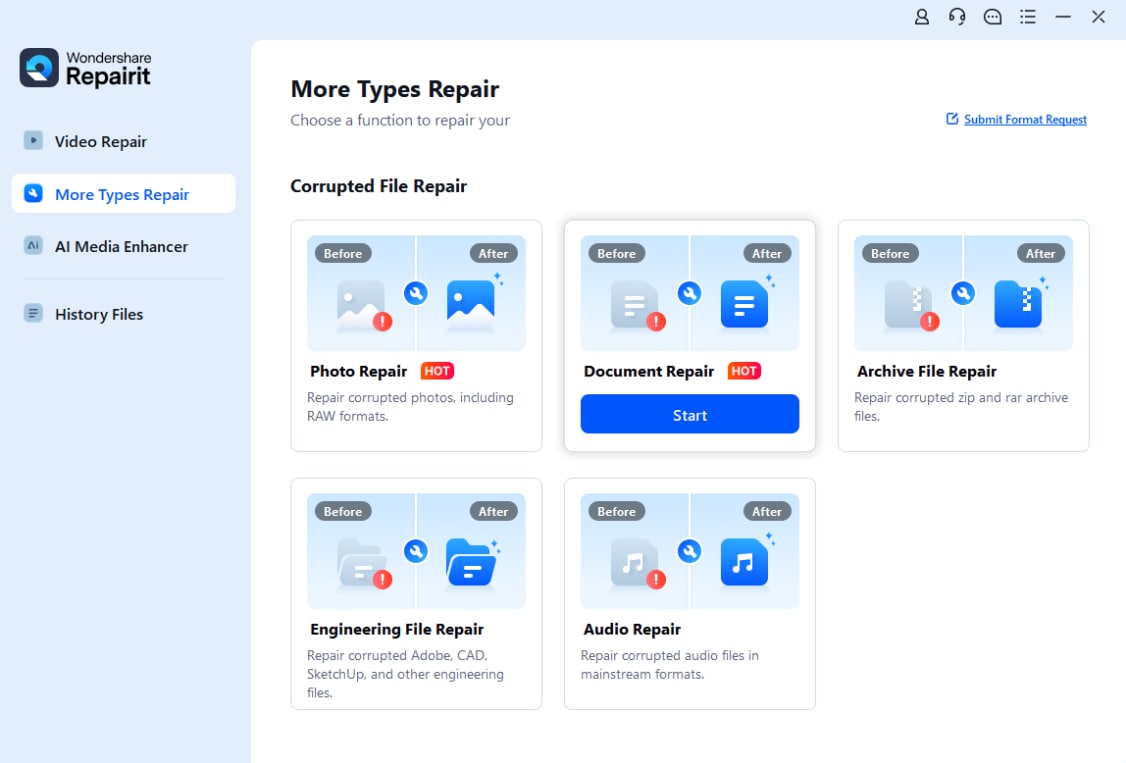
Sometimes, even after applying fixes, users still see "The processor isn't supported for this version of Windows" errors or Windows installation issues due to corrupted system files. At this stage, corruption often affects system or setup files, stopping Windows from installing properly. This is where Repairit comes in with a reliable solution to detect and repair damaged files that might be preventing a successful setup.
Repairit scans your system for corrupted documents, media, and Windows files, then reconstructs their internal structure. Instead of letting a bad file cause installation failures or system errors, it restores the data so Windows can read and process it correctly. Moreover, Repairit fixes damaged files instead of the OS, helping Windows install more smoothly with fewer errors.
Key Features
Batch File Repair: Repairs multiple system files at once to save valuable time and manage large inventories.
Repairs Engineering Documents: It handles complex project files with layers and metadata for quick recovery.
Deep File Scanning: Repairit scans the file structure thoroughly to locate and repair all damaged areas accurately and safely.

-
Batch File Repair: Repairs multiple system files at once to save valuable time and manage large inventories.
-
Repairs Engineering Documents: It handles complex project files with layers and metadata for quick recovery.
-
Deep File Scanning: Repairit scans the file structure thoroughly to locate and repair all damaged areas accurately and safely.
Ultimate Guide to Repair Corrupted System Files With Repairit
If you keep encountering "The processor isn't supported for this version of Windows" message, follow the steps below to repair system files:
Step 1. Access Document Repair Tool
Once you reach the main interface, press the "More Types Repair" tab and click the "Start" button in the "Document Repair" section.
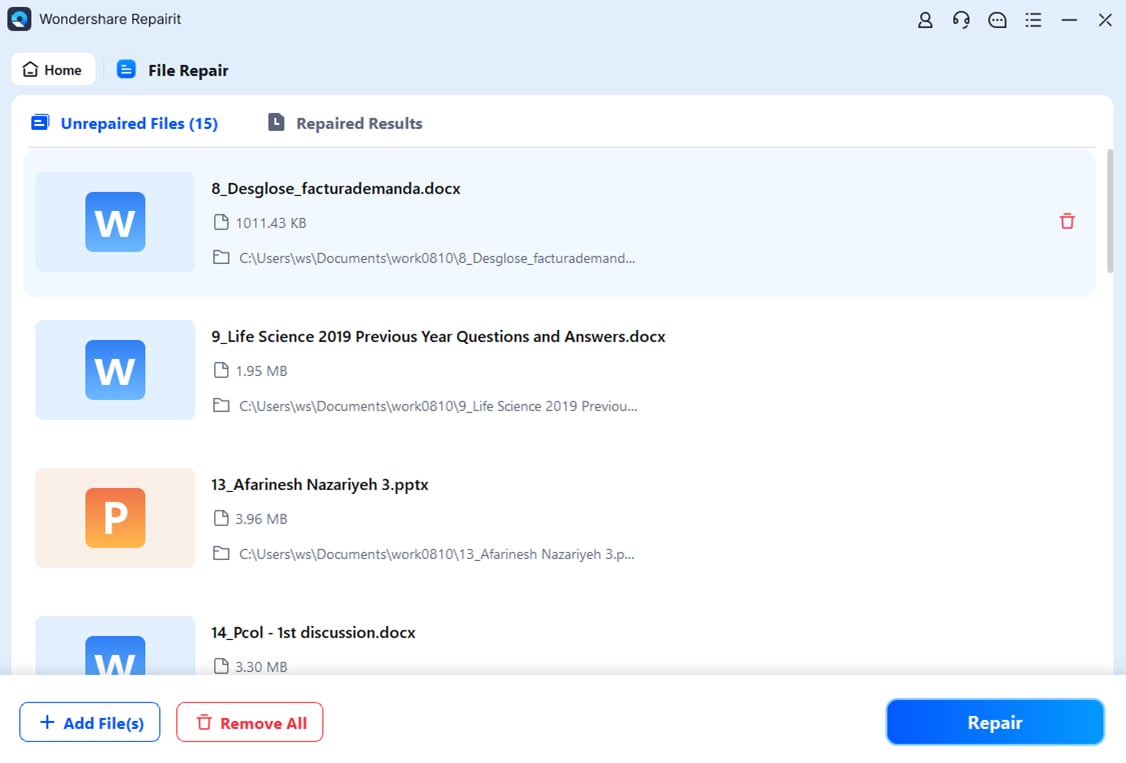
Step 2. Start The Repair Process
Press the "+Add" button to import all the corrupted system files to the platform. Afterwards, click the "Repair" button at the bottom to start the process.
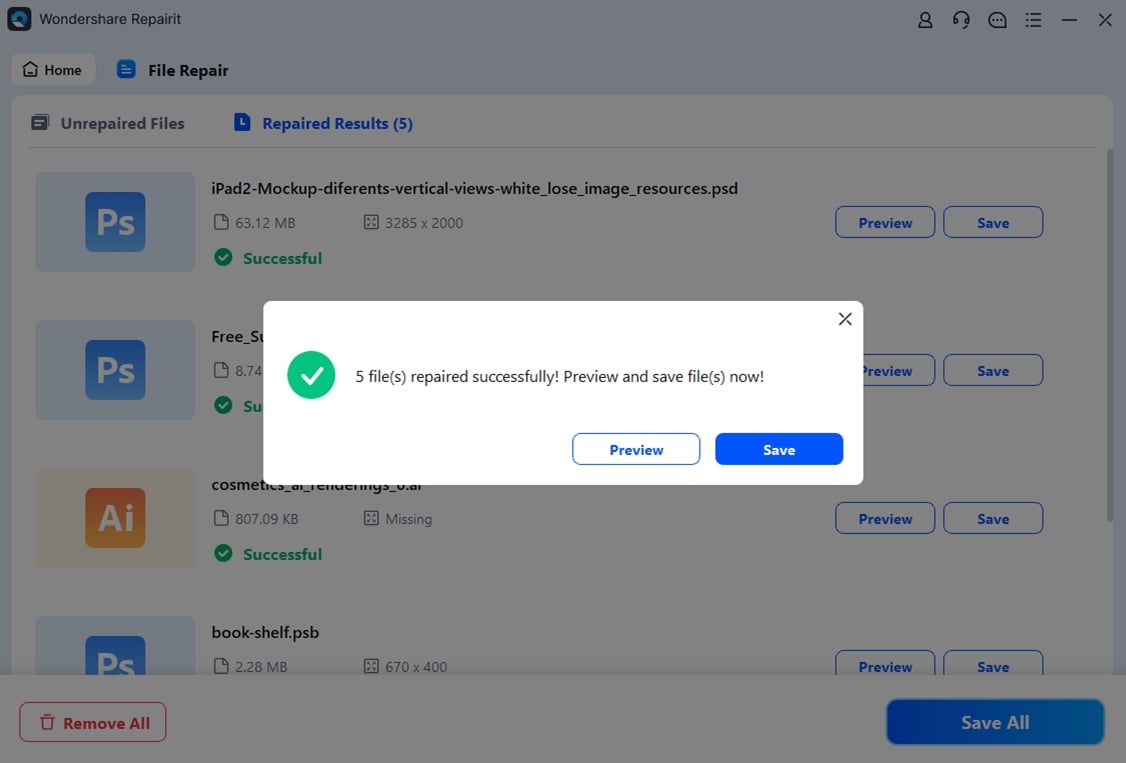
Step 3. Preview and Save Repaired Files
After all damaged system files are repaired, press the "Preview" option to view them and click the "Save" button to export the repaired system files.
Repair Corrupted Files Now
 Security Verified. Over 7,302,189 people have downloaded it.
Conclusion
In conclusion, "The processor isn't supported for this version of Windows" message can be resolved by a combination of hardware upgrades and registry tweaks. This guide provides practical solutions for keeping your system compatible and installing Windows 11. If issues persist due to corrupted system or setup files, we recommend using Repairit to repair those files.
FAQs
-
Q1. Does an unsupported installation affect warranty or official support?
Running Windows 11 on unsupported hardware can limit help from Microsoft or the PC manufacturer. Some vendors might still assist with basic hardware issues, but decline OS-level troubleshooting entirely. -
Q2. Are there performance issues on unsupported Windows 11 processors?
Many unsupported processors run Windows 11 acceptably, but performance can vary between different workloads. Using unsupported CPUs may also trigger the message “The processor isn’t supported for this version of Windows” during installation. -
Q3. Can I easily revert after using any bypass?
You can usually roll back within a limited period if upgrading from Windows 10. Creating full system backups or images beforehand provides safer rollback options if problems appear. -
Q4. How frequently are supported processor lists updated?
Microsoft updates supported processor lists occasionally, usually around major releases or hardware generations. New CPUs can be added while very old lines remain permanently excluded from support.
