TL; DR: What's the bet method to heal a clipped / distorted sound? What tools/software doyou recommend and what would be the workflow? I need to work with a very poorly made recording from an event and the sound is very "broken"; mostly clipping due to the recording device not being designed to handle that kind of loudness. I know it would be ideal to prevent this from happening in the first place but re-recording and/or obtaining a better recording is not an option." - Reddit user
Bad audio can destroy an important recording. In this article, you'll learn why the audio becomes clipped, and 3 tools to fix clipped audio.
Table of Contents
Part 1: Common Reasons Audio Peaks or Clips
Understanding why audio peaks or clips is essential before trying to fix it. Did you know that you can prevent damage to your recordings and choose the right repair method by knowing the causes?
What Causes Audio Clipping in Recordings?
- Recording levels set too high. When you push your microphone or interface input gain too far, the signal exceeds the digital ceiling. This creates harsh distortion. For instance, if you’re recording a podcast and your mic is too close to your mouth, even normal speech can clip.
- Sudden loud sounds. Unexpected noises, like a shout, door slam, or a dropped object, can spike the signal momentarily. These short bursts often create harsh digital peaks that are very noticeable in playback.
- Multiple audio sources combined. Recording multiple tracks at once without balancing their levels can overload your system. For example, a drum kit and a vocal mic recorded simultaneously can push the combined input into clipping if not carefully monitored.
- Post-recording gain boosts. Raising the volume in a DAW after recording can reveal peaks that were originally hidden. Even if it sounded fine live, boosting the track can create clipping in sections that were previously safe.
- Low dynamic headroom. Recording close to the maximum signal level leaves little room for unexpected peaks. This is common in live recordings or situations with unpredictable volume changes.
- Faulty cables or connections. Loose or damaged cables can cause sudden spikes or distortions, which appear as clipped audio. Even professional setups can be affected if connectors are worn or not fully seated.
- Incorrect sample rate or bit depth. Using mismatched or low-quality recording settings can make your audio more prone to clipping. For instance, recording at 8-bit depth can exaggerate peaks compared to higher bit depths.
- Too many plugins/effects. Having multiple plugins such as compressors, EQ boosts, or reverb units might result in audio portions overlapping to produce clips. This can occur despite audio data being clean prior to such processes.
- Environment-related spikes. Recording in echo-prone rooms or near reflective surfaces can amplify sound. This makes sudden peaks more likely to clip.
- Unmonitored recording. Not using headphones or monitoring meters allows peaks to go unnoticed until playback. This makes it difficult to catch clipping in real time.
- Fast-moving instruments. Instruments like drums or brass naturally produce quick peaks. Without careful level management, these peaks can exceed the recording limit, causing distortion.
Why Digital Limiters Can Create Peaking Audio
- Over-compression of loud signals. Limiters reduce volume peaks, but when set too aggressively, they squash the audio dynamics and can introduce distortion, making the track sound harsh or unnatural.
- Loss of natural audio dynamics. When a limiter flattens peaks, it removes subtle variations that give audio its “breathing” quality. Speech may sound robotic, and music may lose its punch.
- Digital distortion from excessive limiting. Limiters can produce unwanted artifacts if thresholds, attack, or release settings aren’t optimized. These artifacts often appear as high-frequency harshness or a “metallic” tone.
- Cumulative effect in mixing or mastering. Stacking multiple limiters can drive the audio past the point of being safe, producing undesired clipping factors even if the processing appears fine.
- Hidden peaks during export. Some audio peaks are only revealed after bouncing or rendering files. Even if the DAW shows safe levels, the final file may clip due to format conversion or dithering issues.
- Excessive loudness normalization. Pushing audio to match streaming platform standards can introduce subtle clipping in louder passages.
- Incorrect stereo linking. Processing left and right channels separately without care may cause one channel to clip, even if overall volume looks fine.
- Cumulative plugin gain. Each effect may slightly increase signal level. Individually, this may seem negligible, but combined, it can push audio into clipping.
- Over-compressed peaks. Limiting every peak reduces contrast between quiet and loud sections. Over time, this can make audio sound fatiguing and “tired,” even if technically not clipped visually.
Device-Specific Reasons for Audio Peaking
- Smartphone microphones. Many phones use automatic gain control. Quiet sounds are boosted, but loud sounds can easily exceed limits, creating peaks and clipping during speech or music.
- Low-quality USB microphones. Cheaper USB mics have weaker preamps, so even moderate audio levels can cause distortion. This is especially noticeable in loud vocals or instruments.
- Camera internal microphones. Built-in camera mics are not designed for high dynamic range. Loud outdoor environments, concerts, or sporting events can easily produce peaks.
- Audio interfaces with high gain. Setting input gain too high without proper monitoring can overload channels. This creates consistent peaks in your recordings.
- Wireless microphones. Interference or sudden spikes from the transmitter can appear as peaking audio in the recording.
- Tablet microphones. Tiny condenser elements make tablets sensitive to sound pressure. Close talking or room echoes can cause clipping.
- Laptop built-in mics. Limited preamps and low dynamic range often produce peaks during loud passages or fast speech.
- Headphone monitoring issues. If your headphones mask clipping, you may not notice peaks while recording, leading to distorted files.
- Digital cameras and action cams. Auto-level or compression algorithms inside these devices can unintentionally raise peaks beyond safe limits.
- Mixer channels. Without proper balancing, one channel can clip even if others are safe. This is common when combining multiple microphones or instruments.
- Room acoustics. Hard surfaces or small reflective spaces can amplify sounds, causing peaks even when your source isn’t extremely loud.
Part 2: How to Identify Clipped Audio?
You should also need to know how to spot clipped audio. Recognizing the signs helps you understand how severe the problem is and choose the right repair method.
Distortion, Crackling, or Harsh Digital Noise
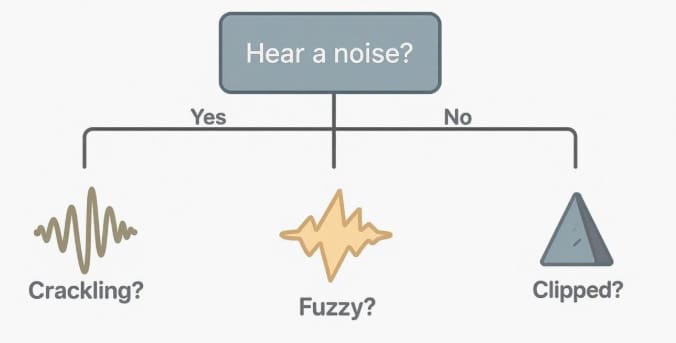
When audio clips, it doesn't just get louder. It changes in character. Clipped audio often produces digital distortion that has a metallic or brittle texture to it-not warm-and is indicative of analog saturation. This can manifest as crackling, popping, or a subtle "gritty" texture that appears only in louder passages. Even very short bursts, like a drum hit or vocal accent, can produce noticeable crackles that make the audio unpleasant.
Context is key to listening. If these distressing artifacts are being masked by louder sections, then it is a very good bet that it is clipping that is being caused and not other issues of noise. High-frequency material, such as cymbals or vocal sibilance, will accentuate clipping artifacts far more than bass-heavy material.
Note that specific consonants in vocal tracks, such as “s” or “t/k” sounds, tend to have a sharper edge, indicating peaking audio distortions. These distortions tend to be steady on any playback device, and you will be able to notice this effect better on headphones that have a strong high-end, such as treble.
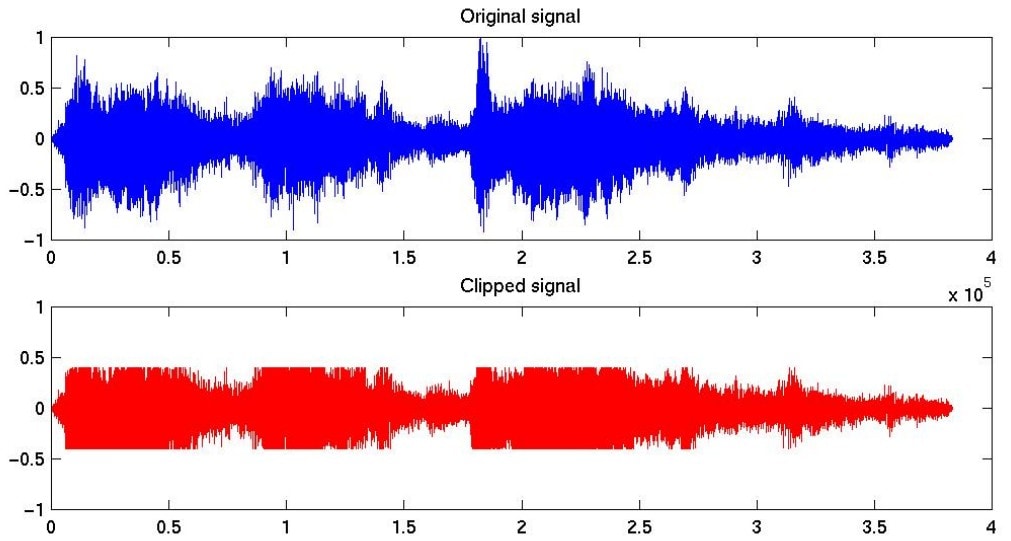
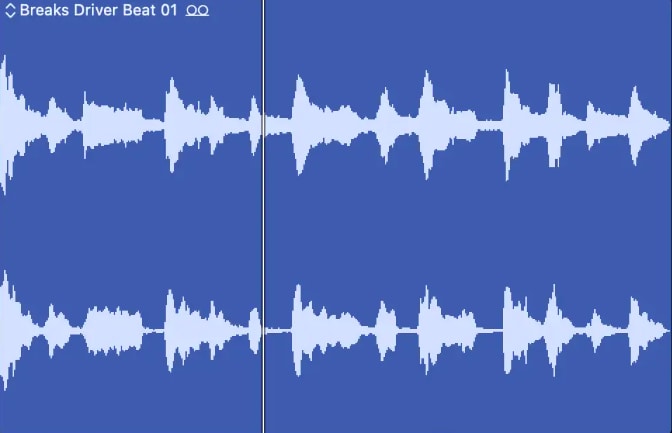
Flat Topped Peaks in Waveforms (Visual Clipping)

Visual inspection of waveforms in your DAW is a powerful way to confirm clipping. In a normal waveform, peaks curve naturally, but in clipped audio, they appear flattened at the top, forming a plateau that shows the signal has hit the maximum digital limit. Some clips are extremely brief and can be easy to miss if you’re looking at the full track view, so zooming in is often necessary.
Clipped peaks often align with loudest moments, like a chorus or accent hit, and they may appear only in one stereo channel. It’s also helpful to compare the waveform to other clean recordings; the difference is usually obvious. Even small flattened peaks can introduce audible artifacts, so visual analysis gives you a clear, objective way to detect peaking sections before you start repair.
Harsh, Over-Compressed Sound at Loud Moments
Clipping often makes recordings sound unnaturally compressed. Loud parts may feel squashed, while softer sections remain unchanged, resulting in a loss of natural dynamics. For example, a vocal line that should rise and fall in volume may feel monotone, and musical instruments may lose their expressive range. This over-compressed character can also make the audio tiring to listen to for extended periods.
In some cases, the clipping interacts with other compression or limiter effects applied during recording or mixing, creating a “pumping” sensation where volume seems to rise and fall unnaturally. Clipping also masks subtle details: harmonics in instruments, soft background effects, or quiet breaths in speech can disappear under harsh peaks, reducing clarity and richness. Listening carefully at loud passages and paying attention to the overall tonal balance can reveal these issues, even if the waveform doesn’t look severely flattened.
DAW Indicators for Audio Peaking Fix
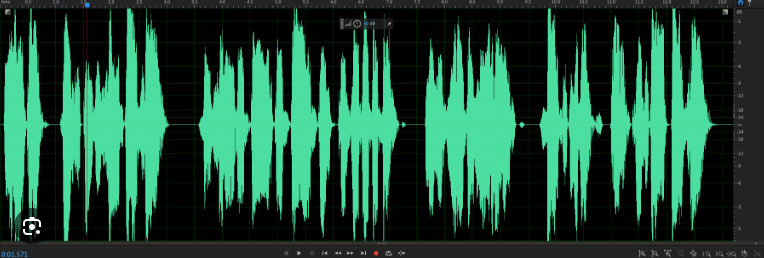
Most modern DAWs have built-in meters that show when audio exceeds safe limits, often highlighting peaks with red warnings. Watching these indicators in real time helps pinpoint exactly where clipping occurs, even if it’s brief. Some DAWs also show inter-sample peaks, which can exist between digital samples and may not be visible in the waveform itself but still cause audible distortion.
Using both peak and VU meters gives a more complete picture: peak meters show instantaneous clipping, while VU meters indicate overall loudness and dynamics. Multi-track projects may have channel-specific clipping, so monitoring each track individually is important.
Additionally, some DAWs offer history meters or envelope displays, showing repeated patterns of peaks over time, which can reveal sections that consistently cause clipping. Paying attention to these visual cues ensures you catch problem areas before attempting repair, helping maintain the natural quality of your audio.
Part 3: How to Fix Clipped Audio (Step-by-Step Methods)
Several tools can restore clipped recordings while preserving quality. Selecting the right tool for your level of damage is important. Below, we compare three popular audio repair tools and explain which situations they work best for.
| Tool | Best For | Key Features |
| Repairit Audio Repair | Severe clipping and distortion | ✅AI-powered restoration ✅Background noise suppression ✅Dynamic balance ✅Batch processing |
| Descript | Light audio peaking | ✅AI peak detection ✅Visual waveform editor ✅Transcription integration ✅Auto-leveling |
| AudioCleaner | Mild clipping or quick fixes | ✅Real-time preview ✅Basic EQ ✅De-essing ✅Fast correction |
Tool 1. Repairit Audio Repair — Best Tool to Fix Clipped Audio Automatically
Repairit Audio Repair is designed for users who need complete audio restoration. It goes beyond simple volume adjustments by analyzing the waveform and intelligently reconstructing clipped sections. The software uses advanced AI to recreate lost frequencies, which makes it ideal for recordings where peak distortion is severe or multi-layered audio is involved, such as podcasts with multiple speakers or gaming streams.
It also has built-in features to reduce background noise and balance loudness, so your final output is clear and professional. Moreover, it preserves subtle audio nuances, which is crucial for music or voice recordings where tonal quality matters.
Pros
✅Restores heavily distorted or clipped audio perfectly.
✅Maintains original sound quality without flattening dynamics.
✅Supports multiple audio formats for flexibility.
✅Very user-friendly, even if you have no audio editing experience.
✅Batch processing lets you repair several files at once.
Cons
❌Limited options for fine-tuning advanced edits.
Steps to fix clipped audio using Repairit Audio Repair
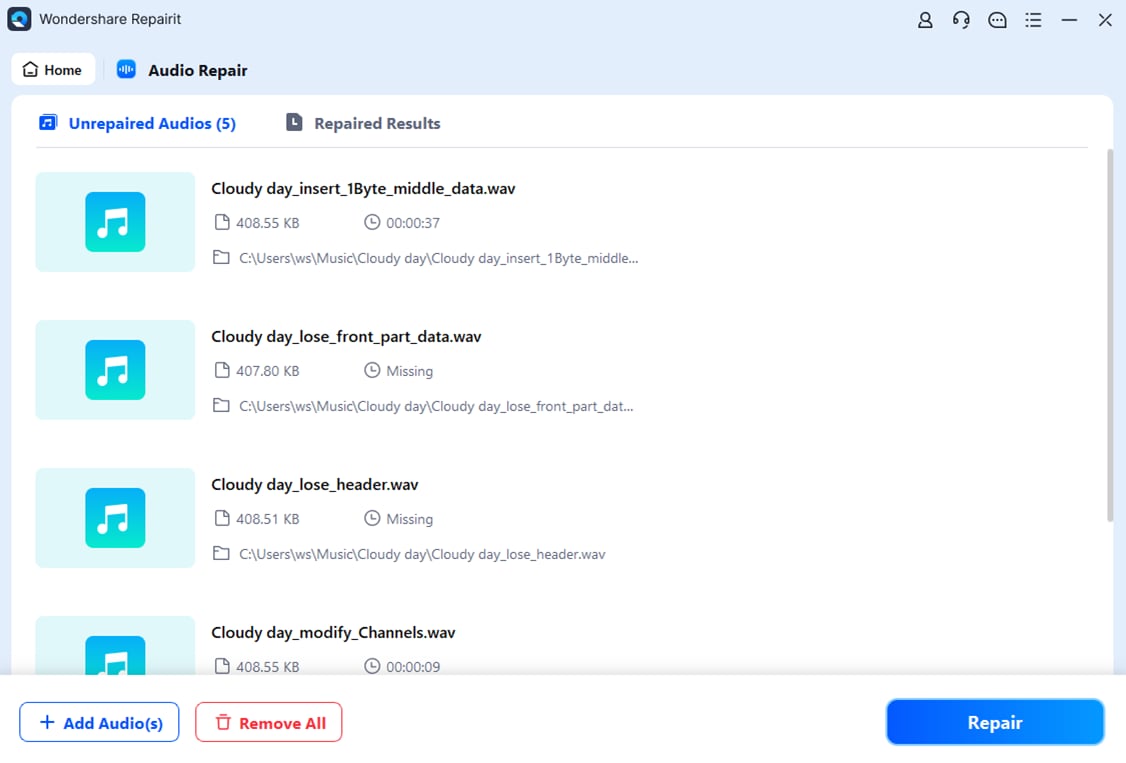
Step 1. Launch the Repairit software and select the Audio Repair option from More Types Repair.

Step 2. Click the option to add files, then select the audio file with clipping issues.

Step 3. Once the file is loaded, begin the repair. The tool analyzes the waveform and reconstructs the damaged peak areas automatically.
Step 4. Upload a good sample audio with the same format.
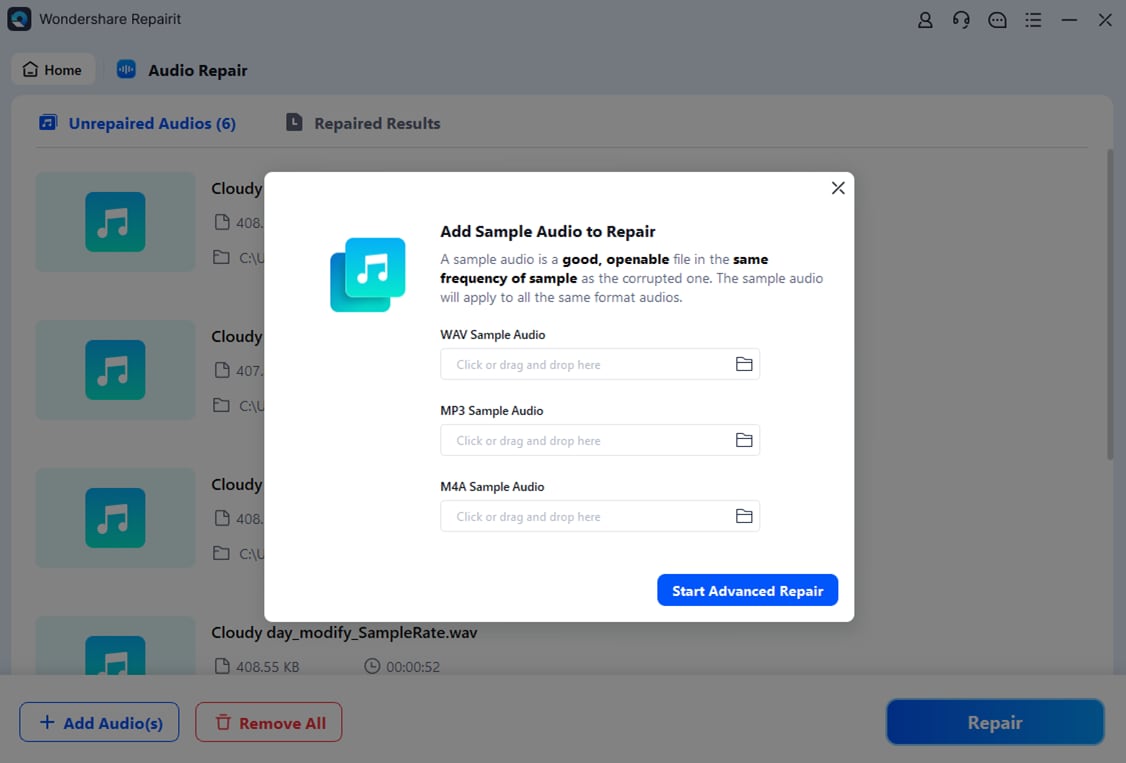
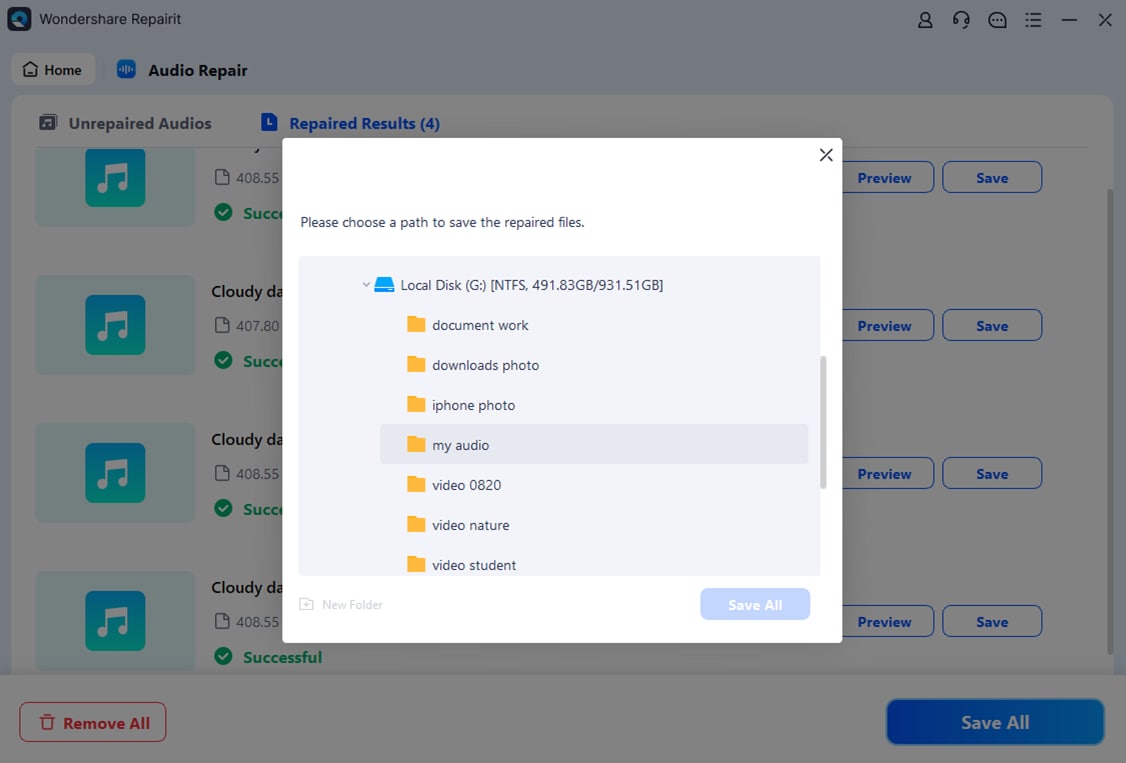
Step 5. After processing, listen to the preview. Pay close attention to loud sections that were previously distorted. If the audio sounds clean and natural, save the repaired version to your computer. Always keep the original file as a backup.
Repairit Audio Repair — Best Tool to Fix Clipped Audio Automatically
 Security Verified. Over 7,302,189 people have downloaded it.
Tool 2. Descript — Good for Light Audio Peaking Fix
Descript is particularly useful when you need quick, subtle improvements rather than full-scale restoration. Its AI can automatically detect peaks and reduce harshness in speech or dialogue. It also allows visual editing, so you can identify small problematic segments and clean them without affecting the entire recording.
An additional advantage is its integration with transcription, which makes editing dialogue recordings easier. Descript also offers automatic leveling, helping maintain consistent volume across a podcast episode or video narration.
Pros
✅Excellent for podcasts and dialogue-based content.
✅Very simple interface that anyone can use.
✅Integrates transcription and audio editing.
✅Quickly reduces minor clipping.
✅Offers cloud storage and collaboration features.
Cons
❌Not suitable for severe clipping or heavily distorted audio.
❌Full functionality requires a subscription.
Steps to fix clipped audio using Descript
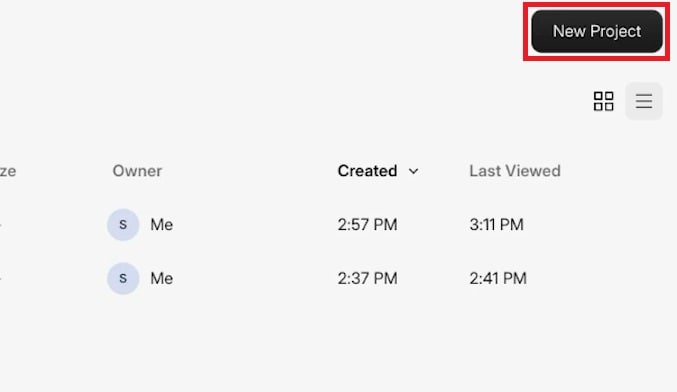
Step 1. Open Descript and create a New Project. Import the audio file that contains peaking issues.
Step 2. Use Descript’s built-in audio repair tool. Go to Project and click Recordings. Then, hit the three dots.

Step 3. Choose Repair file and select Repair audio drift.

Step 4. Wait for the process to finish and once satisfied, export the audio file using a high-quality format to preserve clarity.
Tool 3. AudioCleaner — Quick Fix for Mild Clipping
AudioCleaner focuses on speed and simplicity. It’s ideal when you have minor clipping in home recordings, voiceovers, or interviews. Beyond basic clipping correction, AudioCleaner offers real-time preview, which helps you hear adjustments immediately. It also provides simple EQ and de-essing tools, allowing you to fix sibilance or harsh high frequencies caused by slight peaks.
While it’s not designed for complex restoration, it excels in small, fast fixes and can be used even by beginners who want a polished final product without spending hours in a DAW.
Pros
✅Fast and efficient for minor audio issues.
✅User-friendly interface for beginners.
✅Supports multiple audio formats.
Cons
❌Not effective for severe distortion.
❌Limited batch processing capabilities.
Steps to fix clipped audio using AudioCleaner
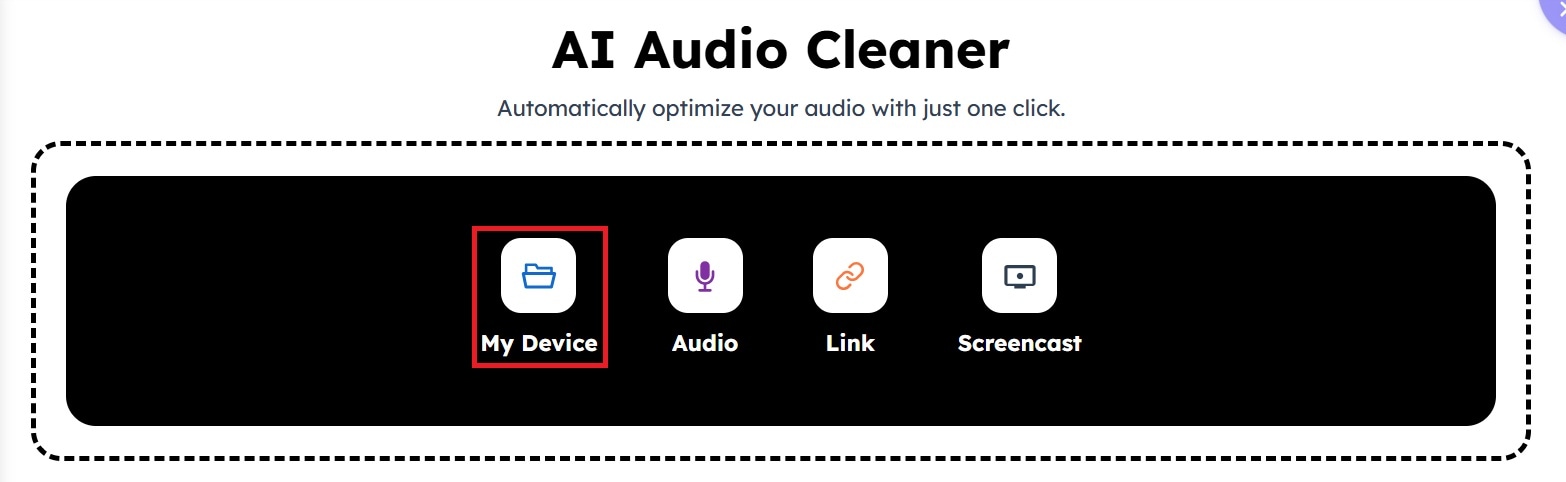
Step 1. Go to the AudioCleaner website.
Step 2. Click My Device and select the audio file you want to fix.
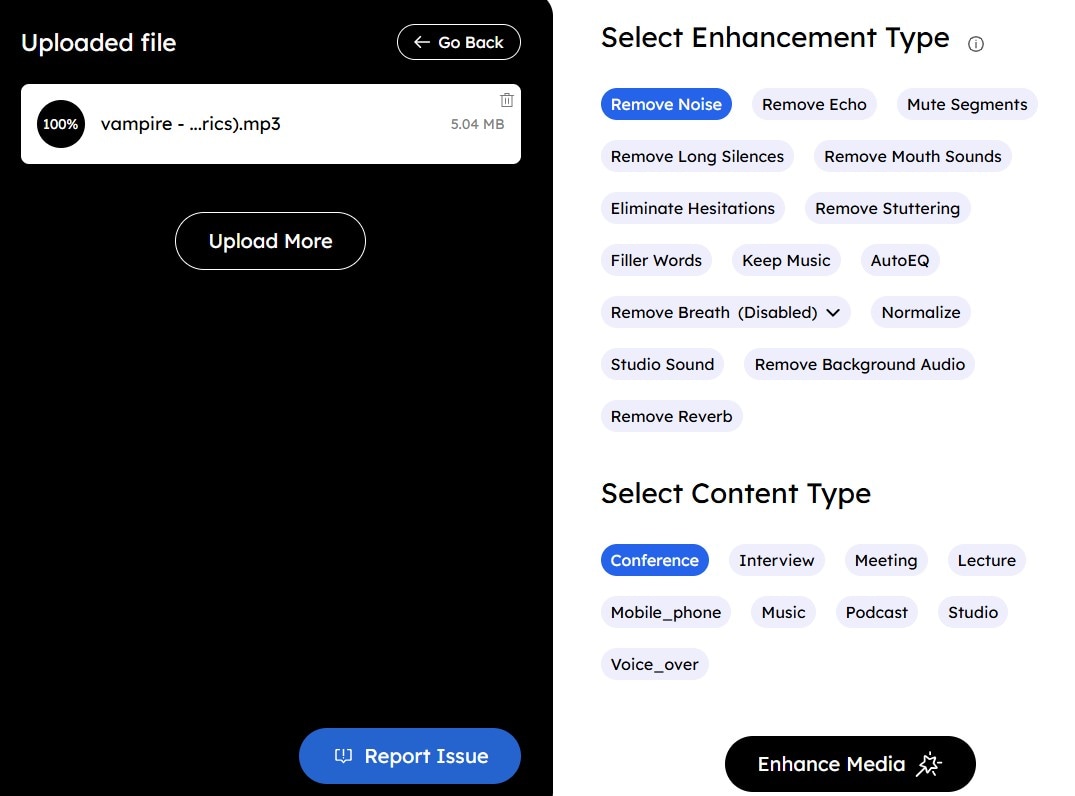
Step 3. Choose the Enhancement Type you need and your audio type. Then, click the Enhance Media button.
Step 4. Save the audio file once the distortion is minimized and the audio sounds balanced.
Conclusion
Audio clipping can be frustrating, but identifying the problem and using the right tool to fix clipped audio makes recovery possible. For severe issues, Repairit Audio Repair is the most reliable choice. For light peaks, Descript works well. For quick fixes of mild clipping, AudioCleaner is a solid option. With these tools, you can fix clipped audio without losing quality, making your recordings clear and professional.
FAQs
-
1. Can I fix clipped audio without software?
Yes, you can reduce clipping manually in a DAW using volume automation, EQ, or compression, but software tools like Repairit or Descript are faster and more precise. Manual fixes work best when clipping is very light and limited to a few moments. However, once audio is heavily clipped, missing sound information cannot be fully restored without specialized repair tools. -
2. Will fixing clipped audio restore original quality?
Repair tools can recover most lost details, but severely distorted audio may still have subtle artifacts. High-quality repair software minimizes these issues. The final result also depends on how badly the audio was clipped and how early the damage is addressed. Light clipping usually restores better than long or repeated peak distortion. -
3. Is it better to prevent clipping than fix it later?
Absolutely. Monitoring recording levels, using limiters correctly, and keeping your input signals within safe ranges prevents clipping and preserves audio quality from the start. Prevention also saves time during editing and ensures your recordings sound clean across different devices without the need for heavy processing.