

While MP3 is the most widely used audio file extension in the world, there are many other options that preserve the audio quality. FLAC stands out as one of the best formats, known for preserving HQ sound while also compressing file sizes. However, like any digital file, these files can become corrupted due to transfer errors, storage issues, or system glitches.
Therefore, this guide will explore the common causes of its corruption and methods to check FLAC files for issues. Additionally, we’ll recommend a professional tool to repair corrupted files and restore their original quality.
In this article
Part 1. What is FLAC Format?
As discussed, Free Lossless Audio Codec (FLAC) emerges as an advanced audio format that compresses sound files without losing quality. Unlike MP3, which sacrifices some audio quality to reduce file size, this format maintains the full sound spectrum. This makes it ideal for audiophiles and music enthusiasts who value higher sound quality. People use this file format to archive or stream playbacks without losing quality.
Additionally, this file format is quite famous in the music industry because of its compatibility and quality. Since it is an open-source format, it works on all platforms like iOS and even on portable audio players. Similarly, music collectors save their music in this format since it is usually where light is stored. It is just like ZIP files that retain the quality while saving storage space.
Part 2. Why FLAC Files Get Corrupted or Damaged [Major Reasons]
Since this is a relatively new format, it is more stable and rarely results in any errors. Unlike other formats, it is much less prone to corruption or glitches. However, storage issues or malware attacks can corrupt these audio files and make them unplayable. Before we move on to the solutions, let's see a few common reasons that can help you check FLAC files for corruption.
- Transfer Errors: During file transfers, such as power outages or unstable connections, interruptions can cause incomplete or corrupted data. This often results in missing audio segments or playback issues.
- Storage Issues: Your audio files can get corrupted when there is physical damage or bad sectors on storage devices. Usually, improper device handling and lack of regular maintenance are the root causes of this problem.
- Software Conflicts: Using outdated or incompatible software to play or check FLAC files can damage file metadata. As a result, you get playback errors and loss of quality when playing audio.
- Virus or Malware Attacks: Sometimes, users install software from insecure sites, resulting in malicious programs. Such programs can corrupt your audio files by injecting harmful code or changing the file structure.
- Incomplete Downloads: When you lose the internet connection during the downloading process, the partially downloaded files remain on your computer. This incomplete data makes files unreadable and prone to errors.
Part 3. How to Check FLAC Files for Corruption in 2025?
Now that we know the reasons behind the corruption of such audio files, we can now find relevant solutions. Usually, these errors are easier to find, and you can solve them in no time by using external programs. The following section outlines two reliable methods to check FLAC files for corruption.
Method 1. Using FLAC Frontend
It is the ideal software to encode, decode, and check FLAC files for errors or corruption. Due to its minimal and lightweight design, you can use it easily on all PCs. Additionally, FLAC Frontend is ideal for those users who prefer a manual method to check their files. To use the software, download it from a reliable online source and follow the steps below:
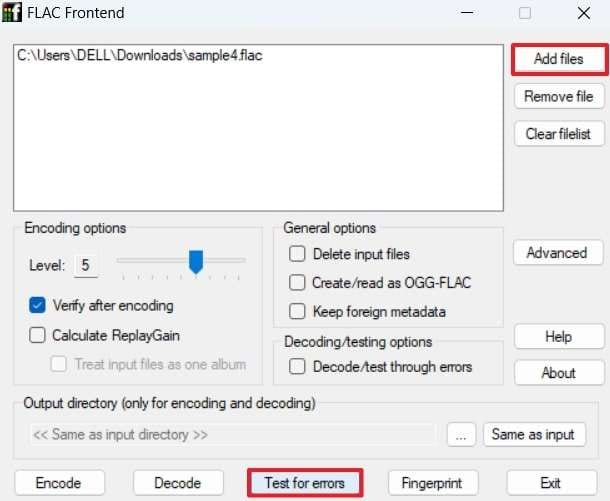
Step 1. After the installation is completed, launch this simple software on your PC. From the main interface, hit the “Add Files” button and select the potentially corrupt audio file. Once you see its directory location in the designated box, click the “Test for Errors” button.
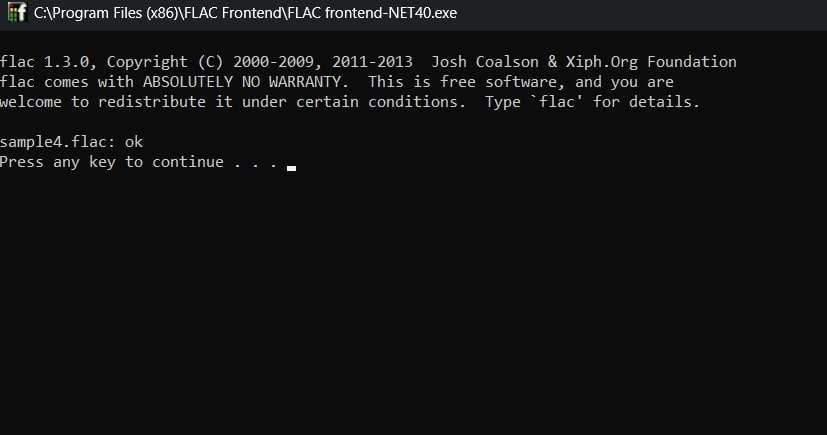
Step 2. This will open the Command Prompt on your PC to run some tests on the FLAC file. Soon, you will see the final results of the tests in the CMD.
Method 2. Using FlacChecker
For users with some coding knowledge, FlacChecker is a strong tool for checking the integrity of FLAC files. Basically, this is a GitHub-based utility tool that is fast and efficient for programming enthusiasts. Additionally, you can check batch files using this. To use this tool, ensure you have Python 3.0 installed on your PC, and then follow these steps:
Step 1. Download and install the “flac_checker.py” from the official GitHub repository. After that, open your Command Prompt and locate the script using the “cd” command. Now, run the following script:
“python3 flac_checker.py [path_to_music_folder] [path_to_corrupted_flacs_folder] [path_to_log_file]”
Within this code, replace “[path_to_music_folder]” with the directory containing your FLAC files, “[path_to_corrupted_flacs_folder]” with the location to store corrupted files, and “[path_to_log_file]” with the path where logs should be saved.
Step 2. Finally, the script will put the corrupted files in a separate folder that you can delete later on.
Part 4. How to Fix Damaged or Corrupted FLAC Files to Restore Original Quality?
Upon understanding why audio files may get corrupted, it’s clear that restoring them is important to retain their original quality. Corruption can strip audio of its richness, which leads to disrupted playback and poor listening experiences. This creates a demanding need for a reliable solution to repair damaged audio files seamlessly.
To address these needs, we recommend Repairit, which is designed to repair and restore audio issues. It repairs common audio formats, including MP3 or FLAC, to ensure versatility across diverse audio needs.
Furthermore, you can restore the rhythm and melody of your music or recordings and bring them back to life. Thus, Repairit lets you check FLAC files for corruption and restore them so you can enjoy your soundtracks.
Key Features of Repairit Audio Repair
- Adaptable to Recording Tools: This tool can fix audio from professional equipment like Sony voice recorders and shooting devices.
- Advanced Batch Repair: Users will be able to repair or restore multiple corrupted audio files at once without too much hassle.
- Preview Before Saving: Repairit allows you to preview repaired FLAC files before saving them and ensure satisfaction with the restoration quality.
- Safe Repairs: The software ensures no data loss during the repair process and maintains the privacy and security of your files.

-
Repair damaged audio with all levels of corruption, such as audio not working, clipping audio, humming audio, rumbling audio, sibilant audio, out-of-sync audio, etc.
-
Repair audios of diverse formats, including MP3, M4A, FLAC, AAC, WAV, etc.
-
Repair damaged or corrupted audio from multiple devices: portable voice recorder, recording software, shooting apparatus, SD cards, phones, hard drives, USB flash drives, etc.
-
Support Windows 11/10/8/7/Vista, Windows Server 2003/2008/2012/2016/2019/2022, and macOS 10.12~macOS 13.
Step-by-Step Manual to Use Repairit to Fix Damaged FLAC Files Quickly
Follow the comprehensive instructions below to understand how to use this audio repair tool to repair corrupted audio files:
Step 1. Access the Repairit to Commence the Task
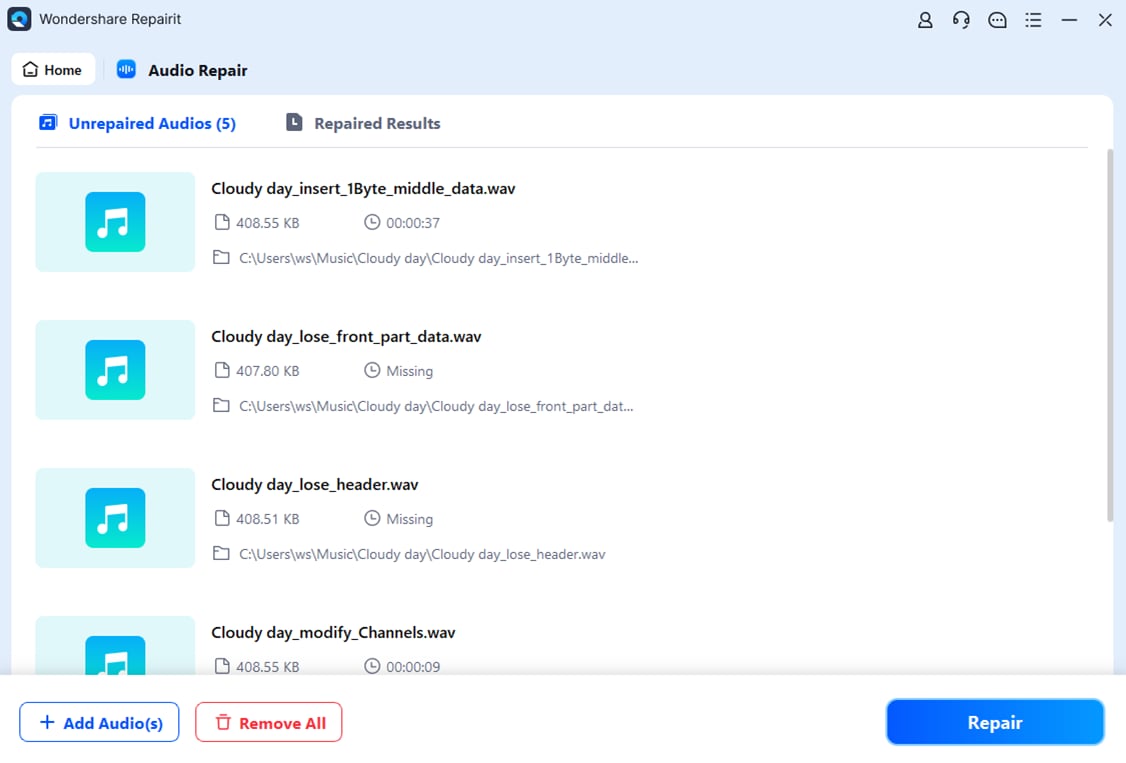
Begin the FLAC repair process by downloading and launching the Repairit toolbox. Upon accessing the main interface, navigate to the left panel and select “More Types Repair.” Afterward, you need to choose the “Audio Repair” feature and import the corrupted audio file you want to fix.

Step 2. Start the Repair Process of Damage Files
Following this, press the “Repair” button after importing all the damaged FLAC files.
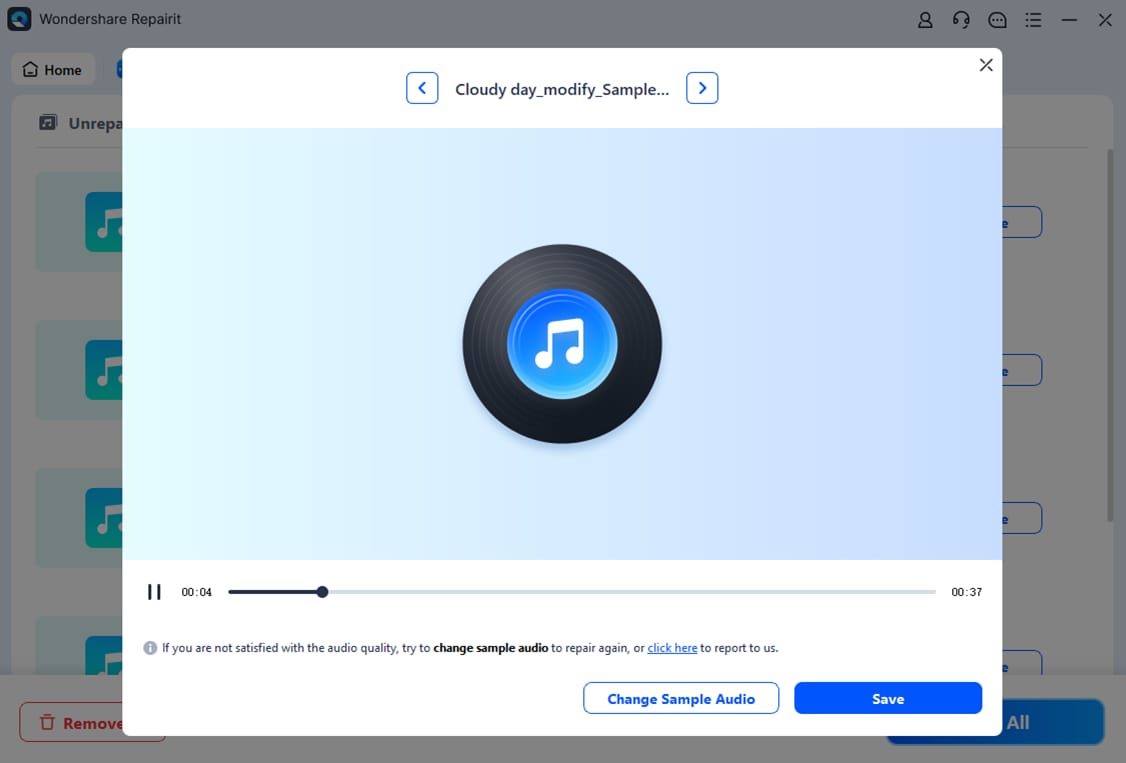
Step 3. Preview the Newly Repaired FLAC and Save the File
Upon repairing the FLAC file successfully, the status will change to “Completed.” Now, you have the option to preview the repaired audio file and ensure it meets your expectations. Afterward, click the “Save” button to save the audio file to your preferred location for easy access.
Repair Corrupted Audio Files
 Security Verified. Over 7,302,189 people have downloaded it.
Conclusion
To sum up, ensuring the integrity of audio files is important for preserving high-quality sound. Nevertheless, audio files can become corrupted due to various reasons, such as incomplete downloads or software errors. Tools that help you check FLAC files for corruption are valuable for detecting problems early on. While some basic methods can help identify damaged files, using specialized repair software offers a more reliable solution.
To cater to damaged FLAC files, Repairit stands out as an excellent option because of its innovative and advanced algorithms. This tool restores audio quality and handles different file formats to ensure comprehensive support. So, download Repairit today to fix and restore damaged or corrupted FLAC files.
FAQ
-
Q1. How can I detect if an audio file is corrupted?
You will be able to detect a damaged audio file by observing playback issues like missing sections. Other than that, errors like messages in unsupported formats also indicate corruption. Additionally, when the file size appears unusually small compared to its original size, it may be an indication of damage. -
Q2. Is there a way to prevent FLAC file corruption?
Users can prevent this file corruption by using reliable storage devices and avoiding sudden power failures during file transfers. Moreover, you should always download FLAC files from trusted sources to minimize the risk of receiving damaged files. -
Q3. Can Repairit handle severe corruption?
Repairit’s advanced algorithms are designed to repair heavily damaged audio files and restore them to their original quality. Irrespective of the cause of the failure, it can fix issues like missing data and playback problems.
