We all know that Windows is one of the world's most popular used operating systems. Windows 10 now contains many more features since its launch. But still, many users experience issues such as Audio services not responding. Windows sound troubleshooter generates this error message. It means there is an issue with your audio device and your sound device is unresponsive. In this guide, I will discuss how to fix this problem in detail.
Part 1: What's The Reason Of Audio Services Not responding?
The Audio services not responding in Windows 10 is a typical issue. You can only resolve this problem if you understand why this error occurs in your system.
There are many reasons that cause this issue:
- There might be an issue with your sound settings.
- Malware could have harmed the audio components.
- Physical audio components, such as damaged speakers.
- Your system may be experiencing internal connectivity issues.
- Audio drivers may be faulty.
- You are using outdated drivers.
- It is also possible that the audio-playing software you are using is not working.
Part 2: What Can I Do To Solve This Issue?
Let's look at some of these tested methods as there could be a variety of reasons for Windows audio service issues.
Method 1: Restart the Windows Audio Service and All of Its Dependencies
You should restart the Audio services as a first step. This service controls the sound on your computer. So, restarting it might help.
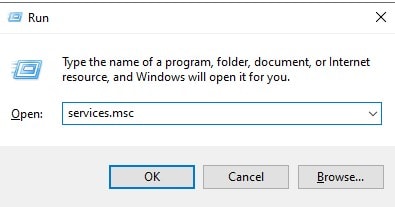
Step 1: On your keyboard, press the Windows+R keys.
The Run tool will appear as a result.
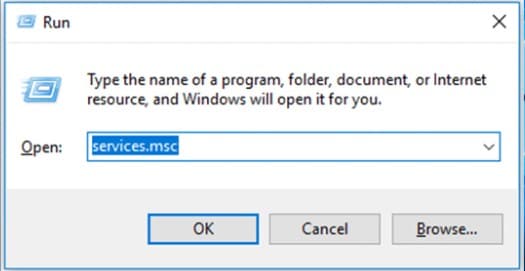
Step 2: Type services.msc.
Then, click Ok. When you do this, the Services window will open, but it might take a few seconds to load.
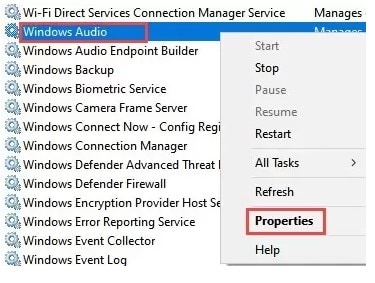
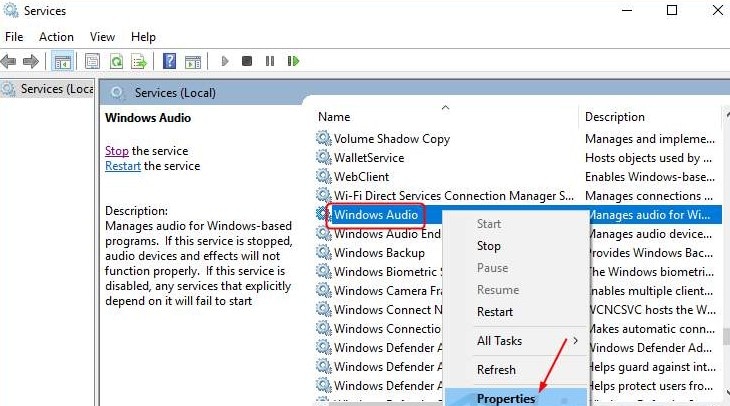
Step 3: Then right-click on the Windows Audio service and select Properties.
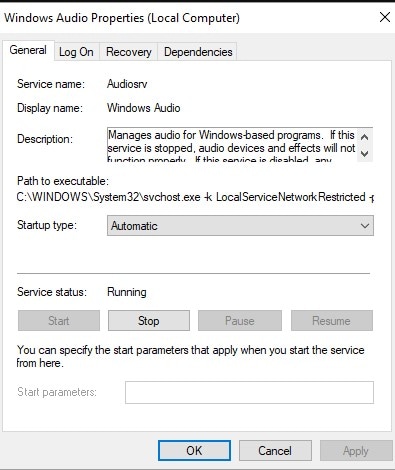
Step 4: Now, if you see the service is not running, Start the service. If the service is running, select "STOP."
Then select "Automatic" on Startup Type. And click on Start to begin the service.
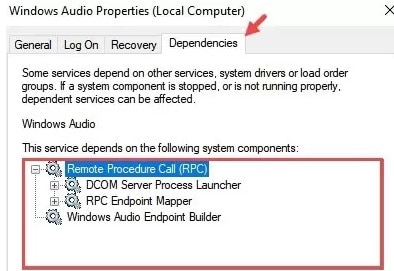
Step 5: Then, navigate the Dependency tab.
The following service components are necessary to expand and check the services.
Step 6: Next, click on Apply and OK.
Method 2: Modify the Audio Related Services Settings
This issue is the inappropriate condition of the Windows audio service. Updating the status can solve your issue.
Follow the steps to change the audio-related services settings:
Step 1: To open the Run Box, hit the Windows logo Key and R on your keyboard.
Step 2: Type services.msc. Then, hit the Enter button to open the Services window.
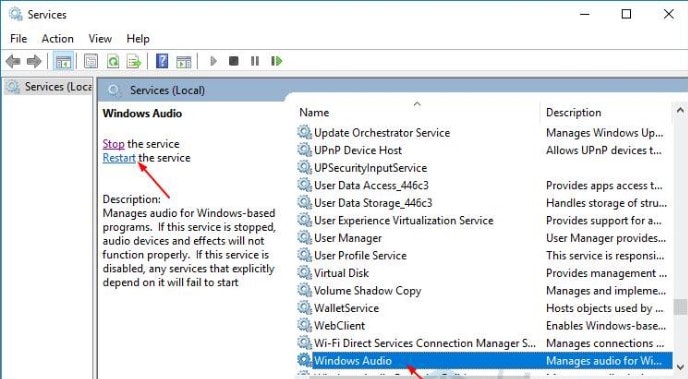
Step 3: After selecting Windows Audio, click Restart.
Step 4: Select properties from the context menu of Windows Audio.
Step 5: Select Automatic for Startup. Then select OK>Apply.
Step 6: Use the same procedure to restart the following two services.
And change their Startup types to Automatic in step 4.
Windows Audio Endpoint Builder
Multimedia Class Scheduler
Step 7: To check if the audio is working, try to play some music or a video.
Method 3: Change Log-on Settings
This trick sometimes fixes sound services Windows 10 issues. You should go back and restore the settings to their initial state only if it does not work though. Before starting the process, make a note of the settings for your services.
You must carry out this procedure on the computer's administrator account. If you are not logged into that account, you won't finish it.
Step 1: Press Windows Key+R and write "services.msc" without quotations.
Step 2: Select Properties with a right-click on Windows Audio Properties.

Step 3: Click the Local System account option rather than This Account under the Log On tab.
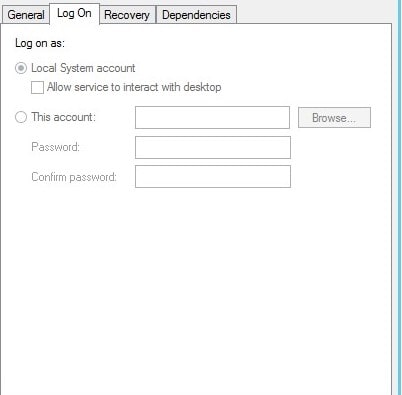
Step 4: From the drop-down option, pick Local System Account.
If the issue still exists, choose This Account. Then type Local Service into the text field.

Step 5: Then, enter any password and confirm password boxes. Choose Apply and then Ok.
Method 4: Update Audio Device Drivers
An outdated device driver often causes issues with audio services. The updated audio drivers can resolve any sound issues on your computer. You can update the sound drivers on your devices by following the steps below:
Step 1: Do right-click on the Start Menu.
Step 2: Choose Device Manager.
Step 3: Extend the category of game, video, and audio controller.
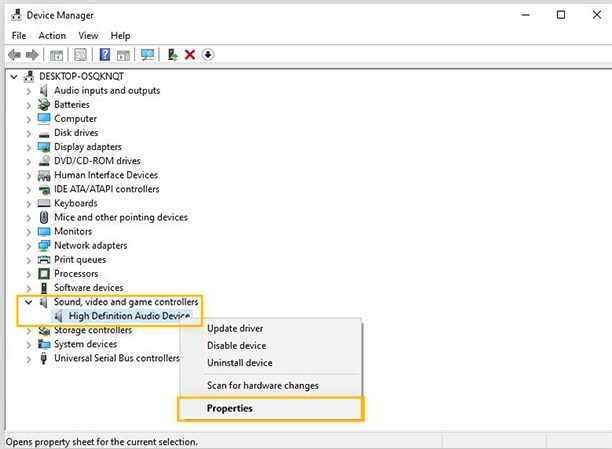
Step 4: Select Properties by doing a right-click on the Audio Device.
Step 5: On the Driver tab, click.
Step 6: Then select Update Driver.
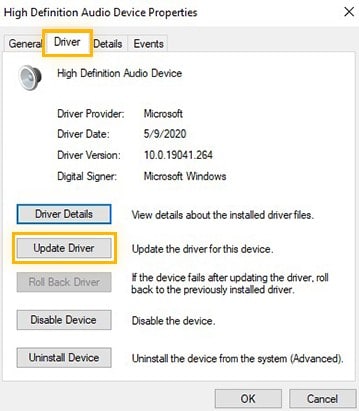
Step 7: Check for updates online or set up a driver you downloaded by hand.
Method 5: Scanning For Changes
The sound drivers can have accumulated some damaged configurations or files. As a result, the Windows audio service keeps stopping.
Step 1: To open the Run Prompt, press Windows + R.
Step 2: Type “Devmgmt.msc”. Hit Enter on the Run Prompt.

Step 3: Expand the device manager's "Sound, Video, and Game Controllers" sections.
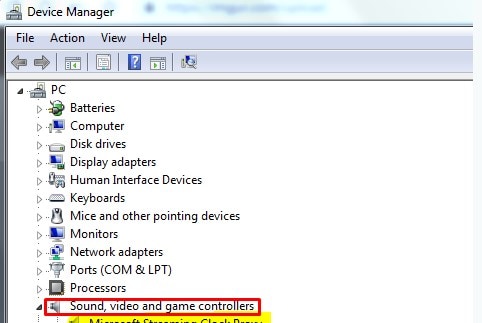
Step 4: Select "Uninstall" from the context menu when you right-click on the active audio driver.
Step 5: Select "Hardware changes" to have the device manager reinstall it for you.
Step 6: Right-click on the driver. Choose Properties if the issue is still there.
Step 7: Check to see whether that resolves your problem; if not, repeat the procedure above.
Then choose Update Driver.
Method 6: Run CMD Commands
Audio services not responding in Windows 10 Dell problem occurs. Because corrupted drivers are present. So, that is why I use the Net localgroup command in Command Prompt (CMD) to maintain the local groups on a system. You can add, create, and delete local users to groups via this command.
Step 1: Type CMD in Windows search and right-click on CMD.
Then, select Run as Administrator.
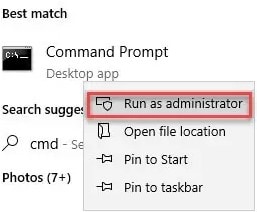
Step 2: Then, input net localgroup Administrators/add networkservice. Then press Enter.
Step 3: Then, input net localgroup Administrators/add localservice. Then press Enter.
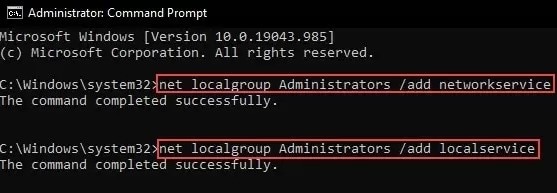
Step 4: Next, restart your computer.
And check if these changes fix Windows audio service issues.
Method 7: Audio Drivers Rollback
For some people, updating the driver might not work. The revised version has some flaws. So, with a few clicks, you may go back to an earlier driver version.
Step 1: Activate Device Manager.
Step 2: Right-click on Audio Component.
Step 3: Decide on Properties.
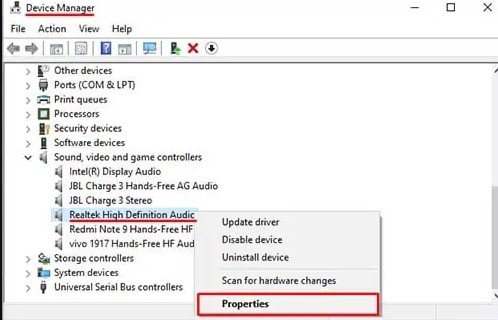
Step 4: Choose the Driver tab.
Step 5: Select Rollback Driver.
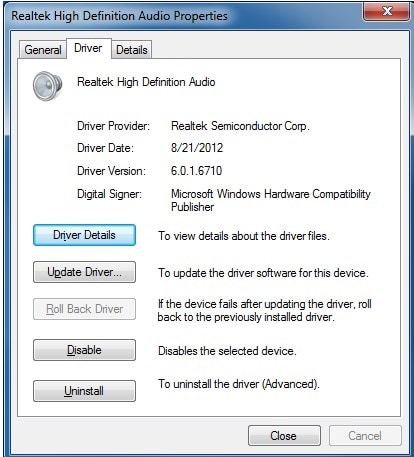
Step 6: Select a reason why you want to roll back the driver.
Step 7: Choose Yes. And after the update, click Yes. Then, Restart the computer.
An outdated driver is not present on your machine if the button is unreachable.
Method 8: Update Windows OS
It's time to update your OS if none of the above fixes succeed. When Windows installs the most recent update, your Audio Service will also be updated.
Step 1: Select Start from the menu.
Step 2: Choose the Settings button.
Step 3: To Update and Secure, click Ok.
Step 4: Then Select Check for Updates.
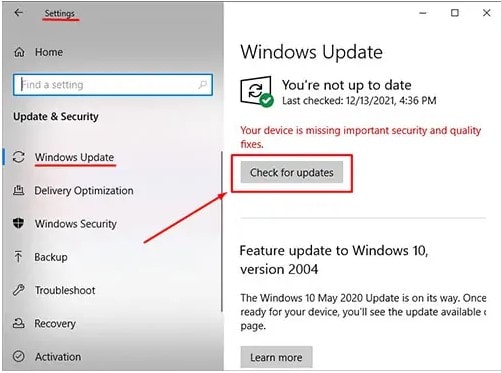
Note: Before updating Windows, make sure to backup everything. You can reset your computer from the Advanced Startup Options menu.
Bonus Part: Try Repairit to Fix All The Audio File Issues On Windows 10
Many users encounter the Windows audio service stopping problem. Wondershare Repairit - Audio Repair can help you fix any damaged audio files. This audio repair solution supports the main audio formats. Plus, this tool has a high rate of data recovery and will support you in a variety of data loss situations. That's why, in my recommendation, this is the best data recovery tool as compared to other tools.

Wondershare Repairit - Audio Repair

-
Repair damaged audios with all levels of corruption, such as audio not working, clipping audio, humming audio, rumbling audio, sibilant audio, out-of-sync audio, etc.
-
Repair audios of diverse formats, including MP3, M4A, FLAC, AAC, WAV, etc.
-
Repair damaged or corrupted audio from multiple devices: portable voice recorder, recording software, shooting apparatus, SD cards, phones, hard drives, USB flash drives, etc.
-
Support Windows 11/10/8/7/Vista, Windows Server 2003/2008/2012/2016/2019/2022, and MacOS 10.13~MacOS 15.
Let's see the steps of fixing all the audio file issues on Windows 10 with Repairit.
Step 1: Upload Your Damaged Audios.
First, launch Wondershare Repairit on your computer. Then, choose the "Audio Repair" from the ”More Types Repair" section.
For uploading your corrupted audio, choose the "Add" button. The supported audio formats are MP3, M4A, FLAC, AAC, WAV, etc.
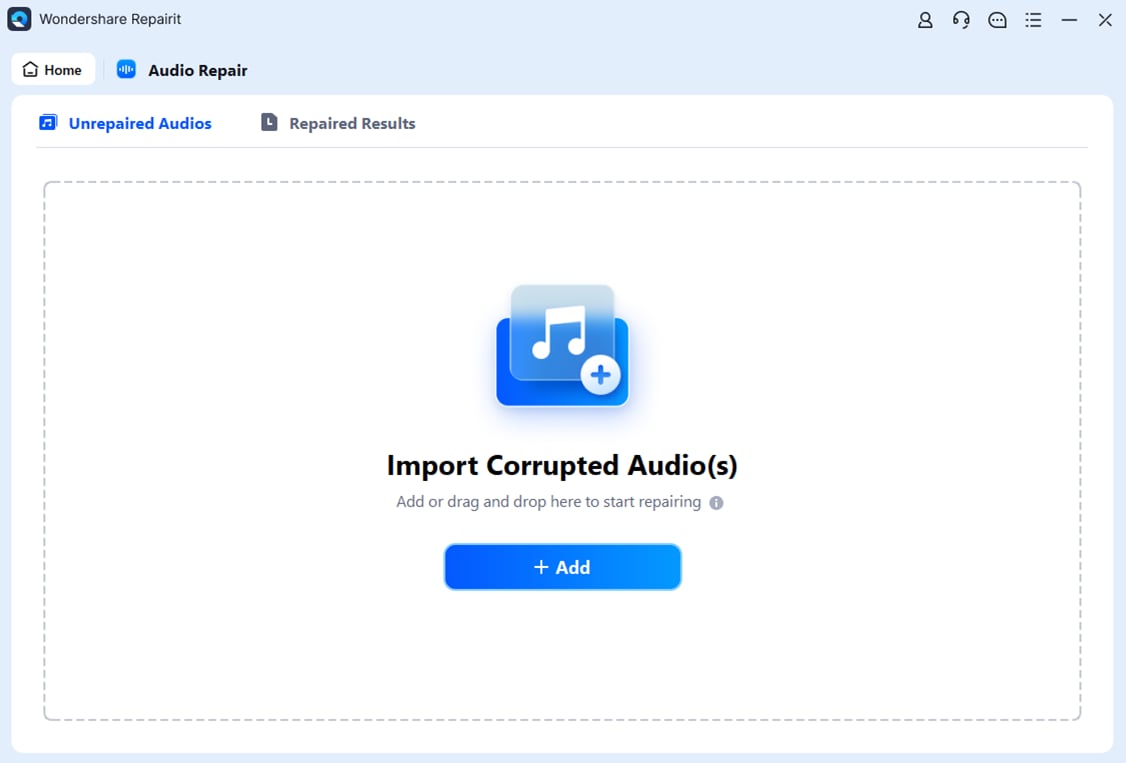
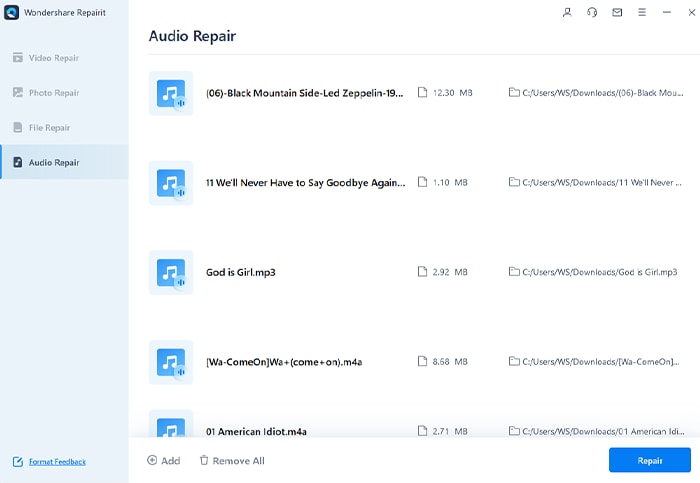
Then, the interface will show the details of each audio - FileName, FileSize, and FilePath.
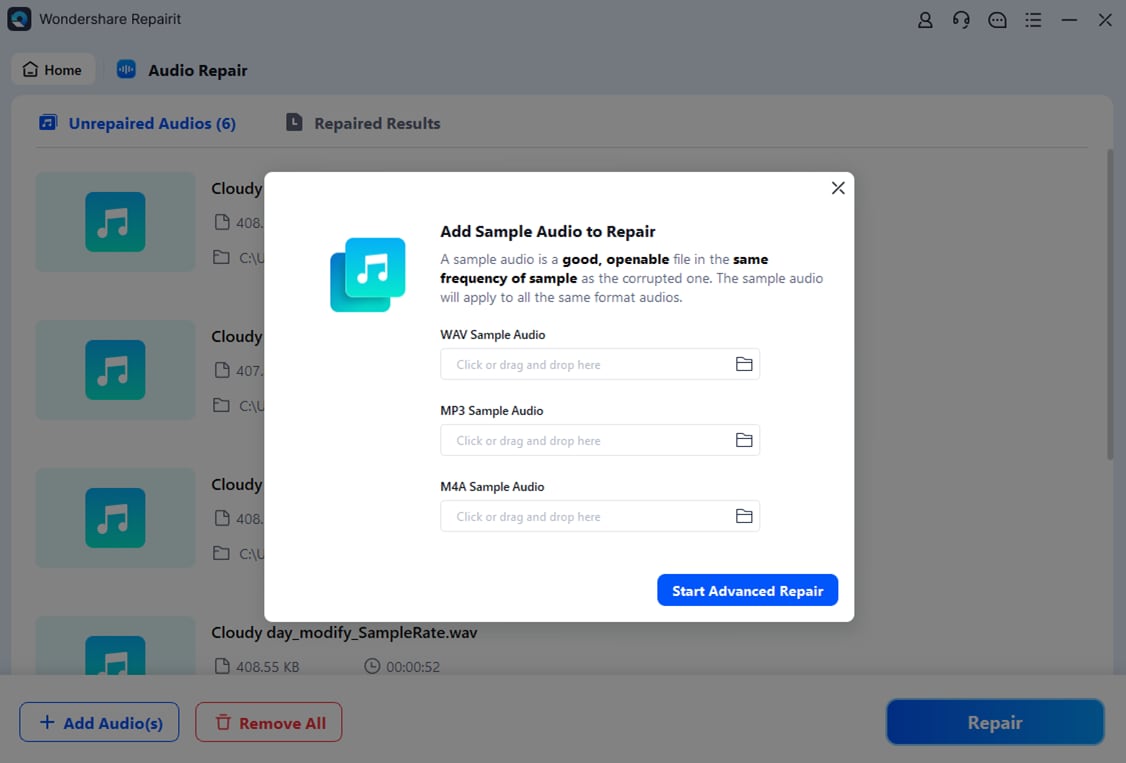
Step 2: Start To Fix Audios.
Choose the "Repair" button to start the audio repairing procedure. A window will appear. Add good sample audios with the same audio format as the damaged audios. And, the sample audio will work with all audio of the same format.
Step 3: View and Download the Corrected Audios.
When the audio repairing process finishes, you will view the result of each audio. You will see the status "Completed". Now, you can click the "Preview" button to check the audio quality.
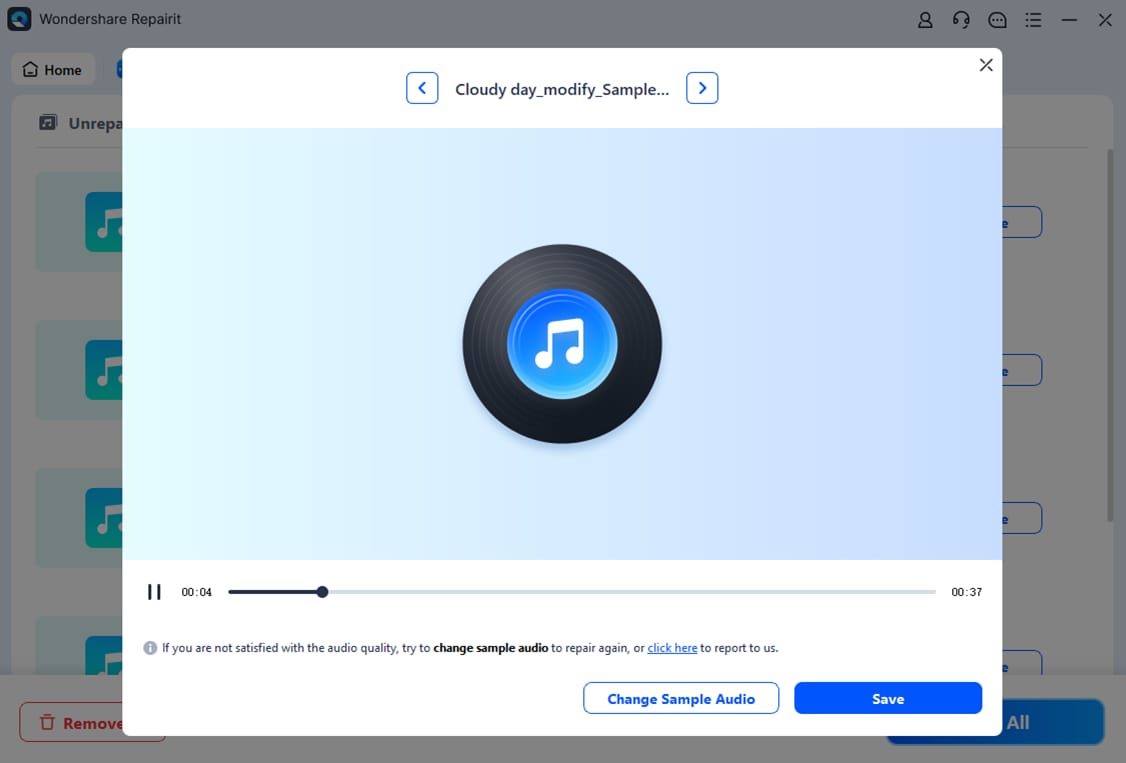
If the corrected audio satisfies you, choose the "Save" button. And select a path to save the corrected audio.
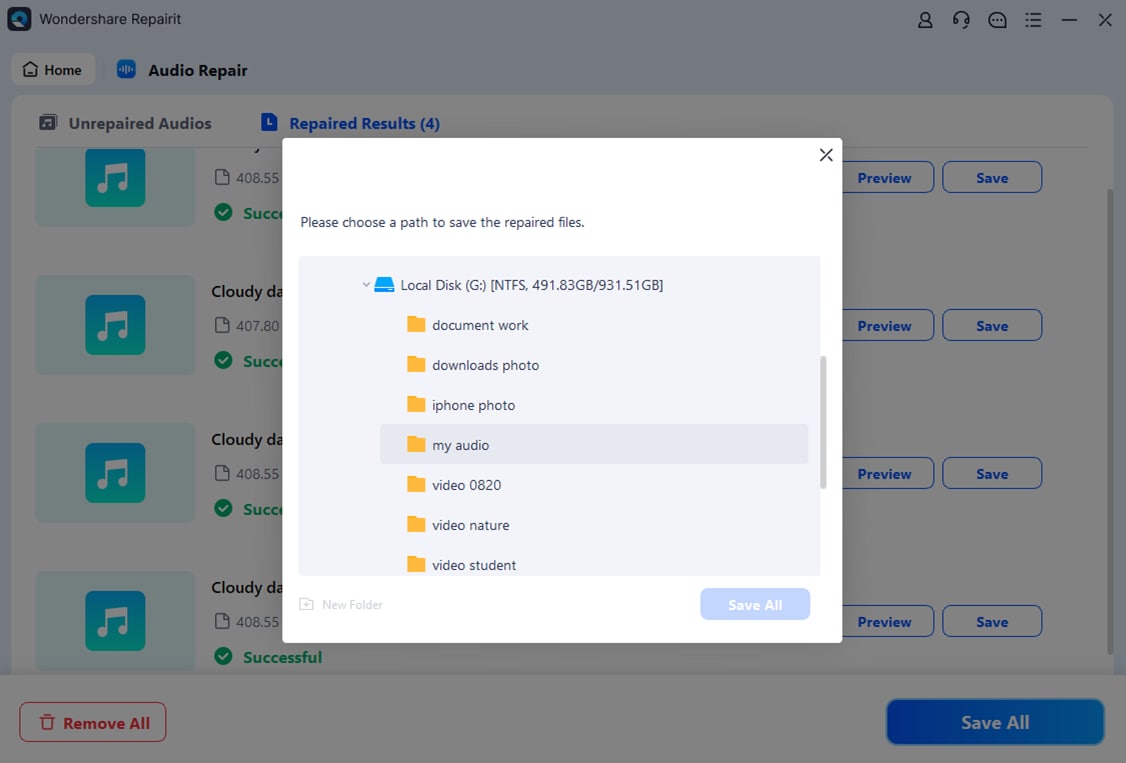
Wait for a few minutes to save the repaired audio.
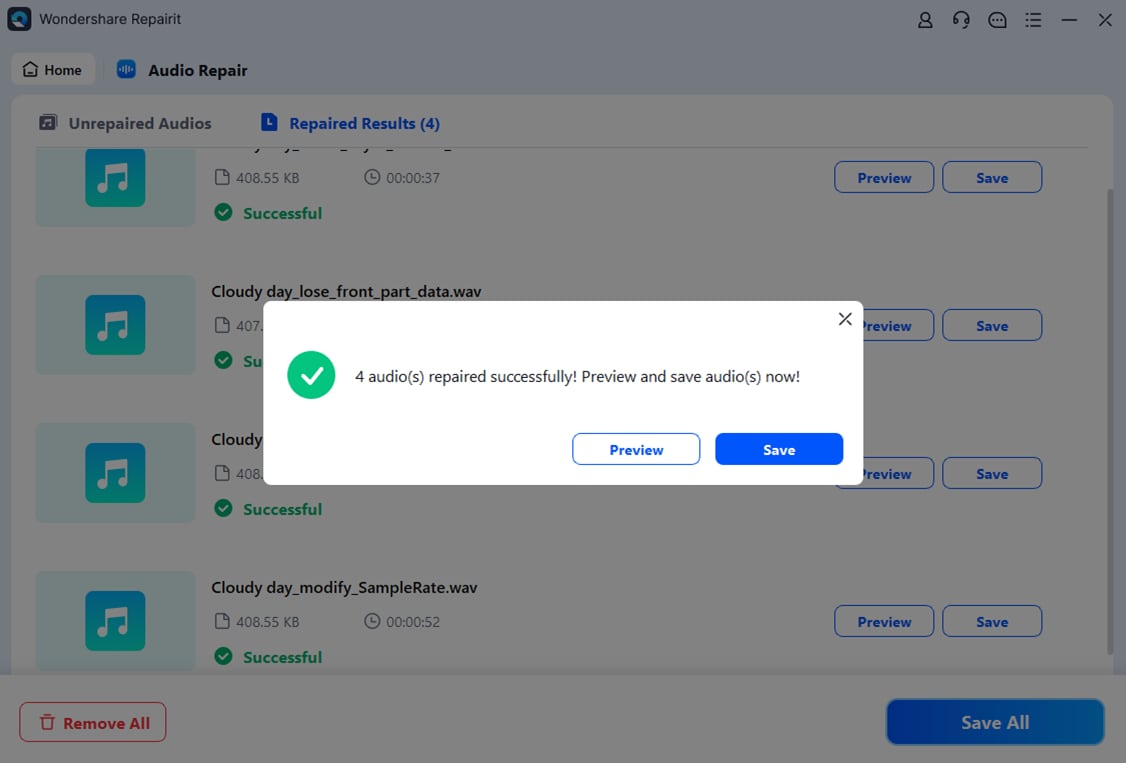
On your Windows PC, Repairit will successfully save your audio files to the location you have selected. Now, you can access your fixed audio.
Conclusion
Win 1O Audio Services not responding is a very common issue. You can solve this issue by following the methods mentioned above. Moreover, you can take the help of Wondershare Repairit Audio Repair. Because this wonderful tool will help you to fix corrupted audio files.
* Some of the above codec formats may need to be supported by system.


 ChatGPT
 Perplexity
 Google AI Mode
 Grok
Grok
