
For any movie enthusiast, an Onkyo receiver with no sound issue can ruin their entire home theater experience. Imagine settling down for a movie night and encountering complete silence from your speakers; no dialogue, no music, no sound effects. It's not just annoying; it's confusing, especially when everything seems to be connected and powered on.
After all, when the receiver goes quiet, so does your entire entertainment setup for the night. When fixing it is the only solution, the guide below will help you get sorted anyway. From what an Onkyo receiver is to workable fixes for no sound, everything is explained to address a user's needs.
Table of Contents
-
- Way 1. Power Cycle the Receiver
- Way 2. Check Input and Output Connections
- Way 3. Ensure Correct Input is Selected
- Way 4. Check the Muting and Volume Settings
- Way 5. Inspect Zone and Headphone Settings
- Way 6. Reset Factory Settings
- Way 7. Check Speaker Configuration and Cables
- Way 8. HDMI/ARC Troubleshooting
- Way 9. Address DSP / HDMI Chip Failure (Especially TX-NR609 Issue)
- Way 10. Contact Onkyo Customer Support or Authorized Repair Centers
Part 1. What Is an Onkyo Receiver & Why Does It Lose Sound?
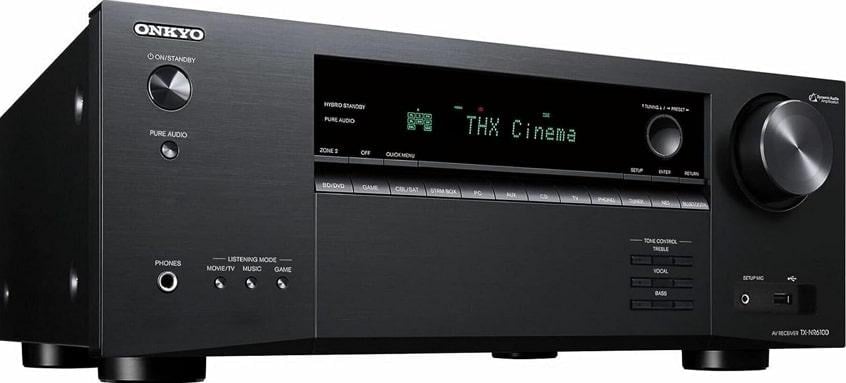
An Onkyo receiver is a high-performance audio and video component designed to serve as the central hub of your home entertainment system. It often features multiple HDMI inputs, 4K/8K video support, built-in Bluetooth, and Wi-Fi for music.
The receiver even has multi-room audio capabilities and a room calibration feature like AccuEQ for a clear sound and movie experience. Still, the Onkyo AV receiver's no sound problem can emerge anytime, indicating the following reasons:
- Loose Cable Connections: Periodically, HDMI or speaker cables can shift from their ports or wear out due to bending or frequent plugging. Even a slightly misaligned connection can completely interrupt the audio signal, resulting in no sound.
- Incorrect Input or Output Settings: In the majority of cases, the receiver might be perfectly functional, but incorrect settings could be the actual reason. Once your receiver is set to the wrong input source or muted channel, it won’t process any sound, even with correct connections.
- Due to Outdated Firmware: While the firmware serves as the internal software that controls the Onkyo receiver, using an outdated version can cause overall instability. Onkyo periodically releases updates that fix these glitches, improve sound signal processing, and add support for new audio formats.
- HDMI Handshake Failure: HDMI handshake is a process where connected devices authenticate and agree on the type of signals they’ll exchange. Once this handshake fails, it results in missing audio or video signals, particularly when incompatible HDMI versions are connected.
- Internal Hardware Not Working: If all software and connection checks fail, the Onkyo receiver's no audio issue might arise from internal hardware damage. Sometimes, overheating or internal protection circuits can even trigger automatic shutdown of audio outputs to prevent damage.
Part 2. How to Fix an Onkyo Receiver No Sound – Step-by-Step Solutions
For a consistent Onkyo receiver sound not working issue, the suggested proven methods can help in troubleshooting before seeking professional repair:
Way 1. Power Cycle the Receiver
Usually, a power cycle might sound basic, but it's one of the most effective steps when dealing with a no sound issue on Onkyo. A complete power cycle helps discharge residual electricity from internal components, resets digital circuits, and clears out temporary memory errors. To overcome sound issues, simply turn off your receiver, unplug it from the power outlet, and plug it back in after a few minutes.
Way 2. Check Input and Output Connections
Damaged or loose cables are among the most frequent causes of the Onkyo receiver no sound issue. HDMI cables are sensitive to wear and can lose connection if twisted, so it is essential to confirm that each connection is assigned correctly.
Even properly seated cables prevent dropouts, reduce interference, and maintain high-quality sound under any condition. High-definition audio formats, including DTS-HD, rely on a stable HDMI connection, and verifying restores audio performance.
Way 3. Ensure Correct Input is Selected
Whenever a wrong input source is connected, you might experience the Onkyo receiver no audio problem because of multiple input options. Your TV might be connected to the “TV/CD” port, but the receiver is set to “BD/DVD,” resulting in no sound with everything connected, apparently. An assurance that the correct input source is selected helps your receiver process digital signals from your device. Follow the tutorial to ensure accurate input on Onkyo:
Step 1. On the receiver’s remote, press the “Input” or “Source” button > Enter Setup menu > Choose the “Input/Output Assign” option.
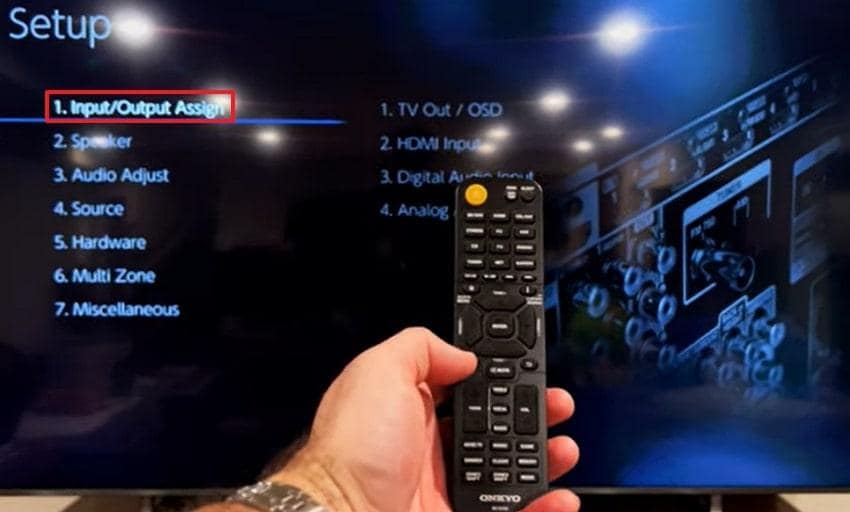
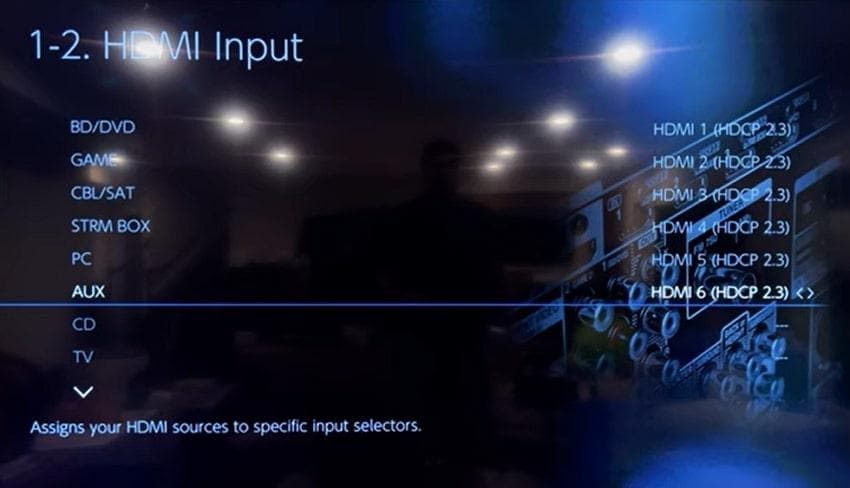
Step 2. Access the “HDMI Input” option and verify that the input name matches the name of your connected device.
Way 4. Check the Muting and Volume Settings
It might sound simple, but a muted receiver or an extremely low volume setting is a common reason behind the Onkyo receiver's no sound issue. This check and adjustment of volume settings ensures your receiver and all connected devices are synchronized in audio output.
In most cases, unmuting the receiver and adjusting the volume settings restores audio without requiring unnecessary resets. Explore the guidelines and check your receiver's mute and volume settings:
Step 1. From the Setup menu, select the “Audio Adjust” option and press the “Volume” option on the display screen.
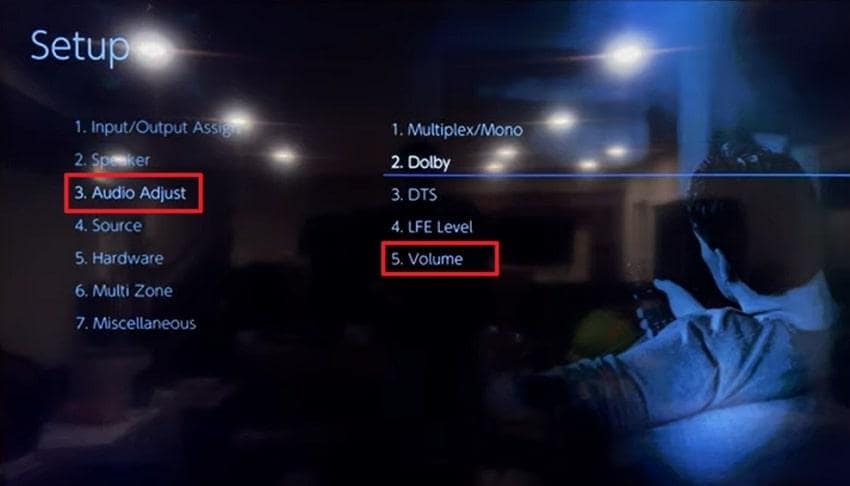
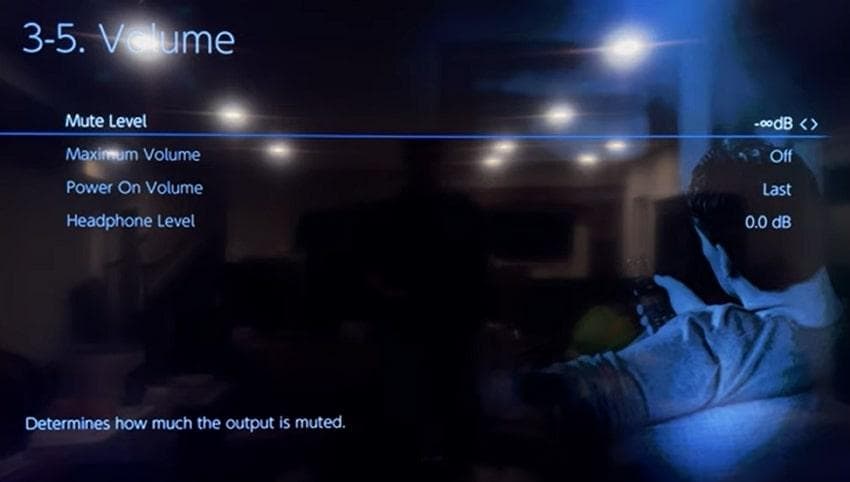
Step 2. In the Volume settings, check the “Mute Level” and “Maximum Volume” or “Power on Volume” to ensure proper sound. Following this, you can adjust the volume settings to your preferred level for consistent performance.
Way 5. Inspect Zone and Headphone Settings
Onkyo receivers are made for multi-zone audio capabilities to play different audio sources in separate rooms. Though this function adds flexibility to your home audio system, it can lead to the Onkyo receiver having no audio if misconfigured. An inspection and then correcting your zone and headphone settings guarantees that sound is directed precisely where you want it. For a better understanding, adhere to the manual and inspect respective settings for clear sound:
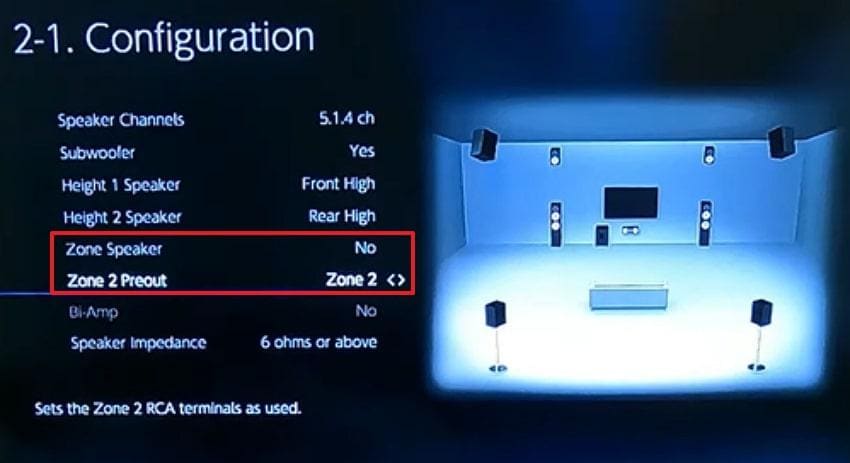
Step 1. Enter the Setup menu > Press the “Speaker” option > Access the “Configuration” option > Set “Zone 2” in both Zone Preout and Zone Speaker.
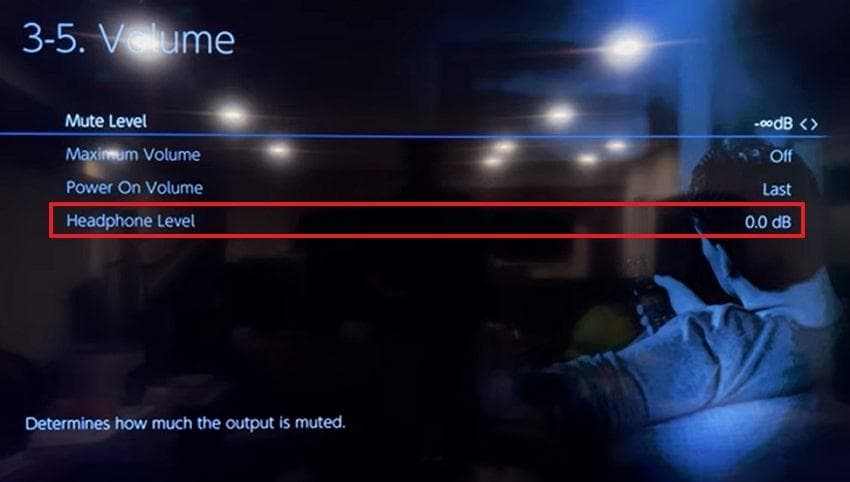
Step 2. Now, navigate back to the “Audio Adjust” option > Access the “Volume” option > Check and adjust the “Headphone Level” settings accordingly.
Way 6. Reset Factory Settings
With the ongoing Onkyo receiver sound not working issue, a complete factory reset may sometimes be the most effective solution. It clears all the stored preferences, returning your device to its original factory state, without any conflicting data. Every function, from sound decoding to speaker output, operates as designed once your receiver gets a clean slate. Dive into the manual and learn how to factory reset your Onkyo receiver:
- To do so, press the “Power” and the “Input” button (CBL/SAT, depending on your model) together until “Clear” appears.
- Following this, all your receiver’s settings will be erased with factory default resets.

Way 7. Check Speaker Configuration and Cables
Just because your receiver distributes sound signals across multiple channels, any incorrect or loose wiring can easily lead to total sound loss. A regular checkup and configuring your speaker guarantee that every channel is active, balanced, and properly assigned.
This not only restores audio output but also improves overall surround sound quality for an immersive listening experience. Simply, follow the instructions and check the speaker configuration for the Onkyo receiver no sound:
In the Setup menu > Select the “Speaker” option > Press the “Configuration” option > Ensure “Speaker Channels” and other speaker configuration options.

Way 8. HDMI/ARC Troubleshooting
If you use HDMI or ARC (Audio Return Channel) to connect your TV and receiver, communication errors might result in the Onkyo receiver having no audio. The HDMI/ARC connection is responsible for sending audio signals through a single cable, and any minor handshake can disturb sound transmission.
Proper troubleshooting of ARC-related problems prevents lag, dropouts, and muted playback, providing the highest audio-visual experience. For more clarity, explore the tutorial to resolve HDMI/ARC issues:
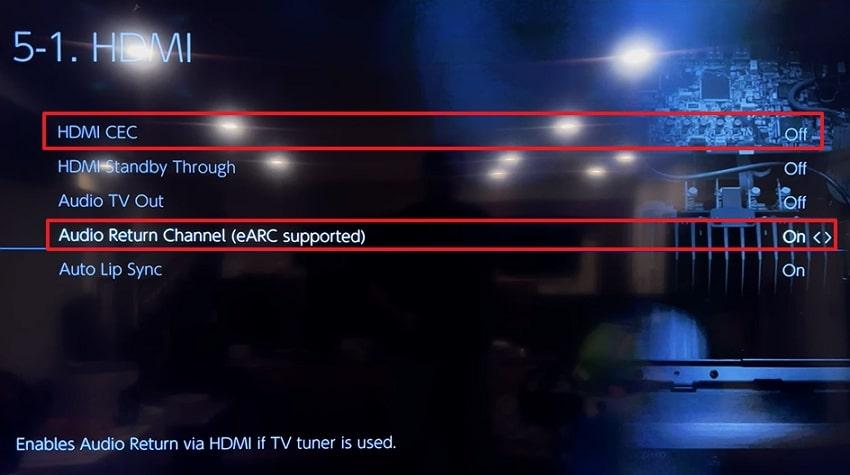
- Ensure HDMI cables are connected to the correct ARC-enabled ports on both the TV and receiver.
- Now, access the Setup menu, choose the “Hardware” option, and press the “HDMI” option to proceed.
- Toggle on “HDMI CEC” and the “Audio Return Channel (eARC supported)” option to ensure proper audio results.
Way 9. Address DSP / HDMI Chip Failure (Especially TX-NR609 Issue)
Receiver models, particularly the TX-NR609 and TX-NR616 series, are known for experiencing sound loss due to a failed DSP or HDMI board. These components are responsible for decoding digital audio signals and managing communication between the receiver and connected devices.
When the DSP or HDMI chip fails, your receiver may display all the correct indicators but still produce no sound, regardless of settings. This type of hardware malfunction can develop over time due to heat buildup or prolonged usage, requiring professional diagnosis to resolve.
Way 10. Contact Onkyo Customer Support or Authorized Repair Centers
Once every fix is tested, and nothing works to overcome the no sound Onkyo TX-NR609 issue, it's time to call trained specialists. This prolonged no-sound issue may now indicate internal hardware damage or a complex electronic failure that requires expert attention. Reaching out to Onkyo’s certified support team or authorized repair center might be the most reliable and safe course of action.
Pro Tip. When It’s Not the Receiver but the Audio File (Corrupted Audio)
If you’ve already checked your cables, inputs, and speaker settings but your Onkyo receiver still has no sound, the problem might not be with the receiver at all. In many cases, the “Onkyo receiver no sound” issue happens because the audio file itself is corrupted or encoded incorrectly. These damaged files can cause silent playback or distortion, even when the receiver is working perfectly.
That’s where Repairit Audio Repair becomes your go-to solution. This AI-powered tool is designed to repair broken, silent, or glitchy audio files, restoring them to full clarity and playback compatibility. Whether you’re dealing with muted tracks, skipping sounds, or files that won’t play at all, Repairit can bring them back to life with studio-grade precision.
Key Features
- Repairs Corrupted or Incomplete Audio Files: Fixes files damaged during download, transfer, or recording so they play normally again.
- Supports All Major Audio Formats: Compatible with MP3, WAV, FLAC, AIF, and other compressed or lossless file types.
- Fixes Skipping or Glitchy Playback: Eliminates cut-outs, dropouts, and timing errors for smooth audio output.
So, before assuming your Onkyo AV receiver no sound problem is a hardware failure, try repairing your audio files first. Repairit Audio Repair often restores playback instantly — saving you time, effort, and unnecessary service costs.
Step 1. Go to the “More Types Repair” tab and press the “Start” button for the Audio Repair module. Later, click the “Add” button to insert all the corrupted audio files and have them repaired simultaneously.

Step 2. Once you have added the damaged audio files, proceed to the “Repair” button and start fixing the corruption issue.

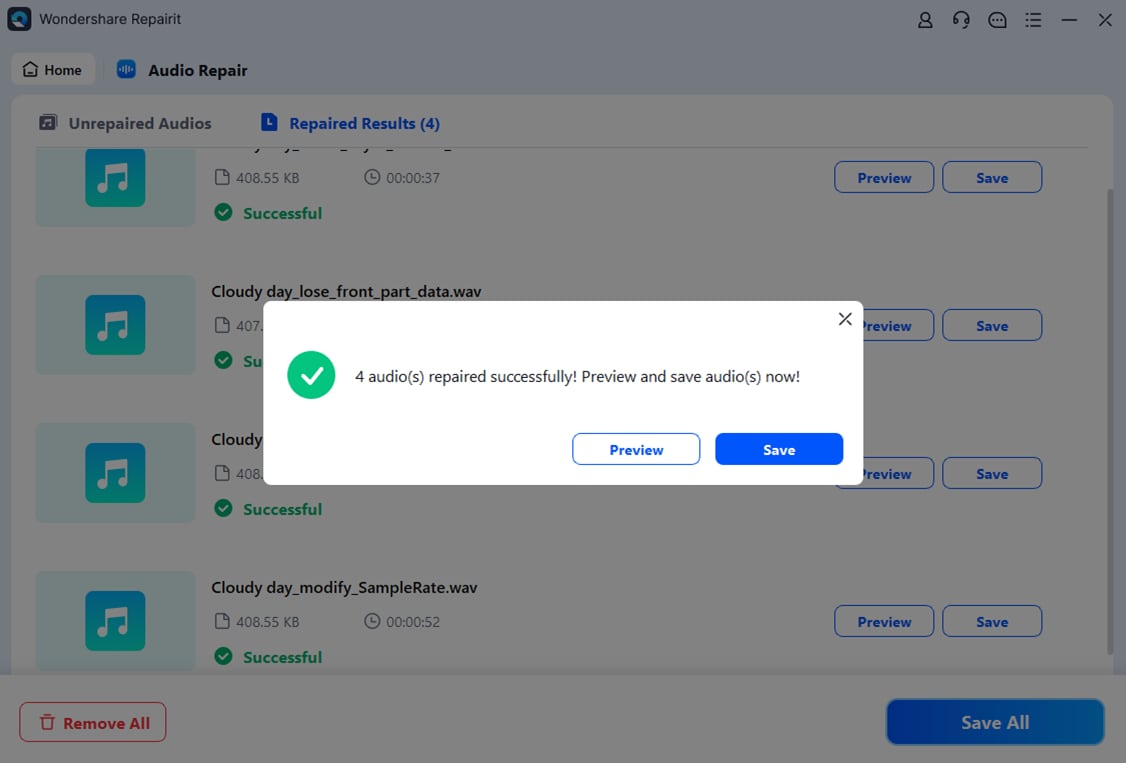
Step 3. Soon, when the process finishes, press the “Save All” and “Save” buttons in the prompt window and save the files if satisfied.
Conclusion
In conclusion, a dreaded Onkyo receiver no sound issue becomes more stressful when you’ve checked every cable and setting with no success. Fortunately, most problems stemming from minor glitches, misconfigurations, or connectivity errors can be fixed easily, as demonstrated in the article. Yet, if your receiver dreams fine and the silence continues, download Repairit and get your corrupted files repaired in no time.
Frequently Asked Questions
-
Q1. Why is there no sound on my Onkyo AV receiver?
When your Onkyo receiver has no audio issue, it might include reasons like incorrect input selection, loose HDMI, or speaker connection. Another frequent cause is a mismatch between the input and output connections, especially when using HDMI or ARC. -
Q2. How do I reset my Onkyo receiver?
Considering resetting your Onkyo receiver to factory settings is one of the most effective ways to resolve persistent sound issues. To do so, you’ll need to press the Power and Input source buttons together on your receiver. Doing this, you can clear all saved data, including input assignments, network settings, and custom audio configurations. -
Q3. Does Onkyo still repair HDMI/DSP issues for TX-NR609?
Onkyo continues to offer repair services for HDMI and DSP issues related to the TX-NR609, although availability may vary by region and warranty status. The TX-NR609 was one of several Onkyo receivers known for HDMI and DSP chip failures that caused complete loss of audio output. If you suspect a DSP or HDMI failure, the best approach is to contact Onkyo’s authorized service center or customer support directly.
