For several reasons, many common issues can arise when using email client apps like MS Outlook. One such frustrating problem is the “Outlook Not Implemented” error interrupting essential communication. It severely impacts the users' ability to send, receive, or manage emails effectively. That means understanding the issue and resolving it is of utmost importance to maintain the workflow.
This guide breaks down 6 practical, step-by-step ways to help fix the “Not Implemented” error in Outlook. Each solution is designed to be easy to follow to ensure users regain full functionality with minimal hassle. Following these techniques, you can troubleshoot and resolve the error to return to an effortless email experience.
In this article
Part 1. What Are the Causes of Outlook Not Implemented Error?
Before going further, it is crucial to learn about the possible causes of this issue to understand it better. The “Outlook Not Implemented” error can occur for several reasons, often stemming from technical problems or software conflicts. Therefore, you can go through these common causes to learn why your Outlook app seems to stop working:
1. Corrupted Outlook Files
Damaged or missing files, often due to abrupt shutdowns or system crashes, can lead to functionality issues, including the “Not Implemented” error. Corrupt PST or OST files (Outlook data files) may disrupt the app’s core processes.
2. Incomplete or Corrupted Installation
If Outlook or Microsoft Office wasn’t installed correctly, essential components might be missing, causing this error. Updates that were interrupted or incomplete can also lead to similar issues.
3. Conflicting Add-ins
These are add-ins that enhance Outlook’s functionality but may conflict with each other or with the app’s base settings. It can trigger the error, particularly if an add-in becomes outdated or incompatible with recent updates.
4. Antivirus Software Interference
Specific security programs can conflict with Outlook, especially when sending and receiving emails. If your antivirus is not configured correctly or is overly restrictive, it can block necessary functions.
5. Outdated Software or Missing Updates
Running an outdated version of Outlook or Office can cause compatibility issues. Updates often contain bug fixes and improvements, and missing these updates may prevent Outlook from functioning as intended.
Fix Outlook Not Implemented Error

Part 2.Tested Solutions to Fix Outlook Not Implemented
Applying a structured and step-by-step approach can make a significant difference in resolving this issue. Below are six reliable ways that have proven effective in fixing the Microsoft Outlook not implemented error for many users. Each solution is crafted to target specific problem areas and restore the app’s full functionality.
Solution 1. Disable Outlook Add-ins in Safe Mode
Faulty extensions commonly cause this issue, so checking them can help resolve it. Add-ins are helpful tools that extend Outlook’s functionality, but some may be incompatible. By launching the app in Safe Mode, you can open it with only essential components.
Doing this makes it easier to identify if an add-in is the cause. Follow these steps to fix the “Outlook Not Implemented” error via this method:
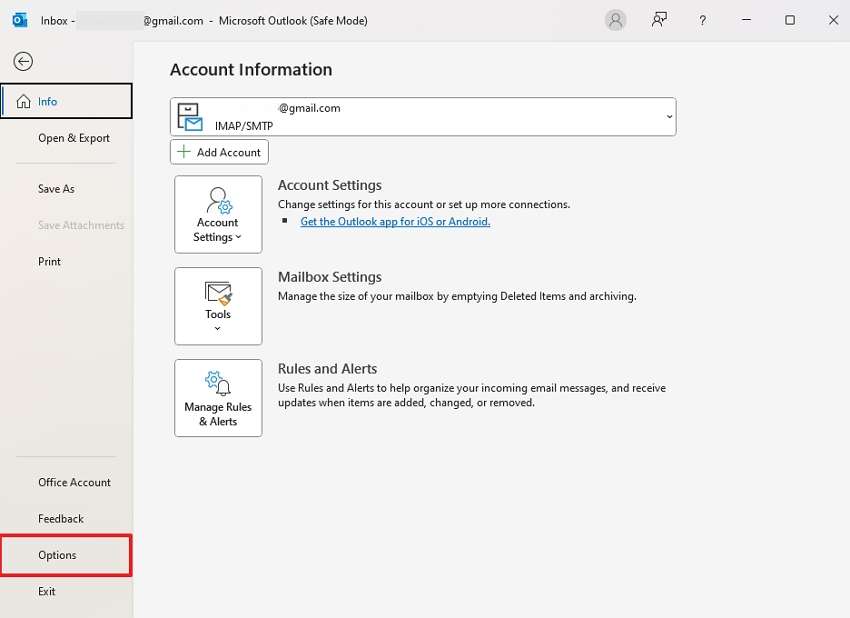
Step 1. Begin by pressing the “Win + R” to open the Run function and type “Outlook.exe/safe” to launch the app in Safe Mode. Once launched, approach the “File” menu and choose “Options” to select the “Add-ins” tab.
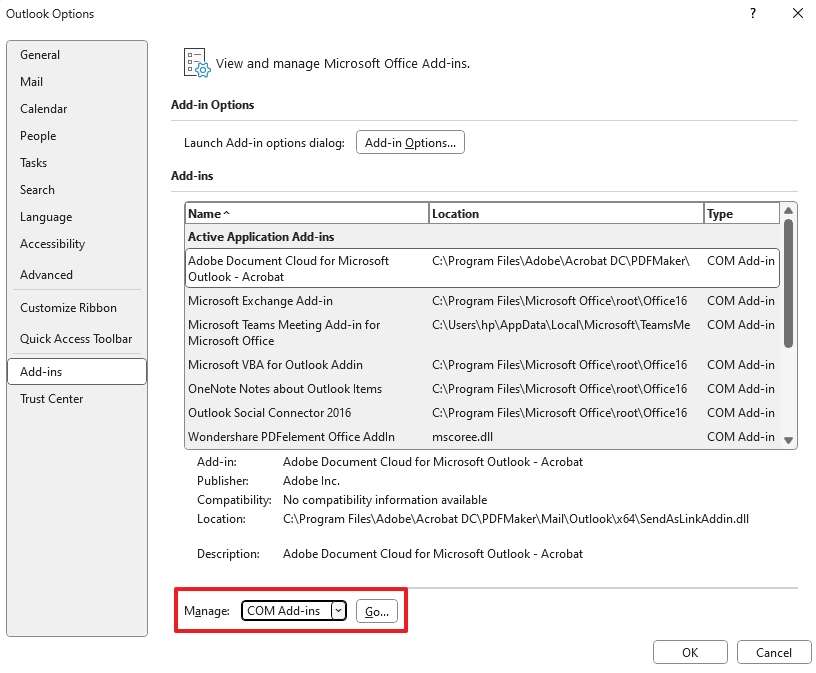
Step 2. Now, you'll see a drop-down menu labeled “Manage” at the bottom of the window. Here, ensure that you have selected “COM Add-ins” and hit “Go.”
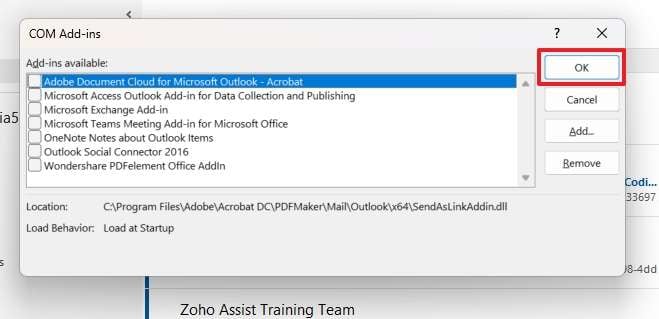
Step 3. On the following pop-up window, uncheck all extensions and tap “OK” to disable all add-ins. Afterward, close the app and relaunch it normally to check if the error has disappeared.
Solution 2. Turn Off Anti-Virus Program
Security software can sometimes interfere with Outlook’s functions, particularly sending and receiving emails. Specific antivirus programs may incorrectly block its core features, leading to the "Microsoft Outlook Not Implemented" error. Temporarily turning off this software can help identify if it's causing the issue. The following instructions can prove helpful in achieving your goal in no time:
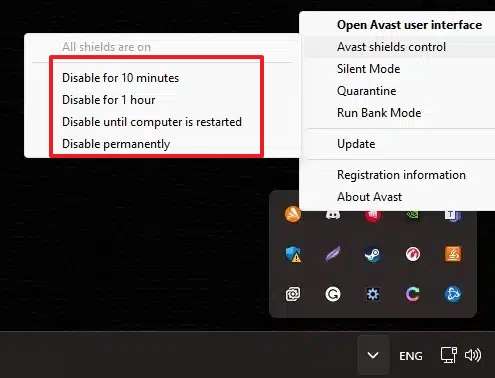
Step 1. In your system tray at the bottom-right corner of the screen, locate your antivirus like Avast’s icon. Now, right-click it to choose “Disable for…” from the “Avast Sheild Control” option.
Step 2. Now, confirm your action by pressing “OK, STOP” and move to the Outlook app. Here, check if the error has disappeared and you are able to send the emails again.
Solution 3. Recreate Send/Receive Settings File
Corrupt configurations are among the top factors behind the “Outlook Not Implemented” error. Outlook’s send/receive settings file manages the parameters for sending and receiving emails. It can cause issues that hamper your ability to use the app if it gets corrupted. Recreating this file using these steps can reset your Outlook’s send/receive settings, potentially resolving the error:
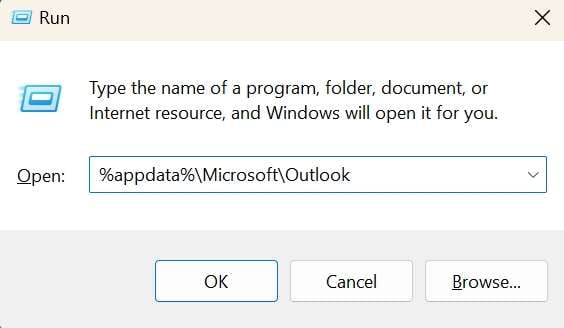
Step 1. As you use the “Win + R” key combination to launch the Run utility, type “%appdata%\Microsoft\Outlook” and press the Enter key to proceed. Doing this will open the Outlook folder where configuration files are stored.
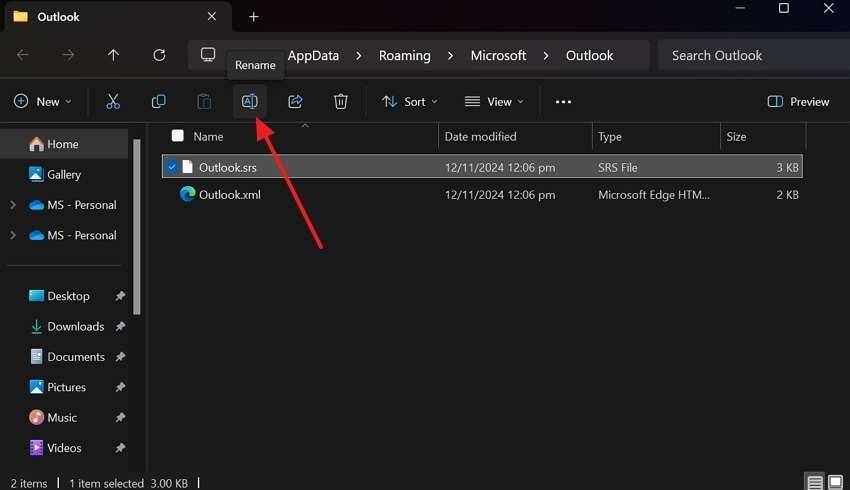
Step 2. Here, find and rename the “Outlook.srs” file to “Outlook.srs.old” and move to relaunch the app. Once Outlook is open, the app will generate a new SRS file, which should resolve any issues caused by the previous one.
Solution 4. Create a New Outlook Profile
There is a chance that your profile file in the app has been damaged or corrupted to cause this problem. Each profile stores settings for email accounts, data files, and custom configurations. It can lead to the "Microsoft Outlook Not Implemented" error if it develops issues over time. Setting up a fresh profile using the following guide can resolve these errors by giving Outlook a clean slate:
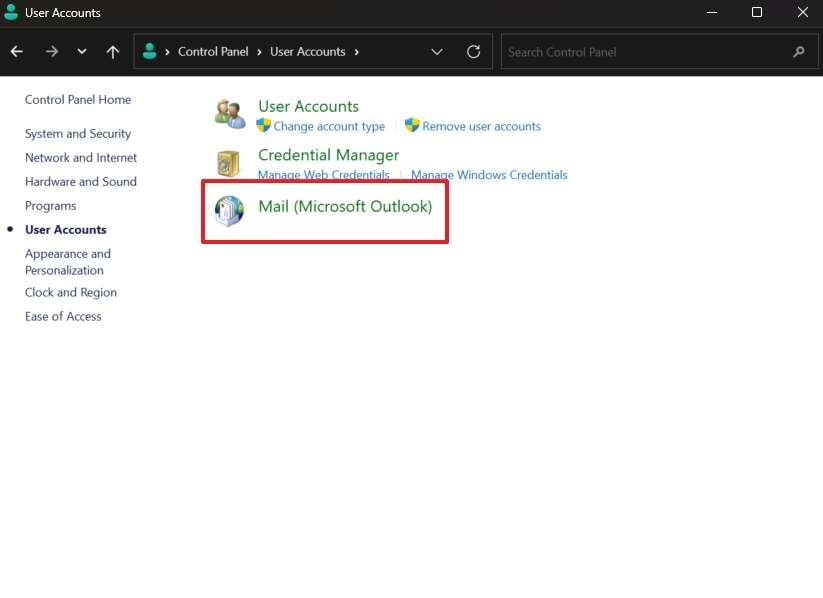
Step 1. Approach your PC’s Control Panel via Windows Search and open the “Users Accounts” tab. Now, click “Mail (Microsoft Outlook)” and tap “Show Profiles” on the upcoming window.
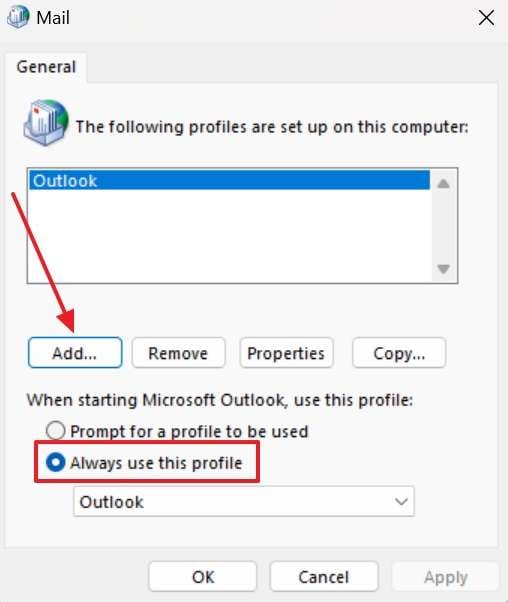
Step 2. Next, click “Add” and provide the requested details to create a new profile for Outlook. Once created, select it and choose “Always use this profile” before pressing “OK” to complete the operation.
Step 3. If the new one works without any issues, you go back to the “Mail” window to “Delete” the old one. Doing this will ensure that you do not face a “Not Implemented” error again.
Solution 5. Repair Microsoft Outlook App
You can attempt to resolve the “Outlook Not Implemented” error by repairing the app if you suspect deep issues within it are the cause. Outlook offers built-in repair tools to fix common problems without a complete reinstallation.
This process checks for issues with the app’s installation and replaces or repairs damaged components. Employ the following instructions to repair the app to fix all associated problems:
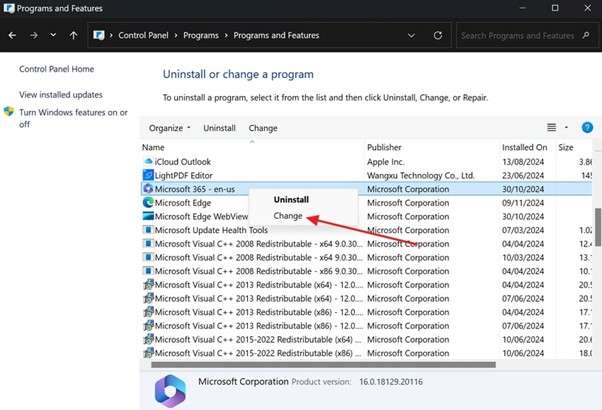
Step 1. After launching your Windows Settings via the “Win + I” key combination, move to the “Apps” section and choose “Apps & Features.” Now, scroll down to find the Microsoft Office from the installed programs list and tap it to click “Change.”
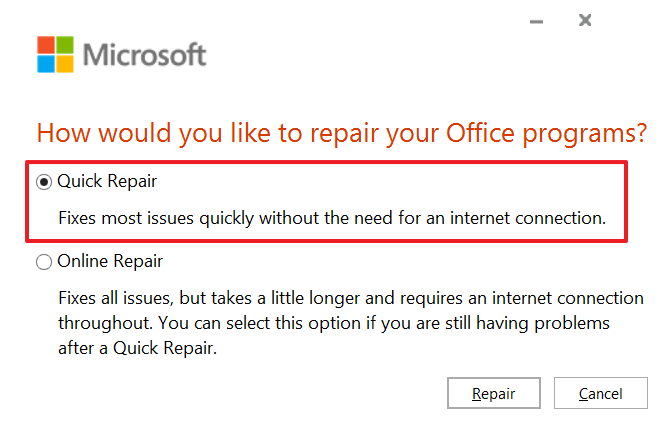
Step 2. Now, choose either “Quick Repair” or “Online Repair” from the next window to proceed. Once you have made the choice, hit “Repair” to fix issues within your Outlook.
Solution 6. Repair Corrupted or Damaged PST Files Without Losing Anything
When none of the solutions works, the root cause likely lies in corrupted or damaged PST files. These files store essential data, and a corrupted PST file can result in various errors. This also includes the “Outlook Not Implemented” issue, which you need to fix as soon as possible. One reliable tool is Repairit for Email, a powerful software designed specifically to fix damaged or corrupted PST files.
This advanced application allows you to repair PST files effortlessly without any technical expertise. It scans the PST file thoroughly, detecting issues and errors that could be causing Outlook to malfunction. What sets it apart is its ability to preserve the integrity of the original data during the repair process, ensuring that no information is lost.
Noteworthy Aspects of Using Repairit for Email

-
Repair damaged PST & OST Files in Outlook in all Email corruption scenarios, such as hard disk crashes & bad sectors, virus attacks & tojan horse, outlook corruption & malfunctions, improper shutdown procedure, etc.
-
Before finalizing the repair, the tool lets users preview the repaired PST file to ensure that the data has been restored.
-
It effectively repairs many issues within PST files, such as corruption, header errors, or attachment problems.
-
This toolkit is designed with security in mind, so users can use it with confidence that their data is being handled securely.
-
Compatible with Windows 7/8/8.1/10/11, Windows Server 2012/2016/2019, and MacOS X 10.12~ MacOS 13.
How to Repair Corrupted or Damaged PST Files Without Losing Anything via Repairit for Email
The simplified guide described below can aid you greatly in fixing your inaccessible email files using this powerful email repair toolbox:
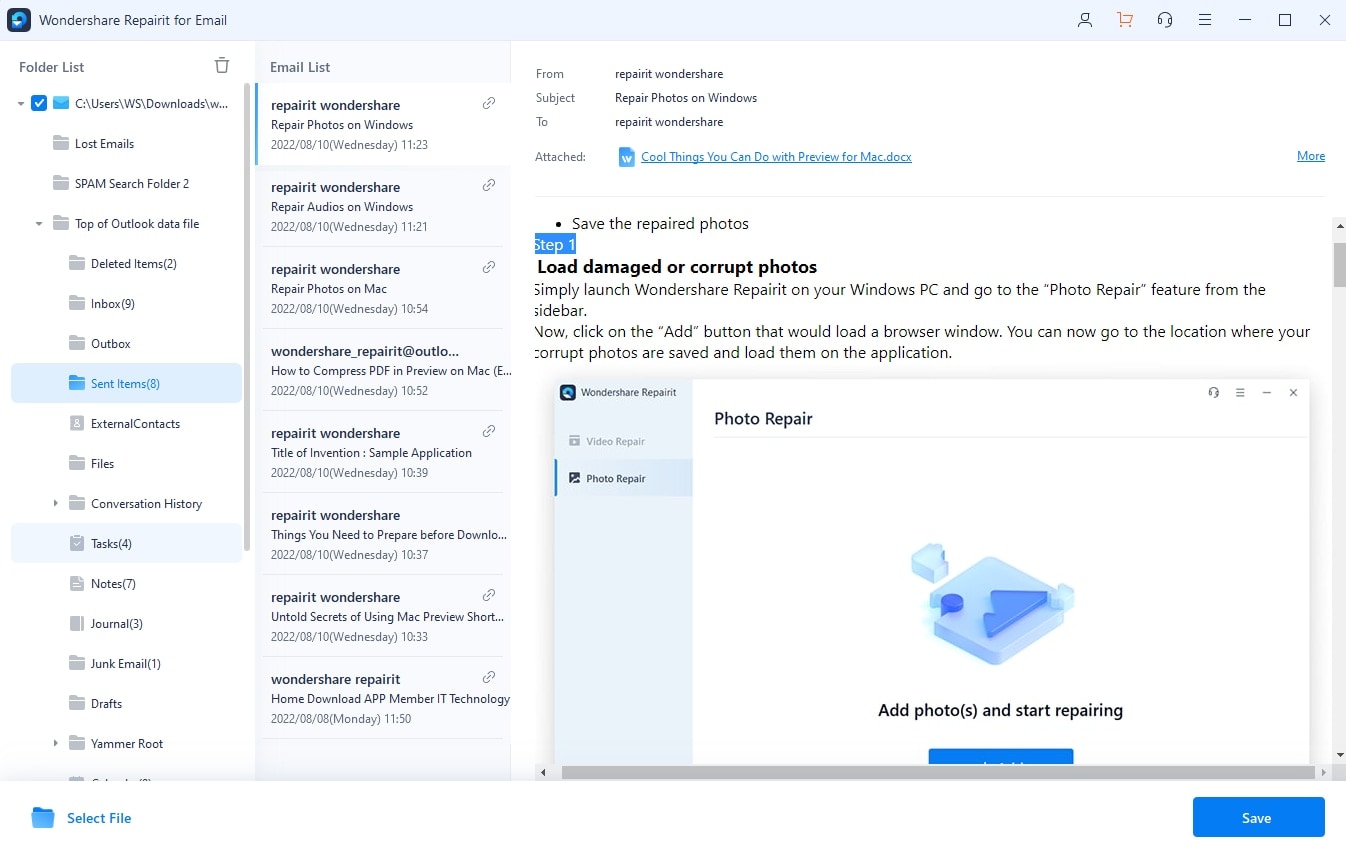
Step 1. Move to Import Damaged PST Files to the System
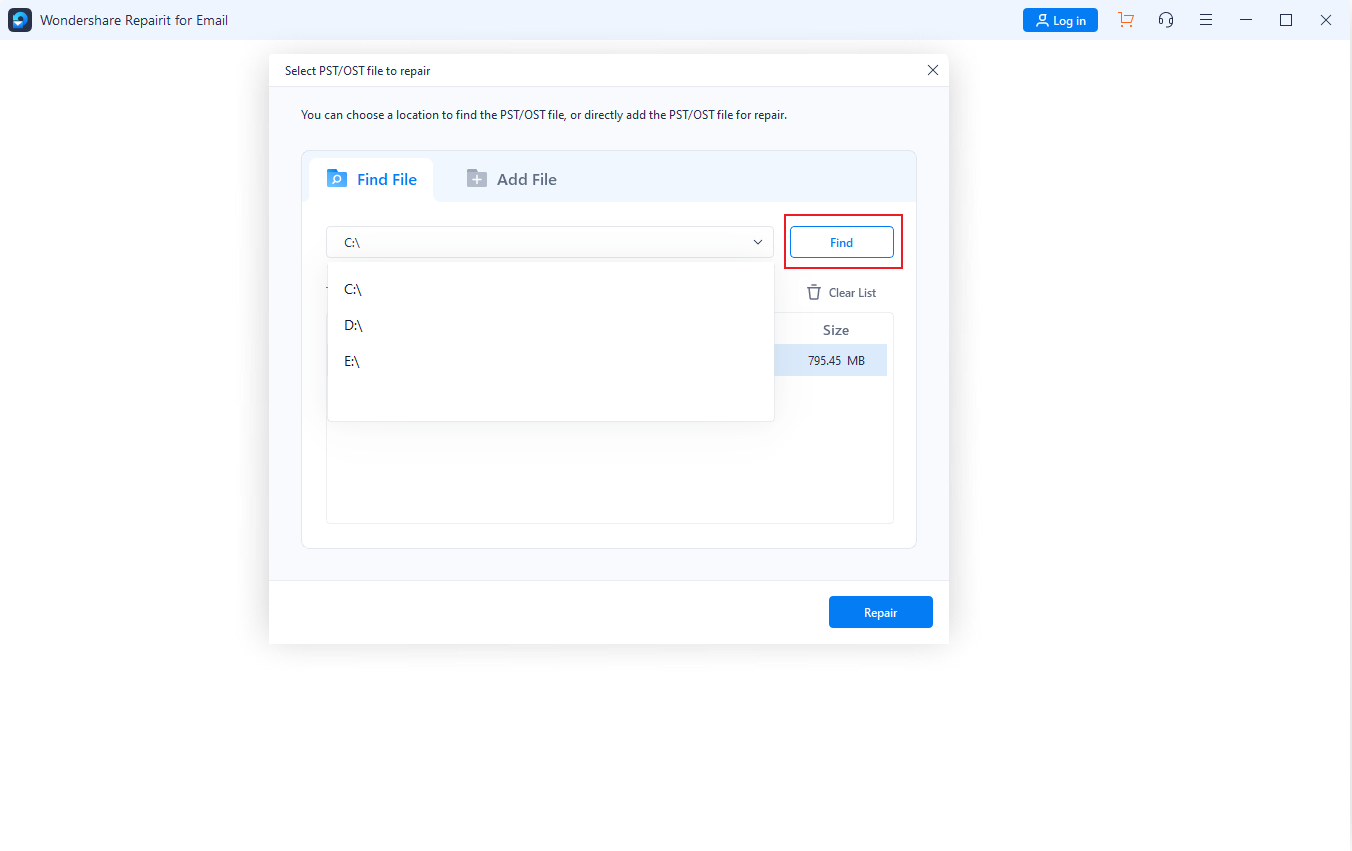
From the main interface of the tool, click “Select File” to bring up the menu for importing the targeted files. The program offers two ways for you to do so, “Find” and “Add File.”
Step 2. Store the Repaired PST Files on Your Computer
Utilize the “Repair” button to kickstart fixing the files you have added and wait for it to complete. Lastly, store the files you have recovered in the desired folder using “Save.”
Conclusion
In summary, the “Outlook Not Implemented” error can be a frustrating issue for many users. However, it is entirely possible to restore full functionality to the application with the right solutions. From disabling add-ins to configuring antivirus settings, each method helps target common error causes. When dealing with corrupted PST files, using a specialized tool like Repairit for Email can be the most effective way.
This powerful software stands out as an excellent solution for anyone struggling with damaged or corrupted PST files. A non-destructive repair process and comprehensive features make it an indispensable tool for Outlook users.
FAQ
-
1. Can the "Not Implemented" error occur in Outlook 2016 and Outlook 365?
This problem plagues all versions of the Outlook app, causing many functions to become glitchy. It is often linked to common issues such as corrupted data files, add-ins, or software conflicts. -
2. Will creating a new Outlook profile delete my emails and data?
It will not happen, as the new profile will just create a fresh configuration. Your existing data files (PST/OST) will remain accessible once connected to the new profile. -
3. Can Repairit for Email recover deleted emails from a damaged PST file?
That is possible, provided they have not been permanently removed from the targeted file. It can scan for deleted items and attempt to restore them as part of the repair process.


 ChatGPT
 Perplexity
 Google AI Mode
 Grok
Grok

