
OBS Studio is a desktop tool for screen recording and live streaming. OBS saves recordings as MKV by default, and many editors like Premiere Pro and Final Cut Pro don’t accept this format. Most users prefer MP4, especially if the video is meant for YouTube or other platforms.
If you record in MKV and need MP4 for compatibility, you don’t need another converter. OBS can instantly convert, or “remux,” MKV to MP4 directly. Here’s a simple guide on how to do it.
Table of Contents
Part 1. Why OBS Uses MKV Format
OBS Studio records in MKV format because it is very crash-resistant. For example, if your device powers off suddenly or OBS glitches while recording, MKV videos are much less likely to be damaged. That’s why this is ideal for long recordings.
MP4, while widely compatible and convenient for editing or sharing, is much more fragile. If a recording is interrupted while saving to MP4, the entire file can become corrupted and unusable. This is why recording directly to MP4 carries a higher risk, especially for lengthy or resource-heavy sessions.
To combine safety and convenience, OBS allows users to remux MKV files into MP4. Remuxing is a quick process that changes the file container without re-encoding the video, preserving the original quality. This way, you get the reliability of MKV during recording and the broad compatibility of MP4 for editing, uploading, or sharing.
Part 2. Two Easy Ways to Convert MKV to MP4 in OBS
OBS makes it easy to get your videos in MP4 format. You can either set MP4 as your default recording format or remux your already-saved MKV files. Below are the steps.
1. Set MP4 as the New Default Recording Format in OBS
One way to avoid dealing with MKV files is to record directly in MP4. OBS allows you to change your recording format in the settings so that all future recordings are saved as MP4.
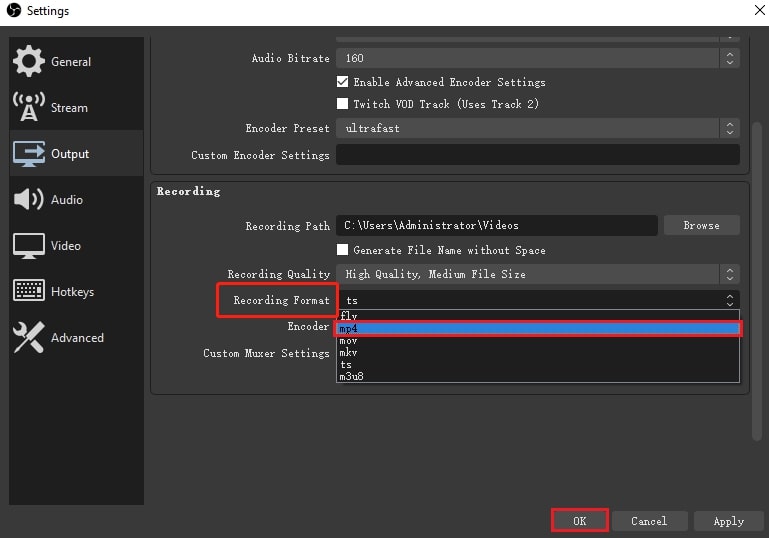
OBS can record in several formats, including MKV, MP4, MOV, FLV, M3U8 (HLS), and TS. MKV is the default, but you can change it so OBS saves your recordings as MP4. To do this:
Step 1: Go to File, Settings and Output.
Step 2: Open the Recording Format dropdown, choose MP4, and click Apply.
Step 3: OBS will show a warning saying MP4/MOV is not recommended and that MKV is safer. Click OK to save your settings. After that, OBS will automatically record in MP4, so you won’t need to convert files later.
Note: This method only changes the format for future recordings. If you want to convert existing MKV recordings to MP4 safely, continue to the next section.
2. Convert Existing OBS MKV Recordings to MP4
MKV is the safest format to record in because it won’t easily get corrupted if OBS crashes. Since MP4 is more fragile, the recommended workflow is to record in MKV and then remux it to MP4 afterwards. This adds just one extra step and keeps your recordings safer.
OBS lets you remux the file directly without losing quality. You can do this automatically or manually.
Method 1: Enable “Automatically Remux to MP4”
Step 1: Open OBS and go to File and Settings.
Step 2: Navigate to the Advanced section.
Step 3: Under Recording, check Automatically remux to MP4.
Step 4: Click OK to save. With this setting turned on, OBS will record in MKV and automatically convert it to MP4 as soon as you stop the recording.

Method 2: Manually Remux MKV to MP4 After Recording
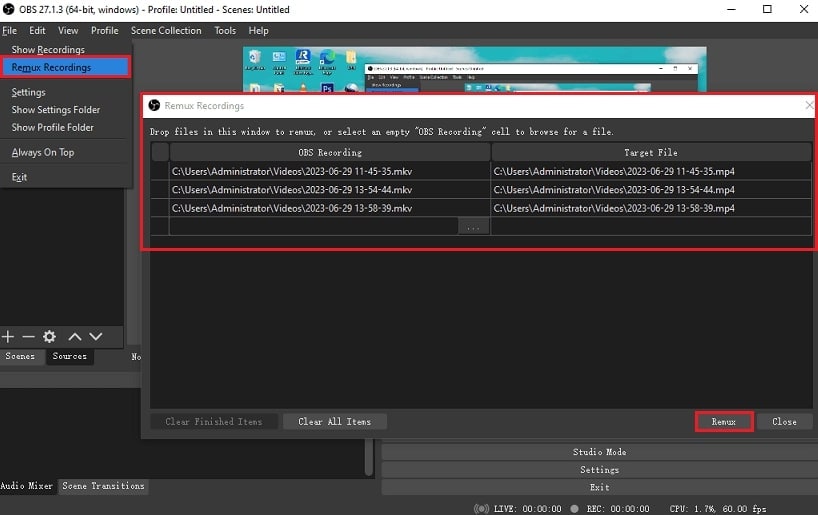
Step 1: Open OBS, click File, then choose Remux Recordings.
Step 2: Click the three-dot button to add the MKV file you want to convert.
Step 3: Choose where to save the MP4 file and rename it if needed.
Step 4: Click Remux to start the conversion.
Part 3. Fix Corrupted MP4 or MKV Files After an OBS MKV to MP4 Conversion
Even though converting—or remuxing—obs mkv to mp4 is generally reliable, issues can still appear after the conversion. In some cases, the MP4 file may refuse to open, show only a black screen, lose audio, or play just a portion of the video before stopping. These problems often occur due to recording interruptions, software glitches, or subtle corruption that wasn’t visible in the original MKV file.
If you run into these errors after converting obs mkv to mp4, a dedicated video repair tool can help. Damaged encoding, broken metadata, or incomplete audio/video segments may prevent the file from playing correctly—even if OBS completed the remux without warning.
A reliable solution is to repair the corrupted file using Repairit Video Repair. It is designed to fix MP4, MKV, and other formats that may become damaged after recording or conversion. The tool can address playback failures, restore missing audio, and repair videos that freeze or stop unexpectedly.
Key Features:

-
Detects and rebuilds damaged sections of video and audio to fix issues such as black screens, missing sound, or broken playback progress.
-
Addresses problems like out-of-sync audio, stuttering, flickering, codec inconsistencies, and format-related errors.
-
Supports batch repair, allowing you to fix multiple corrupted videos at once.
-
Preview repaired files to confirm playback and audio sync before saving.
-
Available on Windows, macOS, and via an online repair tool for quick browser-based fixes.
Step-by-Step Guide:
Step 1: Run Repairit and press Add video and start repairing, or the Add button to import your damaged MKV videos.

Step 2: Once added, you’ll see MKV video details like file name, size, resolution, and device info. Hit Repair to commence the process.

Step 3: Double-click to preview, then click Save to choose where to store the fixed MKV videos. Don’t save it in the same folder where the damaged file was located.

Fix Corrupted MP4 or MKV Files
 Security Verified. Over 7,302,189 people have downloaded it.
Part 4. Tips for Smooth Recording and Conversion
To avoid corrupted videos and ensure your MKV-to-MP4 workflow runs seamlessly, it helps to set up OBS and your system properly. Here are simple habits that keep your recordings stable and your conversions stress-free:
Keep OBS updated. New updates fix bugs, improve stability, and reduce the risk of broken files.
Maintain enough storage space. Low disk space can interrupt or damage ongoing recordings.
Avoid forced shutdowns. Sudden power loss or forced quits often lead to incomplete or corrupted files.
Back up your recordings regularly. Save important sessions to an external drive or cloud storage.
Record in MKV, then remux. MKV is a safer recording format and protects your footage in case OBS crashes.
Close unnecessary apps. Freeing system resources helps prevent freezes, dropped frames, and file errors during long sessions.
Conclusion
Converting MKV to MP4 in OBS is easy once you understand why OBS records in MKV and how remuxing works. MKV keeps your footage safe, and remuxing gives you an easy way to get MP4 for editing or uploading. If any files become corrupted, tools like Repairit can help fix them quickly. With the right settings and simple habits, you can avoid errors and maintain a smooth workflow.
FAQs
-
Can I convert MKV to MP4 without losing quality in OBS?
Yes. OBS remuxing changes only the file container from MKV to MP4, keeping the original audio and video data intact and preventing any quality loss. -
Why does OBS record in MKV instead of MP4 by default?
OBS records in MKV by default because MKV is crash-resistant. If a recording stops unexpectedly, the MKV file usually remains usable, while MP4 files often become unrecoverable. -
Does OBS safely convert MKV to MP4 without needing to re-render?
Yes. OBS safely remuxes MKV to MP4 without re-encoding, as long as the MKV file is intact. This preserves both video and audio quality while changing only the file container.
