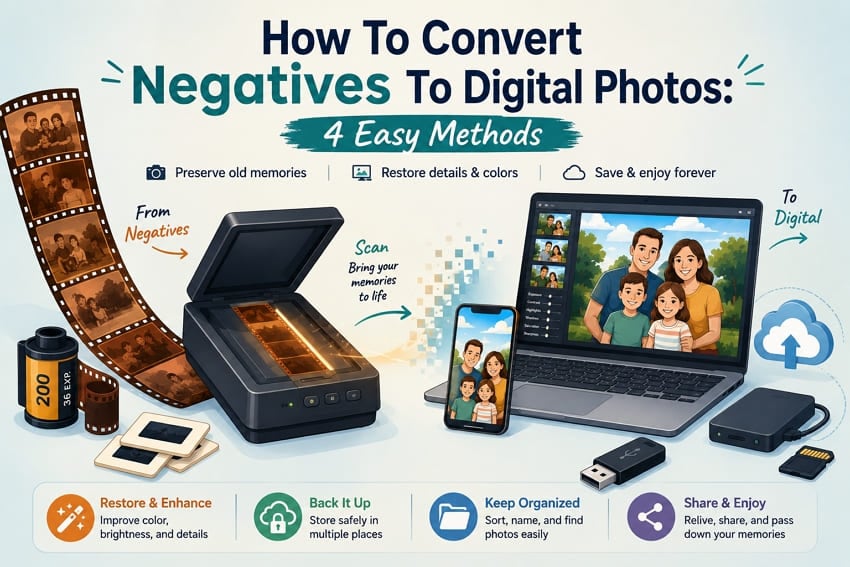
Old film negatives slowly fade, collect damage, and lose image quality as time passes. Many people notice the damage only after finding old boxes of family memories. Using a negative-to-photo converter helps preserve those memories before more details disappear.
Each method works better for certain film types and image quality needs. This comprehensive guide explains how to convert negatives, improve image quality, and preserve your digital photos. If your scanned images still look faded, scratched, or blurry afterward, Repairit Photo Repair can help restore them with AI-powered algorithms.
In this article
Part 1. How Negative-to-Photo Conversion Works
Understanding film negatives helps you convert negatives to digital photos using the right method for better results. Below are 5 important points explaining how negative-to-photo conversion works correctly:
What is a Photo Negative?
A photo negative stores a scene with light and dark areas completely reversed from reality. Bright parts appear dark while dark parts appear bright on the film negative instead. Converting the negative reverses these tones into a normal digital photo again.
Black-and-White vs Color Negatives
Black-and-white film uses one light-sensitive emulsion, while color negatives typically contain multiple color-sensitive layers. Color negatives include an orange mask that affects colors during the conversion process. Removing this orange mask helps produce natural colors in the final digital photo.
Film Negatives vs Printed Photos
Printed photos are finished copies made from original film negatives by photo processing laboratories. Film negatives keep more image details and tonal information than printed photos usually contain.
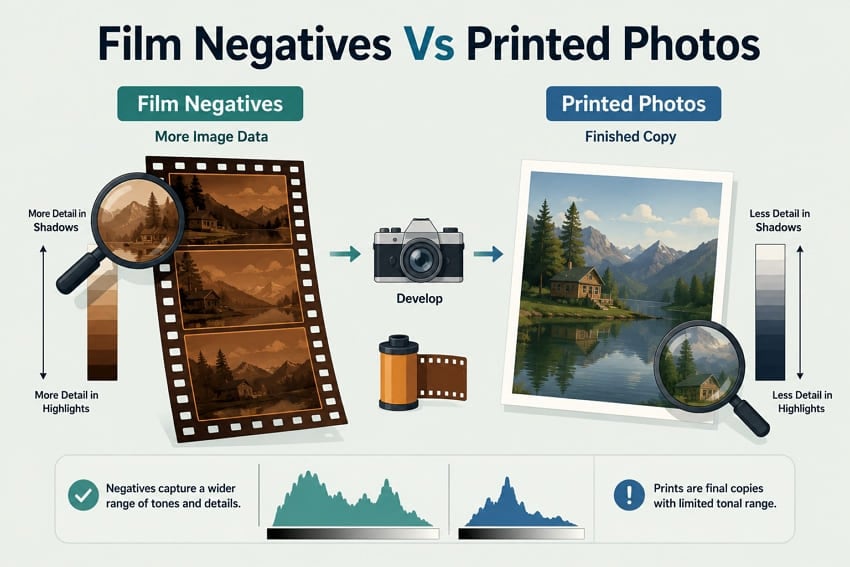
How a Negative-to-Photo Converter Works
A converter uses light to convert negatives to digital photos by digitizing the film, reversing tones, and correcting the orange mask on color negatives when needed.
Common Film Formats You Can Digitize
The table below explains common film formats and where people usually used them originally:
| Format | Frame Size | Found In |
| 35mm | 24 x 36 mm | Most family snapshots since the 1960s |
| APS | 16.7 x 30.2 mm (APS Classic/C) | Compact cameras from the late 1990s and early 2000s |
| 110 | 13 x 17 mm | Pocket cameras from the 1970s and 1980s |
| 120 Medium Format | 6 x 4.5 cm to 6 x 9 cm | Studio portraits and enthusiast photography |
| Sheet Film | 4 x 5 inches and larger | Professional, architectural, and large-format photography |
Part 2. Prepare the Negatives for Digitization
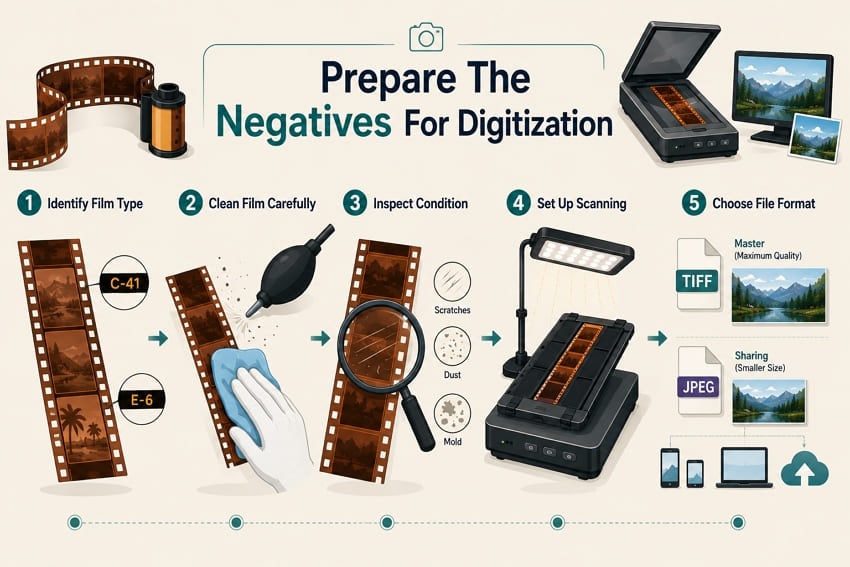
Proper preparation helps convert negatives to digital photos with clearer results and fewer scanning problems overall. Let's prepare your film negatives before scanning for the best possible digital photo quality.
Identify the Film Type and Format
Check the film edge markings to identify the manufacturer and film type before scanning. Color negatives usually show C-41, while slide film shows E-6 on the film edge. Wrong film settings create flat gray images that editing cannot fully correct afterward successfully.
Clean the Film Without Damaging It
Remove loose dust first using a bulb blower before touching the film surface carefully. Wipe remaining dirt gently with a microfiber cloth, following the film strip length only. Hold the film by the edges because fingerprints can permanently damage the delicate emulsion layer.
Check for Scratches, Mold, and Fading
Inspect every film strip carefully under bright light before placing it inside any scanning equipment. The National Archives recommends professional help for warped, brittle, or moldy film materials.
Prepare an Even Light Source and Film Holder
Use a diffused LED light panel to provide even lighting across the entire film negative. A film holder keeps negatives flat and helps convert negatives to digital photos with sharper, more consistent scanning results.
Choose the Digital File Format
Choose TIFF format for master files because it preserves image quality without compression during storage. The Library of Congress digitized many negatives as TIFF files at 2800 pixels per inch. Export JPEG copies later for sharing while keeping the original TIFF file safely stored.
Part 3. How to Convert Negatives to Digital Photos
Every negative to photo converter method offers different costs, speed, and results. Choose the option that matches your film condition and budget for best results.
Method 1. Scan Negatives with a Film Scanner
Dedicated hardware remains the most consistent option, since the light source, holder, and sensor are designed together.
Option 1. Epson Perfection Series
The Epson Perfection Series scans both printed photos and film negatives with one device. Its built-in transparency unit shines light through film for accurate negative scanning and conversion. Here is how to use this negative-to-photo converter:
Step 1. Place your negative side-down on the glass. Open the scanning software > choose the scanner and other settings > press Scan.
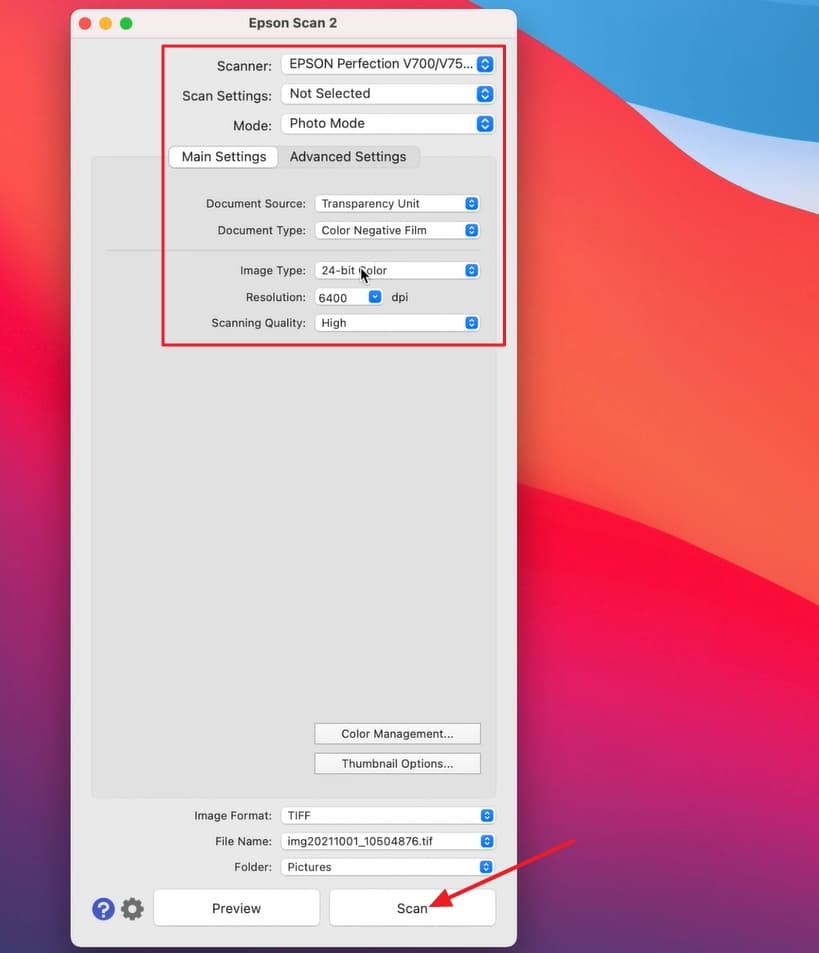
Step 2. Next, press Thumbnail > choose a photo.
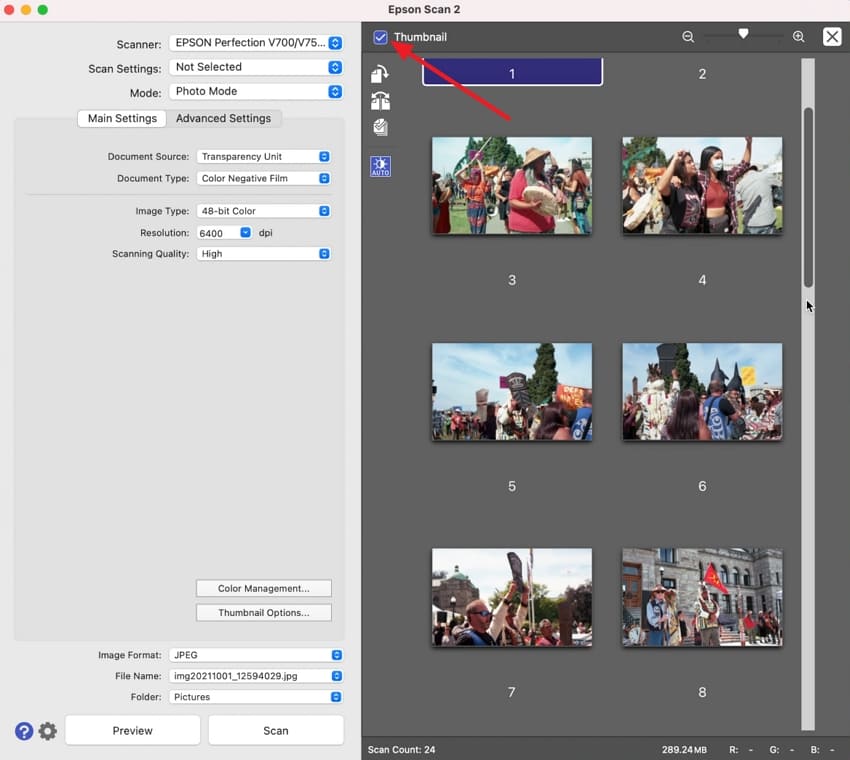
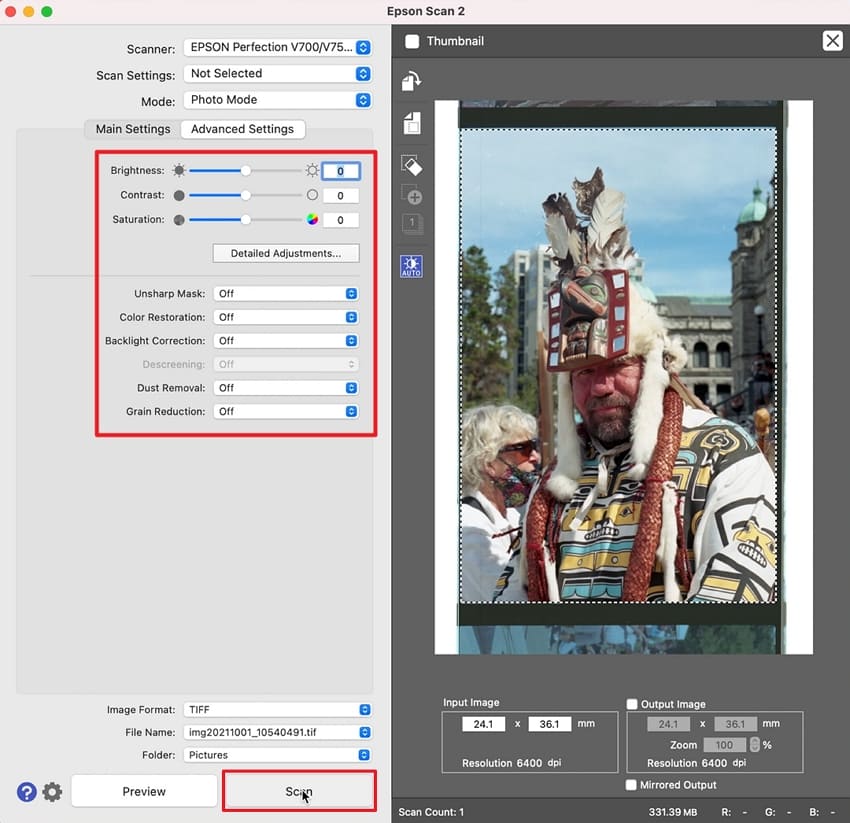
Step 3. After that, crop the photo or adjust the lighting > click Scan again to save the photo.
Cons
- Slow per frame, since every pass reads the whole scanning bed.
- True optical resolution sits well below the advertised figure.
Option 2. Kodak Slide N Scan
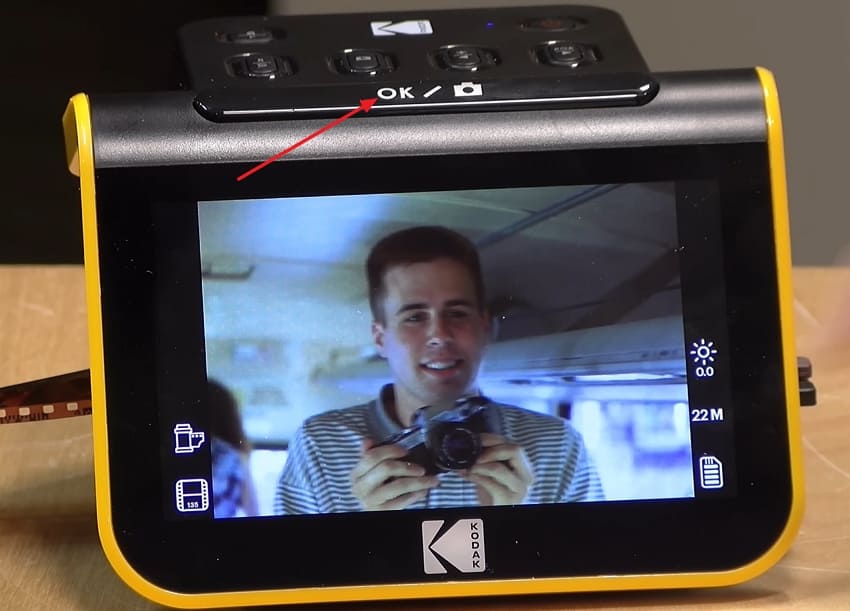
Kodak Slide N Scan converts film without needing a computer or extra software. You need film negatives, an SD card, and a power source to start scanning. Follow these simple steps to begin scanning negatives:
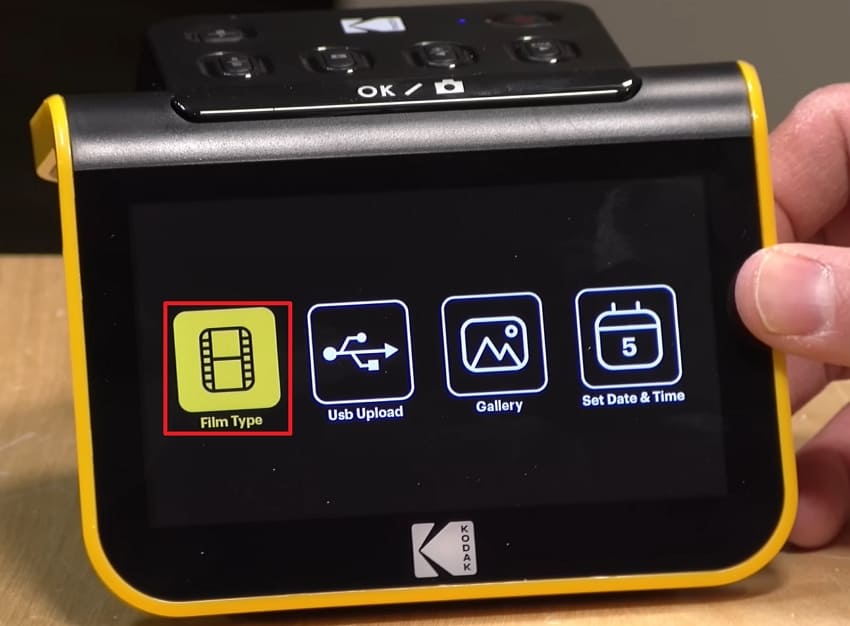
Step 1. Select Film Type on the screen. Load the strip into the film tray > slide it into the device.
Step 2. Use the Brightness button to adjust the brightness of the image if needed.
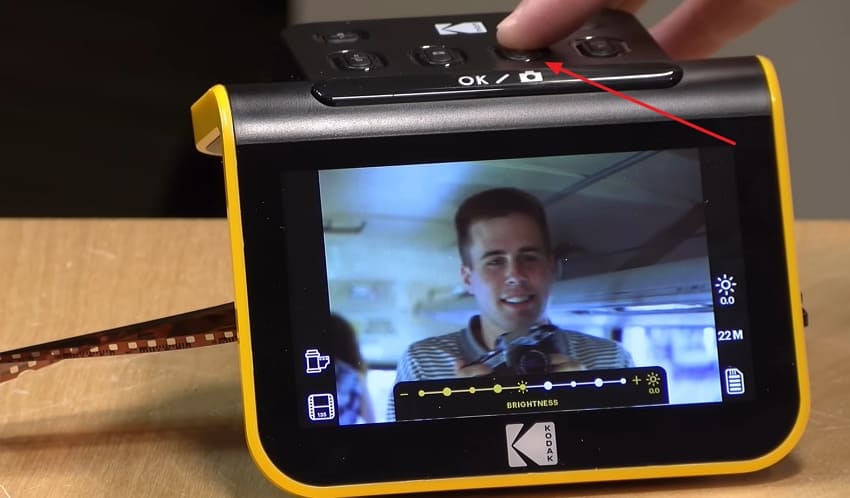
Step 3. Next, press Capture to save the image directly to the card.
Cons
- Resolution is largely interpolated rather than genuinely optical.
- Handles 35mm, 126, and 110 only, with no medium format support.
Option 3. Plustek OpticFilm Scanner
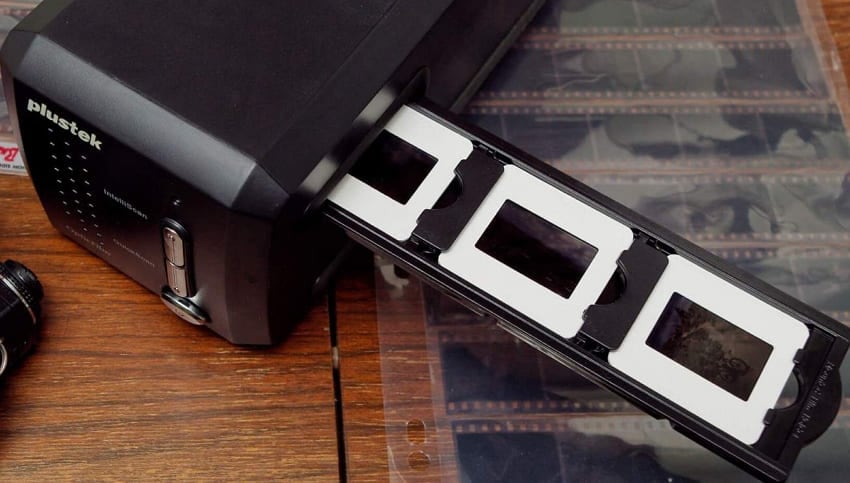
The Plustek OpticFilm Scanner is designed only for 35mm film with detailed scanning quality. It helps convert negatives to digital photos with accurate colors and sharp image details. Here is how this scanner works:
Step 1. Connect the scanner to your PC > Insert the strip into the holder and push it into the scanner slot.
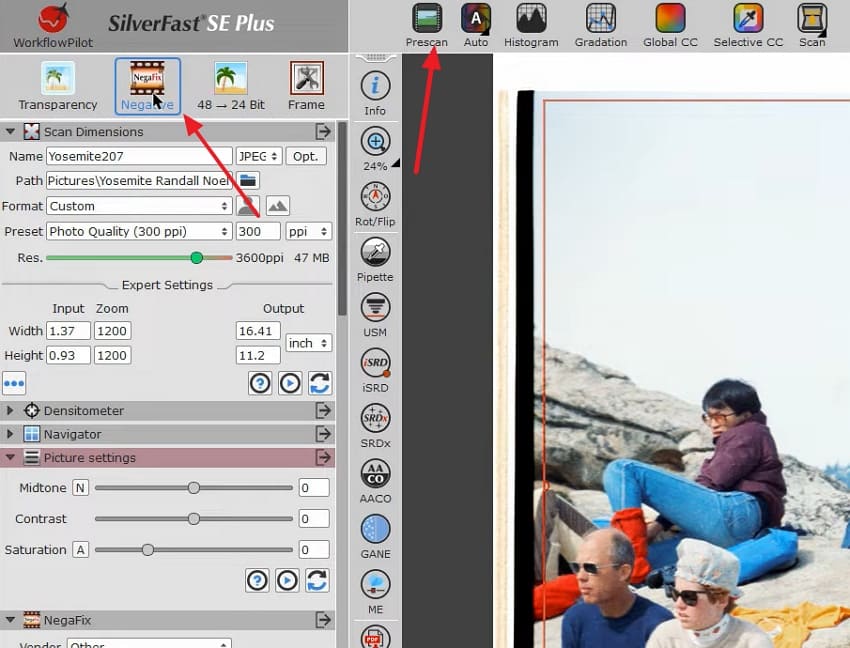
Step 2. Launch bundled software like SilverFast > choose film type Negative > press Prescan.
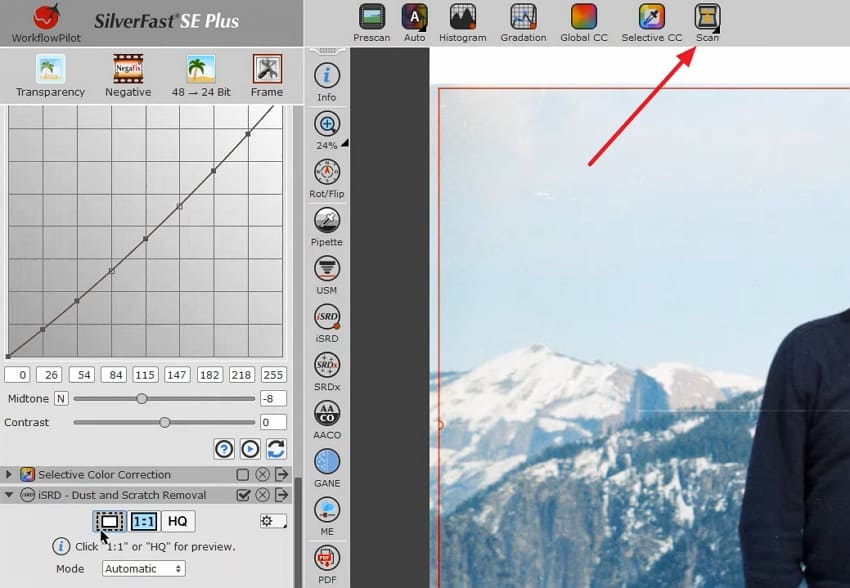
Step 3. Next, adjust the white balance and color > press Scan. It will take some time to save the image.
Cons
- One frame at a time makes long rolls genuinely tedious.
- Accepts 35mm only, so mixed collections need a second device.
Method 2. Convert Negatives Using a Smartphone
Phone apps photograph the negative against a backlight and instantly invert it, making them one of the fastest ways to convert negatives to digital photos without a scanner.
Option 1. FilmBox (Android | iOS)
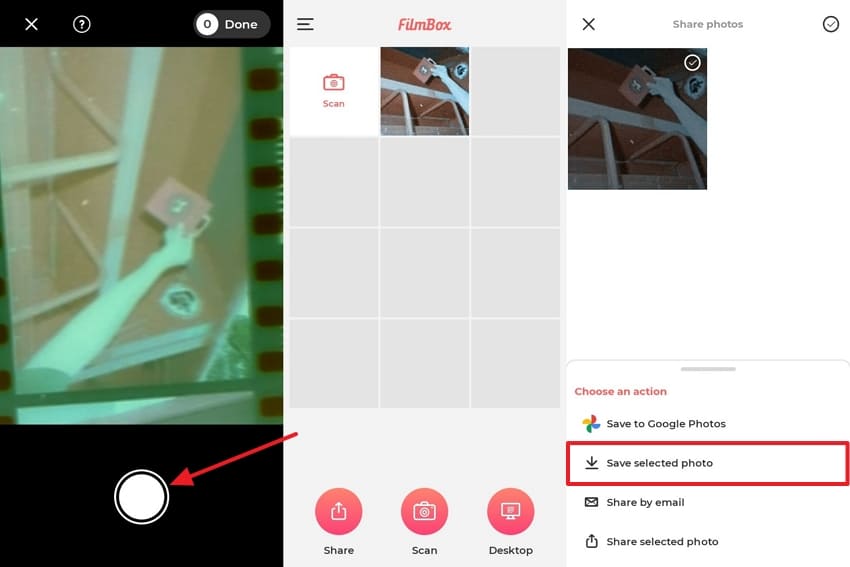
FilmBox is a smartphone app that converts film negatives into digital photos without a scanner. It automatically detects each film frame, aligns the image, and creates a positive photo. To convert negatives, use these simple FilmBox instructions:
Instructions. Place the strip over a backlight > open the app > hold the phone parallel to the film > press and hold Capture. Once converted, tap Save Select Photo.
Cons
- The free tier limits how many frames you can save and share.
- Output resolution is capped by the phone sensor, not the film.
Option 2. FilmLab (Android | iOS)
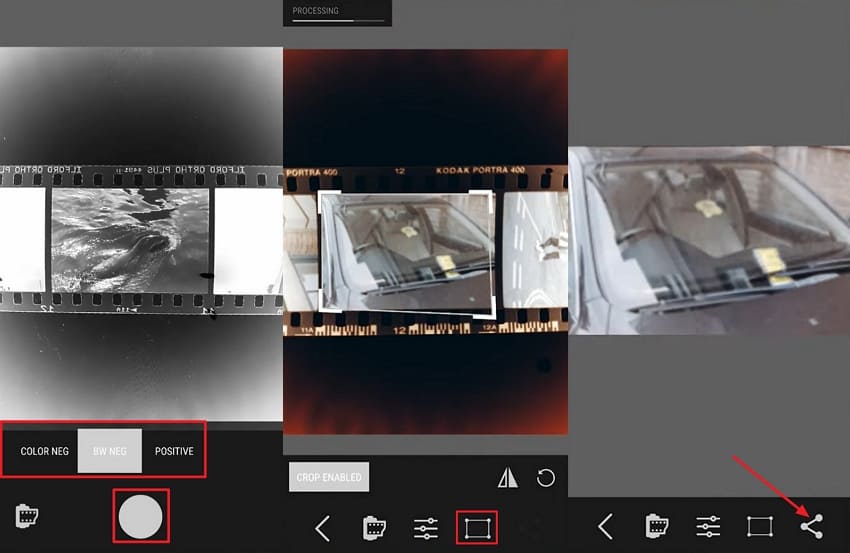
FilmLab converts film negatives on mobile devices and computers while supporting scanned and camera images. This negative-to-photo converter works on Windows, macOS, and mobile devices. To get started, follow these steps:
Instructions. Once you open the app, pick a Film Type > align the film > press Capture. Next, crop if needed > tap Share.
Cons
- Free scans run out quickly, after which a subscription applies.
- Handheld capture introduces tilt that a copy stand would prevent.
Method 3. Use Online Negative-to-Photo Converters
Use a negative-to-photo converter to process scanned negative images online and turn them into viewable digital photos.
Tool 1. Stellar Negative Image Converter
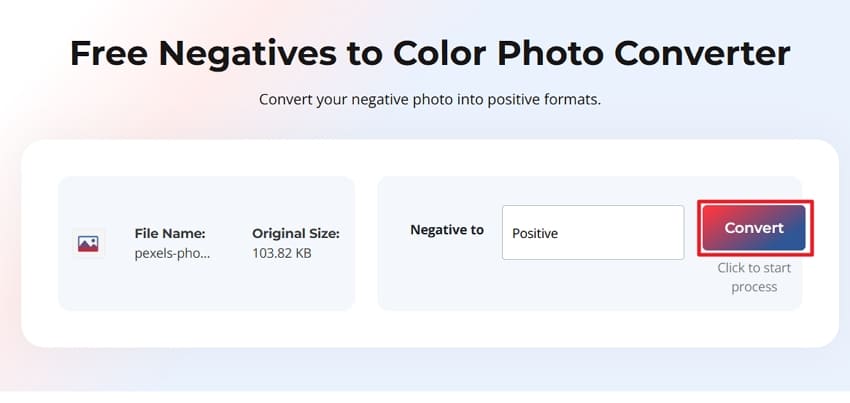
Stellar converts scanned film negatives into clear positive digital photos with minimal effort. See these simple steps to convert your negatives:
Step 1. Once you open it, upload the image > press Convert.
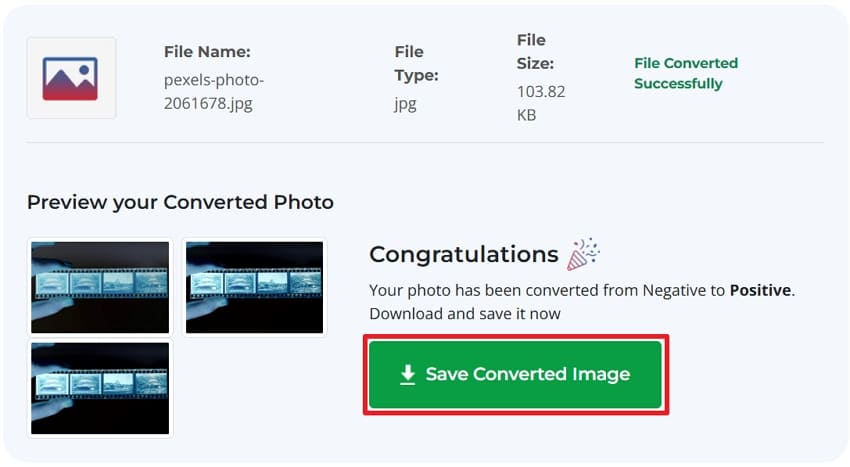
Step 2. Next, preview the results > click Save Converted Image.
Cons
- Upload size limits rule out full-resolution scanner masters.
- Limited editing options after the negative is converted.
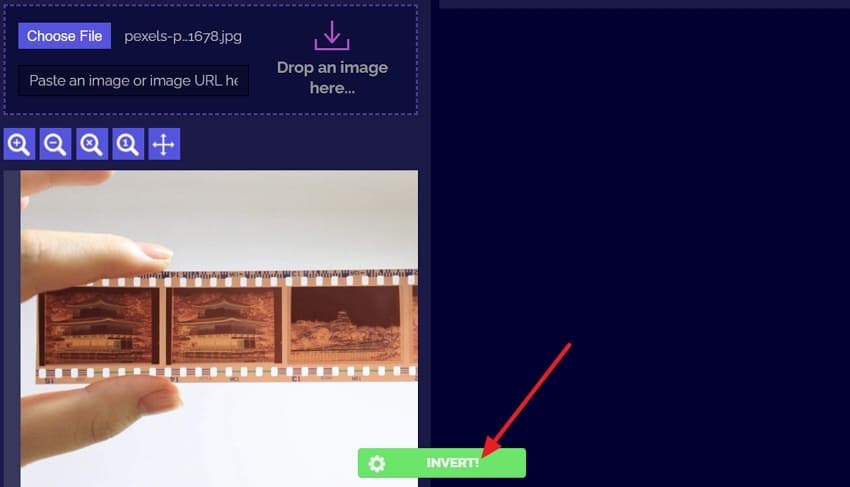
Tool 2. PineTools Invert Image Colors
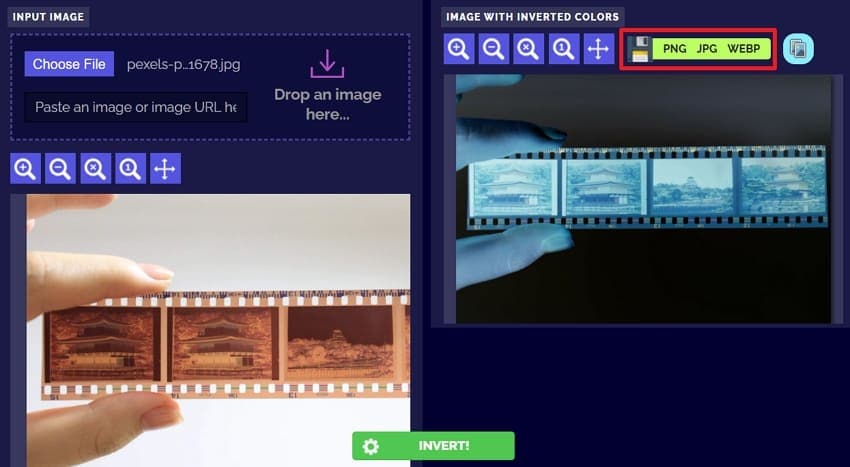
This simple negative-to-photo converter inverts image colors without using film-specific correction or processing. The following steps show how to invert a negative image:
Step 1. Upload your negative image > choose Invert.
Step 2. After conversion is done, pick a format to directly download the result.
Cons
- No mask removal, so color negatives need heavy correction afterward.
- Output arrives compressed, which limits how far you can edit it.
Tool 3. IMGonline Negative Converter
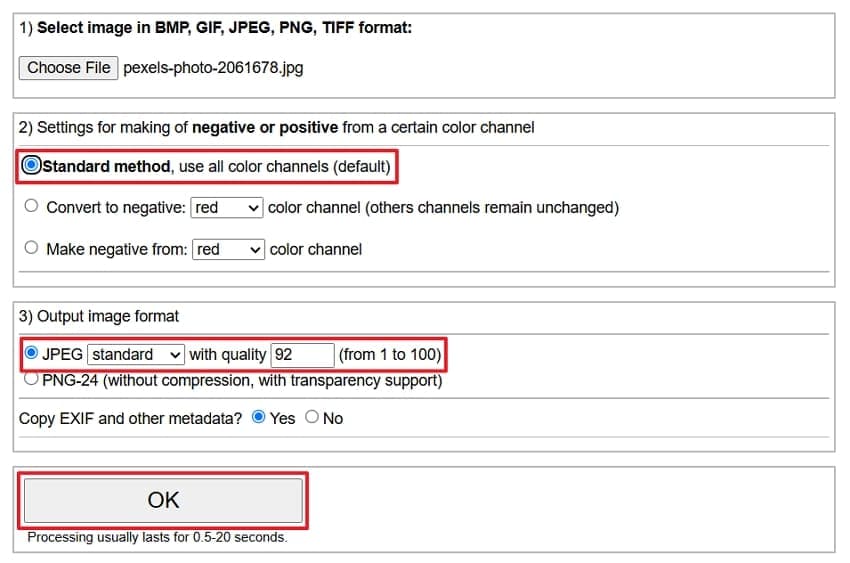
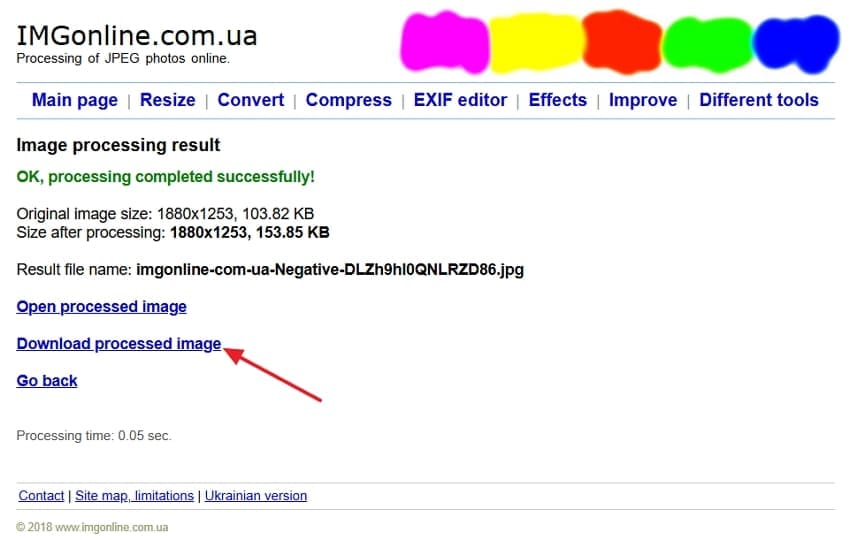
IMGonline Negative Converter lets you invert negative images while adjusting output format and image quality. Use the steps below to convert your negative image online:
Step 1. After the image is uploaded, choose Standard Mode > pick Output Format > press OK.
Step 2. Once done, press Download Processed Image.
Cons
- Mask handling stays manual on every color negative.
- No batch processing, so volume work becomes slow.
Method 4. Photograph Negatives with a Digital Camera
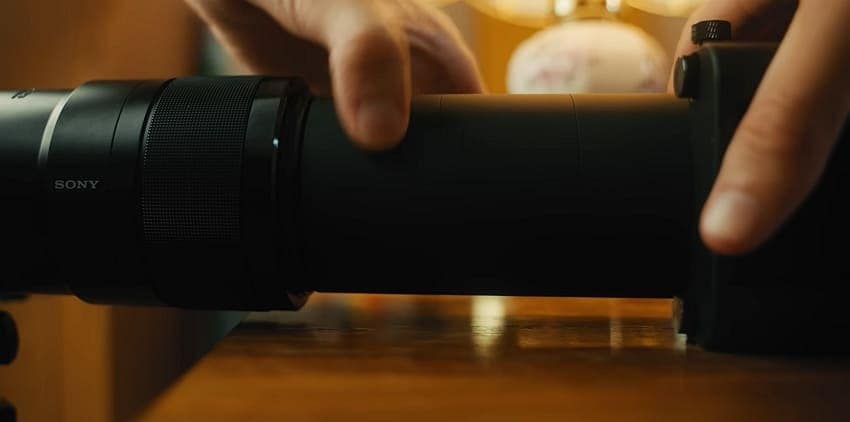
A digital camera helps convert negatives to digital photos with excellent quality. This method works well for large film collections requiring accurate results. Here is how to do this method to convert negatives to digital photos:
Step 1. Mount a Film Camera Scanner on the camera lens > Insert the film in it.
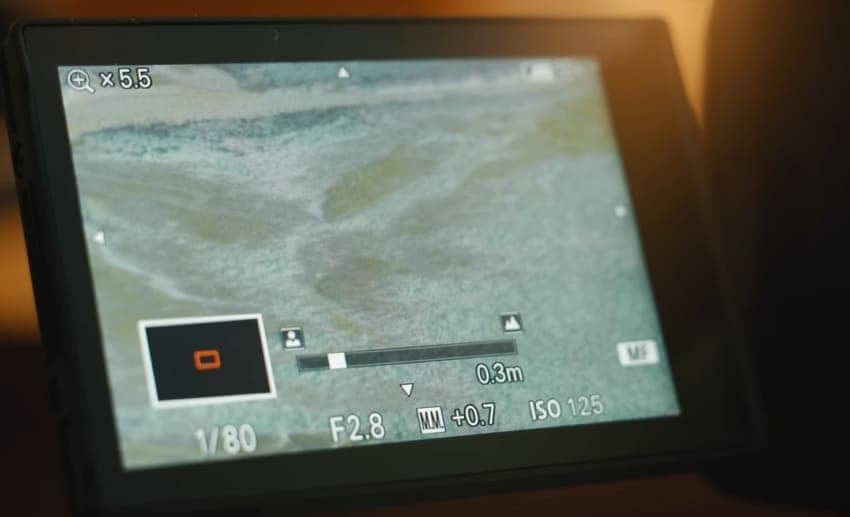
Step 2. Shoot RAW with base ISO > Use manual focus.
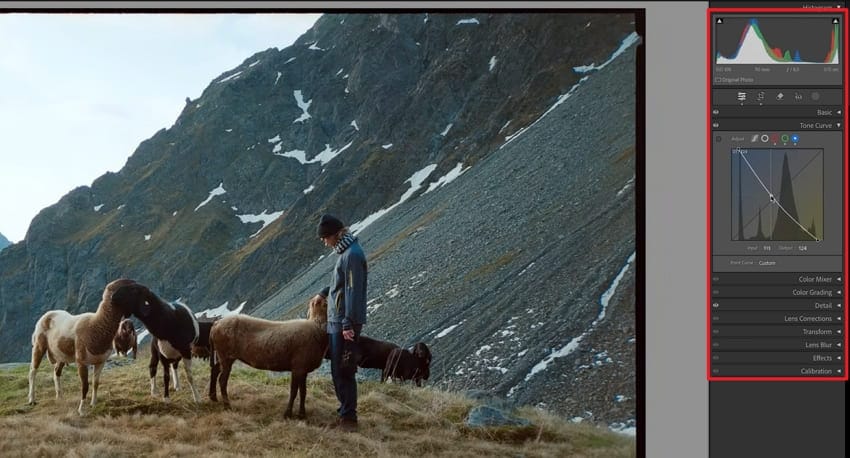
Step 3. Convert the negative captures using software like Lightroom.
Cons
- Setup cost exceeds every other method on this list.
- Any misalignment between sensor and film shows as distortion.
Part 4. Correct the Converted Negative Photo
Every negative-to-photo converter produces images needing basic corrections before saving. Below we have 5 simple correction steps for better photo quality:
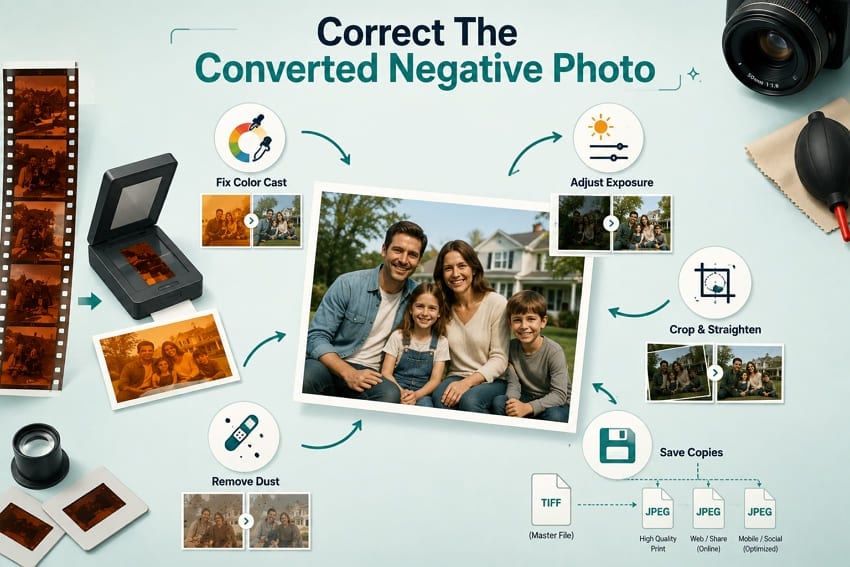
- Fix the Orange Color Cast: Change the color temperature until the orange tint disappears from the converted photo. Check the image again and make small color changes until it looks natural and balanced.
- Adjust Exposure and Contrast: Adjust brightness and contrast until important details become easier to see across the entire image. Avoid making bright areas completely white because lost details cannot be recovered easily later.
- Crop and Straighten the Frame: Remove holder edges and any sprocket area you do not want, then straighten against a horizon or vertical. Crop last, keeping maximum resolution through the tonal work.
- Remove Minor Dust and Spots: Use a healing or clone tool to remove dust and small spots from photos. Zoom into the image while editing to find small marks accurately.
- Save Master and Sharing Copies: Keep the corrected TIFF as your master and never edit it again. Export JPEG copies for phones, email, and prints from that file.
Part 5. Common Negative Conversion Problems
Mistakes while trying to convert negatives to digital photos reduce image quality. The table below explains common problems and simple solutions for each one:
| Problem | Cause | Practical Fix |
| Strong Orange or Cyan Cast | Orange mask not corrected | Correct the film base color before adjusting white balance. |
| Newton's Rings | Film touching scanner glass | Use an anti-Newton glass insert or a proper film holder. |
| Soft Frames | Focus set incorrectly | Manually focus on the film grain before capturing or scanning. |
| Dust Across Every Frame | Dirty film before scanning | Clean the film with a blower or antistatic brush before scanning. |
| Flat Gray Results | Low contrast or incorrect inversion | Set proper black and white points after inverting the negative. |
| Color Drifts Between Frames | Auto white balance enabled | Disable auto white balance and use one fixed white balance setting. |
Part 6. Restore Damaged Photos After Conversion: How to Do It
Some converted photos still contain scratches, fading, blur, or other visible damage after digitization finishes. This section explains why damage remains and how photo restoration helps recover image quality.
Why Converted Negative Photos May Still Look Damaged
Scanners reproduce scratches, mold marks, and dye fading as faithfully as the original image. The Library of Congress notes that digitization captures image content but does not repair the negative's physical deterioration. As a result, poor storage damage may still appear as color shifts, silvering, scratches, and other surface marks in the converted photo.
Repair Converted Photos with Repairit Photo Repair
Repairit - AI Photo Repair Tool
Restore faded, scratched, blurry, or damaged scanned photos before archiving.
-
AI photo repair. Repair faded colors, scratches, blur, discoloration, and damaged photo files.
-
Batch restoration. Restore multiple scanned negatives or old photos in one workflow.
-
Preview before saving. Check repaired results and export copies without overwriting originals.
Converted photos may still show damage after using a negative-to-photo converter for digitization. This is where Repairit Photo Repair helps restore damaged photos with AI-powered repair technology. It repairs faded colors, discoloration, scratches, and unreadable or greyed-out photo files with ease.
This AI-powered photo repair software can restore multiple photos together, saving time when repairing large photo collections quickly. It supports JPG, PNG, TIFF, HEIC, RAW, and many other popular photo formats without conversion. Preview repaired results before saving to check photo quality before exporting.
Key Features
- Scratch and Stain Removal: Removes scratches, stains, dust marks, and other defects transferred from the original negative scan.
- Resolution Enhancement: Upscales photos by up to 8x while preserving sharp details and overall image quality.
- Smart AI Repair: Restores damaged photos by repairing fading, discoloration, blur, and other visual defects automatically.
Guide to Restore a Damaged or Corrupt Scanned Negative
Now, follow this simple step-by-step guide to restore your scanned negative photo with Repairit:
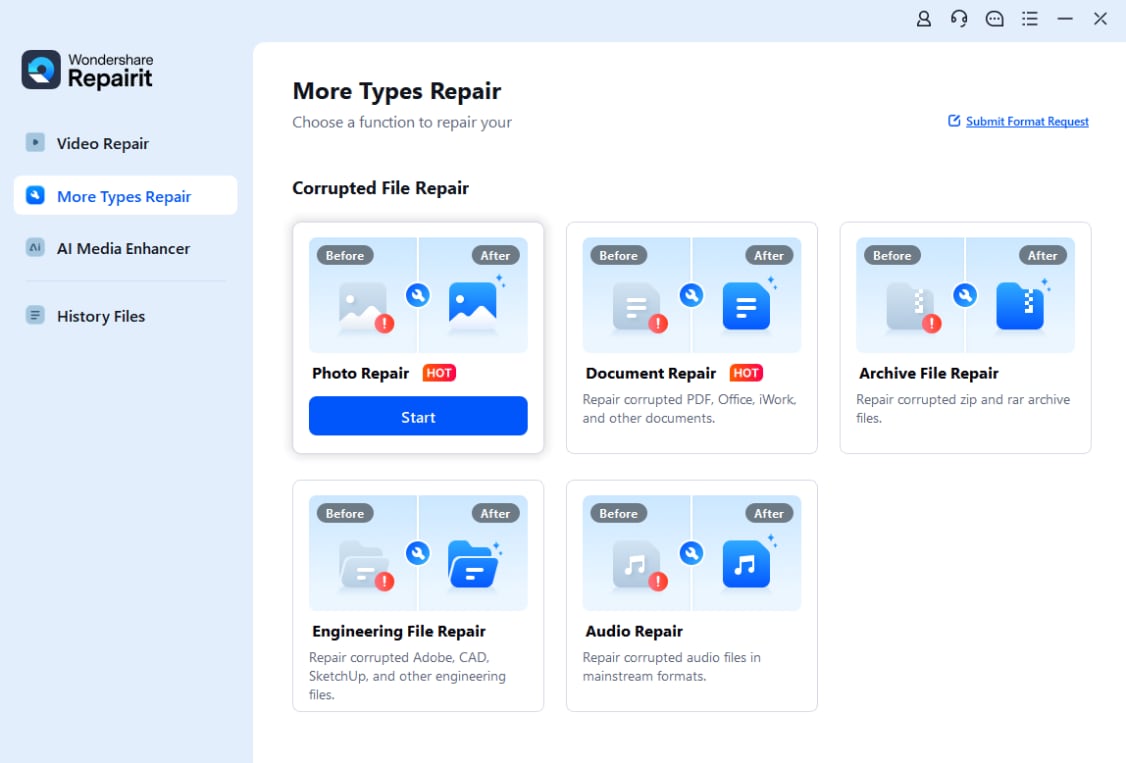
Step 1. Choose Photo Repair and Import Image
Once you open Repairit, press More Repair Types > Photo Repair. Next, import your image.
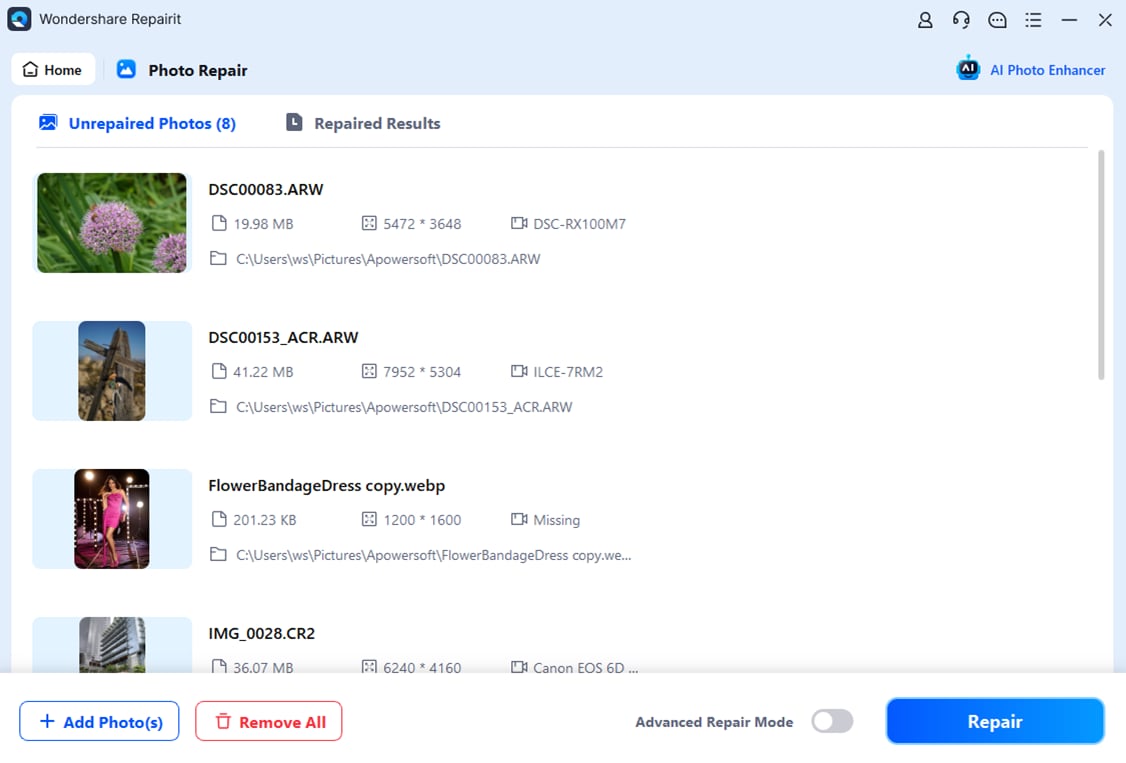
Step 2. Begin the Photo Repair Process
After uploading, check the thumbnails and other details, and press Repair.
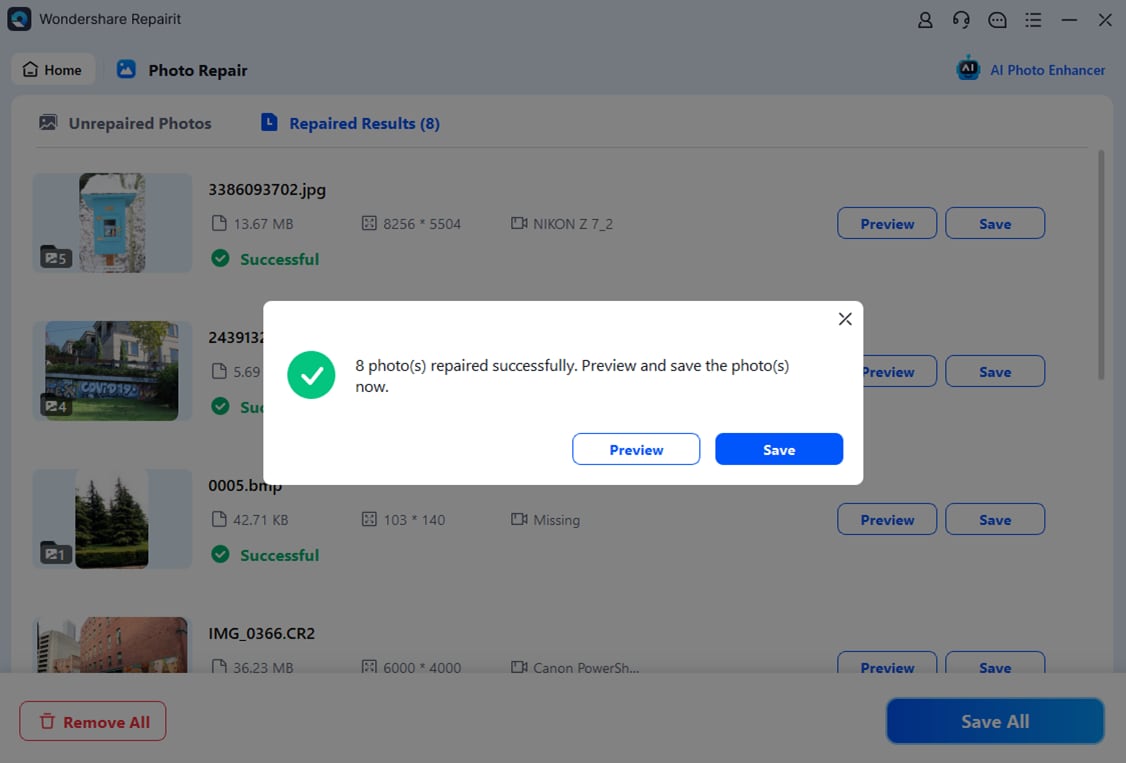
Step 3. Preview and Export the Final Results
Finally, preview the repaired images > click Save to export the repaired images.
Part 7. Preserve the Negatives and Digital Photos
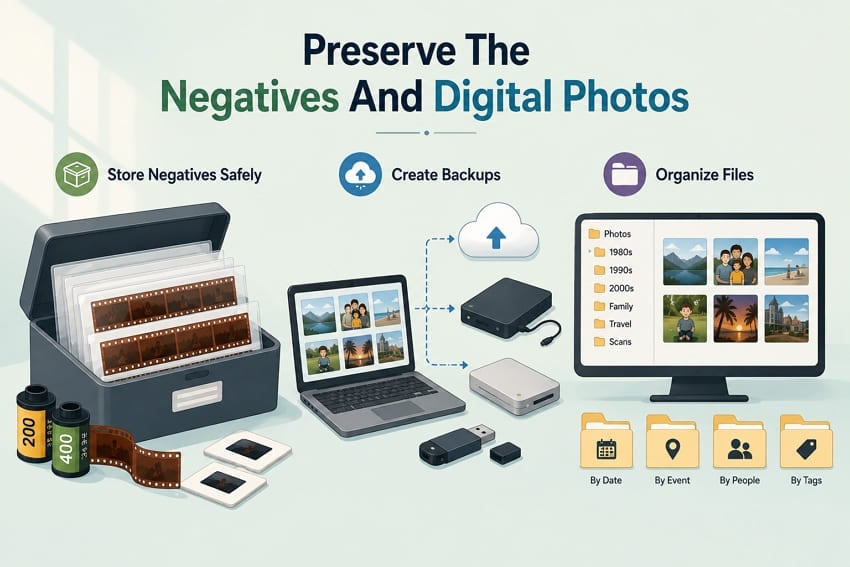
After you convert negatives to digital photos, protect both original film and digital copies carefully. Now, let's explore 3 simple ways to keep them safe for future use.
Store Physical Negatives Safely
Store film negatives in archival sleeves and avoid PVC materials that may damage film over time. Keep negatives in cool, dry, dark places with stable temperature and humidity for long-term protection. The U.S. National Archives advises avoiding PVC sleeves because they can damage photographic film during storage.
Create More Than One Digital Backup
Follow the 3-2-1 backup rule by keeping three copies on two different storage types, with one stored off-site. Remember that one external drive is not a backup, and cloud sync alone can spread accidental deletions. Check annually that every backup still opens correctly.
Use Clear File Names and Folders
Create descriptive file names using years, roll numbers, and frame numbers for future reference. Add names and important details to photo metadata while the information remains easy to remember.
Conclusion
In conclusion, using a negative to photo converter helps preserve old film before more damage appears. Choose the method that best matches your film type, budget, and image quality needs today. Store original negatives safely and keep multiple digital backups for better long-term photo protection always. If your converted photos still look damaged, Repairit Photo Repair is recommended for restoration.
Frequently Asked Questions
-
What resolution should I scan negatives at?
Scan 35mm negatives at around 3000 ppi for excellent image quality and detail. This produces images about 4000 pixels wide without capturing extra film grain. -
Why do my converted color negatives look cyan?
Converted color negatives look cyan when the orange film mask remains uncorrected. Sample the clear film edge as white or use dedicated film software. -
Are phone apps good enough for old family negatives?
Phone apps work well for identifying, viewing, and sharing old family negatives. Use scanners or cameras for irreplaceable frames needing much finer captured detail. -
Should I keep the negatives after digitizing them?
Yes, film often outlives the digital copy, and a better scanner in 10 years will pull more from the same strip.