
 TL;DR:
Resolve the Windows 10 sound settings not opening error by restarting the Windows Audio service, running an admin SFC scan, installing pending OS updates, or performing a System Restore to revert recent buggy updates.
● Restarting the Windows Audio background process via the Services menu or executing sfc/scannow in an elevated Command Prompt resolves deep system file glitches preventing settings access.
● These system-level troubleshooting methods are fully applicable to Windows 11, but reverting to an older OS version via the Create a restore point wizard is specifically advised if the settings broke immediately after a Windows update.
● If individual audio files fail to play while system settings remain functional, utilize Wondershare Repairit to fix corrupted MP3, M4A, FLAC, AAC, or WAV files, which strictly requires uploading a healthy sample audio file to initiate the Advanced Repair process.
Ask AI for a summary
 ChatGPT
 Perplexity
 Gemini
 Claude
 Grok
Grok
Fix "windows 10 sound settings not opening" problem
Check why the "windows 10 sound settings not opening" error occurs and the methods to fix this error, as well as the details to fix corrupted audios with Repairit - Audio Repair with clicks.
The use of sound settings is quite integral in managing the complete audio activity. It helps in making all audio changes across the computer. The user can easily access the sound settings and manage all tasks appropriately. What if the sound settings not opening Windows 10? Although it sounds excessively simple, it can get messy if it does not function properly.
This article offers solutions that can fix Windows 10 sound settings not opening. Go through these solutions to resume all sound-setting activities across your Windows.
Part 1: Why You Need to Open the Sound Settings on Windows 10?
Sound settings are crucial in helping users configure settings across their Windows 10. The platform can be easily accessed from the computer settings. It provides a great experience in setting the quality of audio to perfection. With such utility, the importance of sound settings gets evident.
This is the platform to visit whenever you face issues in your sound outputs or want to enhance audio. All kinds of tweaking are performed within the sound settings on Windows 10. First, you can configure playback devices and set the recording sounds across them. Following this, you will need to open sound settings to set communication settings.
Sound settings can go as far as repairing faulty audio outputs. Such extensive utility makes it very important in the Windows 10 sound functionality. That is why, if any user faces Windows 10 sound settings not opening, it surely needs correction. This is what has been covered in the article for the users as follows.
Part 2: Ways to Fix Sound Setting Not Opening
We shall now look ahead to the ways that can be used to fix the sound settings of your computer. With these fixes, you will soon be able to use your computer’s sound settings.
Fix 1: Restart Your Windows Computer
For this first solution, there might be some uncertain glitch in the computer. This glitch may have a direct impact on opening sound settings across it. To cast out the glitch, you can restart the computer.
Then, follow the simple steps as defined below:
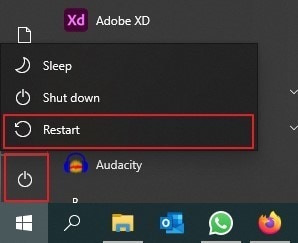
Step 1: Click on the “Start” menu icon on the screen’s bottom-left.
Select the “Power” icon across the menu.

Step 2: From the options available, click on “Restart” to carry out the process.
Fix 2: Update Your Windows
The sound settings not opening Windows 10 problem can be because of outdated Windows. With pending updates, there is a chance that the user won’t be able to practice multiple processes. This may also include opening sound settings across the computer. Thus, if you want to update your computer, you need to do the following:
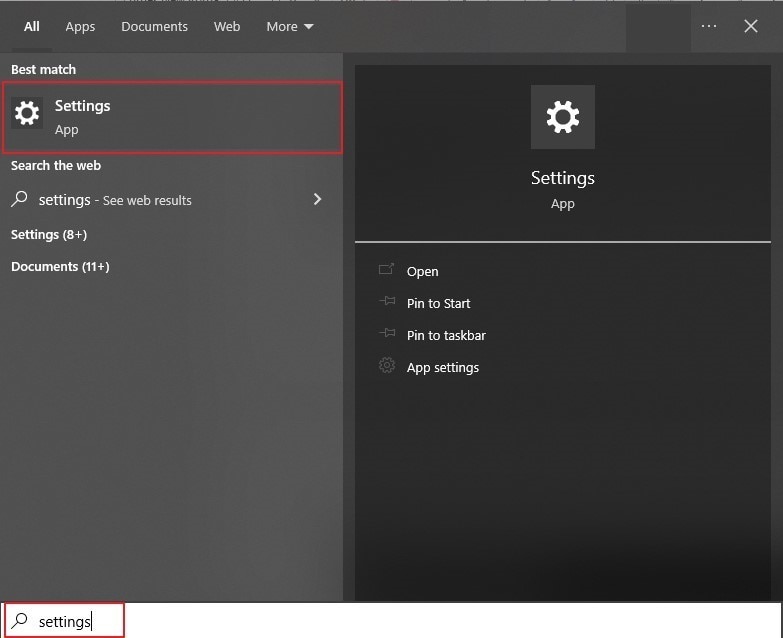
Step 1: Lead into the “Settings” of your computer by typing this across the “Search” feature on the taskbar.
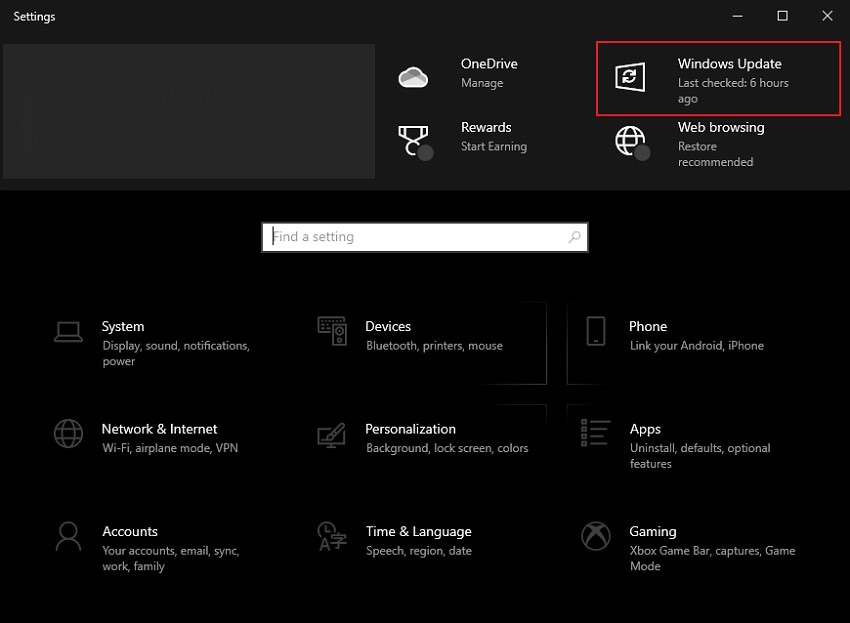
Step 2: On the new window, find the option of “Windows Update” in the top-right corner.
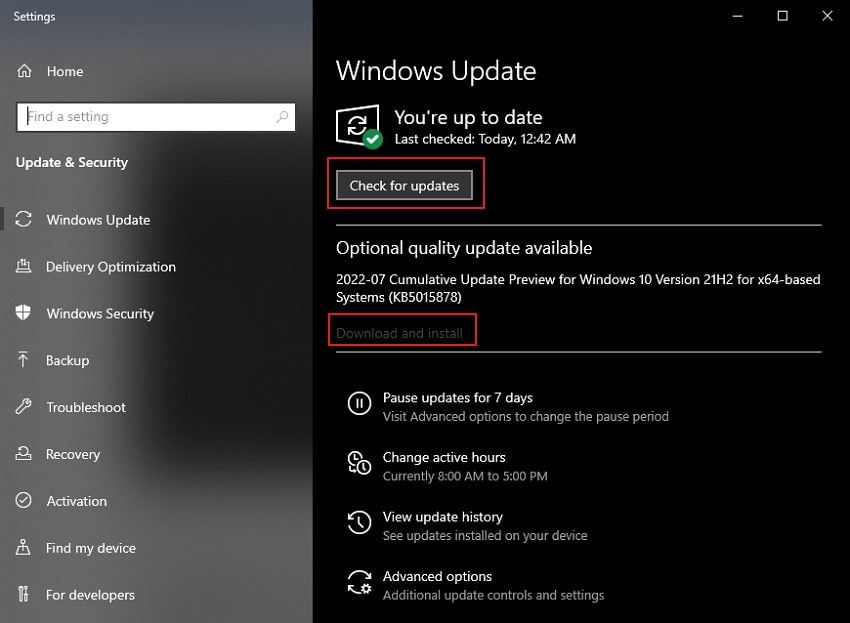
Step 3: As you proceed to the next screen, click on “Check for updates” to let the computer show any pending updates.
If the updates are already detected, they will be displayed just below. Next, click on “Download and install” to update your Windows.
Fix 3: Restart Audio Services On Your Computer
Windows Services operate in the background for all long-running processes on the computer. Windows Services function the sound system services. It includes the functioning of all sound settings. To make sure your sound settings function properly, you may need to restart the audio service:
Step 1: Click on the “Search” icon on the taskbar—type in “Services” across the provided space.
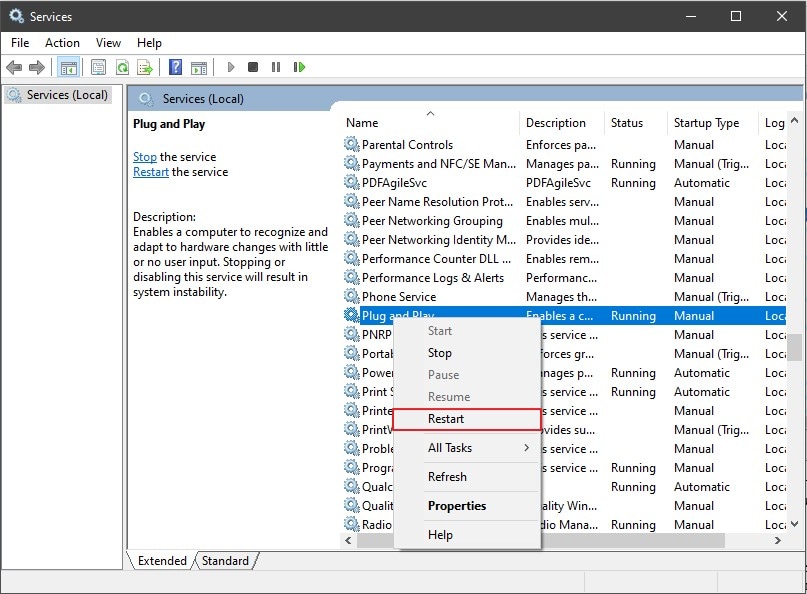
Step 2: As a new opens on the screen, scroll down to locate the “Windows Audio” service.
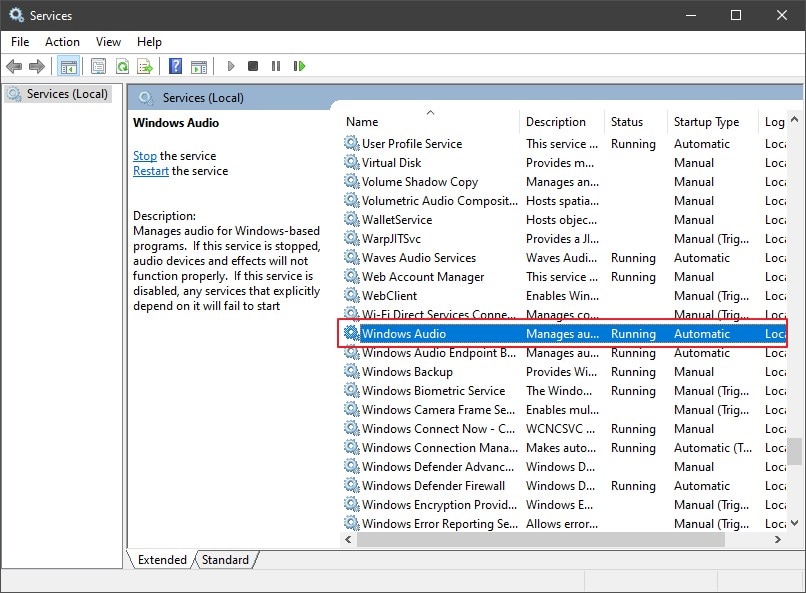
Step 3: Right-click on the service to select the option of “Restart.”
Confirm if any prompt appears on the screen.

Fix 4: Try SFC Scan To Scan And Resolve Problems
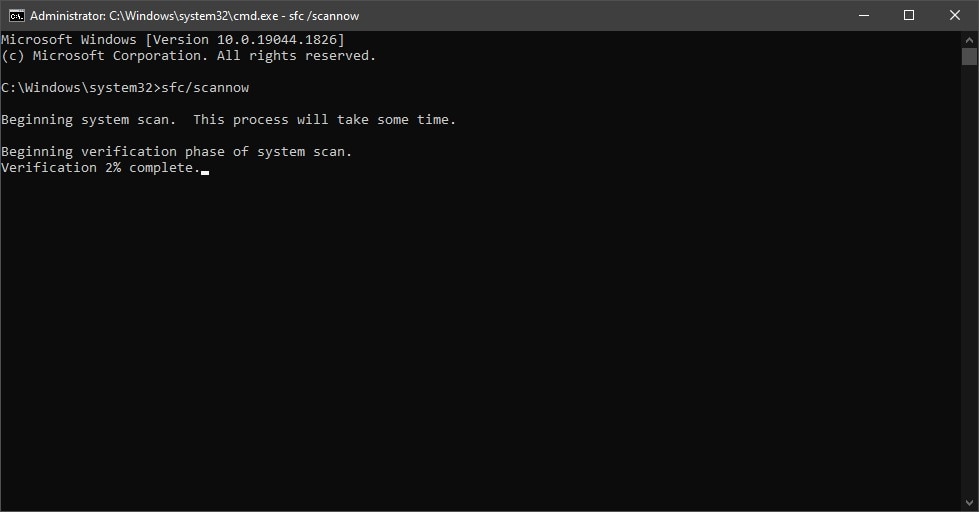
If you want to check the sound issues more deeply, you will need services that go up to the system files. Using the Command Prompt terminal will help you give an in-depth check across the system. It is essentially desired to get the issues within the Windows 10 sound settings not opening. Follow the steps to carry out this process perfectly:
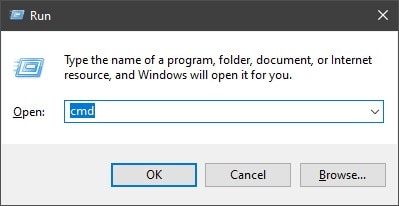
Step 1: You can start the process by opening the Run Program.
For that, use the shortcut keys of “Windows + R.” Next, type in “cmd” and use “Control + Shift + Enter” to open “cmd” as admin.
Step 2: On the terminal, type “sfc/scannow” and tap “Enter” to start.
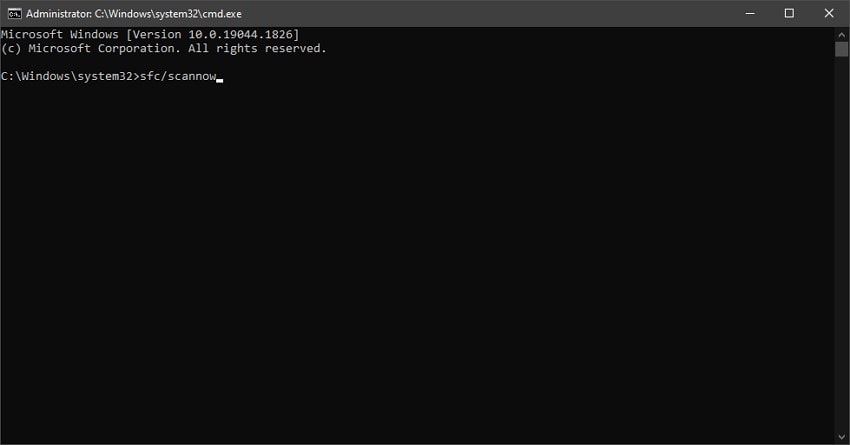
Step 3: A complete scan will be processed, showing all issues present in the computer’s system.
It would also resolve all detected issues.
Fix 5: Revert to An Older Windows Version
Where outdated systems can cause a problem for you, an updated system can also become a mess. Whenever Windows goes through an update, it might disrupt the system with bugs. These bugs can go across any possible service of Windows and damage it. Such is the case with sound settings not opening Windows 10.
There is a case that if a user updates their Windows, they can have it reverted to an older version. For this, check out the steps featured below:
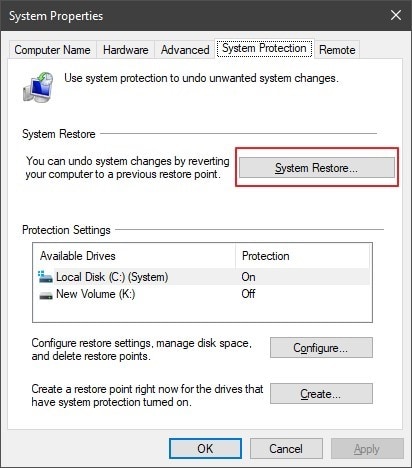
Step 1: Open the “Search” window on Windows using the “Windows + S” shortcut key.
Type “Create a restore point” and open it on a new window. Lead to the “System Restore” option to launch the wizard.
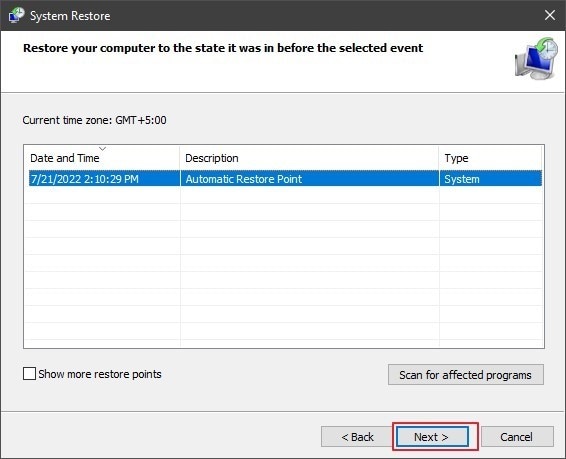
Step 2: Click “Next” and select a restore point automatically saved across the wizard.
To restore your computer, click “Next.”
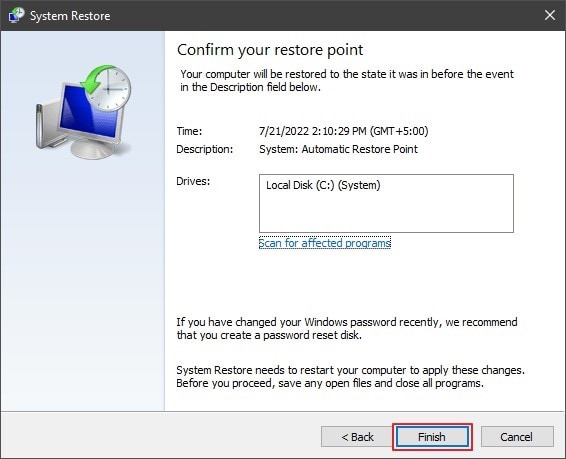
Step 3: A new window opens up. Click “Finish” to restore your computer successfully.
You will find a message appearing on the screen on its completion.
Part 3: Fix Audio Files Not Opening on Your Windows 10
What to do if your audio files are not opening on your Windows 10? This problem may direct to some software or hardware problem; however, this is not always the case. Issues with audio files can also be the primary cause of this problem on your Windows 10. Under such circumstances, you will need to fix these audio files. For this, the need of a proper tool is necessary.
Wondershare Repairit is the go-to solution for users in such cases. Where this tool features a perfect source of repairing audio files, it covers the process in no time. Not only is it easy to use, but it is also accurate in its results. Thus, this platform is highly preferred in the market for data repair.

-
Repair damaged audios with all levels of corruption, such as audio not working, clipping audio, humming audio, rumbling audio, sibilant audio, out-of-sync audio, etc.
-
Repair audios of diverse formats, including MP3, M4A, FLAC, AAC, WAV, etc.
-
Repair damaged or corrupted audios from mutiple devices: portable voice recorder, recording software, shooting apparatus, SD cards, phones, hard drives, USB flash drives, etc.
-
Compatible with Windows PC, Mac OS, and supports PC to mobile transferring/sharing.
If you want to understand this tool, look ahead in the steps below. We shall explain how one can repair their audios using Wondershare Repairit:
Step 1: Open Repairit and Launch Audio Repair Tool.
Start Wondershare Repairit on your computer after installation. Next, choose the “More Types Repair” tab on the left panel, and select "Audio Repair". Proceed to add the corrupt audio file by clicking on “+Add.”

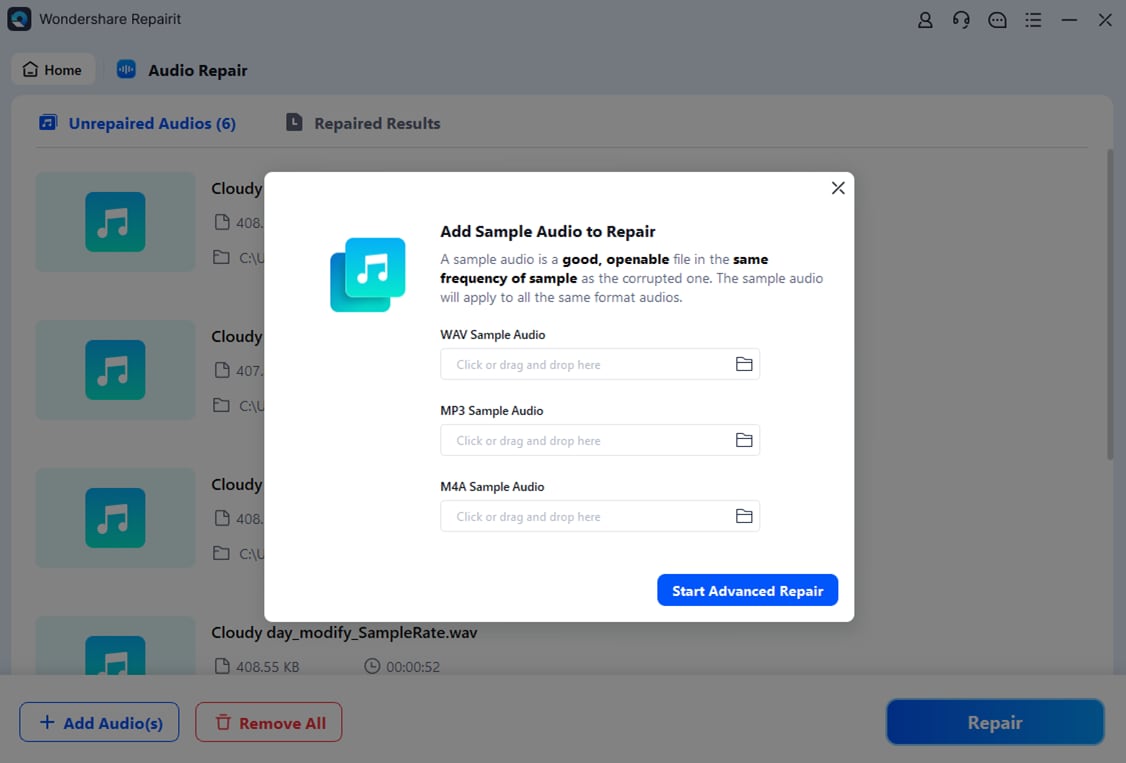
Step 2: Repair File with Sample Audio.
As you import the file, click on “Repair” to start the process. Before that, a prompt will appear asking you to add sample audio. Add sample audio for reference and click on “Start Advanced Repair.”
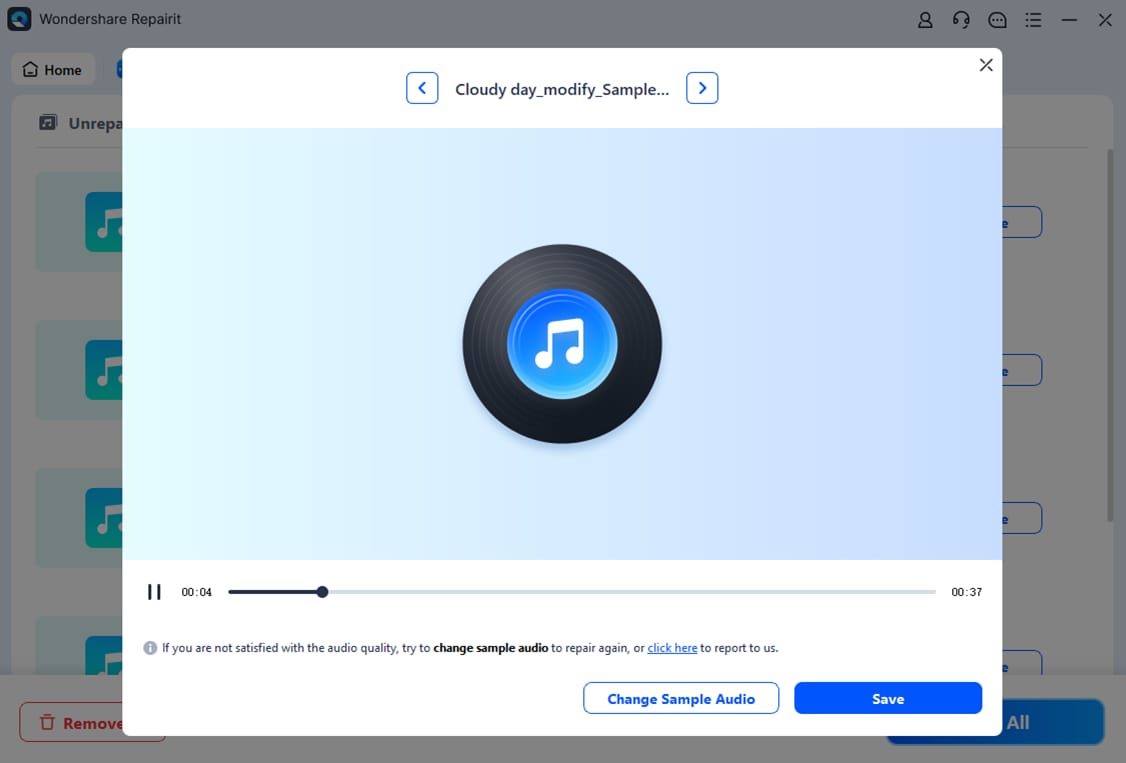
Step 3: Preview Results and Export Audio.
Once the repair concludes, you will find the “Preview” button on the next screen. View the repaired audio, and click on “Save” to export the audio file.
Part 4: Frequently Asked Questions
-
Q1. Can the solutions provided above be used for Windows 11?
-
A1: Yes, for sure. You can use these solutions across Windows 11 if sound settings do not open. However, there might be slight changes in accessibility, which need to be checked out.
-
Q2. What are the causes of sound settings not opening on Windows 10?
-
A2: The primary cause of sound settings not opening Windows 10 can be outdated Windows. Furthermore, there can be some glitches and bugs in the audio services of the computer. Such preventions hold users from opening the sound settings on their computers.
Conclusion
The importance of sound settings has been described properly in this article. Following this, a clear overview of the solutions was recorded. From updating Windows to reverting it, every solution was considered. In this case, the issue lies across the audio file instead of the computer. For that, users have been introduced to Wondershare Repairit. This solution will help them resolve all prevailing errors across the corrupt audio.
Therefore, this article is an excellent read to understand how to avoid sound settings not opening Windows 10.
* Some of the above codec formats may need to be supported by system.