
 TL;DR:
⚡ Quick Fix: Fix Videos Not Playing on Windows 10/11
Resolve video freezing, black screens, or playback errors with these 3 direct methods:
● Fix Broken Files Instantly: If specific videos won't open, use the Wondershare Repairit Online Video Repair tool. It fixes broken MP4, MOV, and 3GP files under 3GB for free directly in your browser. (Use the desktop version for larger files).● Reinstall/Update Graphics Drivers: Press Windows+R, type devmgmt.msc to open Device Manager, and expand Display adapters. Right-click your graphics card to update it, or select Uninstall and click Scan for hardware changes to refresh the driver.
● Optimize System Settings: Run the built-in Video Playback troubleshooter via Control Panel > Troubleshooting. If issues persist, press Windows+R, type powercfg.cpl, and switch your power plan to Balanced to stop hardware conflicts.
Ask AI for a summary
 ChatGPT
 Perplexity
 Gemini
 Claude
 Grok
Grok
"Why won't videos play on my laptop Windows 10/11?" -- I encountered this error when I opened some important videos. Is there any way that can help me solve it?
Many users complain that they experience various "videos not playing on Windows 10/11" errors. These issues may include freezing, crashing, stuttering, glitching, or getting error messages like “no videos are playing.” These may result in a lot of frustration.
If you are experiencing something similar, then you have come to the right place. In this post, we will discuss a wide range of effective solutions that you can use to avoid these disappointing setbacks and enjoy your video-watching experience.
Part 1. 7 Proven Methods to Fix Videos Not Playing in Windows 10/11 (Online Solutions Provided)
If you are using a Windows 10/11 computer, you might face some Windows 10/11 video problems while trying to play videos. One of the quick fixes to solve the "Windows 10/11 videos not playing" error is to restart your computer or the video itself. If that does not work, you can try following the solutions mentioned below.
Solution 1: Uninstall and Reinstall the Display Driver
Most users face video errors, especially after upgrading or updating Windows 10. By uninstalling and reinstalling the display driver in "Device Manager," you can fix the "computer not playing videos" error immediately. Here is how you can uninstall and reinstall the display driver in Windows 10/11.
Step 1: Go to the Windows "Start" option and select "Device Manager." Now you will see a list of devices, choose "Display adapters" to expand the option.
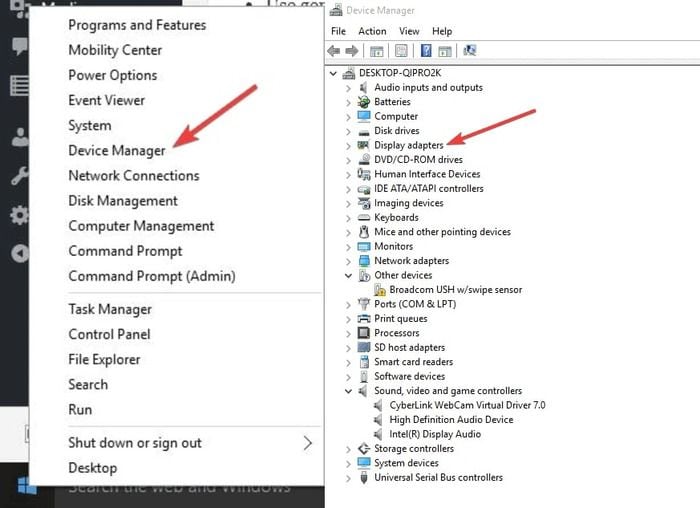
Step 2: After that, click on the device and choose the "Uninstall" option. Ensure that you check the option to remove the driver package from the system.
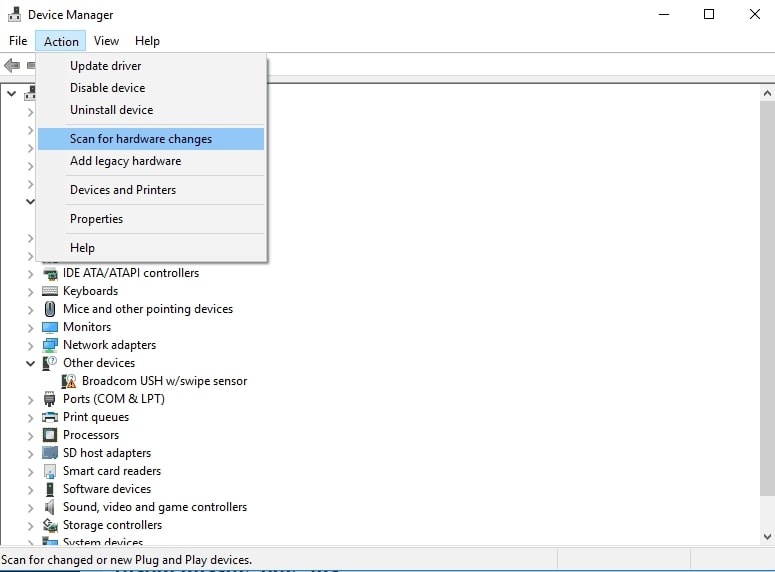
Step 3: Now, go to the "Action" menu in Device Manager and select "Scan for hardware changes" to reinstall the driver.
Step 4: The final step is to restart the computer and see whether the videos are playing or not.
Solution 2. Fix Corrupted Video Online for Free
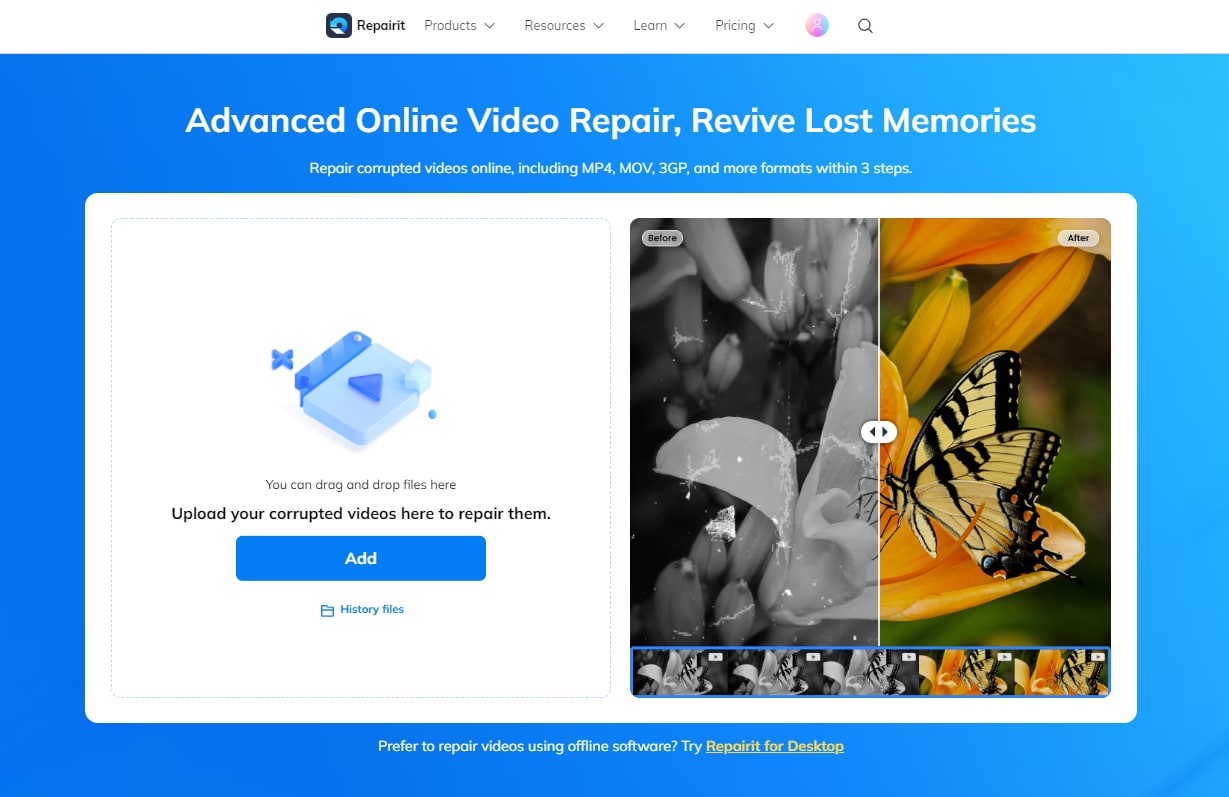
One of the reasons your video is not playing on Windows 10 or Windows 11 can be that your video is corrupted. You do not have to worry about that because right now, you are in good hands. We will introduce you to the Wondershare Repairit Online Tool, which will help you to repair your videos in no time. It supports the repairing of MOV, MP4, and 3GP formats. It can repair the video having a size of less than 3GB. You do not have to go through the long process to recover your video because this Wondershare Repairit Online Tool is here to help you.
- The recovery process is anything but difficult to utilize.
- It can work for 10 video formats, like MP4, 3GP, MOV, etc.
- It doesn't ask you to sign up.
- It takes the least time and is effective.
The steps to continue with this product tool are exceptionally simple. So how about we experience all the means to be followed?
Stage 1: Uploading the video
To upload your video, open the product's interface online. Find and choose the Add (+) option. Browse and add the tainted video.
Stage 2: Repairing measure
Whenever you are finished with the uploading step, the fixing process will start within moments.
Stage 3: Saving
When the process is finished, review and spare the video.

Wondershare Repairit is all ready to serve you with both its Online and Desktop versions. You are recommended to pick it according to the suitability of your concerned video with both versions. Wondershare Repairit Online Tool is recommended when your video has a size up to 3GB and supports 10 video formats. But if your video is larger than 3GB and you want repair software for a variety of formats and want to repair without a video number limit, then choose Wondershare Repairit Desktop Version.
With its user-friendly interface, Wondershare Repairit for the desktop version can also help you to repair seriously corrupted video files with quick and advanced repair modes. All you need to do is follow the simple steps described below to repair corrupted videos in no time.

Wondershare Repairit - Video Repair
 Security Verified. Over 7,302,189 people have downloaded it.
-
Repair damaged videos with all levels of corruption, such as video not playing, video no sound, out-of-sync video or audio, playback errors, header corruption, flickering video, missing video codec, etc.
-
Repair full HD, 4K, and 8K videos and support 20+ popular formats, including MOV, MP4, M2TS, MDT, RSV, WMV, MPEG, DAT, etc.
-
Repair damaged or corrupted videos caused by video compression, system crash, video format change, etc.
-
Repair critically damaged or corrupted RAW/Log/HDR videos from professional cameras such as Blackmagic Design, RED Digital, and ARRI, etc.
-
Repairit has a quick and advanced scanning mode. You can use either depending on the level of corruption the video file has undergone.
-
No limit to the number and size of the repairable videos.
-
Repaired videos are more compatible with professional editing software such as DaVinci, Composer, Final Cut Pro, and Premiere Pro.
-
Support Windows 11/10/8/7/Vista, Windows Server 2003/2008/2012/2016/2019/2022, and macOS 10.13~macOS 15.
Step 1: Upload Corrupted Video Files
The first step is to launch "Wondershare Video Repair" on your Windows computer. When the tool is launched, you can add the corrupted video from the folder by clicking on the "Add Corrupted Video" button, or you can directly drag the file.

Step 2: Start the Repair Process
Now, the software will start uploading video files. The size of the video will determine how long it takes to upload. You can also add multiple videos, but they will be uploaded sequentially. When the videos are uploaded, you can click the "Repair" option to begin the repair process.

Step 3: Check or Preview the Video
The repairing process will only take a few minutes to complete. As soon as it's done, you will see a "success" message on your Windows 10 screen. Before saving the video, you can preview it to check whether the video is fully repaired. After watching the video, you can save it.

Note: Do not save the files to the same path where you lost them.

This video will provide a step-by-step guide on how to fix issues with unplayable videos.
Solution 3. Run Video Playback Troubleshooter
You can solve 70% of the issues on your computer by troubleshooting them. So if you are having trouble opening or playing video files on Windows, then perform the following troubleshooting steps mentioned:
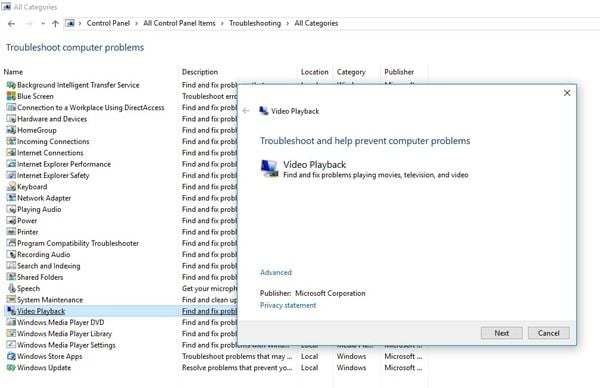
Step 1: Go to the Start search option and open "Control Panel." Now, a list of options will open, select "Troubleshooting" and click on the "View All" option.

Step 2: Run the "Video Playback" troubleshooter and see if this helps to play the video again.
Solution 4. Update Drivers
Sometimes updating your graphics drivers can also help in fixing "video not playing" situations. If you find out that this issue started immediately after upgrading or updating Windows 10, then it is quite possible that your drivers are not compatible. Here are a few steps that you can follow to update your graphics drivers:
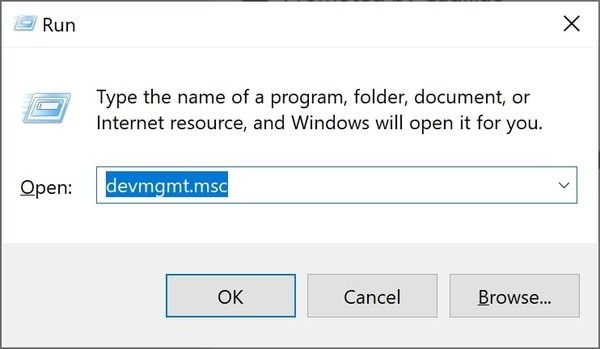
Step 1: Hold Windows+R keys together and then type "devmgmt.msc" and click "OK."
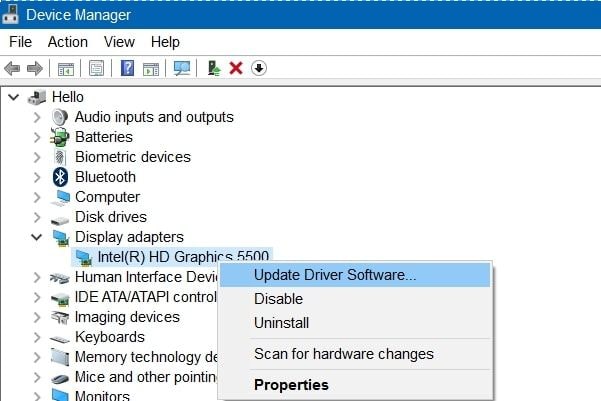
Step 2: You will see a list of multiple options, double click on "Display Adapter." Your video device/card will open, right-click on it and choose the "Update Driver Software" option.
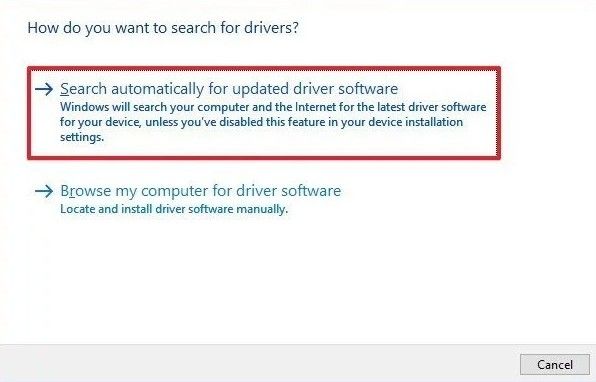
Step 3: The final step is to click on "Search automatically for updated driver software" and wait for your driver to be updated by Windows. Once updated, check if you can play the video.
Solution 5. Change Power Options
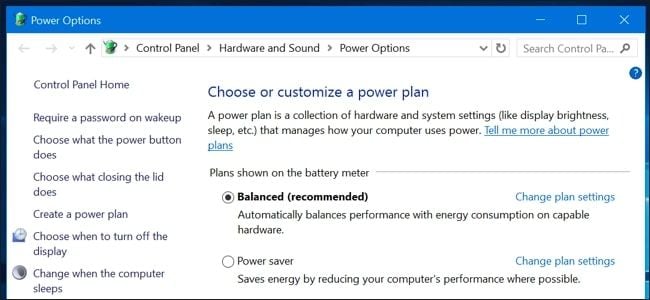
This may sound strange, but plenty of users have claimed to solve their Windows 10/11 video problems by simply changing the power options. You just have to customize the power settings and change it from "High performance" to "Balanced." Follow the steps below to change power settings:
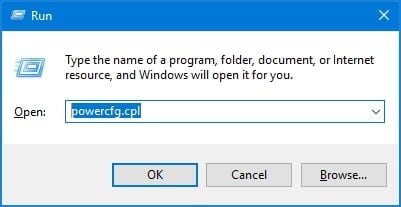
Step 1: Hold Windows+R keys together and press "Enter." Then, type powercfg.cpl and click "OK."
Step 2: Now, choose the option "Balanced" and close the window to check if you can stream the video. This will help you to resolve the issue instantly. If not, reboot the system and check again.
Solution 6. Change Audio Playback Settings
You can also resolve the video streaming issue by lowering the bit rate of the audio playback. To do that, follow the steps below:
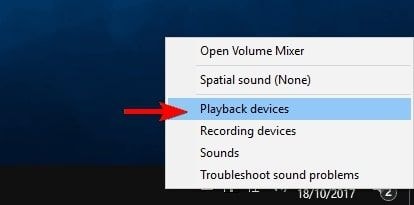
Step 1: Go to the sound icon in the taskbar, situated in the bottom right corner of the screen. Now right-click it and then select "Playback Devices."
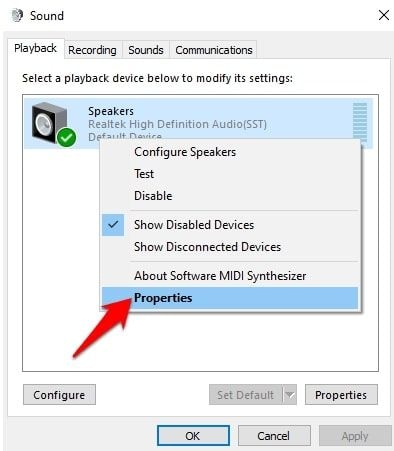
Step 2: Click on your default playback, which is marked with a green checkmark. After that, go to the bottom-right corner and click on the "Properties" button.
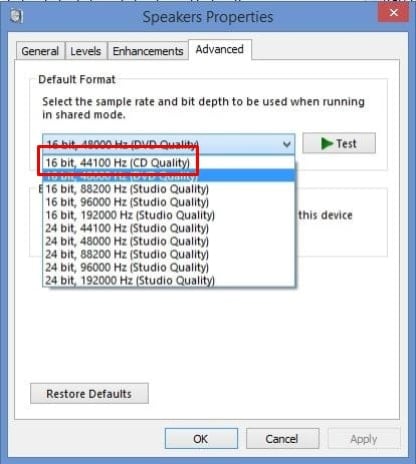
Step 3: Go to the "Advanced" menu tab, and then from the drop-down menu, select the "16 bit, 44100 Hz (CD Quality)" option. Now, you can click "Apply" and select "OK." This will help you play the video again without any error.
Solution 7. Check for All Available Updates
If your computer is not up to date, you might experience a "videos not playing on laptop" error. So make sure that your computer is updated and see if that makes a difference. You can update your laptop Windows 10/11 by following the steps below:
Step 1: Go to the Start menu and select the "settings" icon. You will see a lot of options, click "Update & Security."
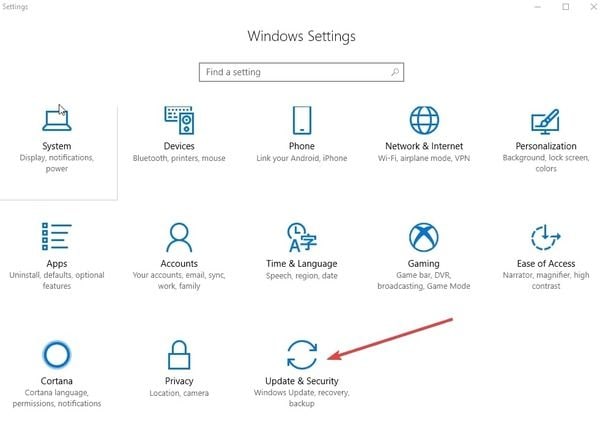
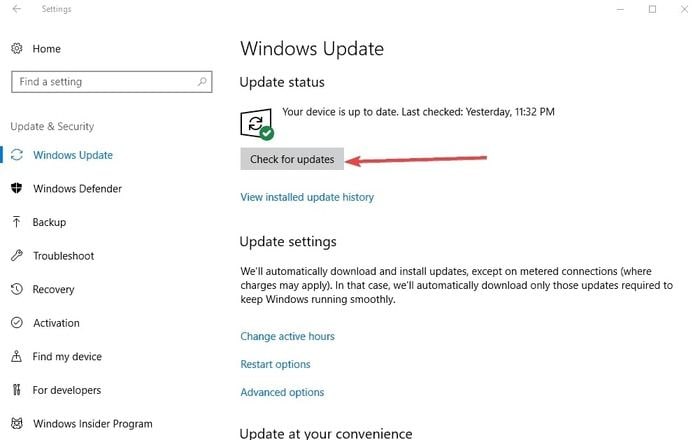
Step 2: Several options will open up; you need to select the "Windows Update" option and click on "Check for updates." The pending updates will start installing. Once the installation process is complete, you can check to see if the issue persists.
Part 2. How to Identify Videos Not Playing Causes
Many possible factors could lead to the "my videos are not playing on Windows 10/11" error, some of them include:
- The system is infected with malware.
- The Graphics driver is outdated.
- The video player is not upgraded.
- There is corruption in the video.
- You have not installed Windows updates.
There are various ways to identify the reasons of the problem "videos not playing in Windows 10/11". Some of them are mentioned below:
1. Blurry, Choppy, or Jerky Videos
It can be extremely disappointing to watch blurry, choppy, or jerky videos. This issue "video not playing smoothly Windows 10/11" can occur with both your downloaded or recorded videos. The poor video quality can be the result of codec issues, corrupt SD cards, outdated media players, or camera glitches while shooting.
2.Videos Playing in Slow Motion
Whether you try to play videos on a hard drive or online, slow-motion videos can be an indication that there is something wrong with the video. This issue may occur due to outdated video drivers or media players in your system. Sometimes, even a corrupt video file may cause "videos not playing on PC".
3.Black Screen when Trying to Play Videos
When you open your video and see a black screen, it can cause disappointment. This problem can be either due to format changes, missing codec, read/write errors, or an outdated driver. The easiest way to fix this issue is through a powerful Video Repair tool.
4. Error Code 0xc00d36c4 while Playing Video Files
Usually, you see a Code 0xc00d36c4 error when you try to play videos transferred from your phone or DVD to your USB device. You may face this issue mostly after updating your Windows 10/11 computer.
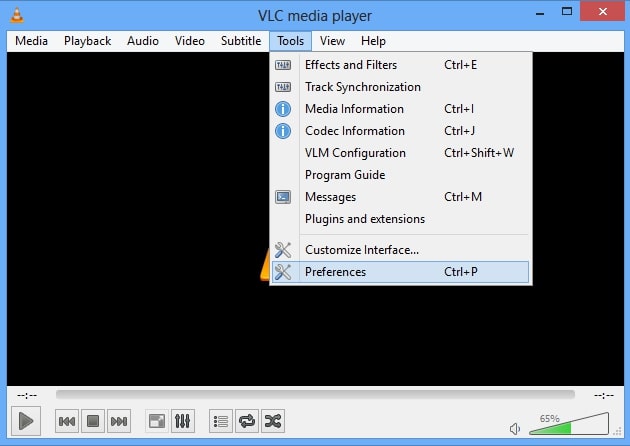
You may also not be able to play the video because it is damaged. In this case, consider getting the video file again. If you are using VLC to play videos, you can follow the steps below to check if the video plays properly.
Step 1: Open the VLC program and select the "Tools" tab. You will see a list of options in the drop-down menu, click on "Preferences."
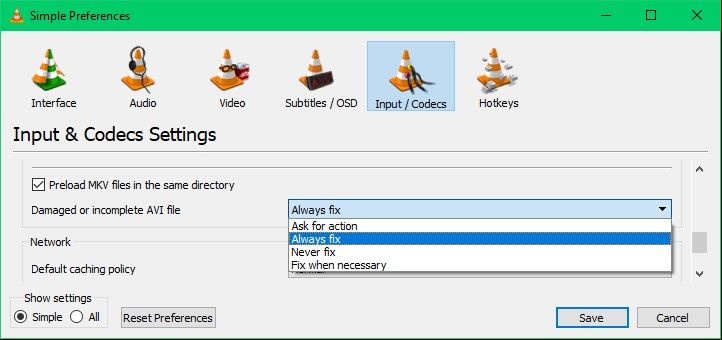
Step 2: Go to Input/codecs at the top of the page. You will see the "File" category — under the "Damaged or Incomplete AVI file, choose the option "Always fix." You can save the changes and try playing the video again.
Part 3. Tips to Play Videos in Windows 10/11 Smoothly
Everyone wants to have perfect video playback. However, some software and hardware issues can prevent you from playing the videos properly. A lower-performance computer and an out-of-date media player are some of the factors that can affect your video performance.
So if you are wondering what you can do to play videos in Windows 10/11 smoothly, keep the following tips in mind.
1. Install a reliable anti-virus and scan your computer regularly. It will protect your computer from all the malware that can corrupt your videos.
2. Whatever media player you use, keep it updated. Whether it is VLC or any other media player, make sure you have the latest version of the software.
3. Use secure websites and reliable video downloading software to download videos.
4. Keep your operating system updated. This will automatically update all the drivers in your system, and you never have to face Windows 10 video problems.
5. Equip your Windows 10/11 computer with all the software and hardware required to stream videos.
6. Consider installing or updating recent GPU and CPU drivers if you are not happy with the quality of your video. Remember, with outdated drivers; you may encounter several errors while playing the video. So for the smooth functioning of the videos, it is suggested that you keep these drivers updated.
7. Install popular media players on your computer and ensure that they are downloaded from a reliable source. It is highly recommended that you download the media player from the official site of its developers.
Closing Words
All the solutions mentioned above will help you to fix Windows 10/11 video problems on your computer instantly. Whenever you face "video not playing" situations, you can always read this post and solve any kind of video error you encounter. If you still find it difficult to fix the issue, you can use the Video Repair Tool WonderShare Repairit, which will automatically and quickly repair your corrupted video files.
Related Content You Might Want to Know
-
1. Does Windows 10/11 have a media player?
Yes, Windows 10 has a media player, which is called Windows Media Player (WMP).If you're wondering why videos won't play on your system, it's important to first check whether these default players support the video format. To open WMP, press the Windows+R keys, type wmplayer.exe, and hit Enter. This could help resolve basic video playback issues -
2. How to watch videos on Windows 10/11?
To avoid situations where videos won't play or no videos are playing, you can use third-party players that support a wide range of formats. Some of the most popular media players include Windows Media Player, VLC, KMPlayer, Kodi, Media Player Classic, DivX Player, and Winamp. The best part about these media players is that they are super easy to install and are easily available. -
3. What are the Windows 10/11 video problems?
You may face one or more Windows 10/11 video problems on your computer. Some of the issues may include - videos showing a black window even though the audio plays correctly, the video may flash, videos only play in expanded or large mode and not in normal mode, or it continually starts and stops instead of playing smoothly. -
4. What is the default media player for Windows 10/11?
Windows 10 usually comes with the 'Movies & TV' application as the default media player. However, you can also use other apps like VLC as your default media player. -
5. How do I fix my video player on Windows 10/11?
You can fix your video player on Windows 10/11 by upgrading it, installing the latest Windows updates, scanning for hardware changes, scanning for malware, changing power plan settings in the Control Panel, or using a reliable and efficient Wondershare Video Repair Tool.