
If you keep experiencing video playback problems on Windows 10 or 11, there might be some issues with the video player. On the other hand, a faulty driver or glitchy system could be causing these problems.
Regardless of the problem, having this issue is more than frustrating. Fortunately, you can fix common video problems on Windows 10/11 in many ways. This article will introduce different video problems and explain why you might encounter them.
It will also present multiple solutions to help you resolve the most prevalent video problems and enjoy a pleasurable video experience.
In this article
Different Types of Video Problems on Windows 10/11

Understanding video problems on Windows 10/11 is the best way to resolve them. Let’s delve deeper into common video problems to help you get familiar with them and find the best ways to fix them.
Problem 1: Video Lags
Video lags occur when your PC or Mac isn’t loading a video at the right speed. They can also happen when you suddenly pause or halt a video and then play it again.
Problem 2: Skipping Videos
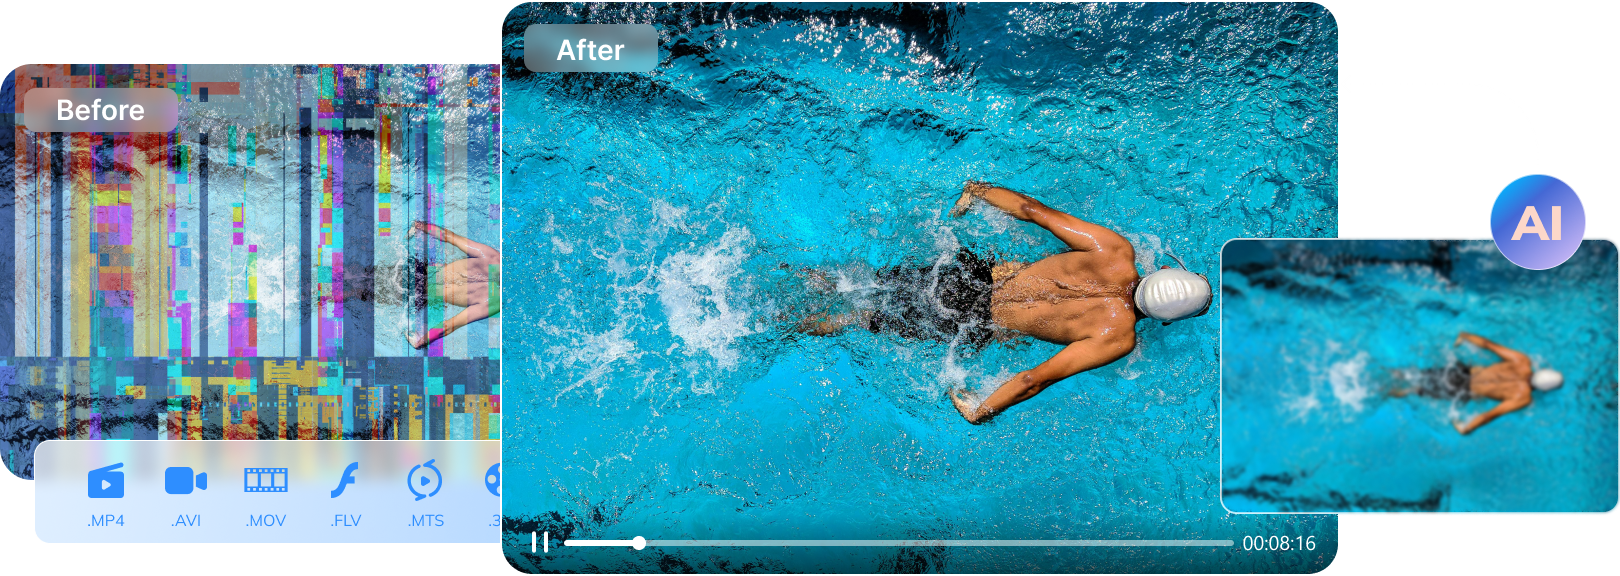
Skipping, jerky, choppy, or blurry videos are common video problems in Windows 10/11. Whether you’re trying to play a recorded or downloaded video file, you might experience this problem or see the ”video not playing smoothly” error message.
Problem 3: Freezing Videos
If your video keeps freezing (pausing) in the middle of the streaming, your video player or video file might be corrupted.
Problem 4: Black Screen
The black or white screen problem can occur due to an outdated driver, read/write errors, missing code, format changes, malware intrusion, etc. You can play the same video file using a different video player.
Problem 5: Missing Audio/Video
Your system might need a long-overdue update if you can’t see the picture or hear the audio. However, before you check for pending updates, check your player to see if you haven’t accidentally muted the audio or video.
Problem 6: Glitches and Stuttering
Video glitches and stuttering issues happen when you upgrade your OS to Windows 11 due to outdated video drivers and players, including incompatible system configuration and video settings.
Problem 7: Error Messages
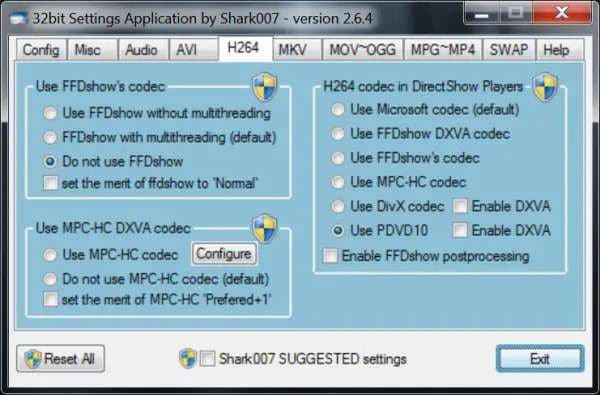
Windows users frequently receive error prompts, such as 0xc00d3e8c and 0xc1010090, when trying to play video files. These error messages appear when your media player can’t read video encoding or is missing codec packs.
Problem 8: Stuck Screen
No matter how many times you replay the same video file, it gets stuck at the same spot. Even if you try a different video player, the same thing happens. A stuck screen during playback is a typical video problem in Windows 10/11.
Reasons You Might Have Video Issues on Windows 10/11
Here’s a short list of common reasons you might experience video problems on Windows 10/11.
Reason 1: Network Problems
If you’re experiencing video glitches and lags while watching videos online, you should check your network and browser to see if there are any problems. A network-related issue could cause an array of video problems mentioned above.
You can fix most network-related video streaming problems by resetting your router, adjusting the video quality, and clearing your browser data like temp files, cookies, and cache.
Reason 2: Compatibility Issues
Some video files or media players may be incompatible with your Windows 10 or 11 PC. Compatibility issues can cause many video problems, such as video freezing, distorted images, black or white screens, etc.
Reason 3: Virus/Malware
Virus infections and malware attacks can do much more than just cause video problems; they can wreak havoc on your Windows 10/11. A virus or malware infection can cause system crashes, hard disk malfunctions, data loss, etc. Such an infection could cause video playback and system performance issues.
Reason 4: Corrupted Video Files
Corrupted video files and outdated codecs are the most common causes of video problems in Windows 10/11. If you try to play a corrupted video file, you may experience video playback issues like a stuck screen, video freezing, error messages, etc.
Reason 5: Outdated Drivers
Graphics and video drivers are vital for an enjoyable video playback experience. If you play a video file using a media player with outdated drivers, you’ll probably experience a few video problems, such as black screens, stuttering, freezing, etc. Keep your graphics card drivers up-to-date and always check for updates for your media players to avoid video issues.
How to Recognize Video Issues on Windows 10/11

Windows 10/11 video issues aren’t limited to just one cause or symptom. Many factors impact various scenarios that may lead to experiencing video problems. Thankfully, you can easily recognize and resolve these problems before they escalate. Here are several methods to help identify video issues in Windows 10/11.
Issue 1: Crashes
Application or system crashes are frequent problems that may cause video playback issues, among many other troubles. If your video player or system keeps crashing while playing videos, something more severe than a simple video problem might be at play.
In most situations, your video player might crash during playback due to poor Windows video compression. Either your system doesn’t have proper video compression settings, or there have been problems during installation.
Issue 2: Videos Don’t Start Right Away
If you play videos from your hard disk, but your player takes a long time to start playing, you’re either dealing with a corrupted hard disk, video corruption, or a faulty video player.
Move your video files to another storage device and use a different media player to see if the problem persists. Also, check your system and video player for updates, which might help resolve the issue.
Issue 3: Black/White Screen
If you keep seeing a black, blank, or white screen when playing any video file, two types of errors might be causing it. Either you’re using a corrupted video player, or there’s an underlying system problem.
On the other hand, you might be dealing with any of the following situations:
- Your video files are corrupted;
- You’re playing a video from a corrupted memory card or defective storage device;
- Malware or virus has corrupted your files;
- A shady video player has rendered your files unreadable;
- Your Windows 10/11 OS might be glitchy;
- You’re experiencing hardware-related issues;
- You don’t have enough RAM to play videos.
These factors could cause multiple video problems on Windows 10 or 11.
Issue 4: Distortion
Video distortion includes many problems, such as freezing, broken pixels, picture stretch, etc. If you experience this problem in the background while playing video clips in Windows 10/11, it could indicate hardware malfunction, CPU failure, software glitch, system issue, etc.
Issue 5: Error Messages
Error messages can appear during video playback due to outdated device drivers, absence of compatible codecs, video corruption, or insufficient system configuration.
Your video player may not support the file type, or your application may crash during a video download or transfer. In such situations, you may receive error prompts like “error 0xc00d36c4,” “video error code 0xc00d5212,” or “Windows cannot play the file.”
Top 8 Fixes You Can Try to Prevent Video Problems on Windows 10/11
Here are the top eight ways to resolve video problems on Windows 10/11 and ensure you have a top-class watching experience.
Fix 1: Repair Video Files With Wondershare Repairit

Corrupted video files are the most common cause of video problems in Windows 10 and 11. Thankfully, an AI-powered video repair tool like Wondershare Repairit can help you fix corrupted video files, including emails, audio clips, and photos.
It’s an AI-enhanced data repair solution for Windows and Mac computers. It uses AI technology to seamlessly repair and restore video, audio, and image files online and offline. It fixes all types of video files and formats, regardless of the corruption level.
If you’re dealing with corrupted video files, here’s how to use Wondershare Repairit to fix them:
Step 1: Navigate to Video Repair and import corrupted video files by clicking +Add (or drag and drop them to start repairing).

Step 2: Click Repair to start the video repair process.
Step 3: Preview the repaired files and click OK to save them in a secure location.
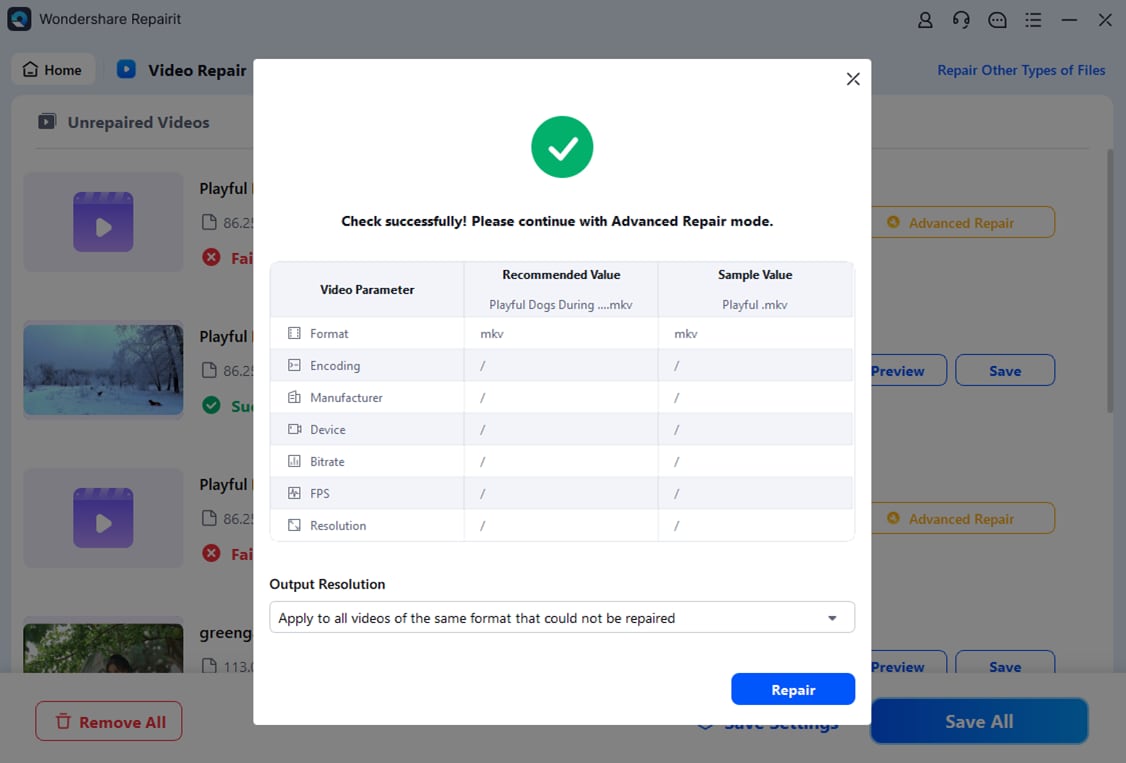
Step 4: Select Advanced Repair if the quality of repaired files isn’t up to your expectations. The tool will notify you if your files are available for this option.

Step 5: Click Repair, allow the software to finish, and click Save.
Wondershare Repairit’s patented data repair technology will make returning your videos to their former glory a breeze.
This video can help you fix your corrupted video files with a step-by-step guide.
Fix 2: Turn off Hardware Acceleration
Wrong hardware acceleration settings can cause video problems on Windows 10/11. Turning them off might resolve the issues.
Here’s how:
Step 1: Start your default video player and navigate to Settings > Preferences.
Step 2: Find Accelerated graphics or Hardware acceleration.
Step 3: Turn off the option and click OK.
Restart your media player and play the video to see if everything is in order.
Fix 3: Reinstall the Adapter
Though your Windows OS requires regular updates to fix hidden system problems and enhance user experience, these updates can sometimes cause video problems. If you receive a “Windows videos not playing” error after an OS update, uninstall and reinstall the display adapter to fix the issue.
Follow these steps:
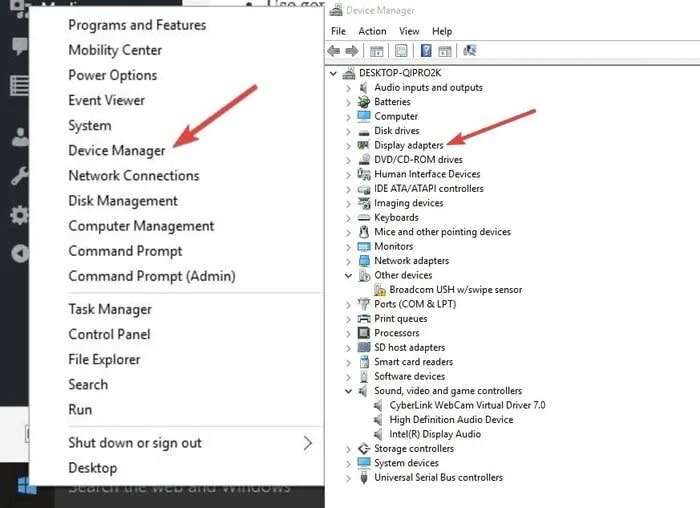
Step 1: Type Device Manager in the Windows Taskbar’s search bar.
Step 2: Select Display adapters.
Step 3: Right-click your display adapter and select Uninstall (uncheck the Remove driver package box).
Step 4: Navigate to the Action tab and select Scan for hardware changes to reinstall the driver automatically.
Step 5: Restart your PC.
Once your PC turns back on, play your video to see if you’ve fixed the problem.
Fix 4: Update Video Drivers
Outdated or corrupted video drivers could cause video problems. Updating them might solve the issues.
Follow the steps below:
Step 1: Go to Device Manager via the search bar and double-click Display adapters.
Step 2: Right-click your video driver and select Update Driver or Update Driver Software.
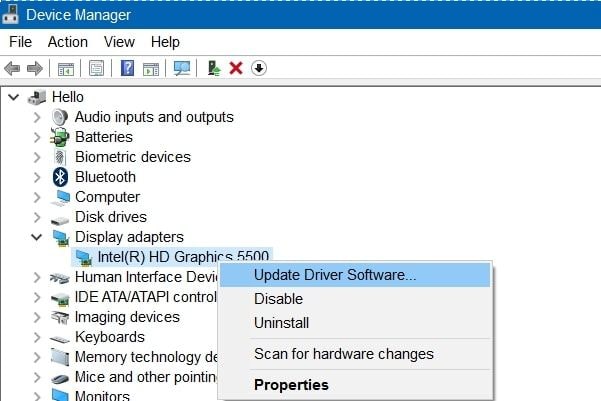
Step 3: Allow your computer to search for the latest software automatically.
If this fix doesn’t work, try the method below.
Fix 5: Update Windows
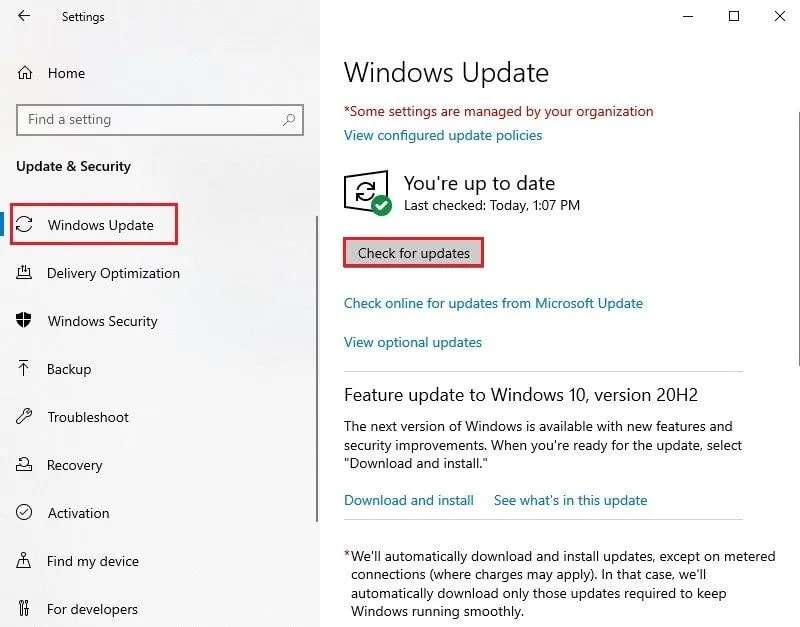
If your Windows 10/11 isn’t up-to-date, you may experience video problems. Check for pending Windows updates to resolve video issues. Windows updates can also solve system issues, upgrade security, and enhance the performance of your PC.
Follow these steps to check for Windows updates:
Step 1: Type Settings in the search bar.
Step 2: Select Update & Security.
Step 3: Navigate to Windows Update > Check for updates.
Step 4: Install pending updates and restart your computer.
Play the video to see if everything is in order.
Fix 6: Run the Video Playback Troubleshooter
Windows enables you to solve most computer issues using a specialized troubleshooter. If you can’t play or open video files on your PC, use the Video Playback Troubleshooter to fix the problem.
Here’s how:
Step 1: Type Control Panel in the search bar.
Step 2: Go to Troubleshooting > View All > Video Playback.
Step 3: Click Next in the Video Playback dialog box.
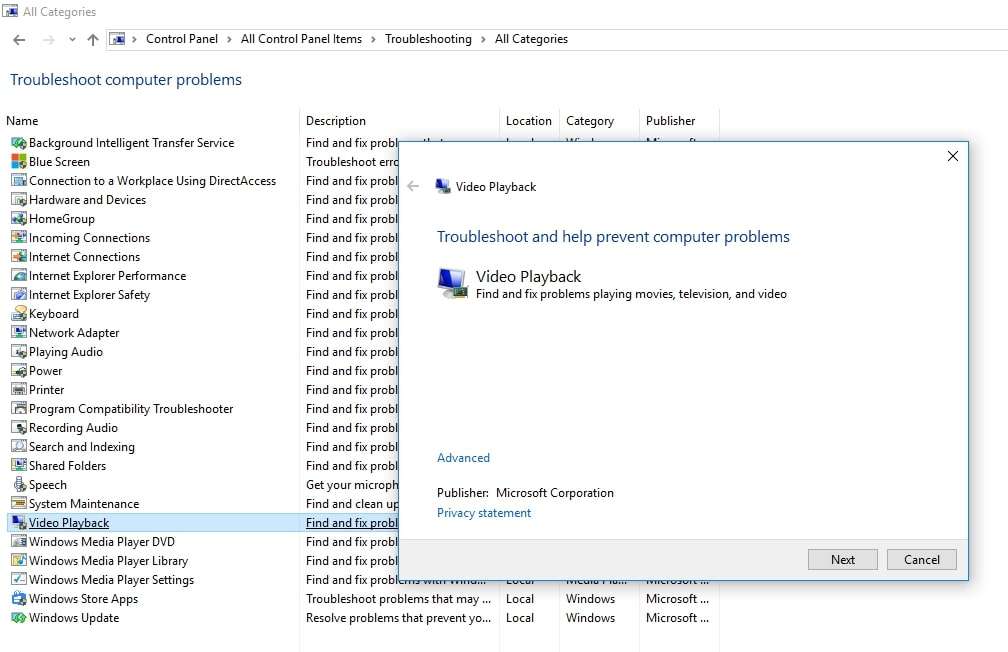
Step 4: Select Open video playback settings.
Step 5: If there are any video playback problems, the troubleshooter will list them and offer solutions.
If the troubleshooter doesn’t resolve the issue, try the following fix.
Fix 7: Update or Reinstall the Video Player
Updating or reinstalling your video player might help you address playback issues. Follow these steps to update and reinstall your media player.
Update the video player:
Step 1: Open your media player and click About.
Step 2: Select Update or Check for a new version.
Step 3: Restart your computer and play your video.
Reinstall the video player:
Step 1: Click This PC in File Explorer and locate the folder with your installed player.
Step 2: Click Uninstall.exe.
Step 3: Visit the official website and download the latest version.
Step 4: Reinstall the video player.
Play your video to ensure you’ve fixed the problem.
How to Ensure Your Videos Run Properly
Here are the crucial tips for avoiding video playback problems in Windows 10/11:
- Keep your media player and Windows system up-to-date to ensure you have the latest system settings and upgrades.
- Install a reliable and effective antivirus program to prevent malware and virus infections from corrupting your system and video files.
- Use a trustworthy media player.
- Always download videos and software tools from secure, reliable, official websites.
- Regularly check for Windows updates to update all system drivers automatically.
- Ensure your video configuration and settings meet video streaming requirements.
- Check your CPU and GPU drivers for updates occasionally, as Windows updates may not include such upgrades.
- Install the latest, compatible codes for digital video compression and decompression.
- Use software rendering.
- Avoid tampering with your video files’ headers, format, and output encoding.
- Avoid running the video files on multiple players.
- Keep your system firmware up-to-date.
- Upgrade your CPU and RAM to support HD digital video loading and streaming.
Conclusion
Video problems on Windows 10/11 can be annoying, preventing you from enjoying your favorite movies, TV shows, home clips, etc. Thankfully, the proper solutions help you resolve all your issues and enjoy a seamless video playback experience.
This article should help you understand the causes of common video issues on Windows 10/11 and how to recognize and fix them as quickly as possible.
Though these methods can help you address most problems, they won’t be enough to fix video corruption. Fortunately, you can rely on Wondershare Repairit to repair and restore corrupted videos, images, audio files, emails, etc.
