
![[2026] An Easy Guide for Photoshop Remove Color Cast](https://images.wondershare.com/repairit/article-trans-image/1540/photoshop-remove-color-cast-1.jpg)
Ever snapped what you thought was a perfect photo, and later found it tinted with an odd blue or yellow hue? Those strange tints are color cast creeping in, stealing the natural tones and feel of your image. Anyway, today you don’t have to settle for something that’s completely off because Photoshop removes color cast timelessly.
From correcting skin tones to restoring the white of clouds, it gives you pinpoint precision to erase unwanted and highlight the beautiful. For more understanding, read the following guide packed with valuable approaches offered by Photoshop to remove color cast. Plus, we will explore a one-click solution to eliminate color cast issues without any manual struggle.
In this article
Part 1. What Is Color Cast in Adobe Photoshop? Why It Occurs
In explanation, these color casts in Adobe Photoshop refer to undesired tints, making images appear too blue or yellow. Instead of the original colors being represented, these color casts distort how the viewers perceive them. Although you can remove color cast in Photoshop, understanding what caused it at first is worth knowing:
No Proper White Balance Settings: Colors may be distorted whenever your camera is not set to the white balance settings that are applicable in the lighting conditions. This discrepancy may eventually deceive the sensor of your camera, resulting in the wrong interpretation of the colors.
Unnatural Lighting Sources: Different sorts of artificial lighting, like tungsten lights, emit light with color temperatures that vary significantly. Whenever your subject is affected by these sources, their natural colors get overshadowed, resulting in a pervasive color cast.
Any Reflection from Nearby Sources: The environment around your subject plays an important role in how colors appear in your image. These color changes that appear due to some reflected lights from the surroundings are sometimes even difficult to notice and appear evident upon focusing.
Low-Quality or Older Camera Sensors: Not all cameras have the potential to deal with color as accurately, and this leads to the problem of color cast. These color casts are even more visible when editing, as poor-quality sensors do not record white points.
Post-Processing Filters and Presets: Over time, color casts can be unintentionally introduced after the photo is taken or during the editing stage. Filters or color presets are made to provide a particular mood to your image, but when overused, they disrupt the natural color balance.
Part 2. The Best Way to Remove Color Cast in One Click Without Any Manual Effort: Repairit
Have you imagined you could remove color cast instantly without the guesswork or any sacrifice in image quality? All this can be done through a devoted platform like Repairit, which allows users to breathe new life into their color-damaged images. It can enhance photo resolution to up to a maximum of 800% without compromising details. Plus, it sharpens blurry edges and fixes pixelated issues, boosting overall picture clarity.
While enhancing, it focuses on every minor detail, including skin textures and other facial features, for a natural enhancement. This photo repair program allows users to remove any unwanted grain and digital noise, preserving the fine details ultimately. Besides the color cast issue, you can fix your grayed-out and unreadable images that are damaged under any condition. After enhancing, you’re allowed to preview photos before considering saving them for later use.
Key Features

-
Multiple Format Support: This photo repair software supports over 20 photo formats, including all common, RAW, and specialized image formats.
-
Batch Photo Enhancement: It allows users to insert multiple photos at a time to remove the color cast issue from them simultaneously.
-
Mends Overexposed/Underexposed Pictures: Repairit corrects the brightness and contrast issues to bring out details in your overexposed or underexposed images.
In-Depth Manual to Remove Color Cast Using Repairit in One Click
Follow the provided manual and get sorted in one click, despite diving into complex editing to remove color cast in Photoshop:
Step 1. Download the Program and Access AI Photo Enhancer
Commence the software and select the “AI Photo Enhancer” tab from the More Types Repair interface. After this, press the “Add” button to insert all your color-cast affected photos onto the platform.

Step 2. Enhance All the Added Color-Cast Affected Pictures
Once all the desired images are added, choose the “General Mode” from the provided 3 AI models. Here, navigate to the “Start Enhancing” button to initiate the photo enhancement procedure.

Step 3. Examine and Save the AI-Enhanced Photos
When the photo enhancement process completes, preview the images and press the “Export All” button to save them on your Windows or MacBook.


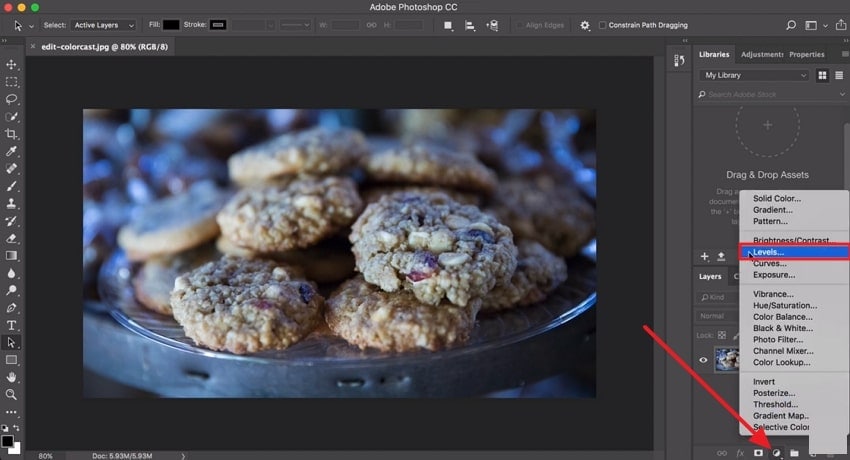
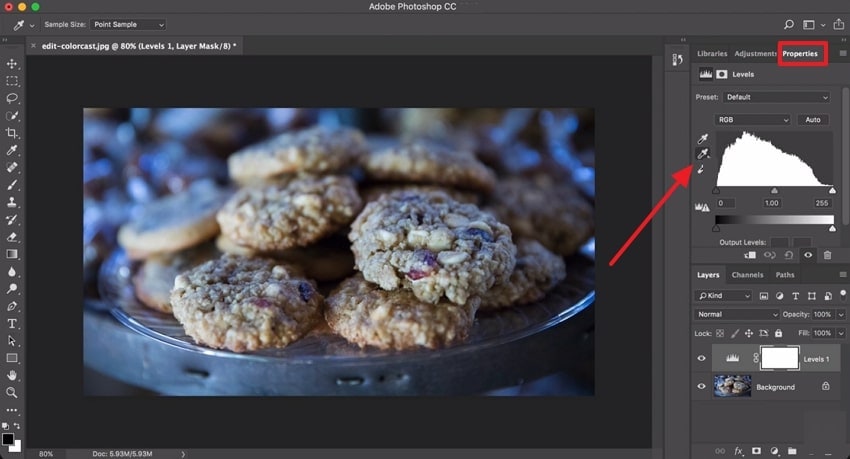
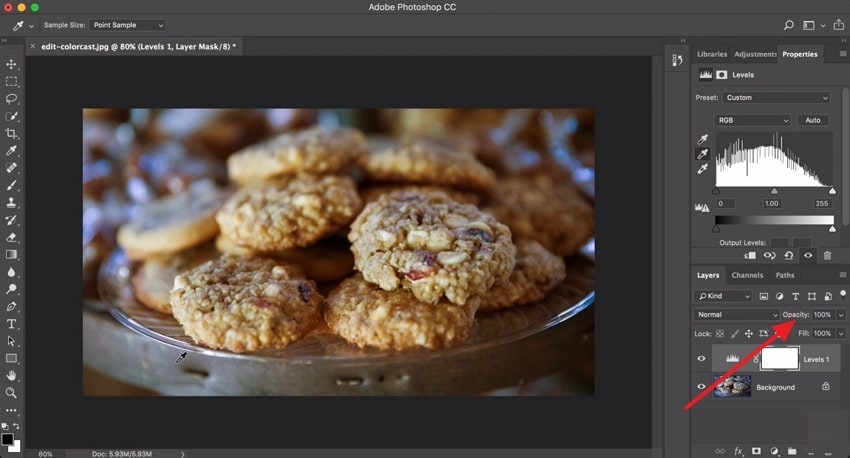
Part 3. How to Remove Color Cast in Photoshop via Levels Adjustment Layer
This Levels Adjustment Layer in Photoshop is a non-destructive approach, which allows users to work on separate layers. The method not only removes visible tint but also improves overall image depth and restores natural vibrancy. Instead of making permanent edits, this technique enables editors to modify or undo changes at any time during editing. To remove color cast in Photoshop, adhere to the provided tutorial and get sorted:
Step 1. At first, access your color-cast photo in Photoshop, go to the Layers panel, and press the “Adjustment Layer” icon at the bottom. From the bottom-up menu, choose the “Levels” option to add a non-destructive level above your image.
Step 2. Next, access the “Properties” panel and locate the middle eyedropper icon to remove gray points in the image. Now, move your cursor into the photo and click on a part of the photo that should be neutral gray. Here, Photoshop will shift colors, neutralizing the area you click, while correcting the overall cast.
Step 3. For further enhancement, navigate to the “Opacity” option and set the opacity of your image until satisfied.
Part 4. How to Remove Color Cast in Photoshop with Curves Adjustment Layer
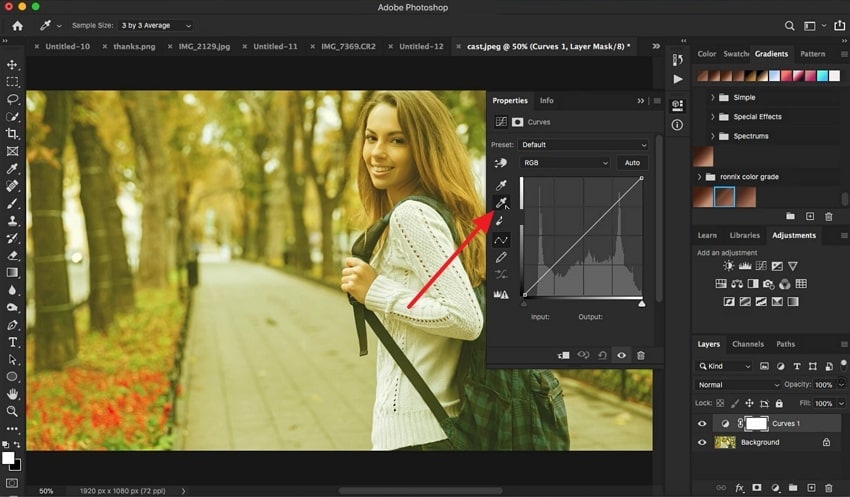
The Curves Adjustment Layer in Photoshop allows users to adjust both brightness and color across the tonal range with exceptional precision. You can work on the composite RGB channel to correct the overall contrasts or target individual red or green channels. Here, the curve graphs give complete control over shadows, midtones, and highlights, which is beneficial for minor adjustments. Explore the provided tutorial and remove color cast in no time:
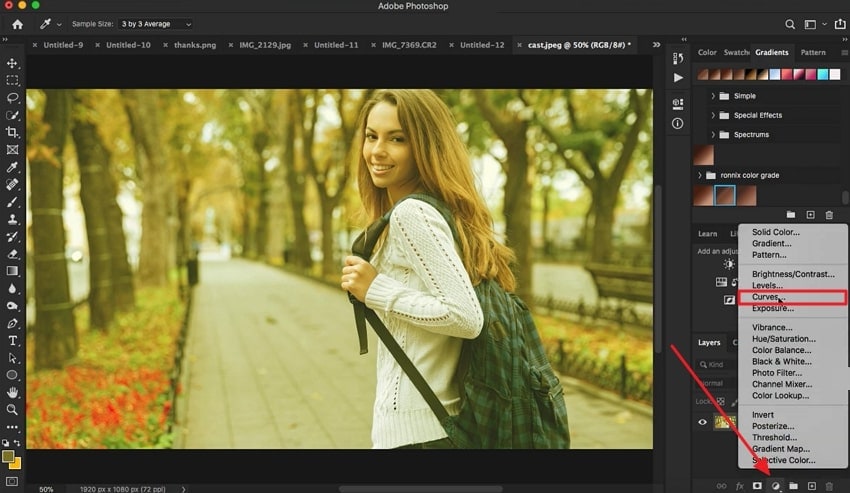
Step 1. Access your color-affected photo in Photoshop and press the “Adjustment Layer” icon at the bottom of the Layers panel. From the revealing menu, select the “Curves” option to create a new curves adjustment layer above your original photo.
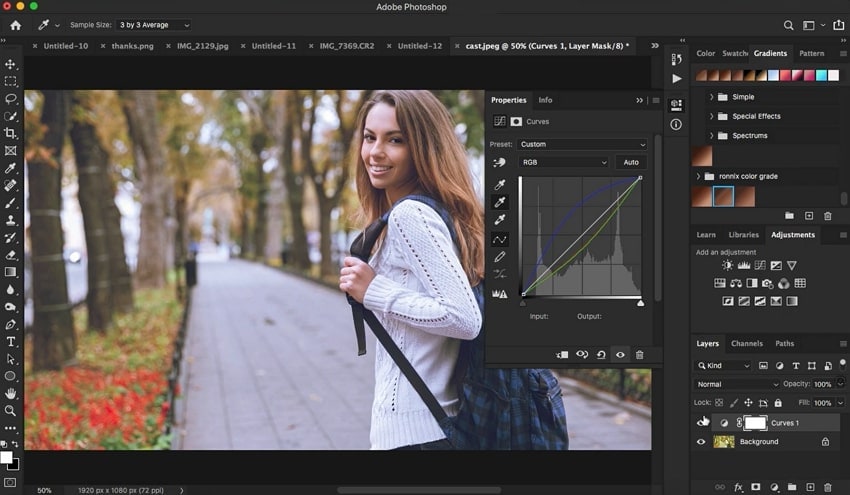
Step 2. Click the drop-down for RGB and choose either red, green, or blue color to reduce that specific color in the image. Next, grab the curve and drag it downward to decrease or upward to increase as per requirement. To further fine-tune, press the middle “Eyedropper” icon and click on the targeted area to set the neutral points in the photo.
Step 3. Once done, navigate to the Layer panel and compare your results with the original image before considering preserving the file.
Part 5. How to Use Auto Color Correction for Color Cast Removal in Photoshop
Another method to remove color cast in Photoshop is through Auto Color Correction, which is the easiest approach among all. It works by analyzing the image’s tonal range and automatically balancing any red or blue channels. This approach is valuable when you don’t have time for quick edits or need the precision of tools like Curves. Go through the tutorial and remove the color cast with a click:
Instructions: Reveal your image in Photoshop first and navigate to the "Image” tab from the top toolbar. From the drop-down menu, simply select the “Auto Color” option to adjust shadows and midtones within the picture automatically. Once done, navigate to the Layers panel and compare your before and after results for better analysis of the outcome.

Conclusion
In conclusion, once you understand how Photoshop removes color cast, either through levels or curves, you can restore natural tones by yourself. As discussed, these techniques offer you creative control, letting you correct unwanted tints with precision.
Conversely, they do demand a bit of time, practice, and manual effort to achieve a professional-looking result. Those who don’t want to get into technicalities, download Repairit and get photos enhanced in a blink.
FAQ
-
How to fix a severe red color cast without affecting other colors?
For severe red casts, try targeting the red channel specifically in Curves: create a Curves adjustment layer, select the Red channel, and gently pull the curve downward in midtones. To preserve green backgrounds, use a layer mask to protect those areas while adjusting the red cast on skin tones. You can also try the Selective Color adjustment to reduce red in the Reds and Magentas while increasing green in the Greens channel. -
Why does removing red cast turn my background brown instead of green?
This often happens because older photos may have color degradation beyond just the cast—red pigments can break down and affect adjacent color channels. Try using the Hue/Saturation adjustment layer, select the Yellows/Oranges range, and shift them toward green. For better control, use a targeted adjustment tool to sample the brown areas and directly adjust their hue to green. -
Does Photoshop's Auto Color always give perfect results?
The results through Photoshop's Auto Color might vary from time to time, but it still works well for the majority of the images. In tricky lighting situations, manual modifications with Adjustment Levels or Curves might be necessary for the most accurate and natural results.
