
 TL;DR:
⚡ Quick Fixes for Blurry Facebook Photos
● Enable HD Uploads: In the Facebook app, go to Settings & Privacy > Settings > Media and Contacts and toggle on Upload photos in HD to stop automatic compression.
● Use Optimal Size & Format: Avoid Facebook's aggressive auto-resizing by format-checking your images to JPEG or PNG, and resizing them to 2048px wide (or 851px × 315px for cover photos).
● Check "High Quality" Album: When creating a new photo album on Facebook, always check the High Quality box to bypass low-resolution downgrades.
● Fix Source Blur with AI: If the original file is already blurry or pixelated, pass it through Wondershare Repairit first to intelligently upscale and restore sharpness before uploading.
Ask AI for a summary
 ChatGPT
 Perplexity
 Gemini
 Claude
 Grok
Grok
People shop, sell things, talk, get entertained even get news and information from Facebook. But recently, many users have been asking the same frustrating question: “Why do my pictures look blurry on Facebook?” Whether you're uploading from your phone or computer, blurry Facebook photos have become a common issue. If your pictures on Facebook look blurry, you're not alone. This article explains why and how to fix blurry pictures on Facebook quickly.
Part 1. Why Are My Pictures Blurry on Facebook?
Many users notice that their photos lose quality and become blurry after uploading to Facebook. This sudden drop in clarity usually stems from Facebook's automated optimization and formatting rules. Here are the primary causes:
-
File Type
Using the wrong file format triggers heavy compression. To prevent blurriness and maintain original quality, always upload images in JPEG or PNG format.
-
Pixel Dimensions
Facebook enforces strict pixel limits that vary depending on whether you are uploading a profile picture or a cover photo. If your image exceeds these dimensions, Facebook automatically compresses and downgrades the resolution.
-
Automatic Editing
Facebook uses a "Scale to Fit" mechanism that automatically stretches or compresses images to match its layout. This forced resizing often distorts and blurs otherwise high-quality photos.
Part 2. How to Fix Blurry Pictures on Facebook?
The most commonly used social media has some drawbacks too. People recently felt that what they upload is not the same as what they took. The drop in the picture quality was a question mark for people towards the application, unaware of the reasons that aid the quality drop.
Another answerable question was, how to fix blurry pictures on Facebook? So, providing our users with the best and feasible solutions will resolve the problem within minutes.
Also, a magic tool will be discussed in the coming section that will be a life-saver for those who are looking for a photo repair tool. Wondershare Repairit has taken the repair job in its hands, and the world is a great relief now.
Method 1: Repair Quality from Android
Nowadays, people prefer using mobile phones for different applications. The usage of web applications has been reduced. Let's not forget that web applications are still in use, but comparatively in a smaller number.
For all Facebook lovers who have been recently facing the problem of Facebook photos blurry, we will now guide you on how to fix it through Android devices within minutes.
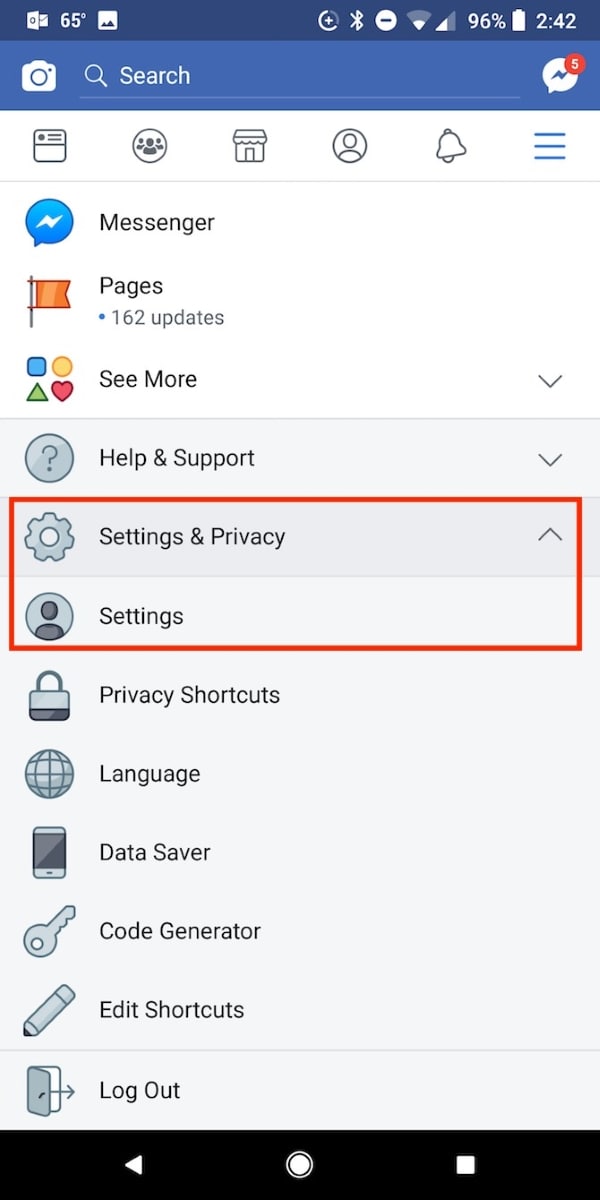
1. First of all, from the top right corner, tap on the Hamburger button.
2. From that screen, go to the option of 'Settings and Privacy.'
3. A dropdown menu will appear, from where you have to go to the 'Settings' tab.
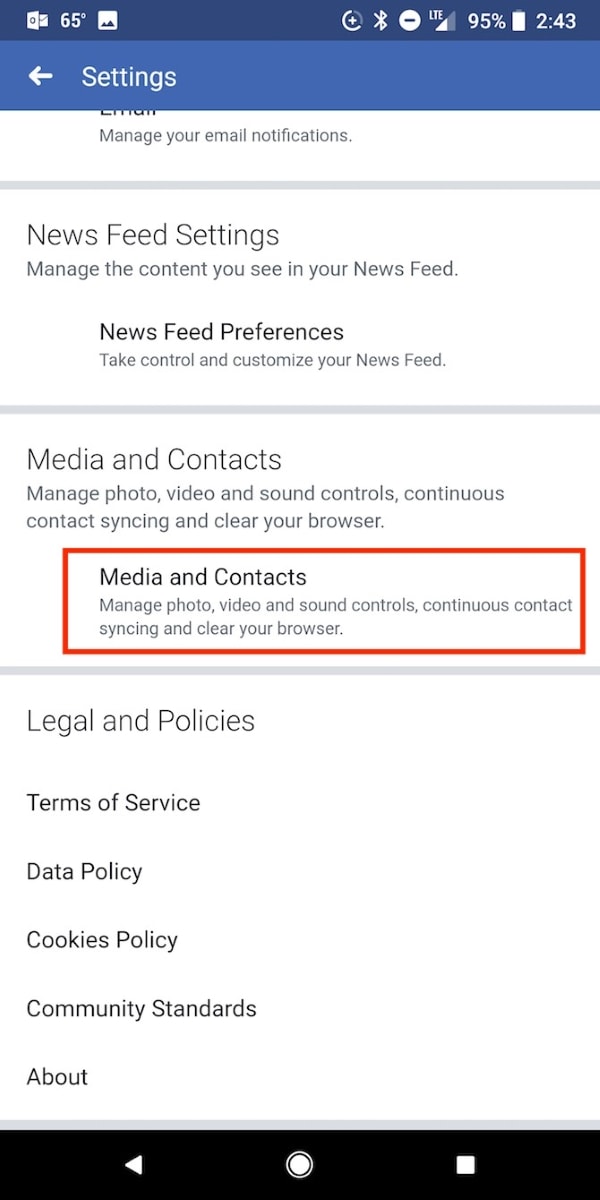
4. A new screen will open up, that is, the settings screen. Find and tap on the 'Media and Contacts' option.
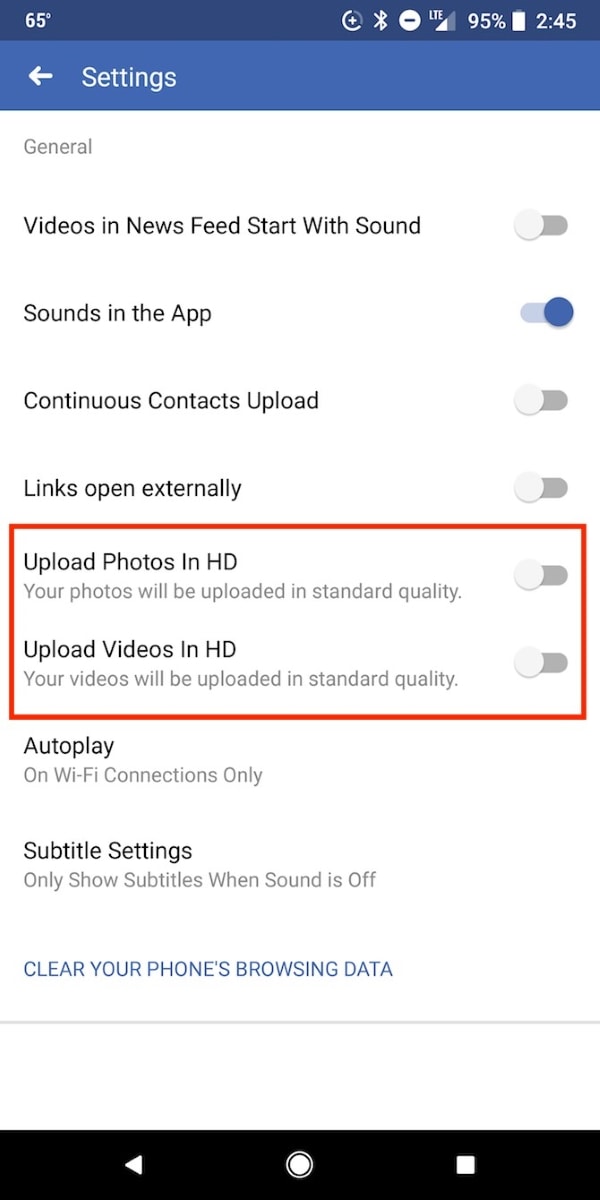
5. Another screen will show up with new and different options. Toggle 'Upload photos in HD' on to upload HD quality photos.
Pros
Easy to follow and built-in to the Facebook app.
No need to download additional tools.
Cons
Sometimes doesn’t fully resolve the blurriness issue.
May not work if the original image is already low quality.
Not available on all Android versions or Facebook app builds.
Method 2: Repair Quality from iOS
The two basic systems are Android and iOS, and both are widely used. The fact that they have different systems is the reason why they have different interfaces, and things are handled differently in both systems.
The method mentioned in the above section to repair picture quality from Android is useless to anyone who has an iPhone. For iOS users, the following steps are to provide the desired guideline;
1. In the bottom right corner, you will see three horizontal lines, the Hamburger button. Tap on it.
2. From there, you are to tap on the dropdown menu button attached to 'Settings & Privacy.'
3. The menu will provide you with a new list of options from which you have to select 'Settings.'
4. Once the settings screen is opened, scroll down and tap on 'Media and Contacts.'
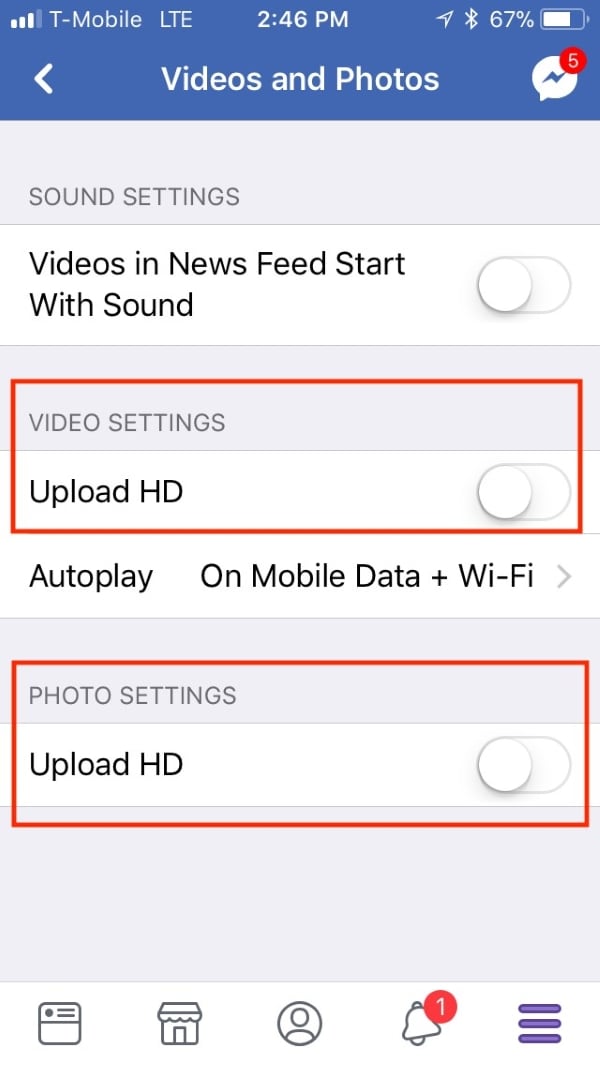
5. A new screen will appear with the top option of 'Videos and Pictures.' The user is requested to tap on that.

6. Now from 'Photo settings,' toggle 'Upload HD' on to upload HD pictures.
Pros
Quick built-in fix for most blurry Facebook photo uploads
No third-party software required.
Cons
Limited control over image quality after upload.
Not helpful if the image was blurry before uploading.
Might not apply to older versions of iOS or Facebook app.
Method 3: Use photo repair software - Wondershare Repairit
The simplest way to fix blurry Facebook photos is to use a professional photo repair software. Wondershare Repairit is an ideal photo repair tool that can fix blurry images with various formats. The following are its main features:

Wondershare Repairit - Photo Repair
 Security Verified. Over 7,302,189 people have downloaded it.
-
Repair damaged photos with all levels of corruption, such as grainy photos, dark photos, pixelated photos, faded photos, etc.
-
Repair images of diverse formats, such as JPG, JPEG, PNG, CR3, CR2, NEF, NRW, etc.
-
Repair critically damaged or corrupted photos available on SD cards, phones, cameras, USB flash drives, and more.
-
Repairit has a quick and advanced repairing mode. You can use either depending on the level of corruption the photos has undergone.
-
The "AI Image Upscaler" feature can enlarge the repaired photos to 2X, 4X, and 8X.
-
Intelligently restore old/scatched photo and colorize black and white photos with various AI effects.
-
No limit to the number and size of the repairable photos compared with the online version of Repairit.
-
Support Windows 11/10/8/7/Vista, Windows Server 2003/2008/2012/2016/2019/2022, and macOS 10.13~macOS 14.
Step 1 Upload Filess
After the application has been downloaded and installed, just launch it to repair any damaged image. When the tool is opened, choose "Photo Repair" from the "More Types Repair" section, then click on the 'Add file' button, which is in the center of the screen.

This button will allow you to load the local image file to the tool so that it can be repaired. You can load and repair as many files as you want.
Step 2 Process of Photo Repair
After you have loaded the file to the tool completely and successfully, just click on the button 'Repair' and let the tool start its process. A process progress indicator will appear in the bottom left corner of the screen, showing you the progress.

The process might take few minutes but keep in mind one thing, that you do not close the application.
Step 3 Restore and Save Repaired Photos
The final step of the process is to restore files. The screen will show you a list of all the repaired files. Users should review and select the files they want to restore. This might take some time but once you are done, click on "Save", Repairit will now save your files.

Pros
Fixes already blurry or corrupted photos, not just upload settings.
Supports a wide range of formats and devices.
Includes AI-powered upscaling and restoration tools.
Cons
Requires installation on desktop (though web version available with fewer features).
Free version has limited export options—premium needed for full functionality.
Part 3. Tips About Photo Size and Format When Uploading to Facebook
You should know that what causes the images to get blurry because you can avoid those factors to get a good result of the photo. If that does not work, then the solutions and methods will help you to repair the image quality.
It is not necessary to fix the issue of blur photos every time. Sometimes, following and adapting a few basic steps might also resolve the problem. Few tips that will surely guide you and help you to get good pictures are;
1. According to Facebook standards, upload pictures of at least 2048 pixels.
2. Create an album and check the box of 'High Quality.' This will upload high-quality pictures in that folder.
3. For an ideal cover photo, keep in mind the size that should be 851px by 315px.
4. Hold the camera properly, in the best position, and try not to move when you take a picture.
5. You should have the proper focus on the object.
6. Try to clean your camera lens with a soft cloth or tissue paper because dirt and dust particles might harm the image quality.
Conclusion:
The article aimed to help its readers by providing tips and tricks to upload a good quality image and what should be avoided to retain its quality. Also, the introduction of the Wondershare Repairit will bring a great change in your lives.
People Also Ask
-
Why won't Facebook upload my photos?
There could be several reasons why Facebook won’t upload your photos. One common issue is the picture might not be in the standard and acceptable format for Facebook. -
How do I find my uploaded pictures on Facebook?
To find uploaded pictures on Facebook, visit Activity Log because it has all the information regarding all activities, even if they were years ago. -
How can I recover deleted pictures from Facebook?
Go to 'Settings.' Select 'Your Facebook Information.' From there, click on 'Download your Information,' and this will help you to recover deleted pictures. -
How can I retrieve deleted videos from Facebook?
According to Facebook policy, once you delete a video, then Facebook will permanently delete it.