

 TL;DR:
You can correct minor photo blur in Lightroom using the Sharpening and Clarity sliders, but heavily out-of-focus images generally require dedicated AI repair software.
● Use the Sharpening tools in the Detail panel and hold Alt (Windows) or Option (Mac) while adjusting the Masking slider to selectively sharpen edges without adding noise to smooth surfaces.
● Limit the application of the Clarity tool and Luminance Noise Reduction, as excessive adjustments will create unrealistic harsh edges in mid-tones or result in a soft, plastic-like texture that worsens image sharpness.
● Lightroom is limited to recovering slight motion blur, whereas AI tools like Wondershare Repairit are necessary to automatically restore severely out-of-focus photos or upscale images up to 8X.
Ask AI for a summary
 ChatGPT
 Perplexity
 Gemini
 Claude
 Grok
Grok
Nothing is more frustrating than capturing a perfect moment only to find the photo turns out blurry. A picture usually loses its appeal when it turns out blurry. It could be a result of shaky hands or slow shutter speed. Whatever the reason might be, it's usually annoying to the photographer. Lightroom becomes even more valuable with its many menus, panels, and sliders for editing pictures in times like this.
However, without fully understanding all of Lightroom's features, it can be pretty confusing. In this article, we'll examine different methods to fix blurry photos in Lightroom; let's take a look.
Part 1. Why Do My Photos Look Blurry in Lightroom?
Most people wonder why a picture turns out blurry after taking them. There are many reasons why a photo turns out blurry, and some are more common than others. Below, we'll be exploring some of the top reasons why photos look blurry in Lightroom.
Poor Focus

Focus is one of the top reasons why photos look blurry in Lightroom. There are many causes why poor focus takes place, like moving before focusing. Additionally, if you do not focus on your composition's main subject, pictures turn out blurry. Pictures also turn out blurry if you press the shutter release before the lens focuses. Being in a hurry to take photos is never a good idea; you should take your time to improve various photography aspects.
Subject Movement

While the focus is primarily the main reason your photos turn out blurry, there are other reasons like subject movement. When you make the wrong choice with your shutter speed, it can result in blurry images. When the subject begins to move and the shutter speed is relatively slow, the subject will turn out blurry. The longer your camera shutter remains open, the higher the risk of a blurry photo. When subject movement is the cause of a blurry picture, it is known as motion blur. If you want to avoid such an issue, you should always choose a faster shutter speed. The shutter speed determines how sharp your subject will turn out.
Camera Movement

A fast shutter speed sometimes saves you the stress of a blurry photo. However, if your camera is unsteady, you cannot avoid a blurry picture. This scenario is also referred to as a camera shake. The speed of your shutter also depends on how steady your camera is. Your camera weight can influence how stable you hold your camera. To stay on the safe side, ensure your shutter speed is the same as the focal length of your lens.
Part 2. 6 Manual Methods to Fix Blurry Photos in Lightroom
Now that you're aware of the many reasons why you might have blurry photos, the next step is figuring out how to fix blurry photos in Lightroom. This software is powerful editing software, and it can turn your pictures appealing once more. After researching, we have found there's more than one method to fix blurry photos in Lightroom. This article covers the top methods to help you improve those blurry photos; let's take a look.
Check These Methods
Method 1: Using Sharpen Tools
Sharpening your photos in Lightroom can help get rid of its blurry features. Sharpening in Lightroom is relatively easy and will only take you a few minutes to master. You can find it under the develop tab.
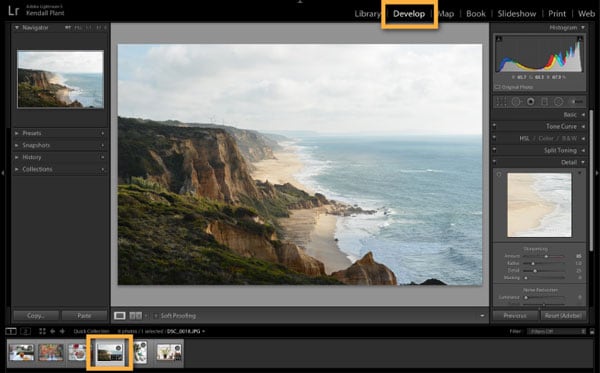
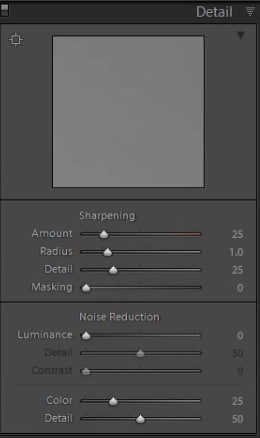
All you have to do is scroll down the right panel, and you'll see the details section. Under the detail section is the sharpen tools. The sharpening tools come in four sliders that efficiently sharpen your images in little time.
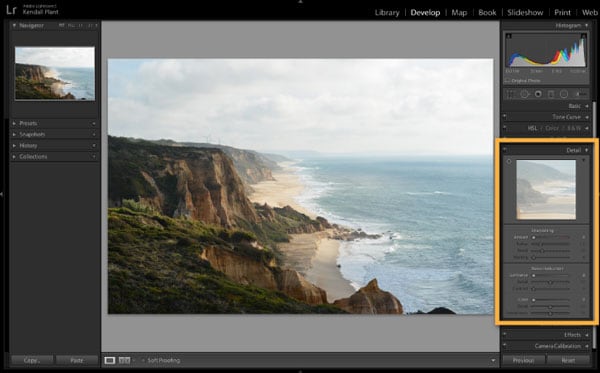
Amount: If you want to control the amount of sharpening on the image, the amount slider is how you can do it. You can either raise this slider or lower it; it depends on your preference.
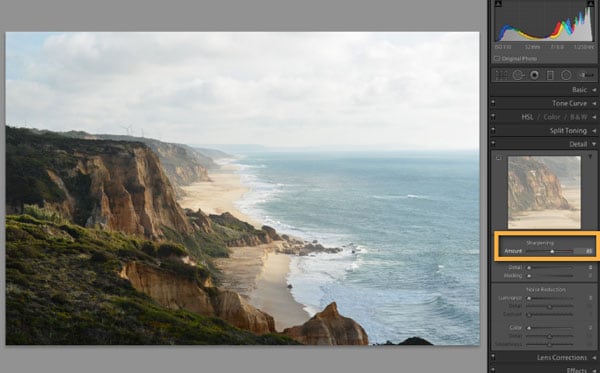
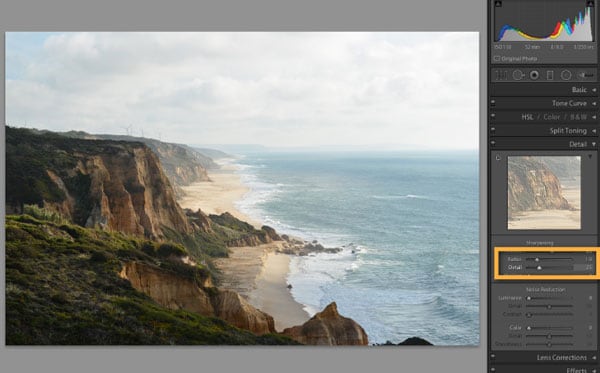
Radius: Another slider amongst the sharpen tools is the radius slider. It helps the user control the size of the details to sharpen. When you increase the radius, it sharpens a much more extensive detail than a smaller radius.
Related Readings:
1. Top 9 Photo KB Reducers to Reduce Photo Size Online
Details: Just like the name implies, this slider focuses on the edges and details of the picture. When the details slider is a small value like 5, it only sharpens the large edges. However, a higher value like 100 helps you sharpen even the smaller edges. This 'sharpen' tool helps to adjust sharpening but goes further by offering pixel-by-pixel sharpening.
Masking: Masking is for masking out areas that you do not want to sharpen. This feature takes care of the noise that comes from the detail and amount slider. While it still works to sharpen detailed areas in a picture, it will avoid smooth areas like the skin.
Method 2: Using Clarity Tool
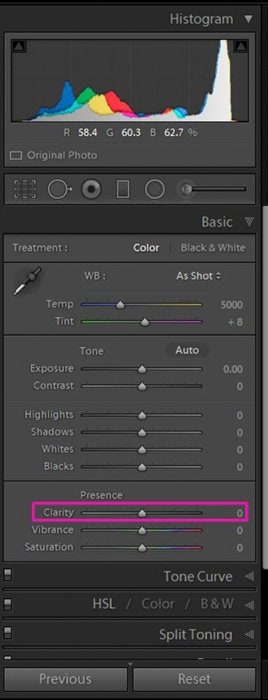
Another method to fix blurry photos in Lightroom is by using the clarity tool. It is a valuable tool in Lightroom and quite necessary when giving your pictures that extra impact. The clarity tool focuses on the contrast in the mid-tones. Using this tool helps you avoid the issue of adding grain to the highlights or shadow areas. When using the clarity tool to fix blurry photos in Lightroom, apply caution. Overusing this tool can lead to unrealistic harsh edges in a picture when you finally print it out.
Attention:
Confused about how to use Photoshop to make images clear? Don't worry! Wondershare Repairit - Photo Repair can help you unblur photos automatically within 3 clicks! No any techniques are required.
Method 3: Using Adjustment Brush
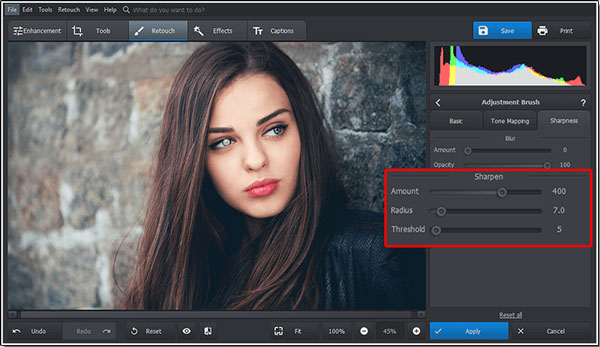
This brush is also quite essential to fix blurry photos in Lightroom. If you find that only a few parts of your picture are blurry, the adjustment brush only helps you adjust those areas. This tool is also in the develop module and works like other Lightroom tools. To utilize the adjustment brush, you have to adjust sliders in the right-hand panel. The adjustment brush is below the histogram in the develop module. You can use the keyboard shortcut k' to access it or click on its icon. Doing this reveals your effect options, and you can now use the sliders to make the adjustment you want. If you select the adjustment you want to effect, you can pick the brush, which has a circle with a plus icon. Brush over the areas and then click Done when you're finished.
Method 4: Using Presets
Lightroom presets are sets of saved adjustments; you can use them later to cut down on workaround time. Presets are excellent because they speed up your workflow and are handy if you don't know the proper adjustments. You can choose to create your presets or download presets that help you fix blurry photos in Lightroom. Although you preinstall presets, there are some steps you can take to use a preset successfully.
Firstly, you need to select the photo you would like to edit.

Once you select the photo, the next step is to click the edit button right on the dropdown menu.

Next, click the preset button located at the bottom of the menu, and it will open up the list of presets available to you.

Next, click the preset you would prefer, and the software will apply it to the photo. If you're looking for a different preset, you can undo your action and apply a new preset. You can also adjust the presets by selecting the different features on the preset and then making your tweaks.
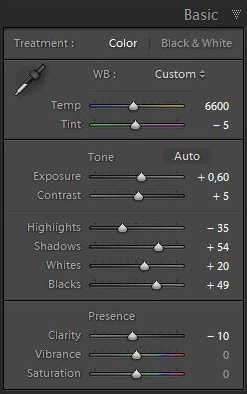
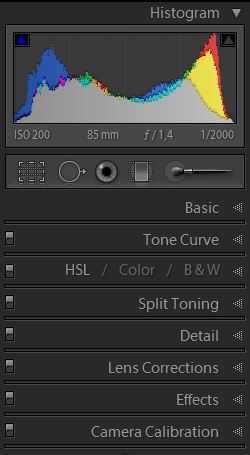
Method 5: Using the Basic and Details Panel
The basic and details panels are also great when you want to fix blurry photos in Lightroom. The basic panel consists of the white balance, presence, and tones.
They each control different editing features and allows you to carry out all the editing you need in a photo. This tool is highly effective and is the foundation of every other processing you need to do. After importing your image, you can find the basic tab on the right-side panel under the develop module.
The details panel is also powerful when it comes to sharpening blurry photos. It also helps in noise reduction, especially after other edits.
While the basic panel is best for starting your edit on a blurry picture, the details panel is ideal at the end of your editing process. Caution is vital when using the details panel as too much sharpening can make your photos look unrealistic. On the other hand, too much noise reduction leads to blurred-looking shots not better than the blurry photo you're trying to fix.
Method 6: Using Radial and Graduated Filter
The radial filter is one of the best options to fix blurry photos in Lightroom. It is pretty versatile, and you can effectively use it to brighten areas in your pictures and darken regions accordingly.
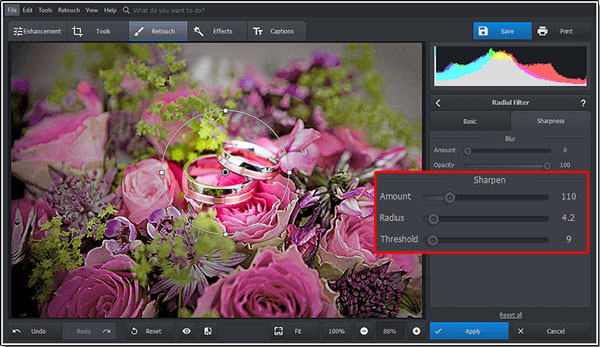
The radial filter also adds sun flares to images and helps you soften the skin on a photo. You can use the radial filter by visiting the develop module. Although using this filter affects everything outside the radial area, the masking feature helps limit its effect.
Using the graduated filter is easy. It's on the develop module as a gray rectangle on the right sidebar. There are many graduated filters, and you can choose your preferred filter by dragging it across your photo.
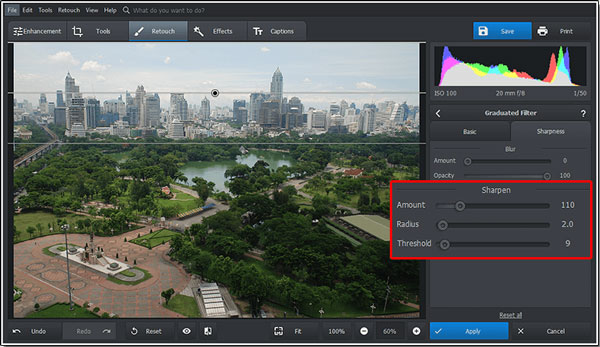
You can move the filter by selecting the center circle on your picture and dragging it where you want the filter. Feathering is another feature that comes with the graduated filter. To define the filter's feathering, drag the outside lines. To rotate your filter, you have to rotate the centerline. Want a clearer result without manual tweaks? Try Repairit AI photo unblur—it does the work for you.
Part 3. How to Fix Blurry Photos With 3 Simple Clicks?
Another top method that works to fix blurry photos is the use of photo repair software. When you find it hard to fix blurry photos in Lightroom, photo repair software can get the job done within seconds. Although several of them are out there, you want software that offers you a holistic repair of your photos.
One way to achieve this is through Wondershare Repairit. It is a secure software that's relatively easy to use and very effective. It supports different file types, so you don't have to worry about your file not being supported. The steps are easy, and you can complete them in a few minutes; let's take a look.

Wondershare Repairit - Photo Repair
 Security Verified. Over 7,302,189 people have downloaded it.
-
Repair damaged photos with all levels of corruption, such as blurry photos, grainy photos, dark photos, pixelated photos, faded photos, etc.
-
Repair images of diverse formats, such as JPG, JPEG, PNG, CR3, CR2, NEF, NRW, etc.
-
Repair critically damaged or corrupted photos available on SD cards, phones, cameras, USB flash drives, and more.
-
The "AI Image Upscaler" feature can enlarge the repaired photos to 2X, 4X, and 8X.
-
Intelligently restore old/scatched photo and colorize black and white photos with various AI effects.
-
Support Windows 11/10/8/7/Vista, Windows Server 2003/2008/2012/2016/2019/2022, and macOS 10.10~macOS 14.
Step 1: Add the Files
Download and launch Repairit on your computer or Mac, then choose "Photo Repair" from the "More Types Repair" section, then click "+Add" to upload your damaged photos.

Step 2: Start Repair
Once you add the photos, you can then proceed with repairing the images. Click on the "repair" button at the end of the screen, and the repair process will begin immediately.

Step 3: Preview and Save
Once the photo repair software repairs your photo, you have the option to view it. If the picture is to your satisfaction, click save and choose the location you want to save to.

However, if your blurred image doesn't turn out perfect, you can always carry out an advanced repair on the photo.
Further Reading:
Here are the useful articles to help you.
1. Lightroom Edit in Photoshop Not Working.
2. Edit JPEG Images on Lightroom Without Losing Quality.
Part 3. Tips to Avoid
Getting a crisp and sharp image is the dream of every photographer. However, it doesn't always turn out like that, and you then have to look for ways to fix blurry photos. Now that you're aware of why photos turn out blurry and how you can fix blurred images, below are tips to help you avoid taking blurry images.
1. Keep Hands Steady
Shaky hands are one of the reasons you end up with blurred photos, so keep it steady. If you want ways to achieve this, use both hands to keep the camera close to the body. When you extend your hands, it can cause quick tiredness leading to a camera shake. Alternatively, you can lean against a wall or place your hands over a solid surface.
2. Utilize a Tripod
You can also avoid the issue of camera shake by using a tripod. This way, your hands won't get tired or become shaky. Ensure the trip stands firmly on the surface. Additionally, ensure you pull out the legs completely to prevent sudden movements.
3. Increase the Shutter Speed
If you're shooting a moving subject, you need to increase your shutter speed to avoid blurry photos. A faster shutter speed helps to freeze moments in your photo. However, using a slow shutter speed leads to capturing motion blur.
4. Shoot in Burst Mode
Another tip when shooting a moving subject and avoiding blurry photos is shooting in burst mode. It helps to increase your chances of a sharp image when there are multiple shots. When you set your camera to burst mode, it will take several pictures in a few seconds when your press the shutter button. This feature is great for sports photography.
5. Take Note of the Focus
Camera shake and subject movement are not the only reason photos turn out blurry. Another common reason why you need to fix blurry photos in Lightroom is poor focus. If you're not focusing in the right area, you will end up with blurry images. If you're using auto-focus, wait till the camera locks focus on the subject.
Closing Words
No one likes a blurry photo, except that was the aim in the first place. There are many reasons why your pictures turn out blurry, and this article introduces you to the common ones. Knowing how to fix blurry photos in Lightroom also comes in handy as it helps your pictures turn out the way you want. This article introduces you to different methods to fix blurry photos in Lightroom.
However, if you're going to try a different but practical approach, you can always give Wondershare Repairit a go. This powerful photo repair software will help you get your pictures sharp again in three simple steps. Utilize the methods shared in this article, and you'll be surprised at the effect.
People Also Ask
-
Can I fix blurry photos in Lightroom mobile?
Yes, you can fix blurry photos in Lightroom Mobile using the same tools as the desktop version. Open the photo, go to Detail > Sharpening, and adjust the Amount, Radius, and Detail sliders. For handheld shots or slight motion blur, combine this with the Clarity and Texture sliders for better sharpness. -
How do I fix grainy or noisy photos in Lightroom?
To fix grainy photos in Lightroom, use the Detail panel and increase the Luminance Noise Reduction slider. Adjust Detail and Contrast for smoother tones without losing texture. Avoid over-reducing noise, as it can make photos appear soft or plastic-like. -
How to fix out-of-focus pictures in Lightroom?
Lightroom can improve slightly out-of-focus pictures using the Sharpening, Texture, and Clarity sliders. However, if the image is too soft or motion-blurred, Lightroom's manual tools may not recover fine details. In that case, try an AI photo unblur tool like Wondershare Repairit, which automatically restores focus and clarity with one click. -
How to unblur a photo in Lightroom?
You can unblur a photo in Lightroom by increasing the Sharpening and Clarity sliders. For stronger effects, hold Alt (Windows) / Option (Mac) while adjusting Masking to sharpen only edges. Lightroom can't fully restore motion blur or heavy focus loss — use an AI-based photo repair tool like Repairit for better recovery. -
Is it better to use Lightroom or AI tools to fix blurry photos?
It depends on how blurry the photo is. Lightroom is great for minor sharpness fixes and creative control, while AI tools like Repairit use deep learning to restore clarity automatically. If your photo is heavily blurred or out of focus, AI unblur tools usually achieve clearer results faster.