Any totally free apps to unblur photos My cousin took a ton of family photos at our uncle’s funeral but they are all blurry. Is there a totally free, easy app to unblur them?-r/androidapps
It is annoying when images are blurry and capture a certain moment that cannot be repeated. Whether it's a picture taken with a shaky hand or movement during shooting, we usually get things that are less clear and of poor quality. Most users erase such pictures because they believe that they can never be corrected, but this is not necessarily true.
With the new online and offline programs, it is possible to unblur an image in seconds and restore focus. This guide examines the most reliable free and paid solutions for restoring your photos with clarity and ease.
Table of Contents
Part 1. Common Reasons Why Images Get Blurred
You should be aware of how photos become soft before attempting to remove blur from an image. The following section will cover the common reasons why our photos get pixelated:
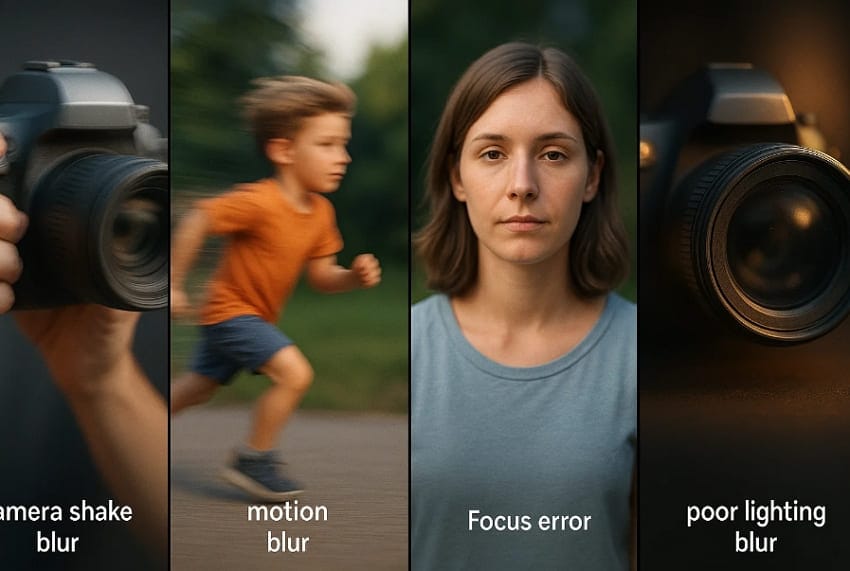
Camera Shake: Even a minor movement of the hands during the shot may indeed blur the whole photo. This is mostly common in low-light conditions, whereby the shutter is extended.
Motion Blur: It typically produces a streak effect, resulting from the swift movement of objects such as running children or a passing vehicle. This occurs when the camera does not have the shutter speed that can capture the action.
Out-of-Focus Shots: When the camera is focused on the wrong part, the subject of the shot will be soft or blurred. This is typical when one is using manual focus or with a moving object.
Poor Lighting: When there is poor lighting, the camera tends to operate at lower speeds, thereby increasing the risk of failing to capture a clear shot. In the absence of a tripod or flash, the sharpness is easily lost.
Dirty or Smudged Lens: Fingerprints, dust, or smudges on the camera lens diffract the light, making the lens less clear. This can be immediately remedied by a quick lens clean.
Part 2. Unblur an Image Using Free and Paid Online Tools Easily
Unblurring an image online is one of the simplest methods to correct blurred pictures without requiring any complicated picture editing skills. To regain the clarity and sharpness, the following tools will assist you in making your picture look professional and presentable:
1. Repairit Online
The first is Repairit Online, an AI-powered tool that enhances image quality and restores details that have been lost. This online tool can also be used for repairing corrupted pictures, which is why it becomes beneficial for both photographers and casual users. You are not required to download or install any software since it's fully web-based. Images can be fixed and improved within three easy steps.
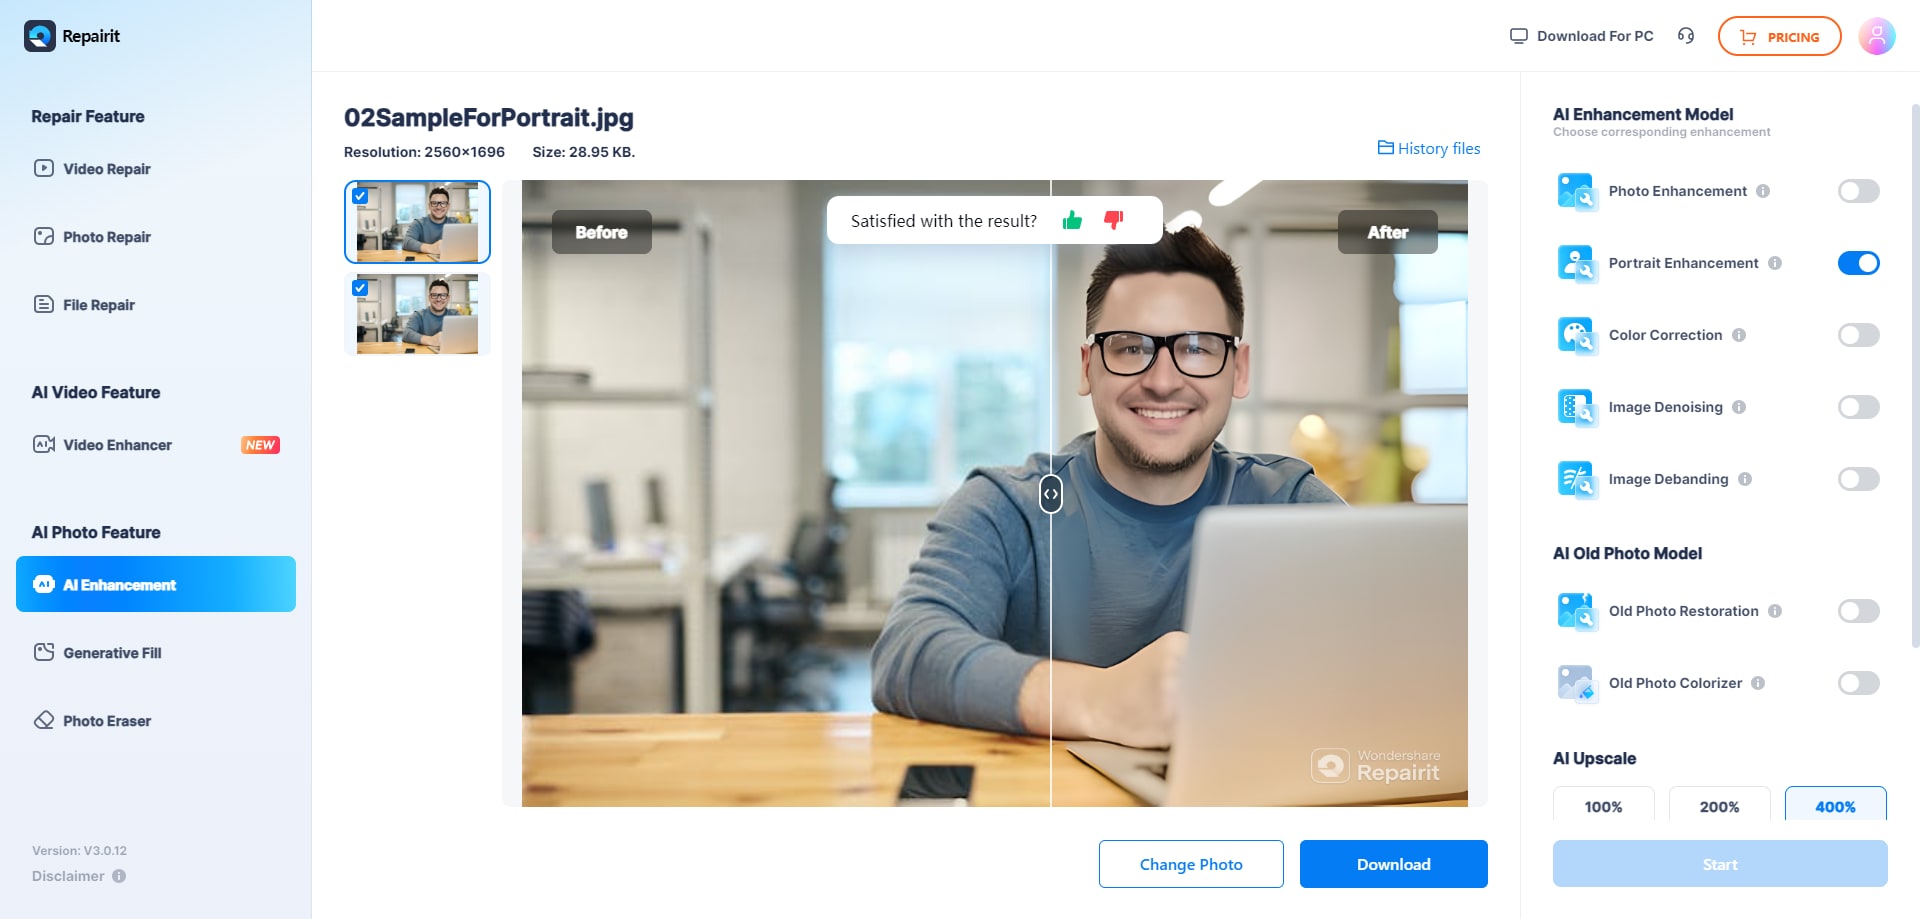
This allows users to see the improved image on a before-and-after slider and only download it when they are satisfied. Repairit intelligently removes noise, denoises camera artifacts, balances color, and even fixes banding lines. Advanced AI Enhancement also allows you to select specific correction models, such as overall sharpening, portrait enhancement, or old photo restoration.
Key Features
- AI Image Upscaler: This AI photo enhancer can upscale blurry images up to 8X without affecting their sharpness.
- Photo Count: It has the capacity to unblur 300 pictures online per month, which is quite beneficial for photographers.
- Safety and Security: Repairit’s end-to-end security uses 2048-bit encryption for all uploads and deletes unblurred photos after 3 hours.
A Complete Guide to Unblur Images Using Repairit Online Photo Enhancer
Now that you know the features of this tool, you might be wondering how to unblur an image online for free. Below is a detailed step-by-step guide on the whole procedure to make your photos sharp and high-quality:
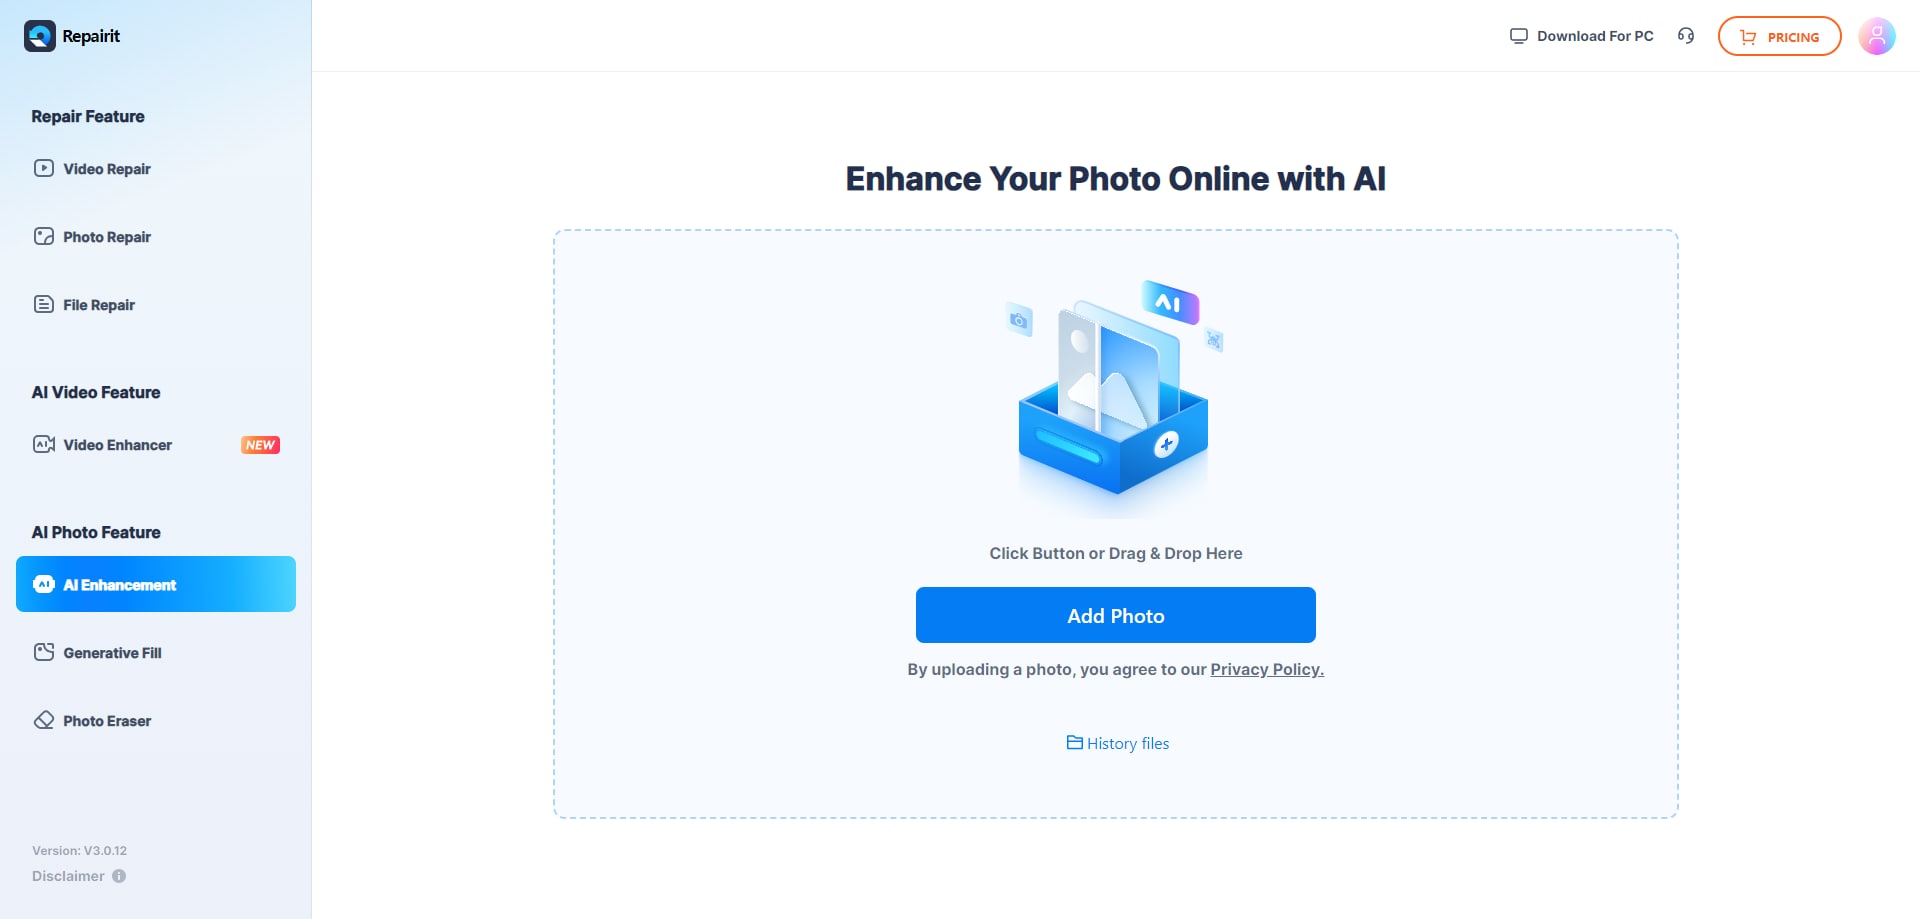
Step 1. Access the AI Enhancement Tool and Add a Photo
Go to the “AI Enhancement” tab from “AI Photo Feature” in the left panel and press the “Add Photo” button to insert your target blurry image.
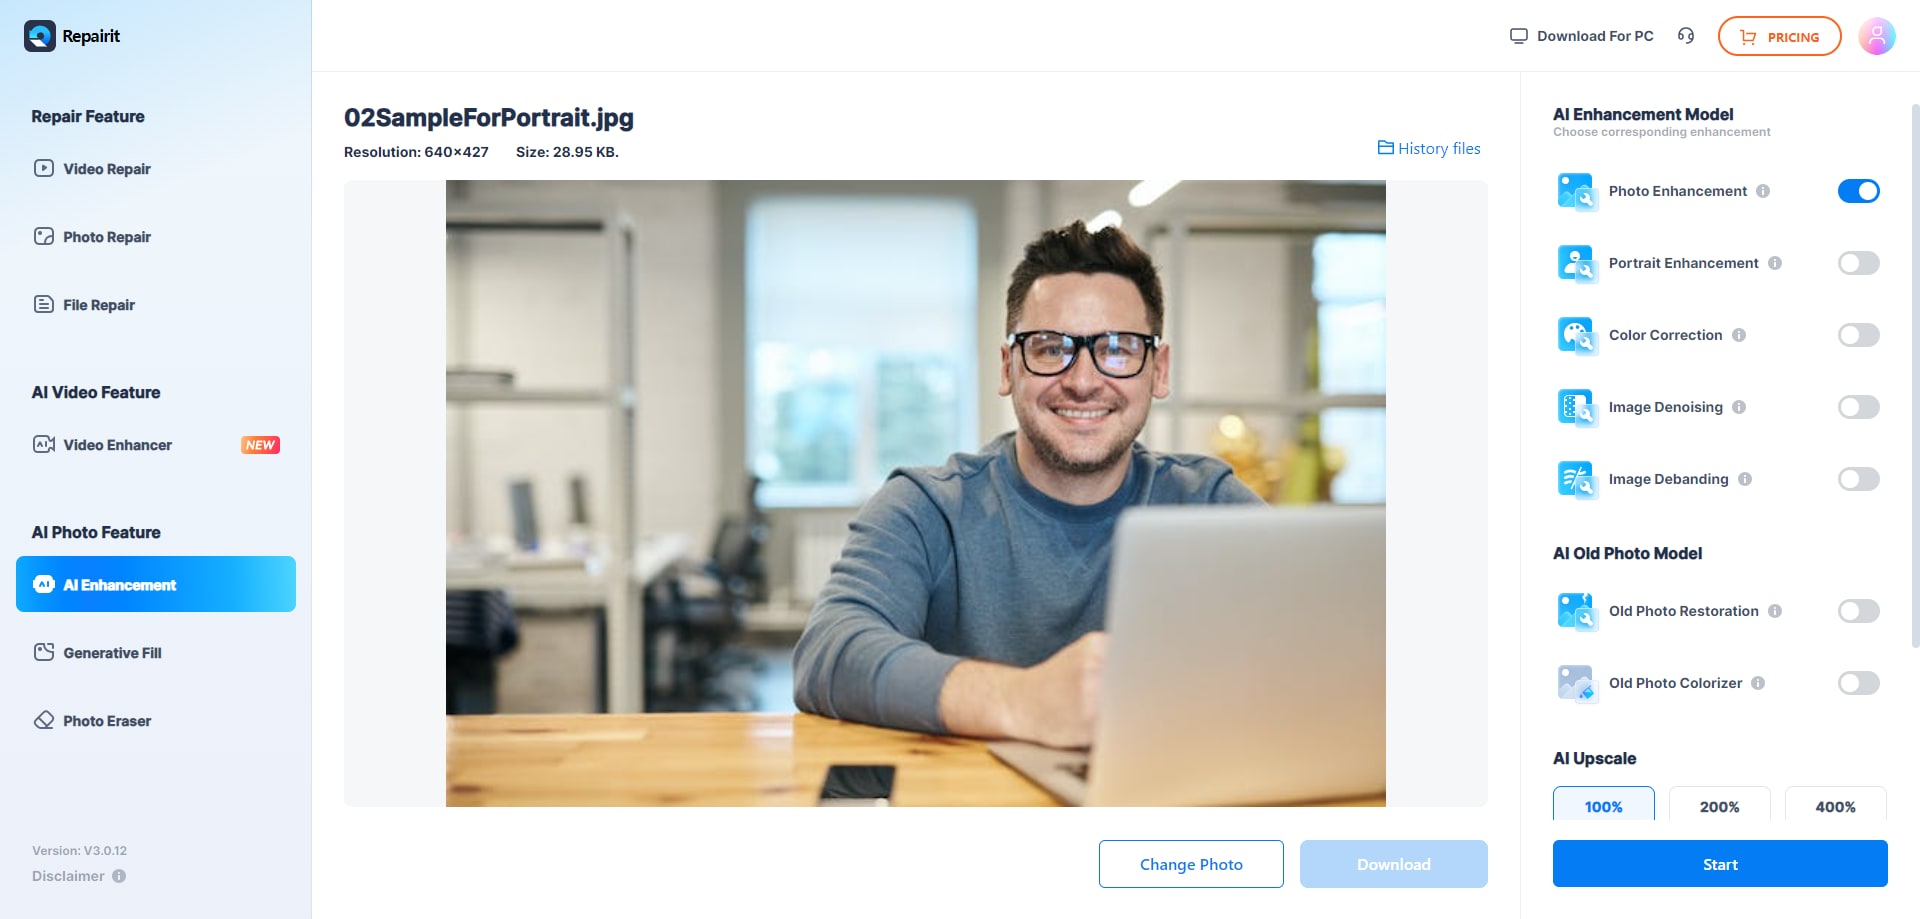
Step 2. Toggle AI Model and Start Enhancing
Now, under the “AI Enhancement Models,” toggle the “Photo Enhancement” or any desired model and hit the “Start” button.
Step 3. Preview the Results and Export the Image
Once the process is finally complete, review the before-and-after results. When you are satisfied, click the “Download” button to save the file to your device.
2. Picsart
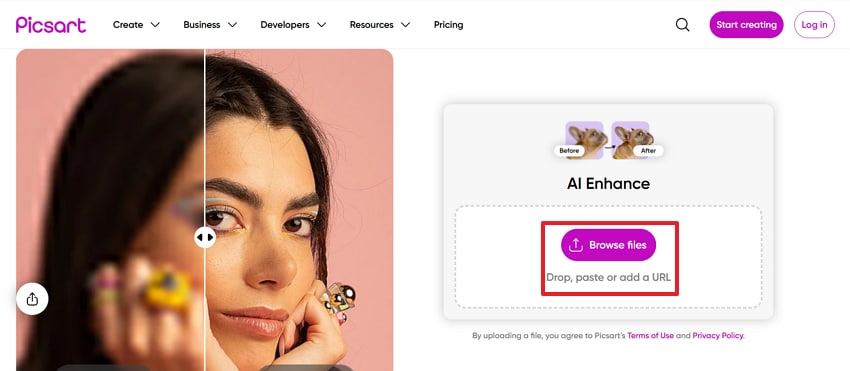
In order to unblur an image free online, this tool enables blurred photographs to become clear with a simple click. It identifies and fixes the blur in a photo using clever algorithms that recover details and sharpen the image and text. The batch editing feature enables users to sharpen up to 50 photos simultaneously, saving time for creators or business proprietors who work with a large body of images.
A Comprehensive Guide to Unblur an Image with Picsart
Step 1. Click the “Browse Files" button to upload the blurry image after accessing the tool.
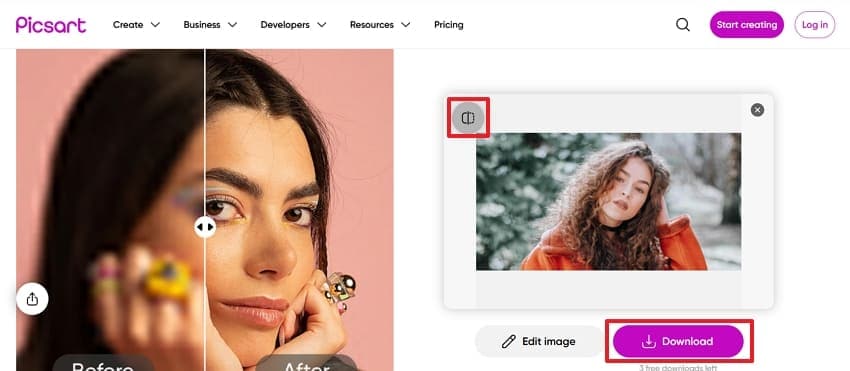
Step 2. Select the “Compare” button to check the enhancer image, and then press the "Download" button to save the image if you are satisfied with the outcome.
Cons
Users cannot manually adjust enhancement strength or select areas to unblur.
HD image downloads are locked behind a paid Pro membership.
3. UnblurImage
It is one of the reliable online tools to unblur images free online and sharpen the images with the help of artificial intelligence technology. This tool magnifies and improves the resolution of the image up to 4000 x 4000 pixels, and renders clearer images. Furthermore, it allows one to upload several photos simultaneously: 3 photos to guests and 5 photos to the people who are logged in.
A Detailed Guide to Unblur Photos Using UnblurImage
Step 1. Press the “Click or Drag to Upload. Up to 3 Files at a Time” button to add the blurry image.

Step 2. Once it's enhanced, preview the before and after results and hit the “Download” icon to save it on your device.

Cons
Severely blurry or very low-resolution images may not be fully restored.
Over-sharpening can sometimes create artificial edges or halos in the photo.
4. Adobe Express
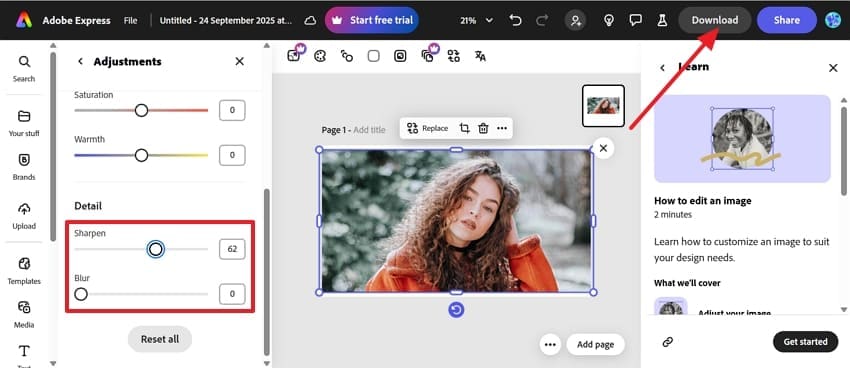
When it comes to un blur an image, Adobe turns the photos clear by adjusting the Sharpen slider or entering a precise value for accurate results. It also has other editing features such as cropping and filters, brightness, and contrast editing. In addition, this online tool allows one to undo and revert to the initial state at any point, which helps in experimentation without risk.
A Beginner’s Guide to Unblur an Image with Adobe Express
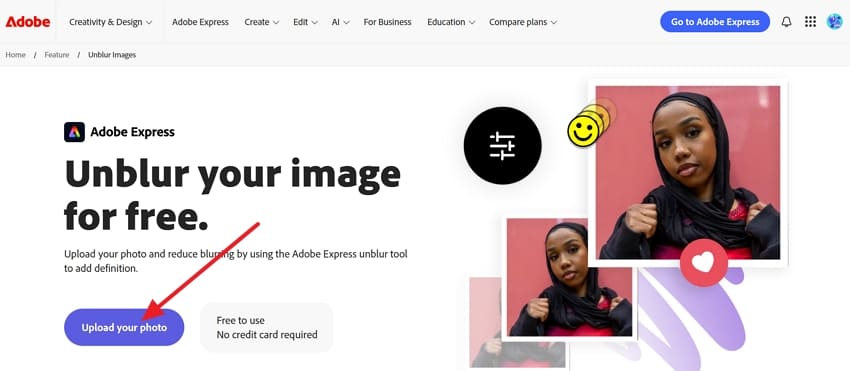
Step 1. To unblur the image, press the “Upload Your Photo” button from the main interface and add the target blurry picture.
Step 2. From the “Image” section, choose he “Adjust” tool to make the picture sharp and unblurred.
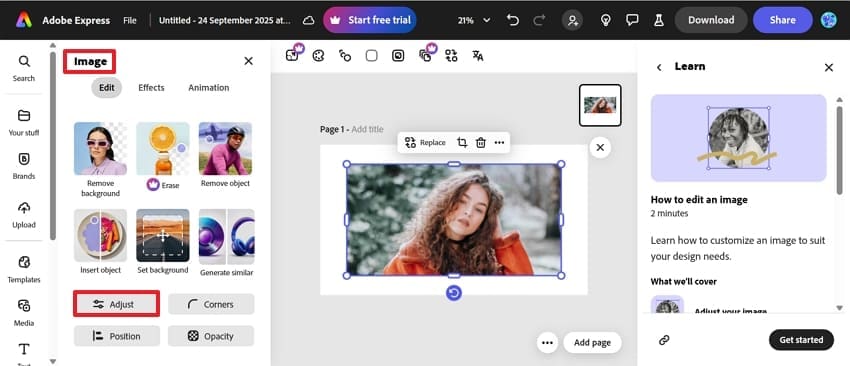
Step 3. Then, change the “Sharpen” option so that it can improve the picture. After being convinced by the results, you can save it by clicking the "Download" button.
Cons
Downloaded images can appear pixelated or less sharp than the edited preview.
This tool doesn’t offer any AI model to remove the blurriness from the images.
5. Fotor
Fotor can be used to sharpen the images of old or dim photos, therefore, to remove blur from an image. It provides image upscaling to achieve better clarity and enlargement of low-resolution smartphone images. The tool also supports unblurring text within images for better readability. You can also do batch photo enhancement and get a cross-platform mobile app for iOS and Android.
Step-by-Step Tutorial to Unblur an Image Using Fotor
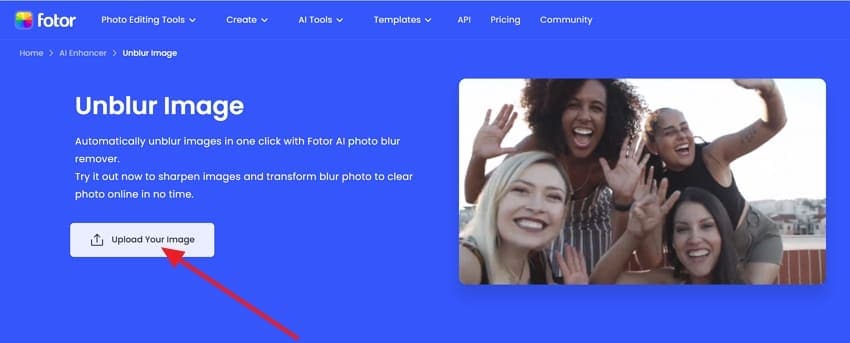
Step 1. Open the Unblur Image tool using your browser and choose the “Upload Your Image” button.
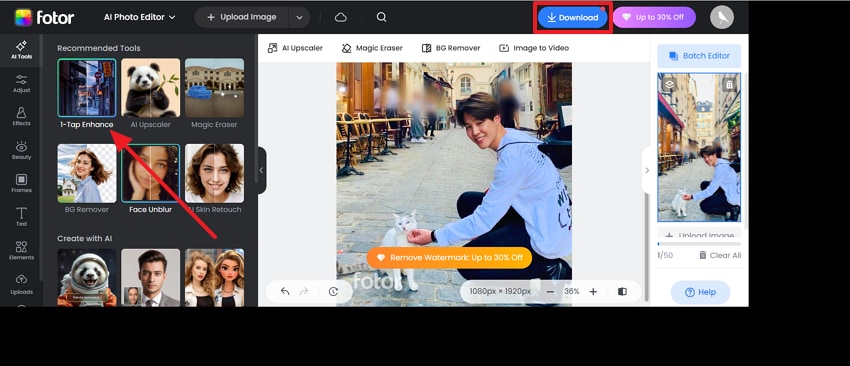
Step 2. Next, select the “1-Top Enhancement” tool from the left panel, and it’ll extract all the blurriness and sharpen it. Then, press the “Download” button to export the enhanced image to your device.
Cons
The free version includes watermarks on some exports and frequent ads.
It can experience lag or freezing in browsers, especially with heavy editing.
Part 3. Unblur an Image Using a Robust Software for Windows and Mac Devices
Apart from using an unblur an image online tool, if you are looking for desktop software, Repairit has got you covered. Repairit AI Photo Enhancer stands out as a robust image enhancement solution for Windows and Mac devices. It effectively fixes static, motion, and lens blur, making dynamic or soft images much clearer. Its portrait enhancer can brightens facial details and brings sharper focus to faces in any photo.
The tool also eliminates noise, overexposure, and underexposure, and adds life and equilibrium to the photos with difficult lighting conditions. Corrupted, illegible, or partially damaged images in a wide range of formats, including RAW files of professional cameras, can be repaired. Besides, it has a clear and straightforward interface with real-time previews and straightforward navigation.
Key Features
Device Type: The tool is unique because it supports more than 2,000 device types, which guarantees high levels of compatibility.
Batch Tool: You can edit multiple images at once to save time using its batch repair feature.
Format Support: Repairit also supports over 20 photo formats, including TIF, and many RAW files from cameras.
Unblur Images Like a Pro: Guide to Using Repairit AI Enhancer Tool
If you are thinking about how to operate this tool, the following guide can help you remove blur from an image:
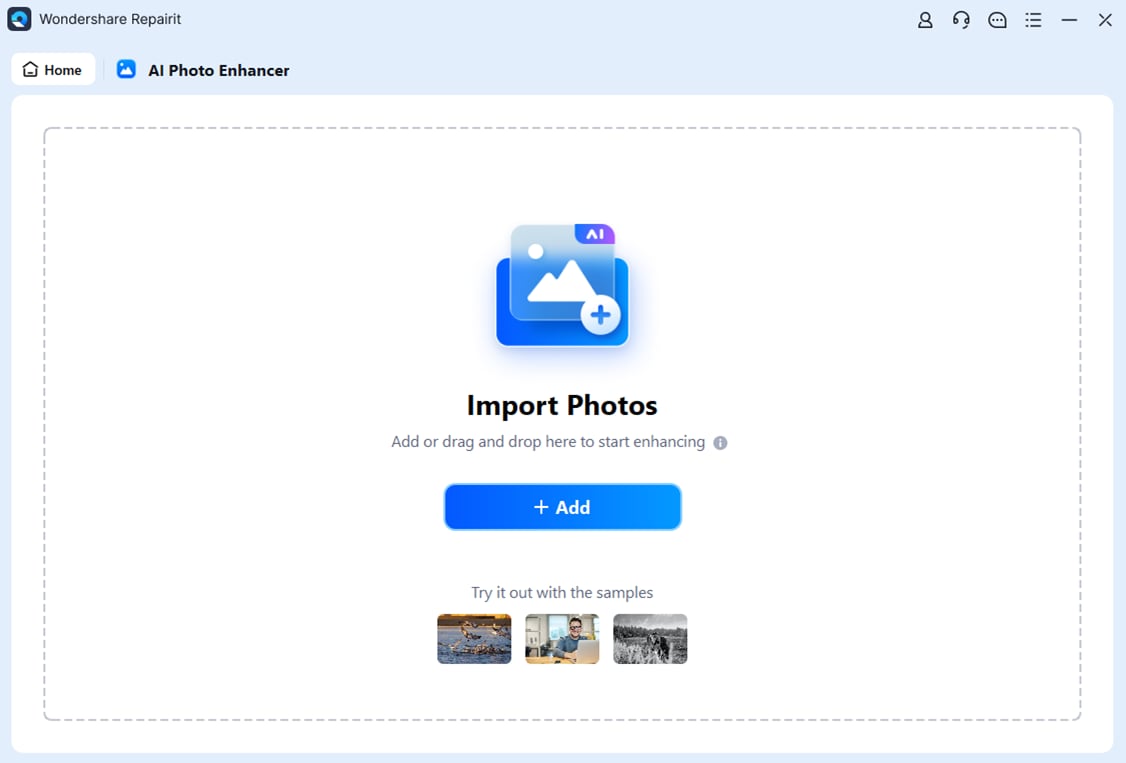
Step 1. Choose Image Enhancer and Insert the Image
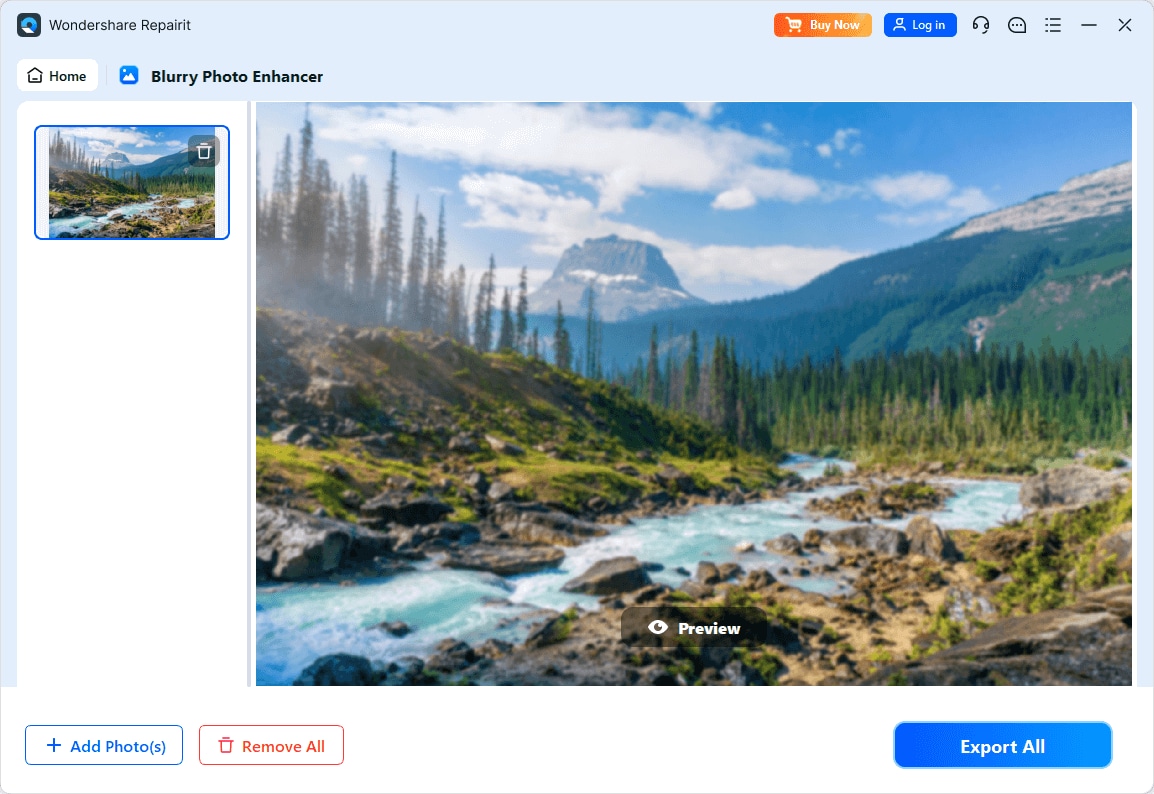
Access the Repairit’s Image Enhancer Tool and press the “+Add” button to insert the blurry image you want to enhance.
Step 2. Initiate the AI-Powered Enhancement Process
Next, press the “Preview” button to begin the enhancement process and wait for it to complete.
Step 3. Check Results and Export the Enhanced Picture
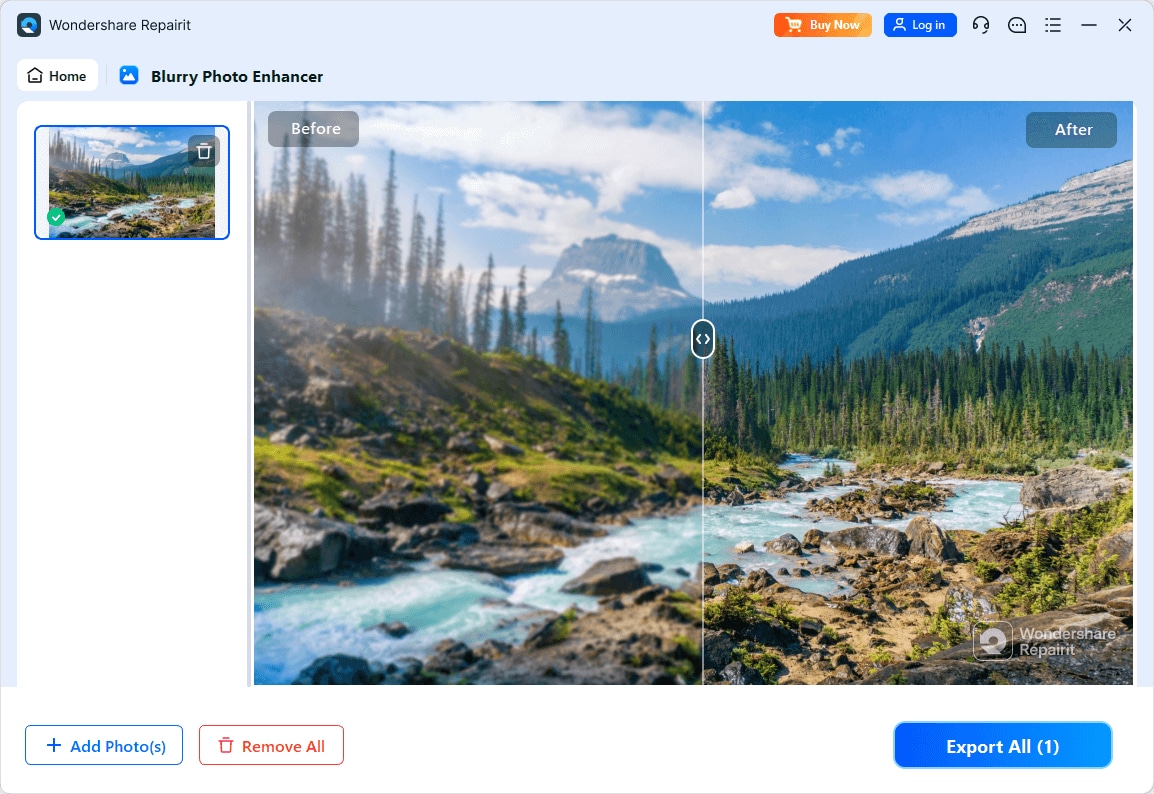
Examine the before and after results, and once you are satisfied, click the “Export All” button to save it on your computer.
Remove Blur from an Image Now

Conclusion
To sum it up, you have been acquainted with the best tools to unblur an image, and with their help, you can easily fix blurred photos. While many online and desktop options exist, Repairit stands out for its versatility. It delivers quick online fixes and robust desktop enhancements, ensuring clear, sharp photos anytime. For reliable results and professional quality, Repairit is the recommended choice.
FAQs
-
1. Do unblurring tools work for blurry images or low-quality screenshots?
Yes, unblurring software can enhance the clarity of screenshots, but the result depends heavily on the original file. While they can restore some details, if the image lacks enough data (so sharpness can’t be retained), results may be limited. -
2. Will removing blur make my image look artificial?
If unblurring is done too aggressively, it might create unnatural edges or excessive sharpness, making the image seem artificial. To avoid this, use moderate adjustments and choose tools that balance enhancement without creating unrealistic results. -
3. Do professional photographers use unblurring tools?
Yes — professional photographers often use tools (including free online unblur services) to fix blurry photos. However, for critical projects, they typically rely on high-end desktop software to ensure the highest image quality.

 ChatGPT
 Perplexity
 Google AI Mode
 Grok
Grok

