Sometimes when you try to play YouTube videos on a browser, you may see that video to play and pause in between many times for several seconds. This is definitely a frustrating situation, but when YouTube video stops buffering, this could happen because of many reasons. However, when it typically happens in Chrome, it's mostly because of Adobe Flash plugins. If you are having YouTube video stuttering / buffering issues, read this guide and find out why and how to resolve the solution.
In this article
Part 1. Why YouTube Videos Meet the Stuttering/Buffering Issues?
YouTube videos keep buffering, and you can't seem to find out the exact reasons. If you are facing YouTube buffering on Chrome, then here are some of the reasons why it might be happening.
Internet-related causes:
The reason for YouTube stuttering on Chrome doesn't always have to be serious. It might have happened just because you are dealing with a poor internet connection. Before getting into the technicality of the issue, you need to check whether internet connectivity is running smoothly or not. Even if it is, check for the internet speed once too.
However, people often meet the problem of YouTube buffering with good Internet, in this case, the video stuttering / buffering issue may be caused by video-related causes or computer-related causes.
Video player-related causes:
Another reason could be the video player-related issue. Check whether you have the updated version of the flash player. This could affect the normal video watching experience. If the problem lies with the flash player, you need to get sorted. Also, another video player-related issue is if you are watching a video which is 1080p HD in resolution, try lowering the resolution. These are common video player-related causes.
Computer-related causes:
If you feel that YouTube buffering with good Internet or YouTube stuttering problem is not happening because of video player-related issues, the next cause could be computer related. Check if hardware acceleration is enabled. If so, then this can slow down the YouTube video. Simply disable it to be sure that it doesn't happen again. Another computer-related cause could be you have maxed out the RAM. And see if the graphics driver needs an update.
Now, we've learned some of the common causes of YouTube buffering and lagging problem. Next, let's see how we can solve these problems one by one to make sure you can watch videos smoothly.
Further Reading: YouTube Video Not Playing? Here's How to Fix It
Part 2. 7 Solutions to Fix YouTube Videos Stuttering/Buffering on Chrome
Now that you know about the causes of the YouTube stutter problem, it's time to figure out how to resolve them. YouTube video stuttering issues are nothing new, but if you are all prepared with the right solutions, things will become very easy for you.
Solution 1. Check Internet speed or network connection
If you notice that YouTube video keeps buffering on chrome, you need to check whether it is happening because of poor internet connection. On the computer, click on the network icon.
Step 1: Restart your computer: This is the simplest thing to do. Before getting into the next steps, try restarting your computer first. This should fix the internet problem.
Step 2: Some computers have a switch for an adapter. You need to see if the wireless adapter is turned on or off.
Step 3: You can unplug the internet modem and router as well. Wait for a few seconds before switching it on.
Step 4: Do a soft reset on your network. This way, the respective caches will be cleared.
Step 5: If internet speed/network connection still doesn't get resolved, you might have to do a hard reset on your network. By doing this, all your settings will be refreshed and restored.
Step 6: If you are using a wireless connection, try getting closer to the modem while trying to watch a video on YouTube. Video stuttering can also happen when your PC or laptop fails to receive the proper signals. This should solve the issue too.

Solution 2. Check about the Chrome
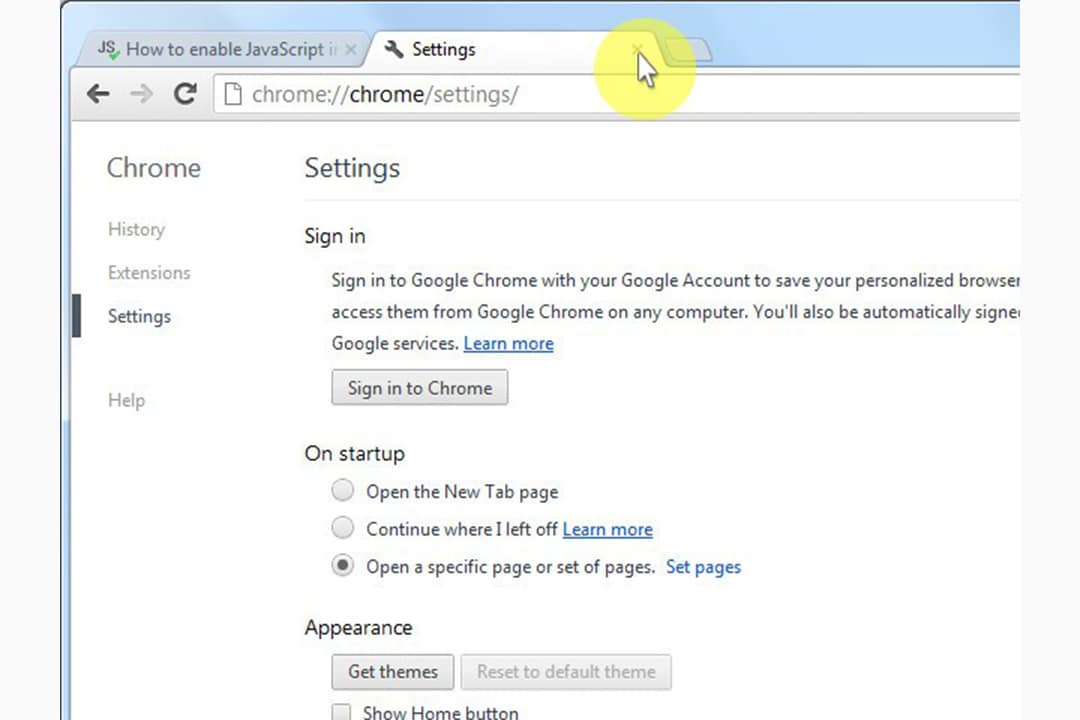
Step 1: On your computer, first lunch Google Chrome. The icon will be there on the screen.
Step 2: On the main page of Chrome, you will see the setting options with three dots or bars.
Step 3: Go to privacy and security now, and then hit the site settings.
Step 4: Now click on Javascript.
Step 5: You need to turn on Javascript.
Step 6: Go to YouTube, and now try to watch a video.
Solution 3. Update the Chrome
YouTube might ask you to update your Chrome if it fails to run a video. To resolve YouTube videos stuttering chrome problems, go through the following steps.
Step 1: Open Chrome on your computer.
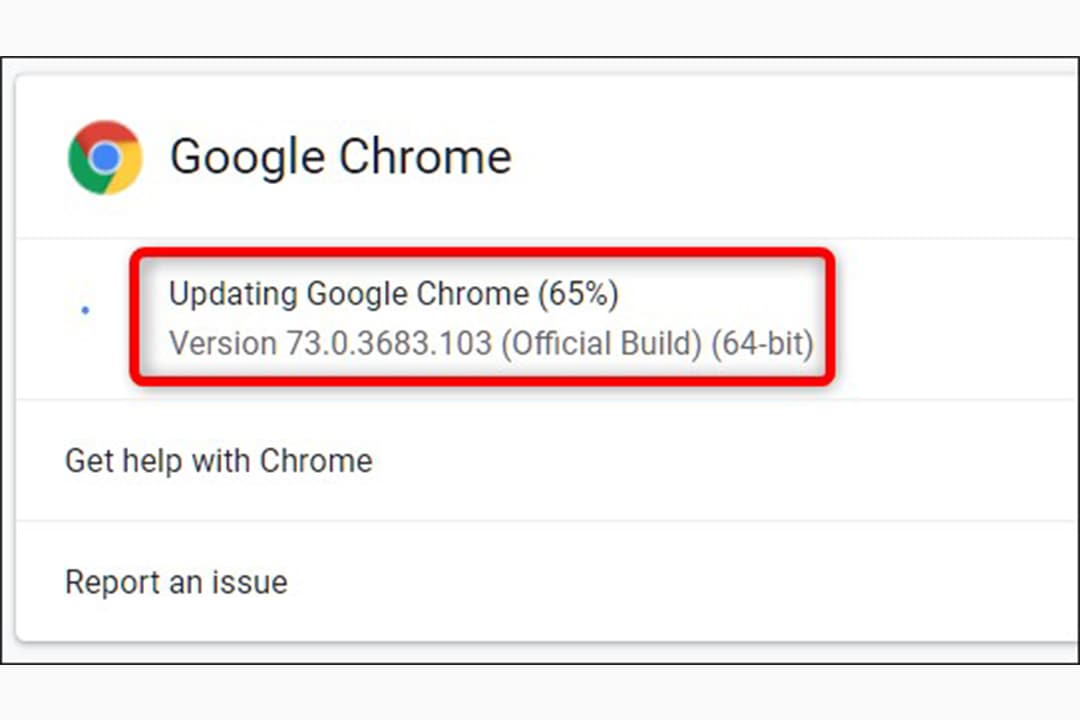
Step 2: Click on the three lines that you see on the top right.
Step 3: You will see the option to update Google Chrome. If you fail to see that option, it means that Google Chrome is already updated and you are using the latest version.
Step 4: Hit the relaunch option.
Step 5: Now go back to YouTube, and the video should run without any issue.
Solution 4. Install Adobe Flash Player
Step 1: First, visit Flashplayer. However, in Chrome, you don't need to install Adobe Flash Player separately. But if it doesn't work. Visit the official site first.
Step 2: You will see a download option. You will see other apps offers as well. Don't click on that if you don't want to.
Step 3: To install, click on the downloaded link and Adobe Flash Player will be installed on your computer. You will have to give the installer your permission to run it. Just follow the instructions that you see on your screen, and it will be done.

Solution 5. Update graphics card drivers
If you are someone who repeatedly goes to YouTube to consume information, then do note that you may have to update your graphics card drivers once a while as well. Chrome videos stuttering can be resolved if you update the graphics card drivers.
If you didn't know already AMD, Nvidia, and Intel are continuously optimizing as well as refining their graphic driver performances. And at times, when you update the graphic card drivers, it can make a few differences. It is always better to use the latest drivers while running a video on YouTube. Please note that updating the driver will consume some time, but once done, you will notice some differences.
Step 1: On your desktop screen, right-click the start option.
Step 2: After that, scroll down the option and click on the Device Manager.
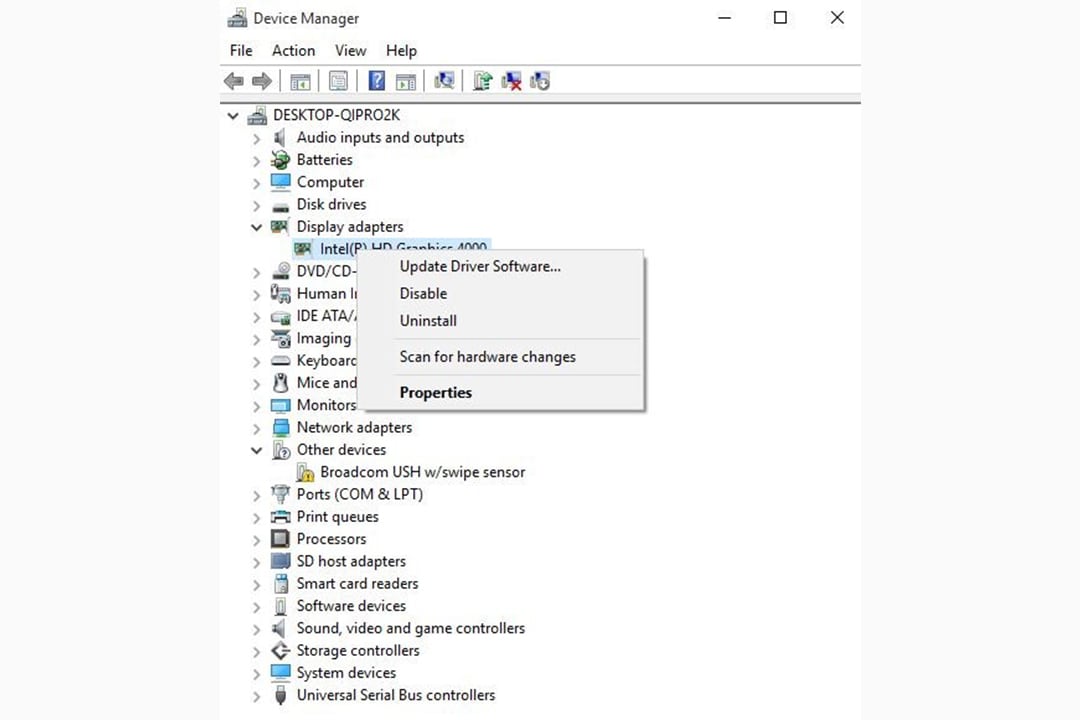
Step 3: You will see the display adapters. Click on it to expand it.
Step 4: Once you see the driver card driver, you need to right-click on it.
Step 5: For the last step, you need to select the update driver software. This will update the graphics card drivers.
If you don't have any driver updates available, you might have to uninstall and install it. Here's how to do it.
Step 1: On the desktop, right-click to Start.
Step 2: Go to Device Manager.
Step 3: From the list of devices, you need to look for your graphics card.
Step 4: Now, right on it. After that, you need to hit the uninstall option.
Step 5: You will see some instructions on your screen. Follow them and get rid of the corrupted driver from the PC.
Step 6: It is better to restart your computer before trying to run any video on YouTube. This is because you will have to install the latest drivers.
Once you are done with every step, go to YouTube again, and see if the video is working properly or not.
Solution 6. Disable/Enable hardware acceleration
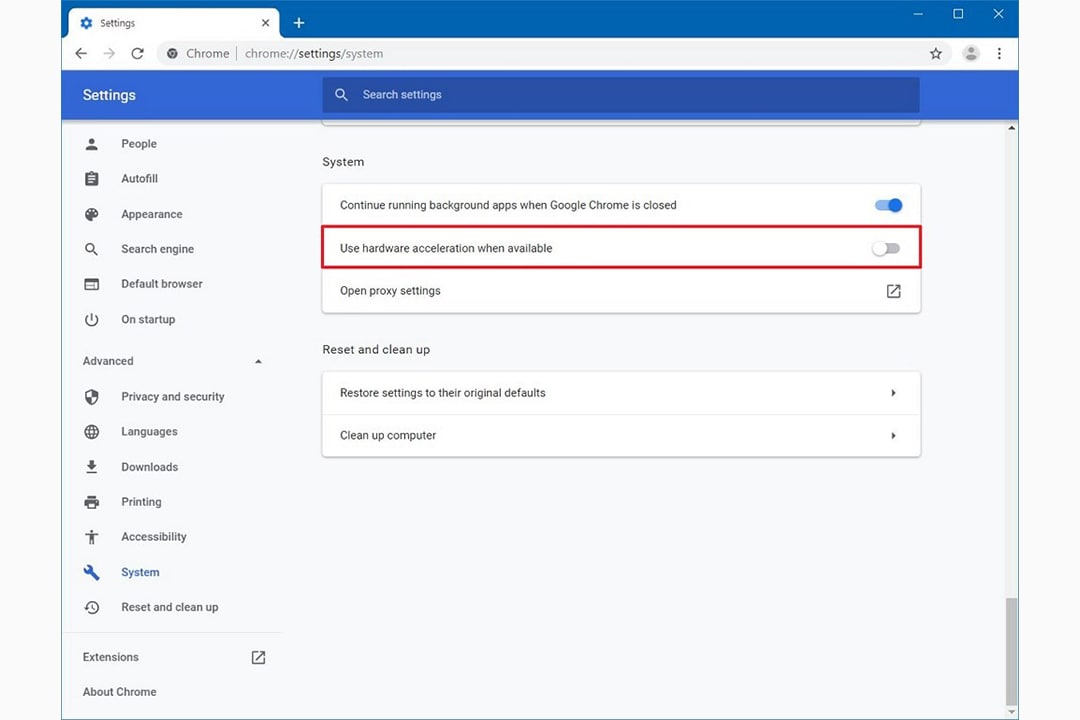
This solution is both for old and new computer users. Enabling hardware acceleration in the new computer, and turning it off in the old ones should mostly solve the problem. If your machine is old, enabling hardware acceleration could make your computer run slow. Especially, some of the applications, for example, YouTube. On the other hand, if you have a fast-performing computer, you need to enable the hardware acceleration to allow apps like YouTube to run smoothly.
Step 1: Go to the Control Panel on your computer. It will be there in your search bar. Open Control Panel.
Step 2: Better to change the view mode to Large Icons to have a proper view of what's in there.
Step 3: Click on Display.
Step 4: You will have to click on the change display setting option. It will be there on the left-hand side of the window.
Step 5: Look for advanced display settings. You will see a new dialogue box.
Step 6: Troubleshoot tab needs to be clicked, and then change the settings button.
Step 7: You will see the hardware acceleration section. To enable it, you need to move the pointer to the full, and to disable it, you need to move the pointer to low.
Step 8: After doing that, hit the OK button. Once done, restart your computer. This should solve the problem.
Solution 7. Perform a clean boot
When you perform a clean boot, most of the app-related issues get resolved.
Here's what you need to do.
Step 1: First, you need to visit the search box.
Step 2: Type MSConfig
Step 3: After that, click on system configuration.
Step 4: Locate the services tab.
Step 5: Now hide every Microsoft services box.
Step 6: You need to select disable all.
Step 7: Now, go to the startup tab.
Step 8: Open Task Manager needs to be opened.
Step 9: Close Task manager. After that, you need to click on the OK option.
Step 10: Finally, reboot your computer and start it.
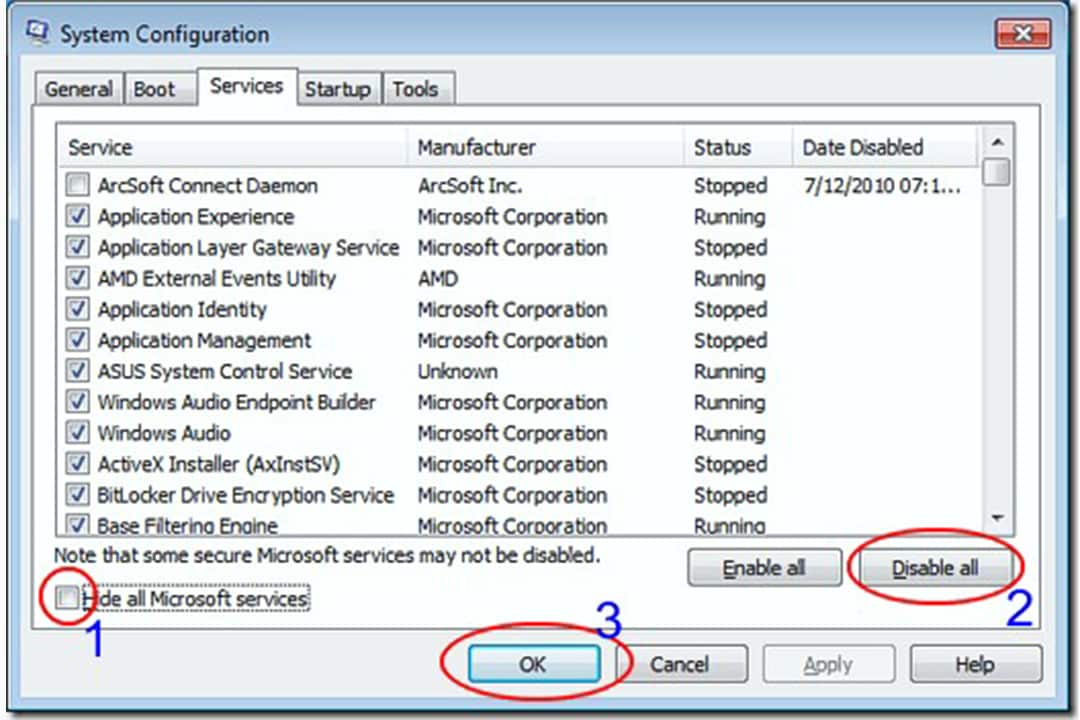
If you have followed all the steps carefully, you will have a clean boot environment. Go to YouTube, and see if you are able to play YouTube Videos smoothly.
Part 3. 3 Clicks to Repair Downloaded YouTube Videos Lagging, Stuttering and Buffering
If you have downloaded several YouTube videos, trying to run it on your system, but face some issues like video laggin、 stuttering or buffering, you might need Wondershare Repairit - Video Repair, an professional video repair software that can help you fix video-related errors within minutes. The following are its main features:

Wondershare Repairit - Video Repair
Security Verified. Over 7,302,189 people have downloaded it.
-
Repair damaged videos with all levels of corruption, such as video not playing, video no sound, out-of-sync video or audio, playback errors, header corruption, flickering video, missing video codec, etc.
-
Repair videos of diverse formats, including MOV, MP4, M2TS, MKV, MTS, 3GP, AVI, FLV, MXF, KLV, INSV, M4V, WMV, MPEG, ASF, etc.
-
Repair damaged or corrupted videos caused by video compression, system crash, video format change, etc.
-
Repair critically damaged or corrupted videos available on SD cards, mobile phones, cameras, USB flash drives, etc.
-
Repairit has a quick and advanced scanning mode. You can use either depending upon the level of corruption the video file has undergone.
-
Compatible with Windows PC, Mac OS, and supports PC to mobile transferring/sharing.
Step 1: Download the YouTube video
To begin with, go to YouTube, copy the URL, and download the video on your computer. There are many trustworthy online tools that will let you download YouTube videos. You can download those videos which are corrupted, or you are not able to play them. Once the video gets downloaded on the system, you can either drag and drop it on the software, else, you can select it manually.

Step 2: Start repairing
Once you upload the video on the tool, you will get to see some details about the video. To repair it, you need to hit the repair button. This will begin the repairing process.

Step 3: Preview and save your file
Once the repairing process gets completed, you can click on the preview option to watch the video. If you feel that everything has been resolved, simply hit the save now option and save it on your computer.

Attention:
If you do not want to download software on your computer and your corrupted video is no more than 3GB, you can try the Repairit Video Repair Online to get your video repaired online with ease.
Conclusion
Now that you know about the different reasons why a YouTube video stuttering and buffering along with the solutions that you can do to solve the problem, we recommend you trying these solutions whenever there is an issue. If you want to solve any downloaded YouTube videos, better to go with a reliable software like Wondershare Repairit, which can help you fix corrupted and damaged YouTube, and all types of files in just a few minutes.
People Also Ask
-
How do I watch YouTube videos smoothly?
To make sure that you get to watch YouTube videos smoothly, always ensure that you have a running internet connection. Also, install the latest Adobe Flash Player. If YouTube videos still load slowly, read on to get fixes to YouTube videos lagging.
-
How do I fix choppy video on YouTube in Chrome?
Use a stable internet connection. Restart your computer. Clear browser cookies and cache. Lower the video resolution.
-
How do you fix YouTube buffering problem on Android?
Try blocking CDNs and access YouTube videos directly. Disable adblocker. Clear cookies and cache of your browser. Disable hardware acceleration. Change the browser. Try using a VPN. First, buffer your videos, and then play.
-
Why is YouTube buffering with fast internet?
Even with fast fiber-optic connections, people may sometimes face this issue. It has nothing to do with a slow connection; it is more related to how the internet connection works with YouTube servers. Also, slow YouTube servers could be the reason for the problem.


 ChatGPT
 Perplexity
 Google AI Mode
 Grok
Grok
