
 TL;DR:
⚡ Quick Fixes for Video Lagging or Stuttering
● Update Graphics Drivers: Open Device Manager, right-click your display adapter, and select update driver to fix playback glitches and rendering failures.
● Reset System Power Plan: Access Edit Power Plan from the desktop search box and restore default settings to eliminate power-throttling stutter.
● Optimize background resources: Adjust wallpaper slideshow intervals to solid colors and close high-RAM background applications via task manager.
● Repair Damaged Video Files: Employ Wondershare Repairit to reconstruct broken video segments, missing codecs, or corrupt headers automatically.
Ask AI for a summary
 ChatGPT
 Perplexity
 Gemini
 Claude
 Grok
Grok
Sometimes you may encounter frame skips, video stuttering, or laggy playback while watching videos on your PC or Mac. If you’ve ever asked yourself, “Why is my video lagging?”, you're not alone. These issues can be frustrating, but they're fixable.
In this article, you'll learn the common causes of video lag or stuttering, proven methods to fix them, and practical tips to prevent video playback problems in the future.
Part 1. Symptoms and Causes of Video Lagging or Stuttering
Why do videos lag or stutter? There is a wide range of reasons including the following:
-
Outdated, missing, incompatible, or corrupted graphics drivers.
-
Outdated, missing, incompatible, or corrupted audio drivers.
-
Windows Operating System updates are not installed.
-
Slideshow wallpaper settings.
-
A wrong power plan setting.
-
Malware infection.
-
Outdated media player.
-
Slow PC with insufficient RAM.
-
Hardware faults.
-
Corrupted video files.
Symptom 1: Flickering or patchy videos.
Cause: Windows 10/11 slideshow wallpaper setting. If it has a short time interval, videos can skip a frame every time a new background comes on, hence the flicker. Outdated video drivers are also known to cause the error.
Symptom 2: Video glitches and stuttering
Cause: Background applications. These applications clog system resources such as RAM. Insufficient RAM can cause videos to stutter and lag. The error can also occur when audio and video drivers are outdated and Windows updates are not installed.
Symptom 3: Blurry, jerky videos.
Causes: Corrupt SD cards, incompatible or outdated media players, insufficient disk space, missing components, and defective encoding are the known culprits.
Related Readings:
How to Fix VLC Player Lagging Issue?
Best 4 Video Lag Removers Online You Can Try
Top 3 MOV File Fixer Tools for Corrupted MOV
Symptom 4: Video and Audio Out of sync
Cause: Out of date or corrupt device drivers.
Symptom 5: Inaccessible Video File
Cause: Corrupted video file, a malware infection.
Symptom 6: Blank/Black Screen. When you click play, all you see is a back-screen video timer moving forward or stuck in one position.

Cause: The video file is corrupted or not all the parts were copied properly from source media, missing codec, outdated video driver, and malware infection.
Symptom 7: Video freezing
Cause: Corrupted video file due to malware infection or interruption during downloading.
Symptom 8: No audio or video
Cause: Missing, corrupted, or outdated audio and video drivers, outdated Windows.
Symptom 9: Video File Not Playing
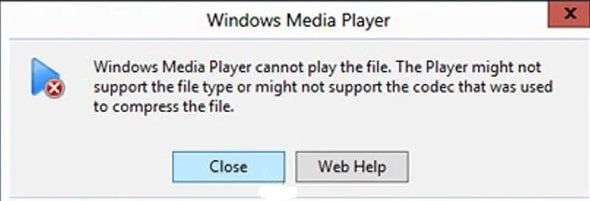
Cause: The Windows Media Player does not support the video format, missing or unsupported video codec. Video codec is the software that is used to compress and decompress videos.
Symptom 10: Video playing slowly or sluggishly.
Cause: Slow computer with insufficient RAM, corrupted video file, browser settings, outdated media player, outdated video drivers, and corrupt video file.
Symptom 11: Video distortion (pixelated, stretched, or broken videos)
Cause: Missing, outdated, or corrupted graphics drivers, outdated media player, faulty CPU, hardware failure.
Symptom 12: Video quality degrades after Export
Cause: Outdated graphic driver, export settings that are wrong, file formats that are unsupported, incompatible codecs.
Symptom 13: Video playing only in Full Screen
Cause: Faulty media player, outdated video drivers.
Symptom 14: Media Player/System crash while playing videos.
Cause: Missing or improperly installed Windows video compression.
Symptom 15: Abrupt starting and stopping of Videos.
Cause: Outdated or corrupt video drivers.
Part 2. Repair Lagging or Stuttering Videos on PC (Automatic & Munal Methods)
Videos that lag or stutter can be repaired using either manual or automatic methods.
Before engaging in these methods, restart your computer. This will refresh Windows and remove any corrupted temporary data. It may just solve your problem. If it does not, proceed with the following methods.
Automatic Methods
👍 Try Video Repair Software
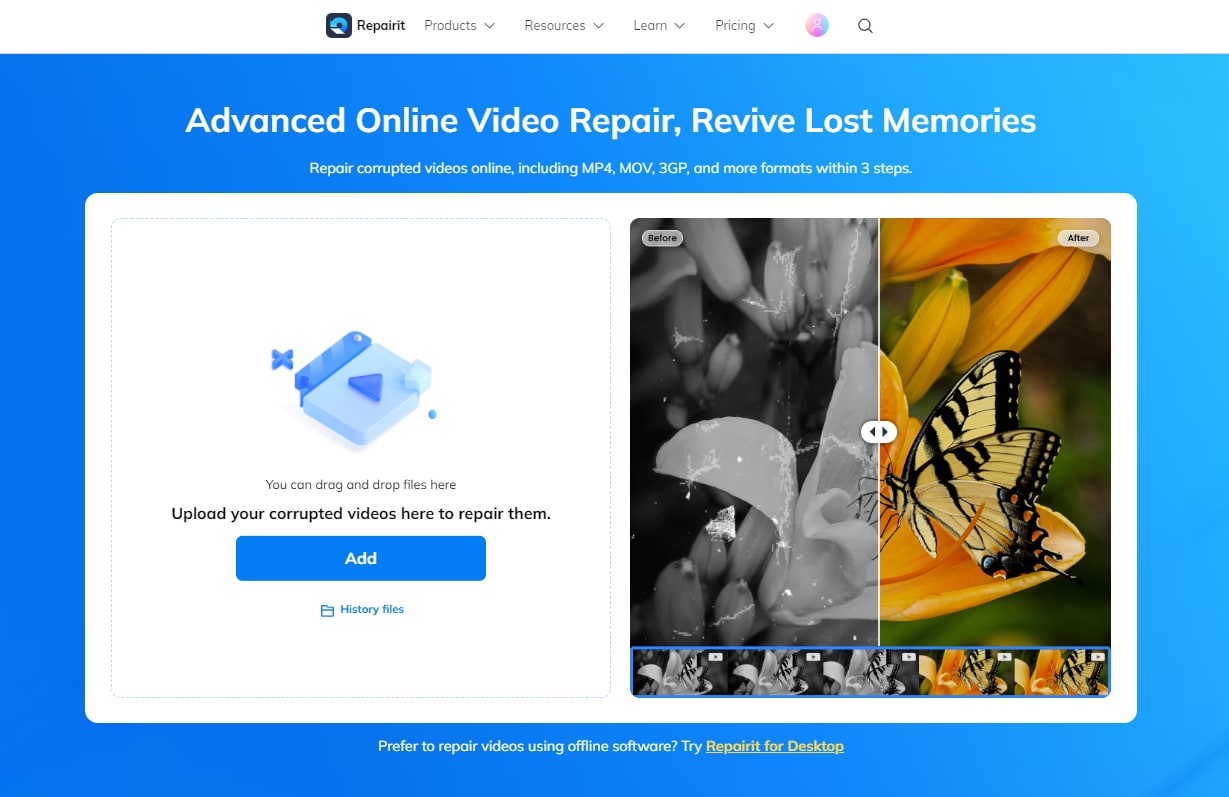
Repairit Video Repair is an excellent video lag remover for those who want to repair larger video files and a bigger range of video file formats. Plus advanced options.
Repairit enables you to repair corrupted videos in three simple steps; upload the videos, repair them, and save them.

Wondershare Repairit - Video Repair
 Security Verified. Over 7,302,189 people have downloaded it.
-
Repair damaged videos with all levels of corruption, such as video not playing, video no sound, out-of-sync video or audio, playback errors, header corruption, flickering video, missing video codec, etc.
-
Repair full HD, 4K, and 8K videos and support 20+ popular formats, including MOV, MP4, M2TS, MDT, RSV, WMV, MPEG, DAT, etc.
-
Repair damaged or corrupted videos caused by video compression, system crash, video format change, etc.
-
Repair critically damaged or corrupted RAW/Log/HDR videos from professional cameras such as Blackmagic Design, RED Digital, and ARRI, etc.
-
Repairit has a quick and advanced scanning mode. You can use either depending on the level of corruption the video file has undergone.
-
No limit to the number and size of the repairable videos.
-
Repaired videos are more compatible with professional editing software such as DaVinci, Composer, Final Cut Pro, and Premiere Pro.
-
Support Windows 11/10/8/7/Vista, Windows Server 2003/2008/2012/2016/2019/2022, and macOS 10.13~macOS 15.
How to repair lagging or stuttering video files using Repairit Desktop
First of all, you need to download the software on your PC and open it.
Step 1: Click on the "+Add" button in the centre of the user interface to open the file navigator. Navigate to the folder that contains the corrupted video files and upload them. You can also drag the files and drop them on the interface.

Step 2: Click the Repair button to repair the damaged videos in batch.

Step 3: Preview the repaired videos and save them to the desired location.

If one video is not repaired successfully, it means they are severely damaged. Then you can use the "Advanced Repair" feature to repair it in a more professional way. What you need to do is to add a sample video that shot by the smae device and has the same format as the corrupted video, then Repairit will automatically repair the corrupted video.

Once the video files are repaired, save them in a different location from where the original damaged files are stored.
Attention:
If you do not want to download software on your computer and the corrupted video is smaller than 3GB, you can try the video lag online remover Repairit Online Video Repair to remove lag from video online for free.
Manual Methods
1. Reinstall your device driver
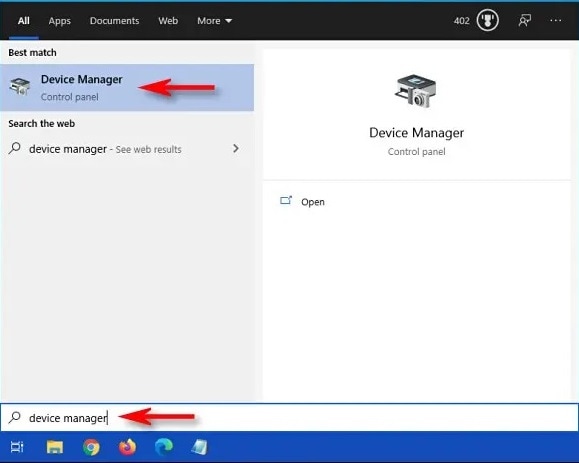
Step 1: On the taskbar, in search box enter “device manager”, then choose Device Manager.
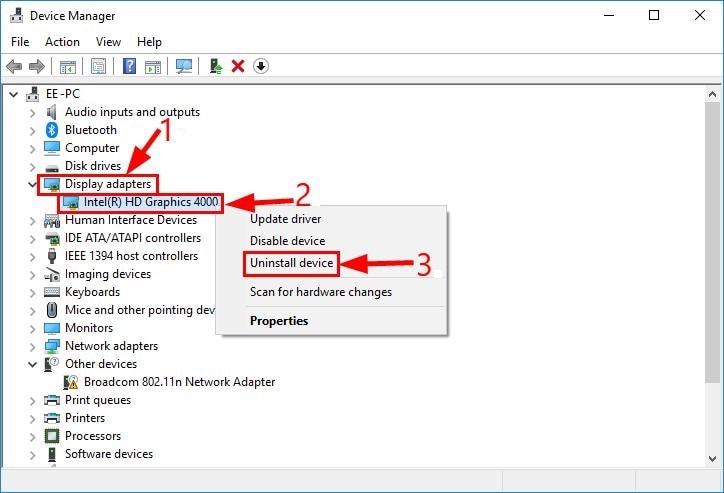
Step 2: Right-click the name of the graphics adapter, and select Uninstall device.
Step 3: In the dialog box, click Uninstall.
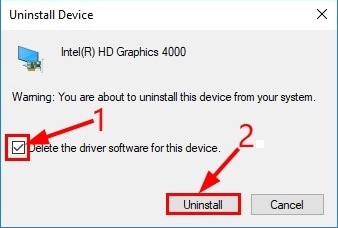
Step 4: Restart your PC.
Step 5: Windows will reinstall the driver.
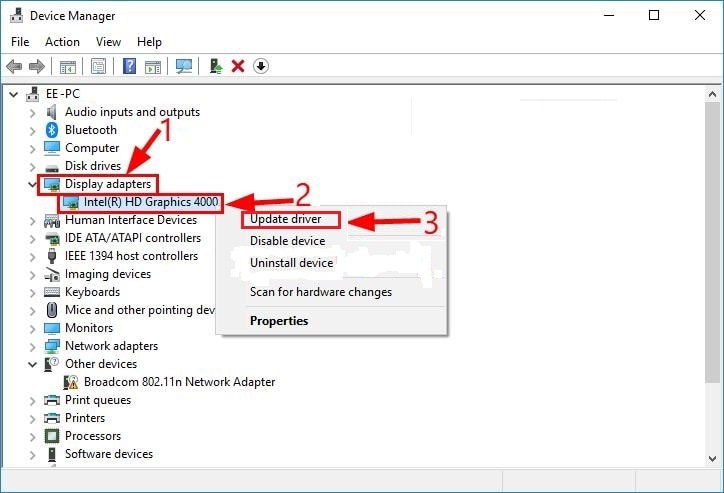
2. Update display drivers
Step 1: On the taskbar in the search box, enter “device manager”, then choose Device Manager.
Step 2: Right-click the name of the graphics adapter, and select Update driver.
Step 3: Select Search automatically for updated driver software.
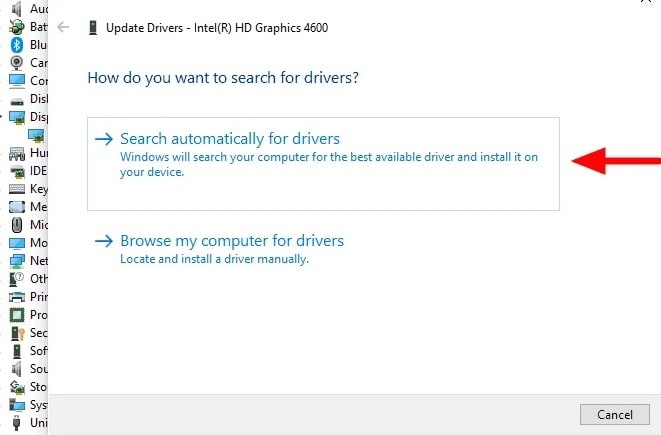
Step 4: If Windows doesn’t find a new driver, search for one on the device manufacturer’s website and follow their instructions.
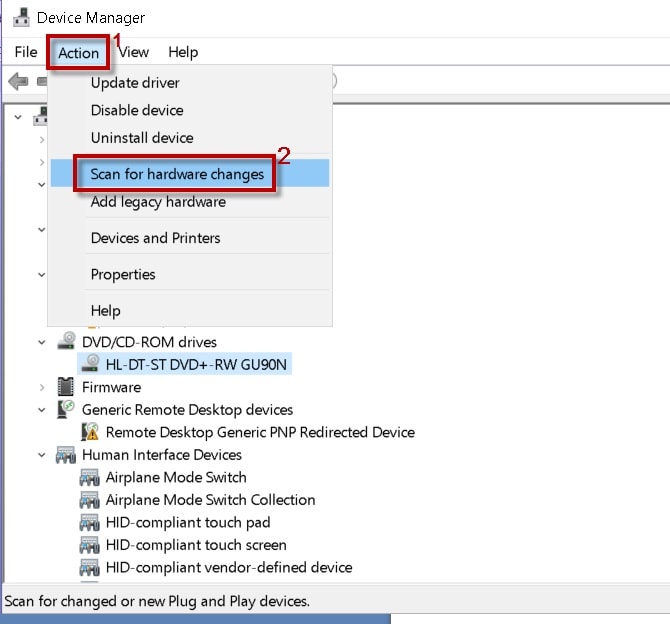
3. Scan for hardware changes
Scanning for hardware changes refreshes Device Manager to show any possible hardware changes for example connected or disconnected devices. If any issues with any device are found, the yellow exclamation will appear on its icon.
To scan for new hardware, click on the Action in the top menu bar, and then click Scan for hardware changes.
4. Change Power Management Settings
Wrong settings in the PC power plan can hinder smooth video playback. Restore the power plan settings to default.
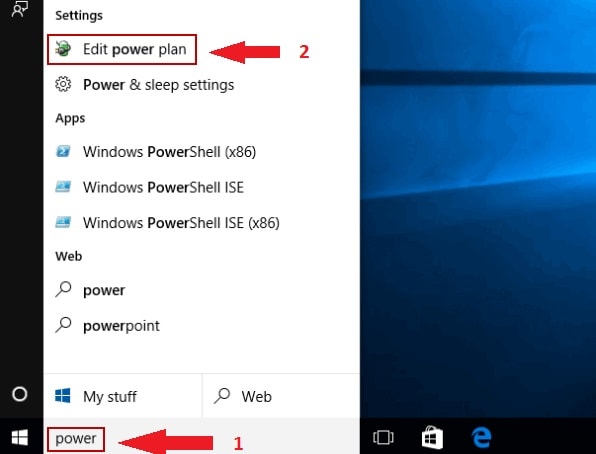
Step 1: Type power in the search box on the desktop, and choose Edit power plan.
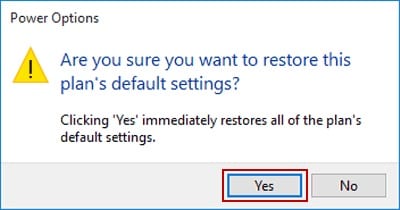
Step 2: Click Restore default settings for this plan.

Step 3: Select Yes to reset the power plan’s settings.
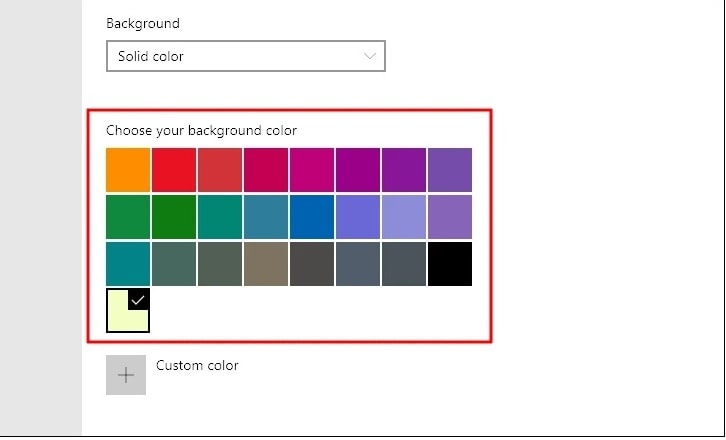
5. Change your Windows 10 Wallpaper Settings
If you set wallpaper settings on slideshow and short intervals between the slides, videos might skip frames hence flicker. Disable it or adjust the settings.
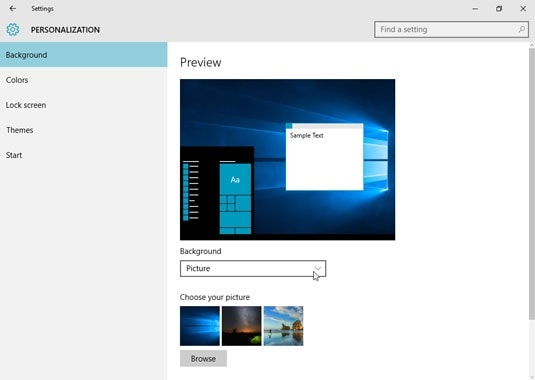
Step 1: Right-click the desktop and choose personalize
Step2: Open the Background setting
Step 3: Choose Solid Color
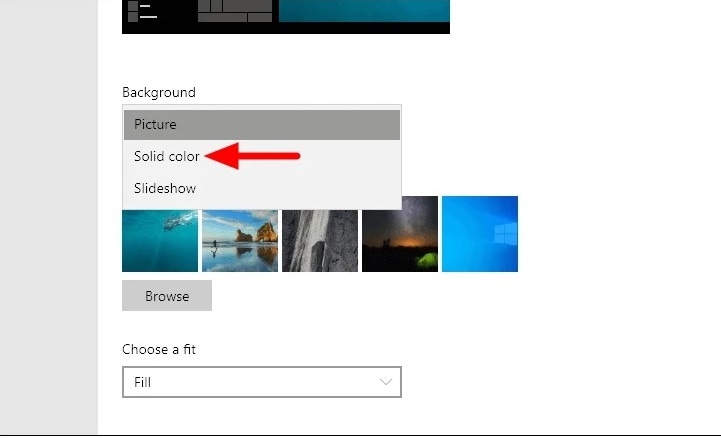
Step 4: Choose background color
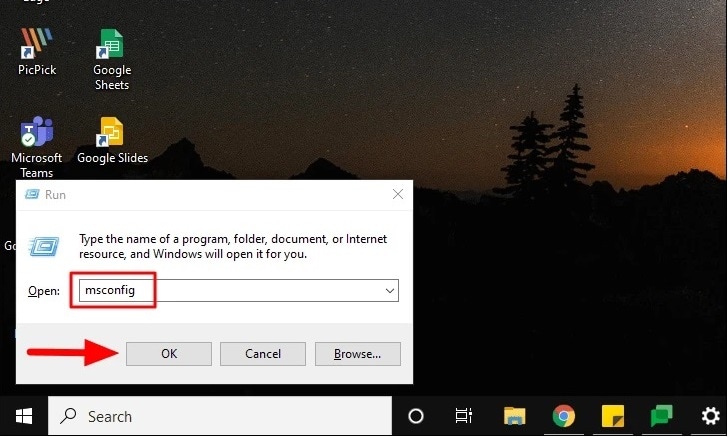
6. Alter the number of processors in MS Config
This is to enhance system performance by maximizing all available CPU resources.
Step1: Press Win+R to open the Run dialog box
Step 2: Type MSConfig in the dialog box and press OK
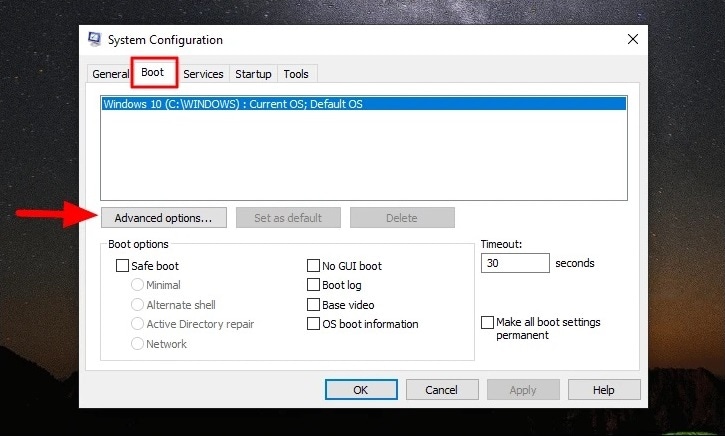
Step 3: In the System Configuration window, click the Boot tab, and click the Advanced options button.
Step 5: Place a checkmark by Number of Processors and choose the highest number from the menu.
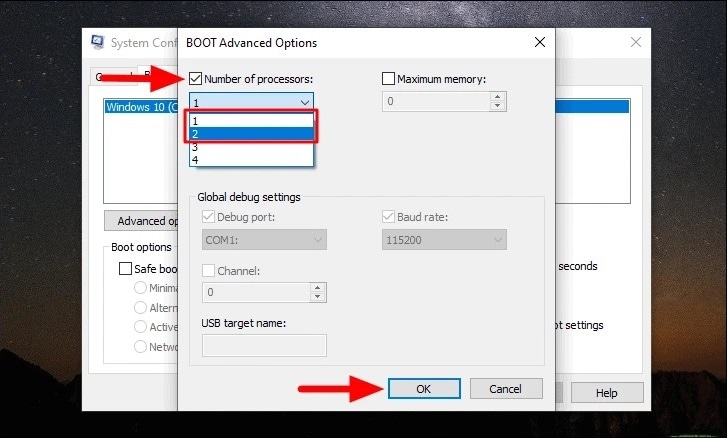
Step 7: Click Ok to close the System Configuration Window.
Step 8: Click Restart Now
7. Update Windows
This will fix any bugs and give you the latest security updates.
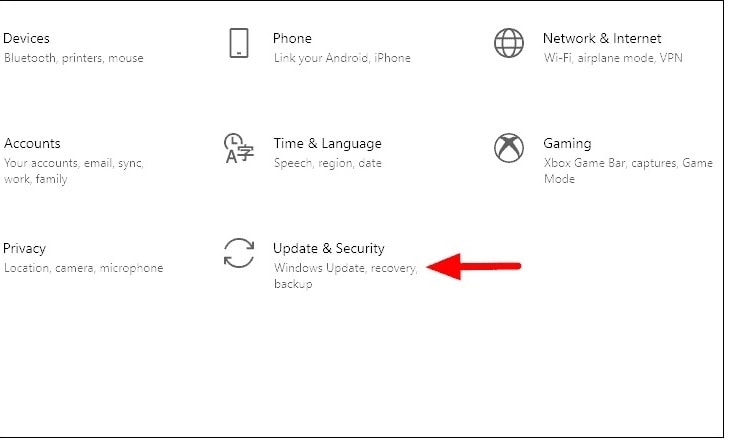
Step 1: Click the “Start” button. Type “update” in the search box. Click on “Windows update.”
Step 2: Click “Check for updates.” If updates are available, click the message and select the ones to install.
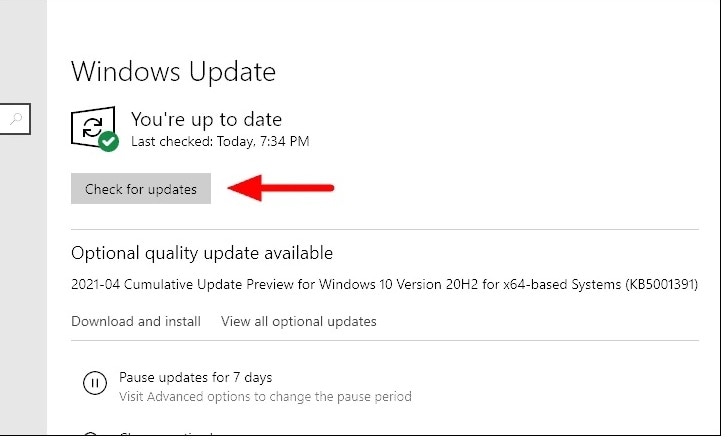
Step 3: Click “Install updates.”
Part 3. Tips to Avoid Video Lagging or Stuttering
Manual and automatic video repair methods can restore your video files. But they can be time-consuming and may not restore your files to their original state. It is better to prevent the error from occurring in the first place.
It’s popularly known that prevention is better than cure. Here are some tips on how to ensure an enjoyable flawless video watching experience:
These updates fix bugs and other issues that affect system performance.
- Install the right codecs: Ensure you have codecs that are compatible with your PC.
- Use reliable antivirus software: Protect your system from malware infections that may corrupt video files.
- Update regularly: Keep Windows Media Player, as well as audio and video drivers, up to date.
- Clear temporary files: Regularly delete cookies and temp files to free up RAM and disk space.
- Add more RAM: Upgrading RAM improves overall system performance and video playback.
- Close background apps: Disable auto-start programs and close unused applications to free up system resources.
Conclusion
Video stuttering or lagging on Windows 10/11 is a common error. It is caused by many factors such as malware infection, outdated device drivers, and corrupted videos.
The leading cause of this error is corrupted videos. The solution to this problem is Wondershare Repairit. Download this effective tool today and use it to repair your videos regardless of how they may have been corrupted.
Related Content You Might Want to Know
-
How do I fix choppy video on Windows 10?
You can refer to a hardware decoding fix section in our piece, where you disable hardware decoding to fix the unwanted chopping effect and you can change the caching value in the VLC media player to solve it. -
Why won't videos play on my PC?
There is not any single cause for it but most probably due to the following reasons.
- Due to slow and outdated PC
- Outdated drivers and media player
- Due to virus and malware attack
- Corrupted video file
-
Why do videos stutter on my laptop?
Video can stutter on PC also. The stuttering effect mostly caused due to weak internet connection while streaming the videos online. -
Why is my computer so Laggy?
There can be three reasons behind it,
- Due to virus or malware attack
- Your operating system and its drivers are not updated
- Your system has got outdated, you need a new system with more RAM and an efficient processor.
-
How do I stop videos from lagging on my laptop?
- Install a dedicated anti-virus to avoid unwanted virus attack
- Check and install new updates regularly
- Keep clearing caches and temp files