

Many users notice someone standing in front of a fake background, like a beach or a city, in social media videos. This is done using a green-colored screen behind the person, which is removed later and replaced with any scene. Mostly, the green screen stays in the video, and it makes the footage look incomplete or unprofessional. In such cases, editing tools come to the rescue and remove this green background.
Out of all the tools, Premiere Pro is widely used by professionals to add and alter this effect in videos. Thus, this guide will explain what this effect is and the reasons you should avoid displaying it in your videos. Additionally, we will explain how to remove green screen Premiere Prowith simple steps. You will also learn about a tool that repairs your footage damaged during the export process.
Table of contents
Part 1. What is Green Screen Premiere Pro? Why Remove It?
The green screen is used as a background color in videos that can be removed digitally and replaced with other backdrops. Most of the editing tools, including Premiere Pro, come with features that automatically detect the green color and replace it with other effects. They do so by using an effect that selects all the green pixels and makes them transparent, allowing you to place any image behind the subject.
Why You Should Remove Green Screen in Premiere Pro?
Since it is easily removable, users get lots of creative options by adding this background color to their videos. A few useful reasons that promote green screen removal in Premiere Pro are listed below:
- Cleaner Final Look: Green areas in the background distract viewers and take away focus from your main subject. Hence, removing this background color gives your video a more polished and finished appearance.
- Background Flexibility: You can replace the green screen with animations or graphics that match your theme. This gives you the freedom to be creative without filming in many places, which saves time and money.
- Better Viewer Engagement: A properly edited video with background changes feels more professional and engaging. Similarly, people are more likely to watch and share a high-quality video as the content feels smooth and modern.
- Brand Consistency: Companies and creators usually use the same background styles to look consistent in all videos. Removing the green screen allows you to add your brand colors and logos, which helps in building a strong visual identity across all content.
- Professional Standards: Most videos today use background replacement to maintain quality and visual appeal. Thus, removing any background color that messes up the aesthetics of your video aligns your videos with current industry standards.
Part 2. How to Remove the Green Screen in Premiere Pro Quickly?
You can use a built-in effect called Ultra Key to remove the green screen in Premiere Pro. This effect is designed specifically to remove one solid color background from videos, such as green or blue.
Furthermore, the Ultra Key feature gives you control over edges and color matching, which helps make the subject blend naturally. You can learn how to use the Ultra Key effect for this purpose with these steps:
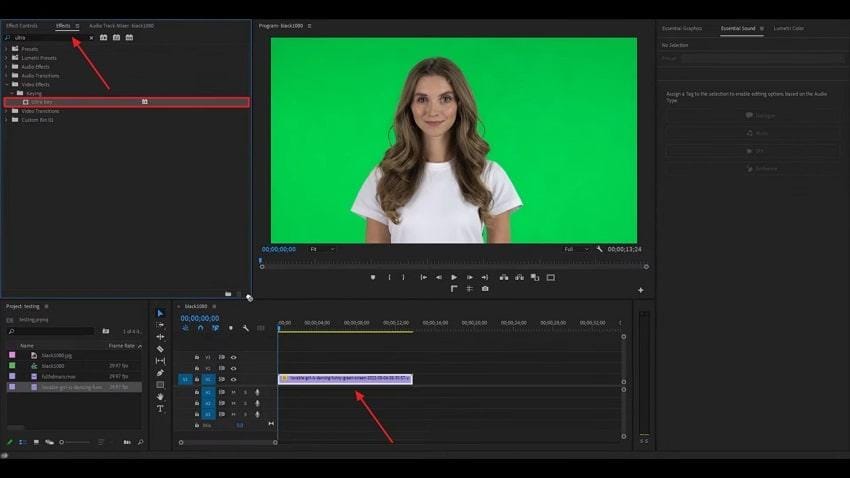
Step 1. Start the procedure by importing the targeted video into the tool and dragging it into the timeline. Afterward, head to the “Effects” menu and select the “Ultra key” to drag it onto your video.
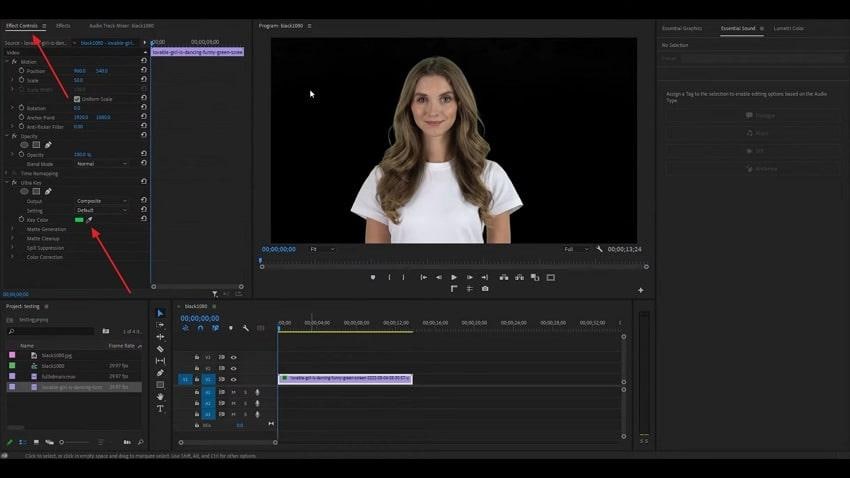
Step 2. Following that, enter the “Effects Control” tab and access the “Ultra Key” section. In this section, you need to utilize the “Color Dropper” icon beside the “Key Color" option. Moving forward, click anywhere on the video background with a green color to make it transparent.
Step 3. Afterward, drag the video with a transparent background to the “V2” timeline and import another media file to the “V1” timeline to use it as a new backdrop.

More related articles to screen problems:
5 Tested Ways to Fix Video Green Screen Error When Playing It
5 Methods to Fix the Video Black Screen Issue while Playing Video
Bonus Part. How to Fix a Corrupted Video You Exported from Premiere Pro
Now that you know the Premiere Pro green screen removal procedure, let’s discuss a useful tool to fix videos that get damaged during their export. Repairit Video Repair is an advanced solution that has the ability to repair your edited footage that gets damaged due to incorrect export settings. In addition to the edited Premiere Pro footage, it supports fixing videos in more than 25 formats, such as RSV and DAT.
The tool's Quick Repair feature enables users to solve minor errors, like lag or pixel distortions in the edited videos, within seconds. Conversely, the Advanced Repair mode takes advantage of AI technology to reconstruct any missing sections on the video file. Furthermore, the tool gets assistance from its huge sample media library to use its header and metadata to fix the damaged videos.
Key Features
- Gyroscope Recovery: With this tool, it is possible to stabilize your drone shots with a 98.15% success ratio.
- Professional Mode: It is an additional feature that supports fixing complex formats and codecs, such as DNxHR and XF-AVC.
- AI Enhancer: Users can remove blur and add colors to their media files to increase their quality by 400%.
Once you are familiar with the tool’s advanced repair capabilities, using it to solve corruption issues becomes easier. The following steps further help fix the damaged videos after using Premiere Pro to remove green screen:
Step 1. Once inside the tool, proceed by hitting the “Start” button and utilizing the “Add” button to import the damaged Premiere Pro videos.

Step 2. Let the tool repair the damaged sections of the Premiere Pro videos once they load by using the “Repair” button.

Step 3. Concluding the procedure, hit the “Save” button from the final popup and export the Premiere Pro videos to your device.

Fix a Corrupted Video You Exported from Premiere Pro
 Security Verified. Over 7,302,189 people have downloaded it.
Pro Tip. Make Green Screen Removal Premiere Pro Flawless
While doing the green screen removal in Premiere Pro, you need to be careful to ensure all colored sections are properly replaced. Therefore, we have shared a few tips below to ensure the process of removing the green background goes flawlessly:
- Ensure Proper Lighting: When your green screen is evenly lit, it avoids creating shadows and darker spots. Consequently, it would make the green screen removal process much easier.
- Avoid Green Outfits: It is very important not to wear any green clothes or accessories because these items will blend into the green screen. Once they are blended, they can get unintentionally removed along with the background.
- Use HD Footage: Videos with lower resolution can have blurry edges and poor contrast around the subject, which makes Premiere green screen removal difficult. That’s why using clean footage in high quality gives significantly better results when you’re performing chroma keying.
- Adjust Spill Suppression: The green spill from the background sometimes creates an unwanted glow around the edges of the subjects. Therefore, you should slightly increase the spill suppression settings to remove this green glow.
- Use Garbage Matte Mask: It is a useful tool as it helps cut out any unwanted areas around the subject before applying Ultra Key. This mask reduces the software’s workload and improves the overall speed of the process by focusing the effect only on the targeted area.
Conclusion
To conclude, the green screen effect in video allows users to replace it with their desired backdrops and gives them a professional look. Similarly, users can remove green screen Premiere Pro using its dedicated Ultra Key effect.
It lets you replace the plain backgrounds with creative visuals that enhance your video. In the end, Repairit is a recommended solution to repair your edited footage that gets damaged during their export.
Frequently Asked Questions
-
Q1. How do I fix shadows on my green screen footage?
You can try adjusting the lights in your filming area to make the screen evenly bright and fix the shadows in the videos. In addition, using the Matte Cleanup controls in the editing software to improve the results is also recommended. These steps are important because shadows can cause the Ultra Key effect to not work properly. -
Q2. Can I use a blue screen instead of green?
Blue screen backgrounds in videos work the same way as green screens and can be removed using the Ultra Key effect in editing tools. Thus, using this background is also recommended when the subject has to wear something green. While using this new background, make sure the main subjects in the video are not wearing anything blue. -
Q3. Can I remove a green screen without an Ultra Key?
While Ultra Key is a recommended solution due to its quick ability to remove the backdrops from the videos, multiple other features can also work. However, other methods, like using Color Key, might not give fine control or clean results because they lack the advanced settings offered by the dedicated tool.
