
Tried cutting your video to match the beat of a song, but found Final Cut Pro snapping your edits to the wrong spot? It can be frustrating when you want frame-perfect timing, but the software seems to fight against your precision.
So, here are 3 effective ways to sync audio and video in Final Cut Pro. You will also learn why sync issues happen in the first place.
Table of Contents
Part 1: What Does Syncing Audio and Video Mean in Final Cut Pro?
Syncing audio and video in Final Cut Pro means matching the sound with the picture so they play in perfect time. If sync is wrong, you might see lips moving before or after the words are heard, which looks unprofessional.
Why do sync problems in FCPX happen?
- Different recording devices. Cameras and external audio recorders often capture sound and video at slightly different speeds, which can cause them to drift apart over time.
- Background noise. Loud or messy environments can make it harder for Final Cut Pro to match audio clips accurately.
- File corruption or glitches. If a file has missing data, skips, or errors, sync can slip during playback.
- Frame rate or format mismatch. Using clips with different settings (like 24fps video and 30fps audio) may lead to sync problems.
- Manual editing mistakes. Cutting or trimming without checking the timeline carefully can push audio and video out of alignment.
Final Cut Pro has built-in tools that help with this. You can use waveform analysis, where the program matches sound patterns between the camera’s audio and an external recorder. Or you can rely on timecode syncing. It works best when both devices are set up with the same timecode. These tools save you from doing frame-by-frame adjustments and keep your workflow smooth.
Part 2: 3 Effective Ways to Sync Audio in Final Cut Pro
Final Cut Pro gives you multiple methods, each suited for different editing situations. Here are the three most effective options you can use to sync audio and video in Final Cut Pro.
| Method | Ease of Use | Time Needed | Best For | Editor Skill Level |
| Automatic Syncing | Very easy | Very fast | Short projects, clear audio, simple setups | Beginner-Intermediate |
| Manual Syncing | Moderate | Slow | Noisy recordings, precise adjustments | Intermediate-Advanced |
| Multicam Clips | More complex | Moderate (setup time) | Multi-camera shoots, events, interviews | Intermediate-Advanced |
1. Automatic Syncing with FCPX
Automatic syncing relies on timecode or waveform matching. If your camera and recorder both generate timecodes, FCPX can align them in seconds. If not, the software compares audio waveforms to find the best match. This method is fast and saves effort.
Pros
✅It is very time-efficient.
✅Requires little to no manual adjustment.
✅Great for straightforward shoots with clear audio.
✅Works well for syncing multiple clips quickly.
✅Reduces the chance of human error.
Cons
❌Depends on having clean, distinct audio.
❌The timecode compatibility is needed for best results.
❌Can misalign if the sound is muffled or distorted.
Step 1. Import both your video and external audio into Final Cut Pro.
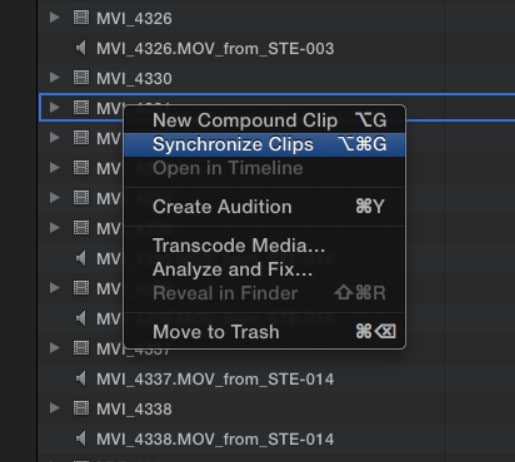
Step 2. Select the clips you want to sync in the browser. Right-click and choose Synchronize Clips.
Step 3. In the dialog box, choose either Timecode (if both devices recorded it) or Audio (for waveform matching).
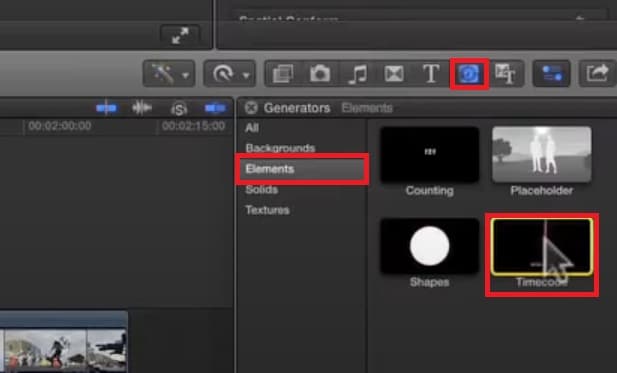
Timecode: Click Generators and choose Elements. Then, drag the Timecode to your timeline.
2. Manual Syncing
Manual syncing means aligning audio and video by hand using waveforms. You match the peaks in the audio file with the corresponding moments in the video. While this takes more time, it offers the highest level of control.
Pros
✅Provides complete precision over every detail.
✅Works even when automatic syncing fails.
✅Has useful for fixing minor mismatches.
✅Ideal when audio has background noise.
✅Allows you to make creative adjustments.
Cons
❌It is time-consuming compared to automatic syncing.
❌Requires careful attention to detail.
❌Not practical for large projects with many clips.
Step 1. Place both the video clip (with scratch audio) and the external audio file in the timeline.
Step 2. Zoom into the timeline to clearly see the audio waveforms.
Step 3. Drag the external audio until its waveform peaks match the scratch audio peaks in the video clip.
Step 4. Play back to check alignment, especially with dialogue or claps.
Step 5. Once synced, disable or mute the scratch audio track, leaving only the high-quality audio.

3. Using Multicam Clips
For multi-camera shoots, multicam syncing is the most powerful option. You can combine multiple video angles with one high-quality audio track, switching between views while keeping the audio locked in place.
Pros
✅It is perfect for concerts, interviews, or events.
✅Keeps all cameras and audio perfectly in sync.
✅Lets you switch angles easily during editing.
✅Saves huge amounts of time compared to manual syncing.
✅Produces a professional, broadcast-ready result.
Cons
❌This is more complex to set up.
❌Requires powerful hardware for smooth playback.
❌It can be overwhelming for beginners.
Step 1. Import all camera clips and audio into Final Cut Pro.
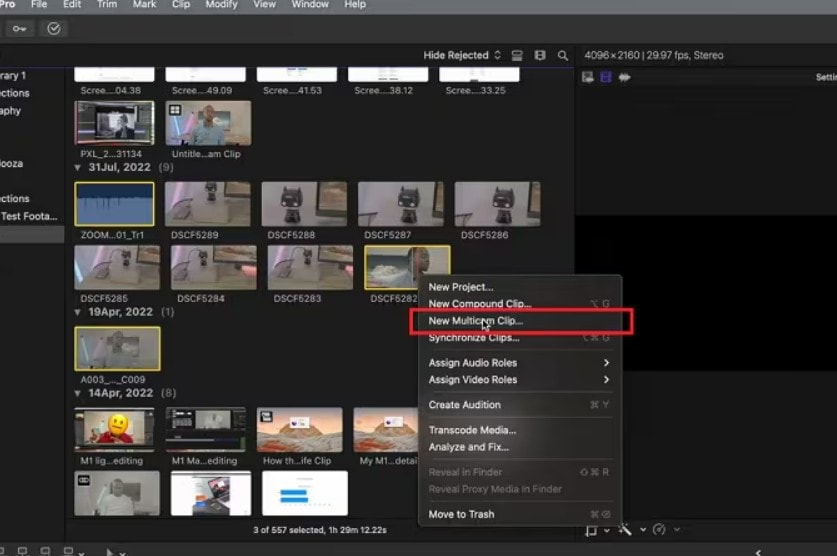
Step 2. Select the clips you want to combine, then right-click and choose New Multicam Clip.
Part 3: Common Sync Issues in Final Cut Pro and How to Fix Them
Even with great tools, sync problems still show up in editing. Audio drift is one of the most frustrating, especially in long recordings. Sometimes the sound starts to align but slowly goes off track. Other issues include waveforms not matching correctly, missing files, or corrupted media that won’t play smoothly.
Quick fixes inside FCPX include re-syncing clips, trimming problem sections, or converting files to a consistent format. But what if the problem isn’t the editor’s fault, and the file itself is damaged? That’s when you need to repair the video or audio before even bringing it into Final Cut Pro.
Repairit Video Repair is a powerful tool designed to fix broken or corrupted media files that cause sync problems. For example, if the video plays but the audio track is missing or distorted, Repairit can restore the file so both elements align correctly. It supports multiple formats, like MP4, MOV, 3GP and more. Repairit also repairs damaged video headers, and restores audio-video structure.
Key features of Repairit Video Repair include:
- Repairs both minor and severely damaged files.
- Restores missing or corrupted audio tracks.
- Supports popular formats like MP4, MOV, M2TS, MKV, and more.
- Offers advanced repair options for badly damaged media.
- Ensures smooth playback before importing into FCPX.
Step 1. Download and install the program from Repairit's official website. Start Video Repair and click +Add to import the corrupted or damaged file.

Step 2. Click Repair to start the quick repair process.

Step 3. Preview the repaired file to confirm the audio and video are back in sync. Save the repaired video to your computer, then import it into Final Cut Pro for editing.

Part 4: Pro Tips for Keeping Audio and Video in Sync in Final Cut Pro
It’s smart to build habits that prevent Final Cut Pro sync problems altogether. These tips can save you time and frustration in every project:
- Use a clap or slate when recording. A clap creates a sharp audio spike and a visible action on screen, giving you a reliable sync point. Even if you’re using automatic syncing, having a clear marker helps double-check accuracy later.
- Match frame rates and recording formats. If your camera records at 24fps and your audio recorder is set differently, sync drift is almost guaranteed. Setting all devices to the same frame rate and format ensures Final Cut Pro keeps them aligned throughout the timeline.
- Back up your synced clips. It’s not just about protecting your work; backups also let you experiment with edits more freely. If something gets misaligned, you can quickly return to the original synced version instead of starting over.
- Check files right after importing. Play through your clips to confirm both sound and visuals are intact. This helps you spot minor glitches, like a muted channel or skipped frames, before you invest hours editing a file that may not hold up.
- Repair corrupted media before editing. Damaged files are one of the biggest hidden causes of sync problems. Using a tool like Repairit Video Repair ensures your media is fully functional before you bring it into Final Cut Pro. Clean, stable files make syncing faster and more reliable.
Conclusion
Sync audio and video in Final Cut Pro doesn’t have to be stressful. With automatic, manual, and multicam options, you can handle everything from simple clips to complex productions. But when sync issues stem from corrupted files, Repairit Video Repair is the best way to fix them before editing. By combining FCPX’s powerful tools with good habits and the right repair software, you can keep every project looking and sounding perfectly polished.
FAQs
-
Why is my audio out of sync in Final Cut Pro?
Audio goes out of sync in Final Cut Pro for several reasons. If your video and audio were recorded separately, small timing differences can cause drift over long clips. Using different frame rates or formats between devices can also create sync issues. In some cases, the file itself may be corrupted, leading to missing or delayed sound. Checking your recording settings before editing and repairing any damaged files can help prevent these problems. -
Does Final Cut Pro automatically sync audio?
Yes, Final Cut Pro can automatically sync audio by matching waveforms or using timecode. If your camera and recorder both capture timecode, syncing is very fast. If not, FCPX analyzes the audio waveforms to align them. Automatic syncing is quick and accurate when the audio is clear, but it may not work well if the recording has too much background noise. In those cases, manual syncing or multicam tools can give better results. -
How do I sync external audio with video in FCPX?
You can sync external audio with video in FCPX in a few ways. The easiest is to select both clips in the browser and use the Synchronize Clips feature. It creates a new synced file. For more control, you can place the clips in the timeline and align the waveforms by hand. If you’re working with multiple cameras, creating a multicam clip is the best option because it keeps all angles and the external audio perfectly aligned.
