
In video editing, precise audio and video alignment is important, especially when dialogues are captured from an external audio recorder. Whenever the audio is recorded externally, it often becomes a challenge to sync it with the video footage that was captured independently. Even the most well-shot footage can lose its impact, as misaligned audio can distract viewers and disrupt the overall experience.
This important emergency often pushes filmmakers and content creators to seek professional help to ensure flawless synchronization. For such professional editing, DaVinci Resolve's sync audio and video capability is an ultimate solution that many people consider. If you're interested in learning more about this program and exploring ways to sync audio in video, continue reading the following article. Each method here is guided by detailed tutorials to save you hours of manual syncing.
Table of Contents
Part 1. DaVinci Resolve Audio & Video Sync Feature: An Overview
DaVinci Resolve's audio sync function is a prominent feature that allows users to automatically align external audio files with video footage. It analyzes and matches the audio waveforms when both camera audio and external audio are recorded clearly and start at the same time.
Moreover, the software supports sync options based on timecode for multi-camera shots and replaces the camera's onboard audio with external audio. It even offers manual synchronization options for scenarios where automatic sync isn’t precise and visual markers need to be aligned.
For multi-camera shots, the program can examine multiple audio and video files at the same time, synchronizing footage from various angles. Plus, editors can access all sync functions from both the Media and Edit tabs, making it easier to incorporate clips into their timeline.
Part 2. How to Sync Audio in DaVinci Resolve [Step-by-Step Methods]
Those who desire precision without manual work can take advantage of DaVinci Resolve's sync audio capabilities and get sorted. For your assistance, we’ve covered 4 possibilities in the following section with step-by-step tutorials to achieve frame-by-frame alignment results:
Way 1. Auto-Sync Feature (Easiest Method)
The Auto-Sync function in DaVinci Resolve is designed to align and synchronize external audio recordings with video footage automatically. It's massively appreciated for its ability to use either audio waveforms or embedded timecode to match the audio and video files. For a better understanding of this easiest method, adhere to the detailed description provided on each approach:
1. Based on Waveform
To proceed with this method, both your camera and external recorder must have captured audio, making it useful for dual-system shoots. The program analyzes the peaks and troughs of each clip’s soundtrack, matches similarities, and replaces original audio with new synced audio. This eradicates the need for manual adjustment and guarantees frame-accurate synchronization, ideal for lip-syncing dialogue scenes.
2. Based on Waveform and Append Tracks
It's somehow similar to Waveform analysis, but appends the matched external audio as additional audio tracks in your video clip. Anyhow, the editors can later choose which tracks to use because it preserves both original and new audio sources. You can view all audio sources available after the sync process, and can disable or enable particular tracks during editing.
3. Based on Timecode
This option is useful for cameras and recorders that generate matching time codes because it uses digital metadata to align audio and video. Apart from this, both files must have timecode information embedded for this function to work precisely. This DaVinci Resolve auto sync audio method eliminates syncing errors and speeds up workflows for large-scale productions.
4. Based on Timecode and Append Tracks
Similar to the Waveform append option, this variant appends the synced external audio to your video clips, retaining your reference audio. It's important in situations where productions want both high-quality external and in-camera audio available for mixing and safety. It guarantees that your original and external audio channels remain accessible, allowing you to blend and select tracks as needed.
To improve your audio-visual alignment with auto sync audio in DaVinci Resolve, follow the provided manual:
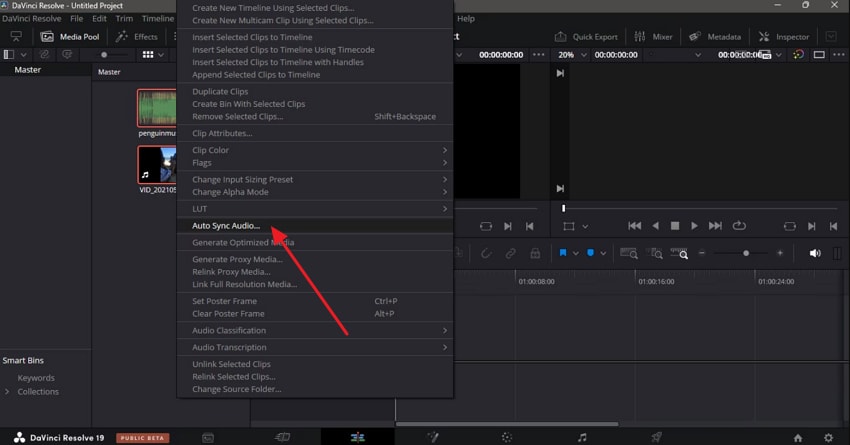
Step 1. First, install DaVinci Resolve, then insert all video and audio files into the program. Here, select both the video and audio files in the Edit tab and right-click to reveal further options. From the menu, choose the “Auto Sync Audio” option and move ahead.
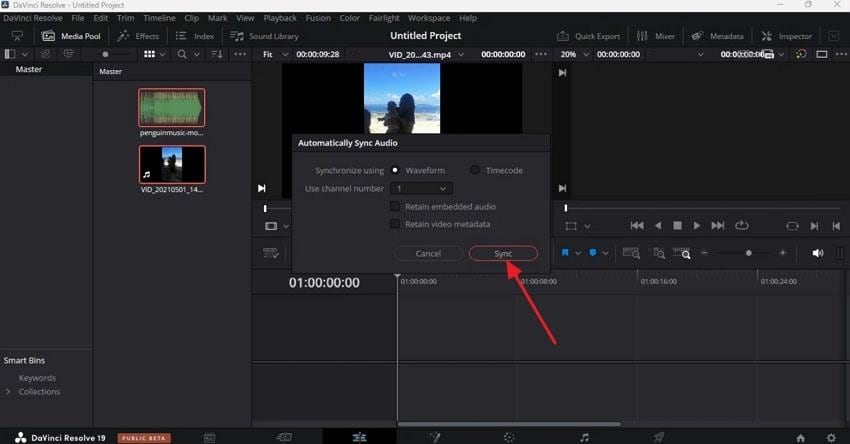
Step 2. Choose an option for “Synchronizing Using” and press the “Sync” button to implement the action. Now, your audio and video will be synced and can be dragged to your timeline for further editing.
Way 2. Timeline Manual Sync (Sync Multiple Tracks)
In the DaVinci sync audio function, Timeline Manual Sync involves manually aligning audio and video clips within the timeline. It's a valuable approach when the automatic sync feature cannot be used, such as when audio quality differs between the camera and the external source.
Through manual adjustment of clips in the timeline, editors can synchronize multiple tracks even for complicated projects. Adhere to this DaVinci tutorial and learn how to proceed:
Step 1. To do so, import both video and audio into the DaVinci Resolve Media tab, then double-click on your video clip. In the Preview window, discover the spot where you can identify a sync point and begin syncing audio.

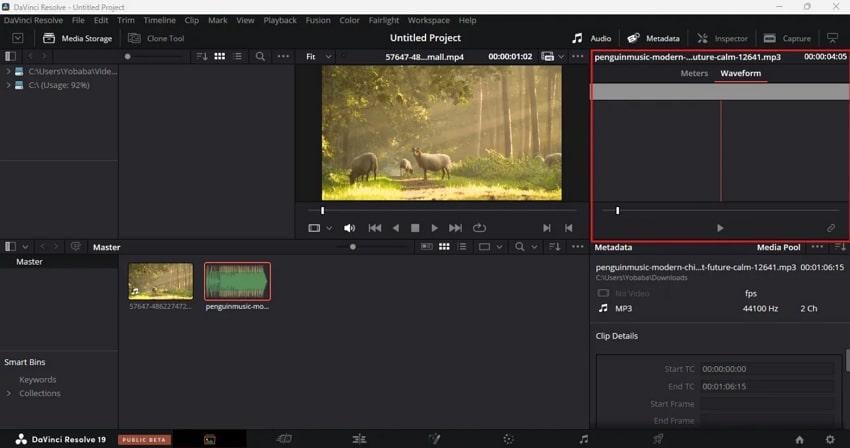
Step 2. Next, double-press the inserted audio clip and then navigate to the audio window on the right side. Now, choose the “Waveform” option and select a sync point in your audio file using the slider.
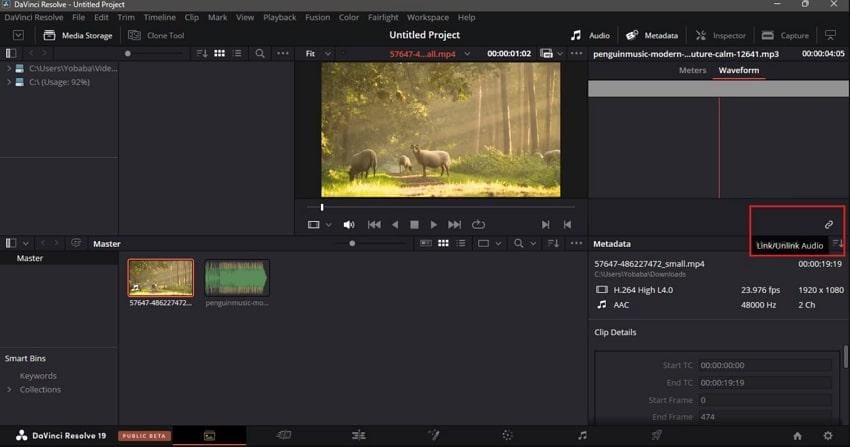
Step 3. Once done, proceed back to your video and press the “Link (Link/Unlink Audio)” icon in the audio window at right. Doing so, you’ll be able to sync your video clip with the audio clip at a certain sync point. For multiple track syncing, add all the video or audio tracks and right-click to “Auto Align Clips.”
Way 3. Auto Align Tracks (Timeline Waveform Method)
Another sync audio and video DaVinci Resolve approach is Auto Align Tracks, which allows editors to sync multiple audio and video clips. The program listens to the reference sounds in each track and aligns them accordingly in the timeline. This approach is handy for multi-camera shoots or projects with separately recorded, clear audio. Dive into the following manual and understand the process of auto-aligning tracks:
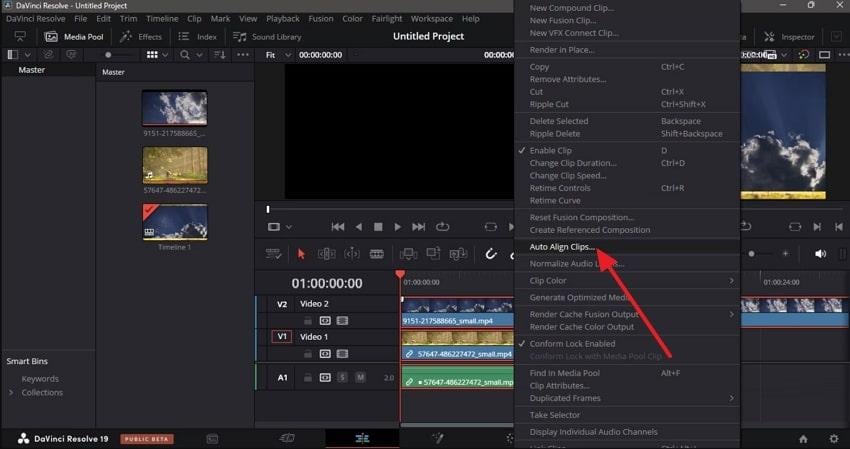
Step 1. For this, make sure in the Edit tab of DaVinci Resolve, and then drag both your added clips into the timeline. Once the clips stack one over the other, select all of them and right-click to choose the “Auto Align Clips” option.
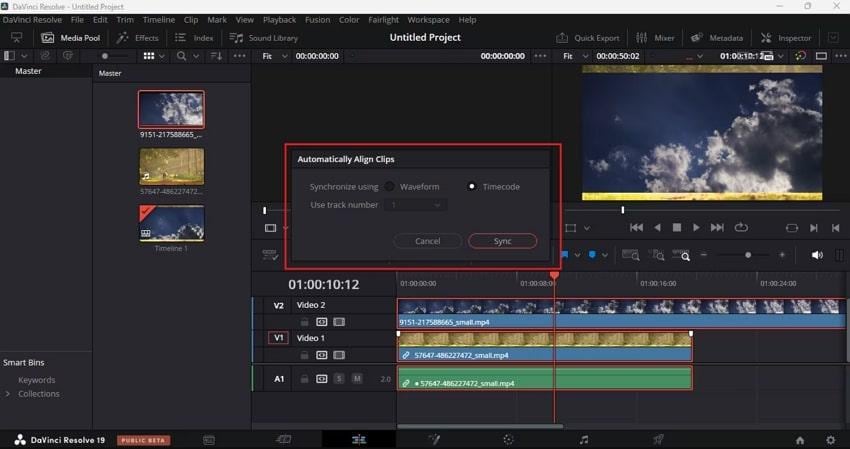
Step 2. Afterward, select the “Waveform” option for the “Synchronize Using” section and click the “Sync” button to complete the task.
Way 4. Sync Using Sound Cues (Clapper/Visual Markers)
The sync using sound cues such as a clapper (slate) or clear visual/audio markers is a reliable manual method for DaVinci sync audio. This process involves lining up a distinct event across your video and audio tracks to guarantee frame-accurate sync. It's a helpful technique when the DaVinci Resolve automatic sync or timecode options aren’t available. Follow the tutorial and get sorted with audio syncing:
Step 1. To initiate, incorporate your video and audio files in the DaVinci timeline, then double-press the video clip to open in “Viewer.” Navigate the playhead to the “Clap Slate” or sync point and press “M” from the keyboard to place a “Marker” on the playhead position.

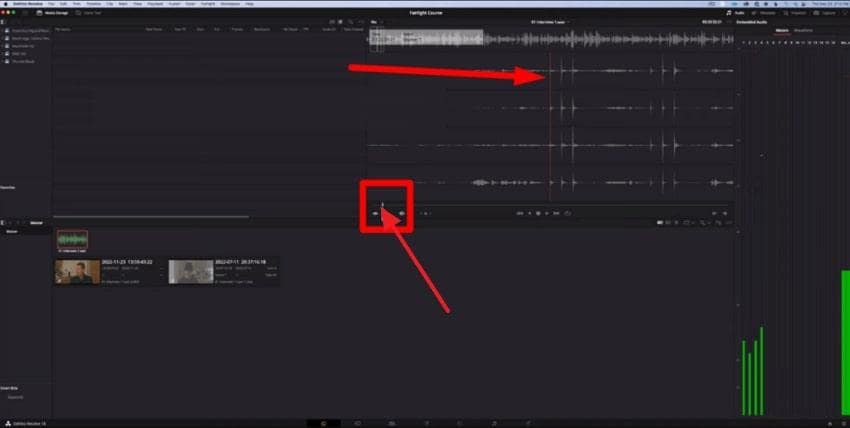
Step 2. Here, double-click on the audio to reveal the waveform in the viewer and move the playhead to sudden peaks. To create a sync point, press “M” again and leave a “Marker” on the position.
Step 3. Once done adjusting playhead positions, select all the clips and right-click to choose the "Create New Multicam Clip Using Selected Clips” option.

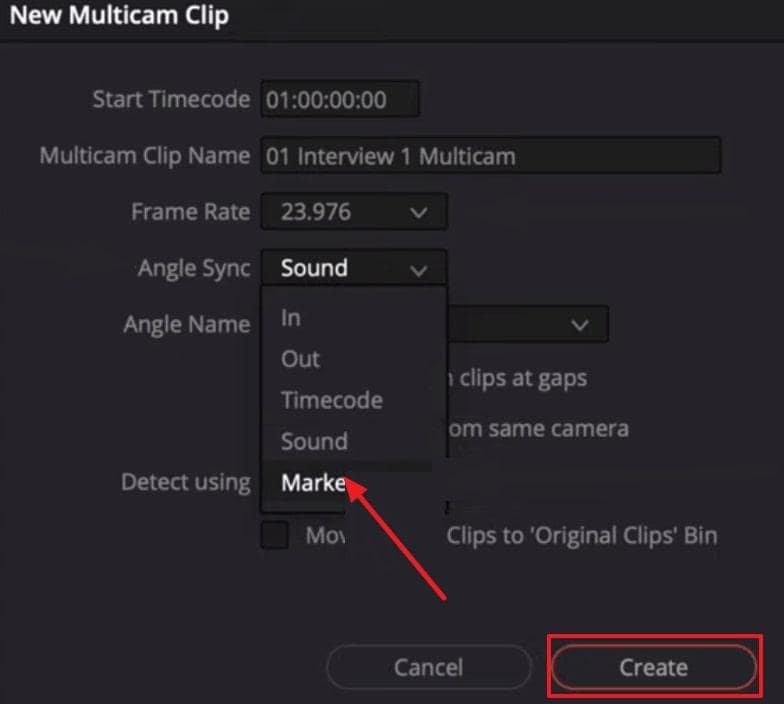
Step 4. From the New Multicam Clip window, expand the menu for Angle Sync and select the “Marker” option. After this, name the multicam clip and press the “Create” button to finish the syncing task.
Part 3. What If DaVinci Resolve’s Sync Audio and Video Footage Gets Corrupted?
Sometimes the real issue isn’t just about using DaVinci Resolve’s sync audio and video tools—it’s when the synced footage itself becomes corrupted. Even after syncing, you might encounter problems like audio drifting out of place, video shutters, or playback errors that no built-in DaVinci Resolve function can fix. In such cases, a professional video repair solution like Repairit Video Repair is essential.
Repairit is designed to handle all types of video corruption, whether caused by recording interruptions, power failures, or file transfer errors. It can restore videos that are synced in DaVinci Resolve but end up with no audio track on playback, or those that show error codes when you try to open them. It also resolves lagging, sluggish response, and slow-motion playback issues that compromise editing workflows.
For editors managing multiple corrupted DaVinci Resolve project files, Repairit allows batch video repair so you can restore several damaged clips at once. After the process, you can preview your repaired videos to confirm sync accuracy before exporting them back into your Resolve timeline.
Key Features
- Fix Black Screen Playback: Repair corrupted videos that display a black screen while audio continues in the background.
- Professional Repair Mode: Handle RAW formats, HDR/LOG footage, and advanced codec videos while preserving encoding integrity.
- Resolve Flickering Playback: Repairit eliminates flickering frames caused by improper rendering or corruption, ensuring smoother sync editing in DaVinci Resolve.
Follow the provided expert manual and learn how to repair a corrupted DaVinci Resolve audio sync video in no time:
Step 1. Commence the program, access the “Video Repair” tab, and press the “Start” button to add all the corrupted DaVinci videos.

Step 2. Once done, proceed to the “Repair” button in the bottom right corner and begin repairing damaged DaVinci videos.

Step 3. As soon as the process completes, press the “Preview” to view your DaVinci videos and then save them on your device for later reference.

Part 4. Best Practices for Smooth Audio Sync in DaVinci Resolve
When dealing with multiple audio tracks, the listed practices can help you master sync audio in DaVinci Resolve for professional-quality projects:
- Utilize High-Quality Audio: To achieve the best synchronization results, use more precise and more detailed audio recordings. When possible, use external microphones and record audio in a controlled environment to minimize background noise.
- Make Use of the Auto Sync Feature: DaVinci Resolve offers an automatic audio sync function that saves a lot of time compared to manual aligning. With matched timecode recordings, you can use Timecode Sync, which matches the timestamps of both video and external audio.
- Check Out Sync Points: After using Auto Sync, it is even more important to double-check the alignment, especially at critical sync points. Plus, zoom in and look for key moments such as claps or other sound cues that align with the video.
- Use Markers to Keep Track: To make syncing more manageable, use Markers throughout your timeline on specific sync points. These markers act as visual cues, enabling you to navigate to important areas in your timeline, guaranteeing the audio remains synced.
- Keep Audio and Video Linked: Once the video and audio files are synced, it's better to link them together. Doing so means that any movement or adjustments made to the video will affect the audio.
Conclusion
In conclusion, today's professional editing demands command of DaVinci Resolve sync audio and video capabilities for a seamless editing experience. Ranging from the Auto-Sync feature to manual adjustments, DaVinci equips you with everything needed to handle complex audio-visual tasks. Even with such professionalism, technical issues like video corruption can happen, and it's completely natural. Despite compromising your project’s integrity, download Repairit and get sorted within seconds.
Frequently Asked Questions
-
Q1. What should I do if DaVinci Resolve can’t sync my audio and video?
When DaVinci Resolve is not syncing your audio and video well, ensure both your video and audio have clear reference points. Besides this, adjust the sync manually with the tools on the timeline, and for video corruption, consider repairing it. -
Q2. How do I fix audio drift in DaVinci Resolve?
Audio drift happens when the audio falls out of synchronization with the video as time passes by. To correct this, use the zoom option on your timeline and change the audio in small steps. The inspector can also be used to adjust the audio speed if it is going too fast out of sync. -
Q3. What if my synced audio is still out of sync after auto-sync in DaVinci Resolve?
If auto-sync fails for DaVinci sync audio, try dragging the audio or video clips on the timeline to adjust. Not only this, but try resyncing using different sync methods such as Waveform and Timecode. In case the problem continues, then there is a possibility of file corruption, where Repairit can be used.
