

A Reddit user once shared,
This article explores how to use noise reduction in DaVinci Resolve, both for video and audio. If your mic has hiss, background hum, or visual grain, we'll guide you to the video and audio noise reduction in DaVinci Resolve. And also, if everything turns into chaos, we will guide you on how to use Repairit to resolve noise reduction.
In this article
Part 1. Understanding Noise Reduction in DaVinci Resolve
Before learning how to reduce noise, it helps to know what kind of noise you're dealing with. It is also important to know which version of DaVinci Resolve you need to access certain features. Noise can appear in both your visuals and your audio, and DaVinci offers different tools depending on the type.
1.1 Video Noise vs. Audio Noise — What’s the Difference?
Noise isn’t limited to just sound. It can show up in both video and audio, and they need to be handled differently.
- Video Noise looks like grain, flickering pixels, or “snow,” especially in low-light or high ISO footage. This usually happens when the camera struggles to capture enough light.
- Audio Noise refers to unwanted sounds in your recording. This can include electric hums, background chatter, wind blowing into the mic, or mechanical sounds like air conditioning. These types of noises often make dialogue or important sounds hard to hear.
1.2 Which Version Do You Need?
Not all versions of DaVinci Resolve give you the same tools for noise reduction, especially for video.
- DaVinci Resolve Studio (Paid Version). If you want full access to advanced video noise reduction, you’ll need the Studio version. It includes Temporal Noise Reduction, which works across frames to smooth motion noise, and Spatial Noise Reduction, which cleans up individual frames.
- Free Version of Resolve. Unfortunately, the free version does not include these advanced noise reduction tools for video. However, you can still try basic color adjustments or install third-party plugins to help reduce visible noise manually.
Part 2. How to Reduce Video Noise in DaVinci Resolve?
Video noise, like grain or flickering, often shows up in low-light or high ISO footage. Luckily, DaVinci Resolve Studio has built-in tools to reduce this noise and improve the overall video quality. In this part, we’ll guide you through the steps to use noise reduction in DaVinci Resolve.
2.1 How to Reduce Video Noise DaVinci Resolve?
The Color page of DaVinci Resolve is where much of the video noise reduction is done. However, you can also find helpful tools and effects on the Edit page. By trying different options, you can adjust your video until it looks clean and smooth.
Navigate to the Edit or Color pages. Open FX panel to cut down on video noise. Locate and drag the Noise Reduction effect onto your node or video clip. You can also use the Motion Effects panel on the Color page to apply noise reduction.
Unlike other simple effects, there’s no single “correct” way to remove noise in DaVinci Resolve. You’ll need to experiment with your video and find the right mix of settings. This may feel tricky at first, but it gives you more control and lets you create the best result.
When applying video noise reduction, you’ll see two main options:
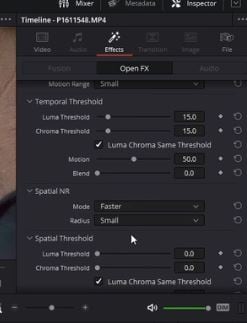
- Temporal Noise Reduction: This method looks at several video frames and compares them to spot and remove noise. It works best in parts of the video where nothing moves. The Temporal Threshold setting lets you control how strong the noise reduction will be.
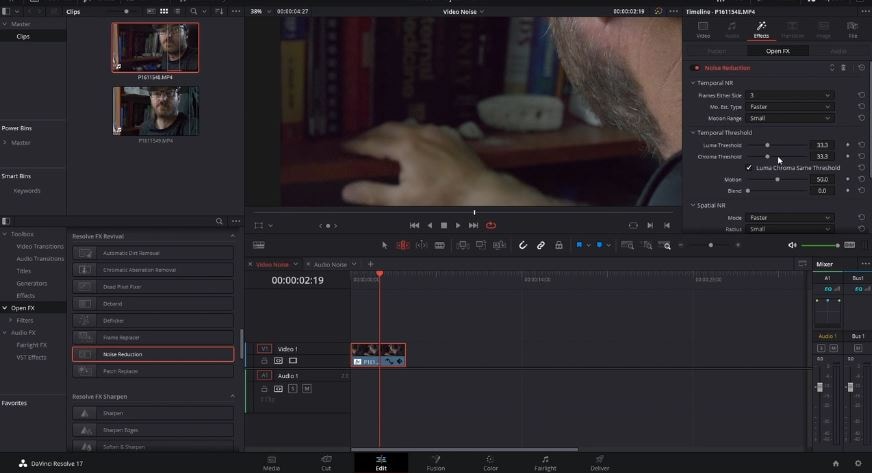
- Spatial Noise Reduction: This option focuses on the pixels within each frame. It checks the surrounding pixels to figure out which ones are noisy and smooths them out. You can adjust the Mode, Radius, and Spatial Threshold settings to fine-tune the effect.
Important Tip
- Noise reduction can slow down your computer because it uses a lot of processing power. So, it’s better to apply it after you finish most of your editing. This way, you won’t face slow performance while editing other parts of your project.
- For very noisy clips, using Render in Place is a good idea. It helps play back the clip smoothly, even with noise reduction applied.
2.2 How to Remove Background Audio Noise?
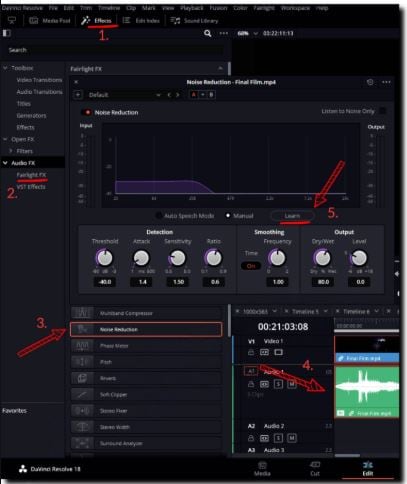
Step 1. Go to the Edit page and click the Effects tab (used to be called “Effects Library”).
Step 2. On the left side, open Audio FX > Fairlight FX.
Step 3. Find the Noise Reduction effect.
Step 4. To clean the audio clip in the timeline, drag and drop the Noise Reduction effect onto it.
Step 5. In the settings panel, select Manual, then click the Learn button (it should light up).
Step 6. Move the playhead to the part of the audio that has only the noise, like wind or hum.
Step 7. Play the noisy part so that Resolve can listen and learn the noise pattern. Then stop the playback.
Step 8. Click the Learn button again to turn it off.
Step 9. Play the clip again. The unwanted noise (like wind) should now be reduced or gone.

You can't miss: [Alternative Included] How to Denoise Videos in Premiere Pro?
Part 3. Alternative Tool to Reduce Noise (When Resolve Can’t Help)
- There are times when DaVinci Resolve might not be the best option for reducing noise in your videos. For example:
- You’re using the free version of DaVinci Resolve, which doesn’t support advanced noise reduction features.
- Your computer struggles to process heavy noise reduction effects, causing slow playback and crashes.
- You’re not familiar with complex editing tools and need a simple solution.
You need to quickly fix multiple noisy videos without spending too much time tweaking settings.
In these situations, using a dedicated repair tool can save you a lot of effort. This is where Repairit Video Repair tool comes in.
Repairit is a powerful yet user-friendly tool designed to fix damaged, blurry, or noisy videos. Unlike advanced editing software that requires manual adjustments, Repairit automates the noise reduction process, making it perfect for people who need fast and easy results.
Key features of Repairit:
- AI-powered noise reduction to clean up background noise and improve video clarity.
- Supports batch processing, allowing you to fix multiple videos at once.
- Can handle blurry, pixelated, or distorted videos, not just audio noise.
- Simple interface that anyone can use, even without editing experience.
- Compatible with common video formats and resolutions.
Who is Repairit suitable for?
- Ordinary users who want a quick way to enhance video quality without technical skills.
- Short video bloggers who regularly upload content to platforms like TikTok, YouTube Shorts, or Instagram Reels.
- E-commerce practitioners need their product demonstration videos to look clean and professional.
- Social media editors managing multiple videos for clients or brands need a faster workflow.
Step 1. Get Wondershare Repairit. After that, press the +Add button within the Video Repair section to add damaged DaVinci Resolve video files in the repair list.

Step 2. Click the Repair button to begin the video repair procedure after uploading the DaVinci Resolve video.


Step 3. If you are happy with how the repaired DaVinci Resolve video files look, click store and select a location to store them. However, avoid returning them to the initial site of their injury.

Try Alternative Tool to Reduce Noise in Video
 Security Verified. Over 7,302,189 people have downloaded it.
Conclusion
Dealing with noisy videos or audio can be frustrating, but DaVinci Resolve’s noise reduction tools give you a solid way to clean up both visuals and sound. But if you’re short on time, using the free version, or just want a faster, simpler solution, a professional tool is a big help. Either way, knowing how to reduce noise in DaVinci Resolve is a must if you want clean and professional-looking videos.
FAQ
Does the free version of DaVinci Resolve have noise reduction?
The free version of DaVinci Resolve does not include advanced video noise reduction tools like Temporal and Spatial Noise Reduction. However, you can still use basic audio noise reduction through Fairlight FX.Why is noise reduction slowing down my DaVinci Resolve project?
Noise reduction in DaVinci Resolve is resource-intensive and requires a lot of processing power. Applying heavy noise reduction in real-time can slow down playback and cause lag. To avoid this, it's recommended to apply noise reduction after major edits or use the "Render in Place" option for smoother playback.Is there a difference between Noise Reduction and a Noise Gate in DaVinci Resolve?
Yes, there is a difference. A Noise Gate only silences noise when the main audio signal (like speech) is absent, while Noise Reduction works to reduce constant background noise even during speech. DaVinci Resolve's Fairlight FX offers Noise Reduction that targets persistent noise patterns.
