
One Redditor asked, "How to stabilize video in After Effects? What am I doing wrong? I stabilize my shot, then pre-compose it to use speed ramping. But when I apply the speed ramps, my shot loses stabilization and looks shaky. How can I properly stabilize the shot and then use speed ramping?" That’s a common concern among creators working with raw or fast-paced clips.
And to tell you guys, it is easier to stabilize video in After Effects if you know the proper way to do it. To make it happen, this guide is created to walk you through the step-by-step process to stabilize video in After Effects. We also have tips on how to fix clips that won’t stabilize due to corruption or other issues.
Table of contents
Part 1. Why Stabilizing Footage in After Effects Matters?
Shaky footage can distract those who watch it, even if your content is great. It gives off an unpolished feel and can make your video look rushed or unprofessional. This is noticeable when you're working on travel clips, interviews, vlogs, or drone shots, basically, anything captured without a tripod or gimbal.
Stabilize video in After Effects helps clean up that unwanted movement. It makes your footage smoother, more focused, and easier to watch. Plus, stable video is easier to edit when you add effects, transitions, or text overlays.
Part 2. How to Stabilize Video in After Effects Using Warp Stabilizer (Step-by-Step)
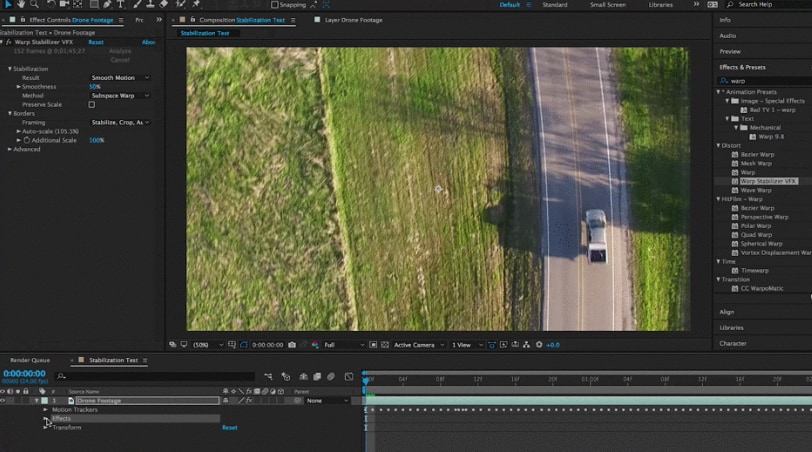
One tool in After Effects that helps with wobbly footage is Warp Stabilizer. It automatically analyzes your clip and smooths out the motion to make everything look steadier. Here's a step-by-step guide to using it.
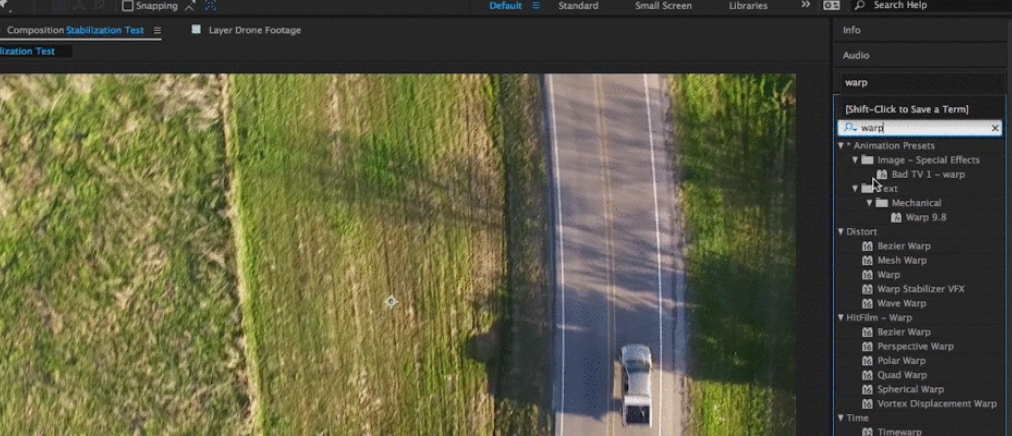
Step 1: Look for "Warp" in the "Effects & Presets" box.
The Warp Stabilizer is found under the "Distort" section in the Effects & Presets panel. What is the fastest way to find it? Type "warp" into the search field, and it will appear immediately away.
Step 2: Include Your Video with the Warp Stabilizer.
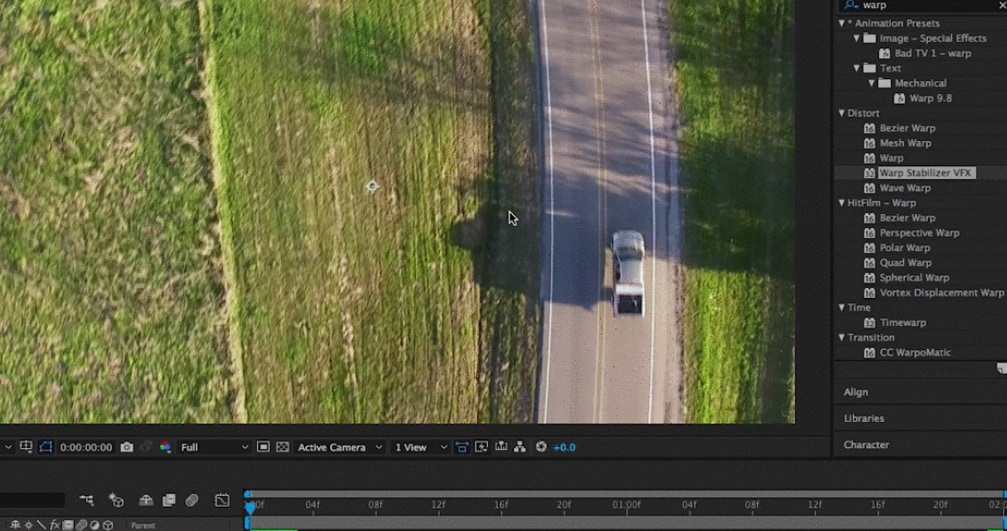
Once you’ve found it, apply the effect to your video layer. You can:
- In the composition box, drag and drop it straight onto your video.
- Drop it onto the layer in the timeline.
- Or, just double-click the effect if the video layer is already selected.
Step 3: Let After Effects Do Its Thing
- After you apply the effect, Warp Stabilizer will automatically start analyzing your video.
- A blue bar will appear in the composition panel—this means it’s analyzing.
- An orange bar will follow, showing it’s stabilizing the footage.
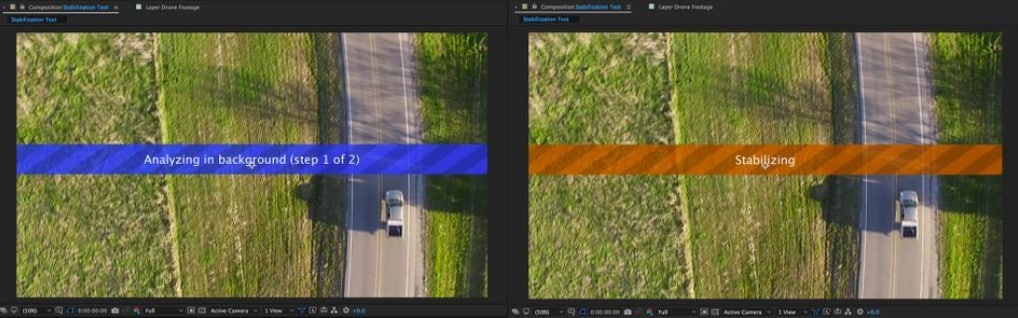
Just wait a bit, this process depends on how powerful your computer is.
Step 4: Preview and Adjust If Needed
Once it’s done, press the spacebar to preview your video. If you think it still needs a few tweaks, select the video layer and go to the Effect Controls panel or open the drop-down options in the timeline to adjust the Warp Stabilizer settings.
More related articles:
All You Need to Know About GoPro HyperSmooth Stabilization
How to Stabilize DaVinci Resolve Video: A Complete Guide
How to Stabilize GoPro Footage Like A Pro?
Part 3. How to Stabilize Footage in After Effects Without Warp Stabilizer?
If your clip doesn't function with Warp Stabilizer or you simply want more control, you can still fix shaky footage in After Effects. You have the option to Stabilize Motion on the Tracker panel. Despite being an older approach, it still works well when used properly.
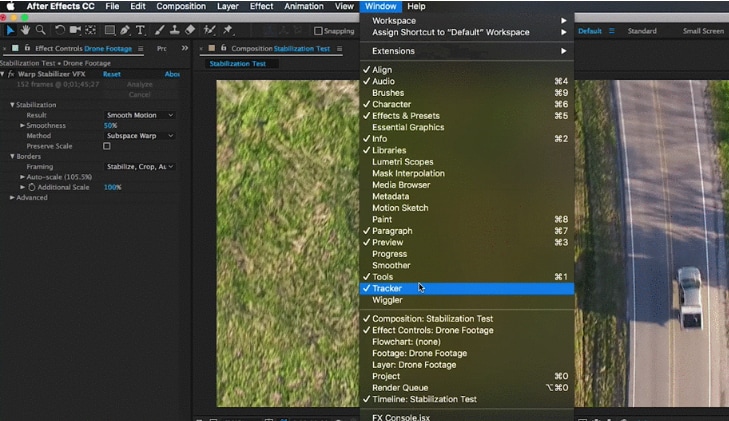
Step 1: Open the Tracker Panel
In most cases, the Tracker panel is already open by default. But if you don’t see it, go to the Window menu at the top and look for Tracker. Make sure there’s a checkmark next to it so it appears on your screen.
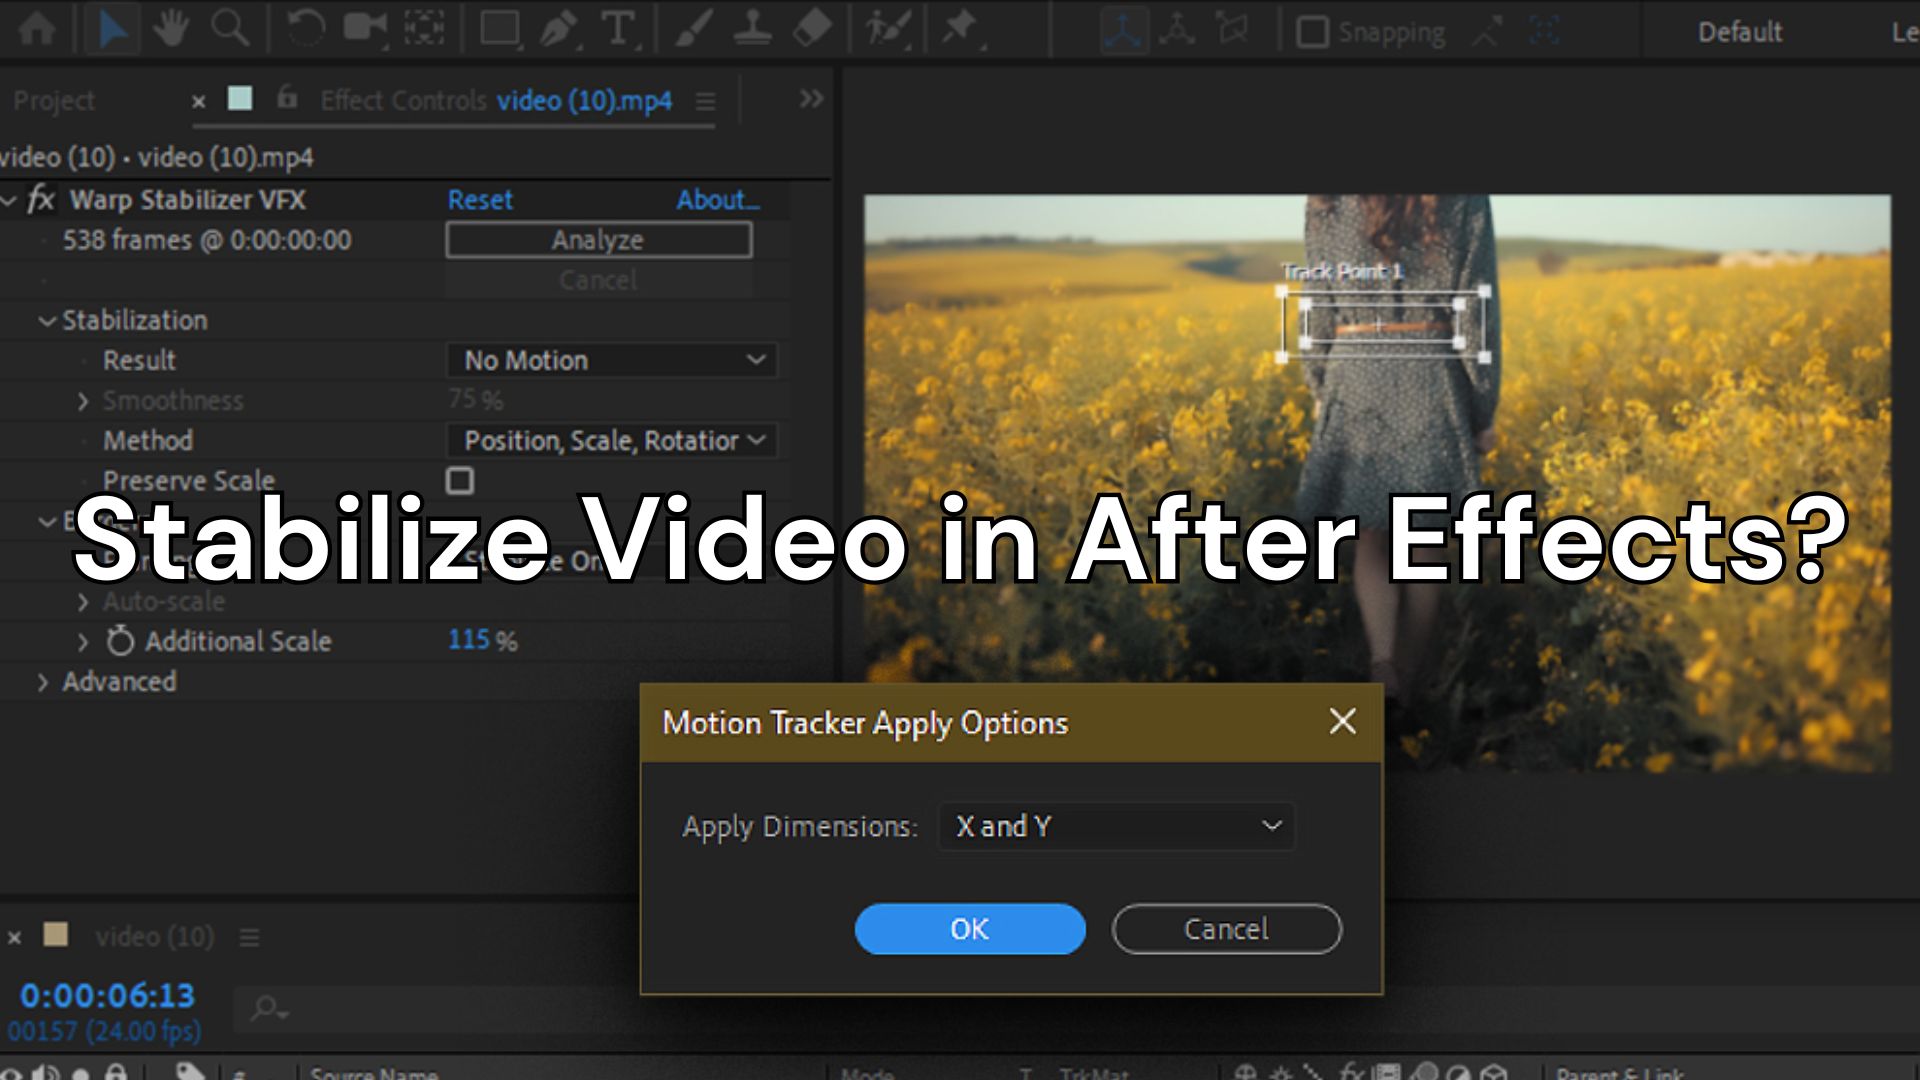
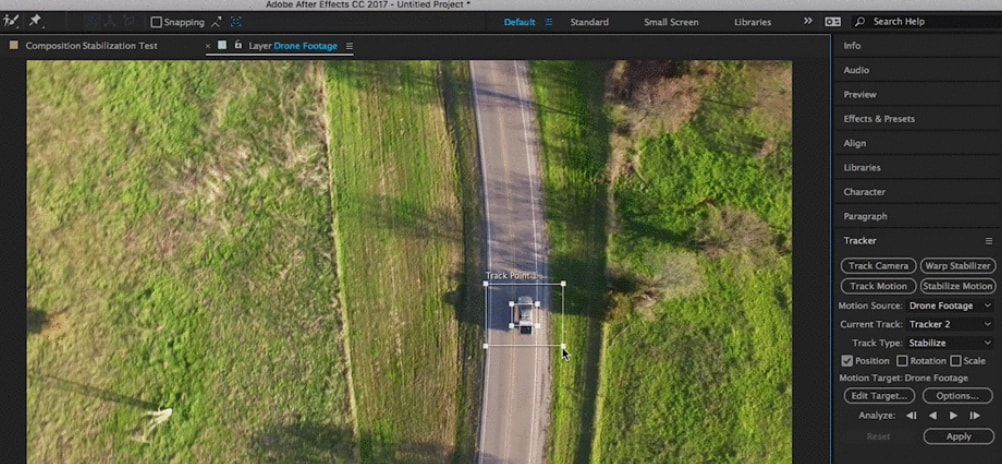
Step 2: Choose “Stabilize Motion” and Pick a Spot to Track
In the Tracker panel, click Stabilize Motion. A tracking box will appear in your Layer Panel. Now, pick a part of the video that has clear contrast and doesn’t move out of frame. That’s what the software will use to follow the motion. For example, if you’re filming a moving car, choose a visible part of it, like the roof or bumper.
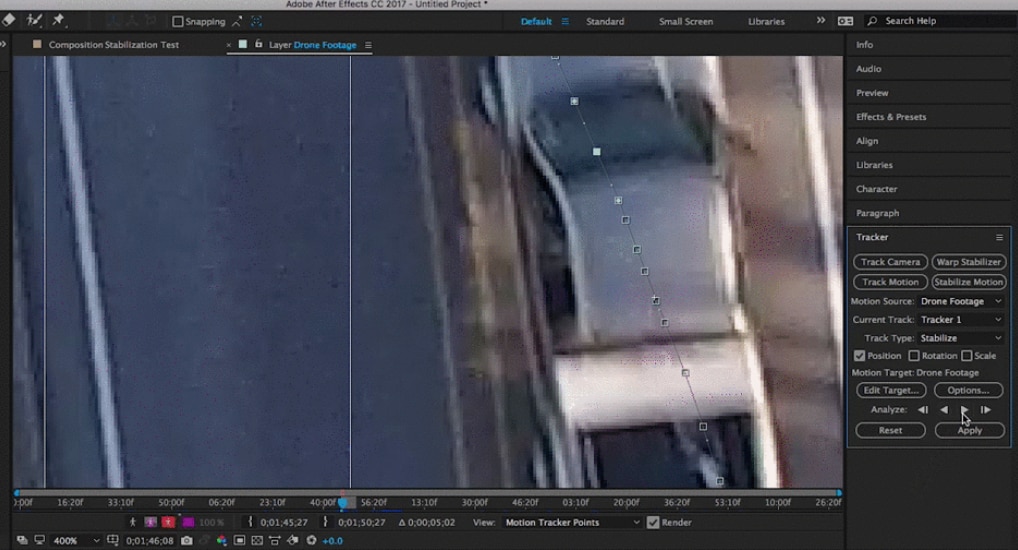
Step 3: Begin tracking and stop if necessary.
To start tracking, click the Play button on the Tracker screen. The box should follow the spot you picked. Click Stop, manually adjust the tracker box, and then press Play again to resume if the tracking stops. If it's not sticking correctly, you can also select a different location to track.
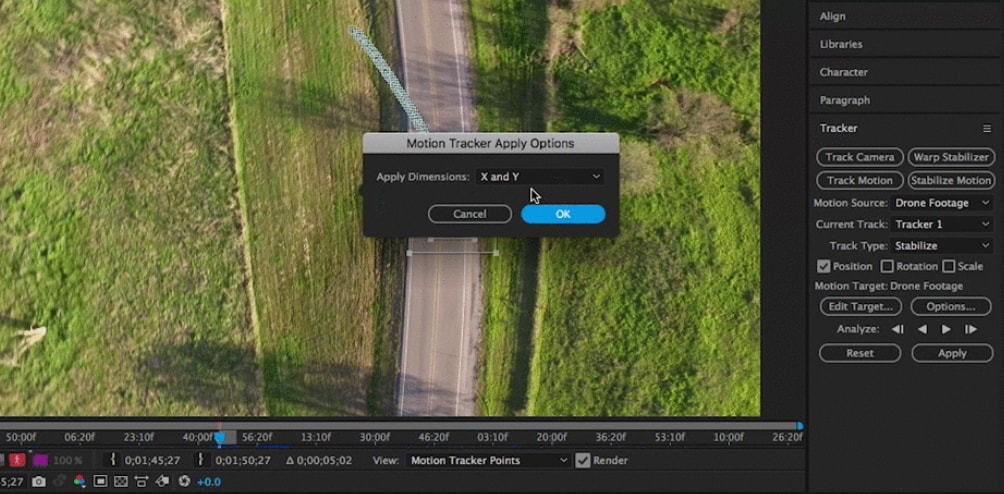
Step 4: Set the Target and Apply the Tracking
Once tracking is complete and you’re happy with it, click Edit Target to make sure the tracking data goes to the right video layer. Then click Apply. A small box will pop up asking which direction to apply the changes; choose X and Y for most cases.
To view a preview of your stabilized video, return to the Composition panel and press the Spacebar. If the result isn’t smooth, you might need to try a different tracking point or start again. This method works best when the object stays in the frame and doesn’t move too fast.
Part 4. Best Alternative to After Effect Warp Stabilizer
There are times when you stabilize video in After Effects, you need more than just motion correction. A great solution for this is Repairit Video Repair.
Repairit is a tool made specifically to fix broken, corrupted, or unplayable videos. It supports many popular formats, including MP4, MOV, AVI, and others. You don’t need to be an expert to use it. Just upload your damaged video, and the software does the work for you. It even has an Advanced Repair option if your video has more serious issues, like missing frames or audio desync.
After Effects is great for fixing camera shake with tools like Warp Stabilizer. But it can’t help when the actual video file is broken or corrupted. That’s where Repairit steps in.
Here’s why it’s a helpful alternative:
- Fixes Corruption, Not Just Shaking: Repairit can repair videos that won’t open, freeze mid-playback, or have glitches like missing sound or visuals.
- Simple to Use: No editing skills are needed; just upload, click repair, and preview the result.
- Saves Time and Footage: Instead of re-recording lost scenes, you can restore the damaged clips and keep your original content.
Step 1. Get Wondershare Repairit. After that, press the +Add button within the Video Repair section to add the unstabilized in the repair list.

Step 2. Click the Repair button to begin the repair procedure.

Step 3. If you are happy with how the repaired video files look, click store and select a location to store them. But don't take them back to where they were injured in the first place.

Try Repairit to Stablize Videos in After Effects
 Security Verified. Over 7,302,189 people have downloaded it.
Conclusion
Shaky footage can ruin even the best moments, but the good news is you have multiple ways to fix it. You can use Warp Stabilizer, the manual tracking method, or a reliable tool like Repairit; there’s always a way to clean up your clips. Learning how to stabilize video in After Effects not only improves your video but also adds a professional touch to your work. So, the next time your footage doesn’t look smooth, try out these methods.
FAQs
-
Why is my footage still shaky after using Warp Stabilizer?
This typically occurs when the clip is edited after the effect has been applied, has too much movement, or lacks contrast for tracking. Once the movie has been pre-composed, try applying the effect again or changing the settings in the Effect Controls box. -
Is it possible to steady a video without using Warp Stabilizer?
Yes. You can use the “Stabilize Motion” option from the Tracker panel in After Effects. It’s a more manual process, but it works well when you need control over how motion is tracked and stabilized. -
What if my video can’t be stabilized because it’s damaged or won’t play?
In this case, After Effects might not help. You’ll need a video repair tool like Repairit, which is designed to fix corrupted, broken, or glitchy video files before you even begin editing.
