
 TL;DR:
⚡ Quick Fix: Fix HEVC Codec Issues in Premiere Pro
● Install the HEVC Codec: If Premiere Pro cannot import H.265 footage, install the required HEVC Video Extensions or follow Premiere’s codec prompt, then restart your computer.
● Update Premiere Pro: Upgrade to a newer Premiere Pro version, especially 12.0.1 or later, to improve HEVC and HEVC .MOV support for iPhone, drone, camera, or 4K footage.
● Convert or Proxy HEVC Files: Transcode HEVC to H.264 MP4 or ProRes MOV for better compatibility, or create proxies to reduce timeline lag and freezing during editing.
● Repair Damaged HEVC Videos: If the HEVC file still shows black screen, no sound, visual glitches, or import failure after codec fixes, repair the corrupted video before editing again.
Ask AI for a summary
 ChatGPT
 Perplexity
 Gemini
 Claude
 Grok
Grok
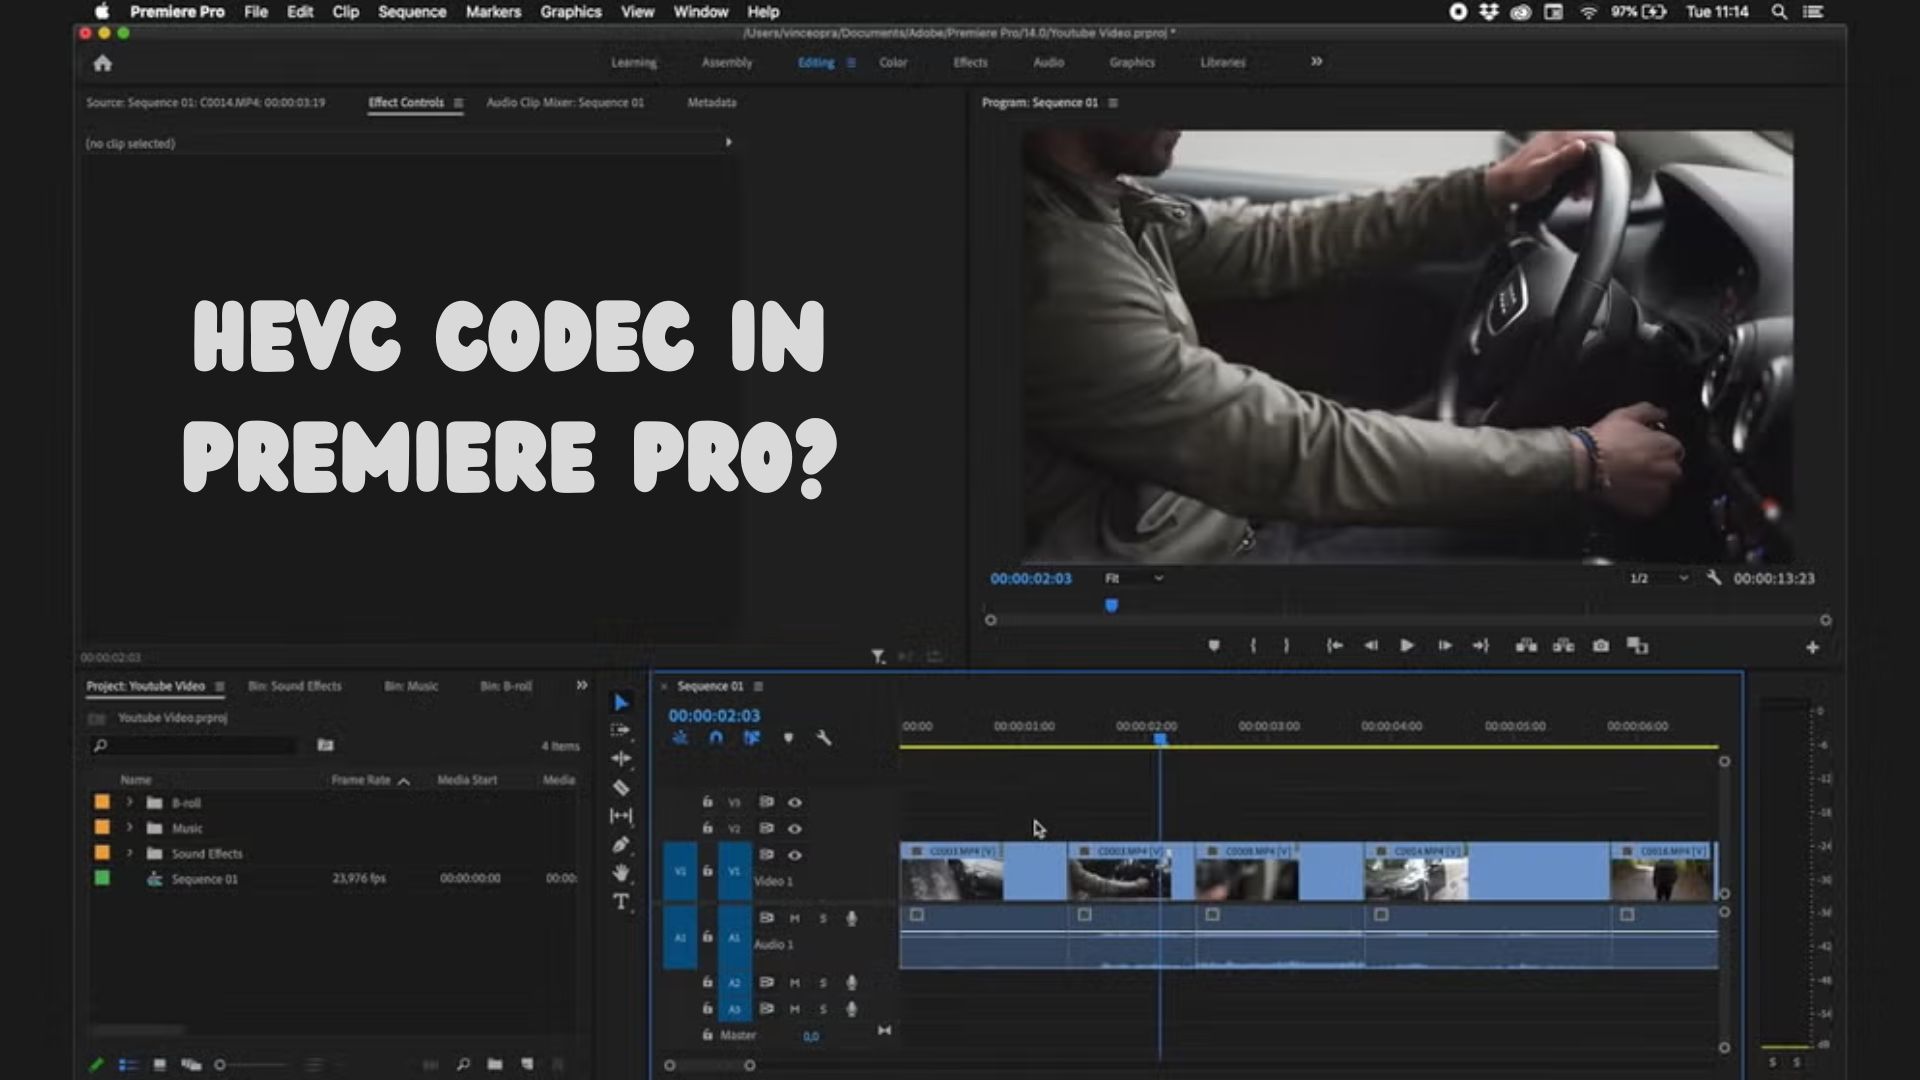
Many of you may run into issues when working with H.265 footage, especially if they're using an older version of Premiere. To tell you guys, Adobe Premiere Pro does support HEVC files, but with a few conditions. Starting from version 12.0.1 of Premiere Pro CC 2018 and CC 2015.1, the software includes extended support for HEVC. However, smooth editing still depends on your system setup, software version, and whether the right codecs are installed. If you are currently using HEVC codec for Premiere Pro and want to learn more about HEVC, common problems you might encounter, and ways to fix it, please proceed reading.
In this article
Part 1. What is HEVC Codec and Why Does it Matter for Premiere Pro?
HEVC (High-Efficiency Video Coding), also known as H.265. is a modern way of compressing video files and taking up less space without lowering the quality. If you have a big 4K video, HEVC can shrink its size to nearly half of what the older H.264 codec would do—but the video will still look just as sharp and clear.
Now, why does this matter for Adobe Premiere Pro? Because many new cameras, drones, smartphones—even iPhones—record video using the HEVC format by default. So, if you're editing that footage in Premiere Pro, the software needs to support HEVC properly. When it does, you'll enjoy smoother editing, faster rendering, and less hassle dealing with large files. Plus, when it comes time to export your final video, using HEVC can give you smaller file sizes with the same high-quality results.
Basic Definition and Comparison with H.264
HEVC, also known as H.265, is a newer way to compress video files so they take up less space without making them look bad. It's an upgrade from an older method called H.264, or AVC, which has been used for many years and is still very common. Both HEVC and H.264 do the same basic job: they shrink video files so they're easier to store, upload, or stream. But HEVC does it better—it can keep the same video quality as H.264 while making the file about half the size. That means you can save storage space, upload faster, and still enjoy sharp video.
The big difference lies in how they compress video. H.264 breaks the video into small fixed blocks, while HEVC uses smarter, more flexible blocks that adjust depending on what's happening in the scene. This makes HEVC more efficient, especially for detailed or high-resolution videos like 4K or HDR. However, there's a catch: HEVC needs more processing power to work. That means older computers or devices might struggle to play or edit HEVC smoothly. Also, H.264 is still more widely supported, so not all apps or devices can open HEVC files just yet. Still, for anyone working with modern video, HEVC is becoming the better choice.
Here's a summary:
| Feature | H.264 (AVC) | H.265 (HEVC) |
| Release Year | 2003 | 2013 |
| Compression Efficiency | Standard | ~50% better than H.264 |
| File Size | Larger | Smaller |
| Quality at Same Bitrate | Good | Sharper and more detailed |
| Hardware Requirement | Less demanding | More powerful hardware needed |
| Device Compatibility | Widely supported | Limited to newer devices and software |
| Best For | General video use, online streaming | 4K/8K content, HDR, professional editing |
Part 2. Common Issues When Using HEVC Premiere Pro
Even though Adobe Premiere Pro supports the HEVC codec, you still run into problems. Here are some of the most common issues you may face when using HEVC in Premiere:
Importing Issues
One of the first problems you may encounter is not being able to import HEVC files at all. You might drag an H.265 video into Premiere only to get an error saying the file format is not supported or missing a codec. This usually happens if your system doesn't have the HEVC Video Extensions installed (for Windows) or if you're using an outdated version of Premiere Pro. On macOS, importing is generally smoother, but issues can still pop up if the footage uses a non-standard encoding or variable frame rates.
Playback Lag or Timeline Freezing
Once the video is imported, another big issue is choppy playback or lag. HEVC files are heavily compressed, which makes them harder for Premiere to decode in real-time. You might notice the preview screen stutters, freezes, or the timeline becomes unresponsive on systems without strong GPU support.
Export or Render Failures
Even if you manage to edit your project, exporting can still cause problems. Some users report that Premiere freezes during export or produces corrupt output files. This often happens when combining HEVC with other high-resolution assets, applying multiple effects, or trying to export using hardware encoding without the proper support.
Real Usage Scenarios
A Reddit user shared a frustrating situation that you might relate to. They wrote:
This kind of issue is common with HEVC files that use HDR (High Dynamic Range) by default. When Premiere Pro reads those files without proper interpretation settings, the color can look totally off and you can't edit it.
Part 3. 4 Ways to Fix HEVC Codec Issues in Premiere Pro
Working with HEVC footage can lead to frustrating issues in Adobe Premiere Pro. If you're stuck, here are four effective ways to fix these common HEVC codec problems:
1. Download and Install Premiere Pro HEVC Codec
If you're trying to work with HEVC (H.265) videos in Adobe Premiere Pro and get an error saying the codec is missing, don't worry—it's a common issue. Here's how you can try installing the HEVC codec directly from within Premiere:
Step 1. Open Adobe Premiere Pro and make sure you're signed in with your Adobe license.
Step 2. Try importing an HEVC video file. If your system doesn't have the codec, you might see a pop-up message. (Some users won't get any messages at all.)
Step 3. Click OK on the pop-up. This will begin the process of installing the HEVC codec.

Step 4. After the install, restart your computer.
Once your computer reboots, you should be able to open your HEVC files in Premiere without getting the "codec missing" error.
2. Upgrade Your Adobe Premiere Pro
Adobe Premiere Pro started supporting HEVC files in version CC 2015.1, but it didn't fully support HEVC in .MOV format (like those from iPhones) until version CC 2018 (12.0.1). So, if your videos won't open or look strange, your Premiere Pro version might be too old. Version 12.0.1 or later is required in order to fully function with HEVC.MOV files.
Here's how to update your Premiere Pro:
Step 1.Close all Adobe programs and save your work. If you don't, you'll be asked to close them before updating.
Step 2. Open the Adobe Creative Cloud app. Go to the Apps tab to see all your installed Adobe programs, including Premiere Pro.
Step 3. If there's an update available, click Update next to Premiere Pro. To update everything at once, click Update All.
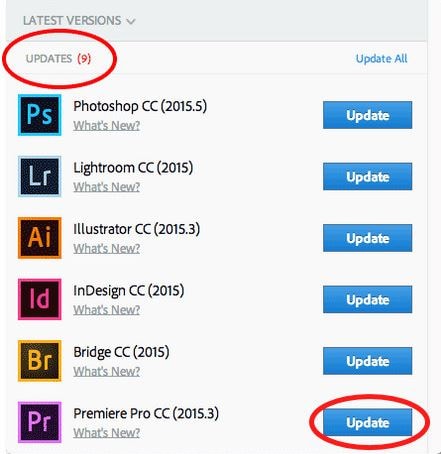
Step 4. Click Advanced Options and choose:
- Import previous settings and preferences – keep your old settings (optional).
- Remove old versions – delete the older version after the update (optional).
Step 5. Click Update to start the upgrade process.
If the update doesn't work, check Adobe's help page for Creative Cloud installation problems.
3. Restream HEVC to an Adobe Compatible Format
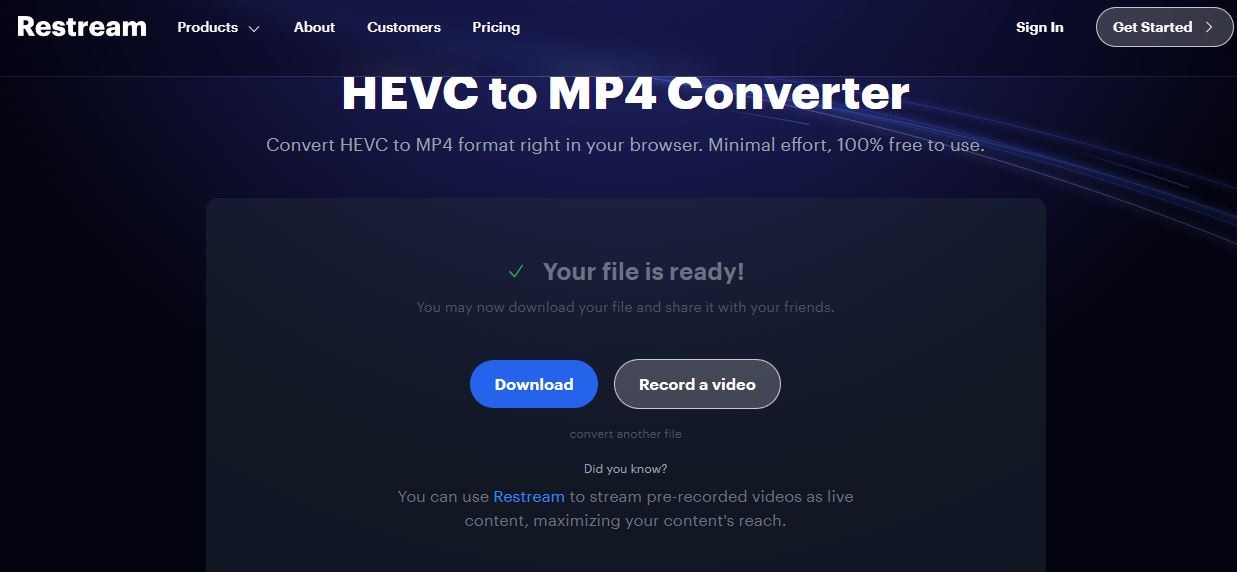
If Adobe Premiere Pro still doesn't open your HEVC files, convert the video into a format that Premiere supports better, like H.264 (MP4) or ProRes (MOV). These formats are more stable and work in most versions of Premiere Pro.
Step 1. Go to Restream HEVC to MP4.
Step 2. Click “Choose File” and choose your HEVC video from your device.
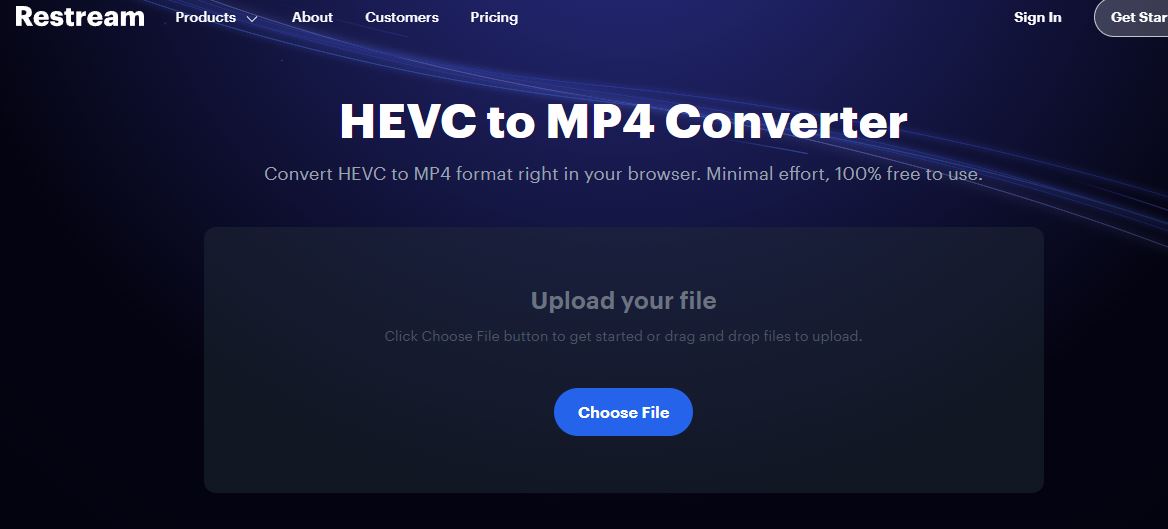
Step 3. Make sure the output format is set to MP4 (or choose MOV if you prefer ProRes).
Step 4. Click “Convert” to start.
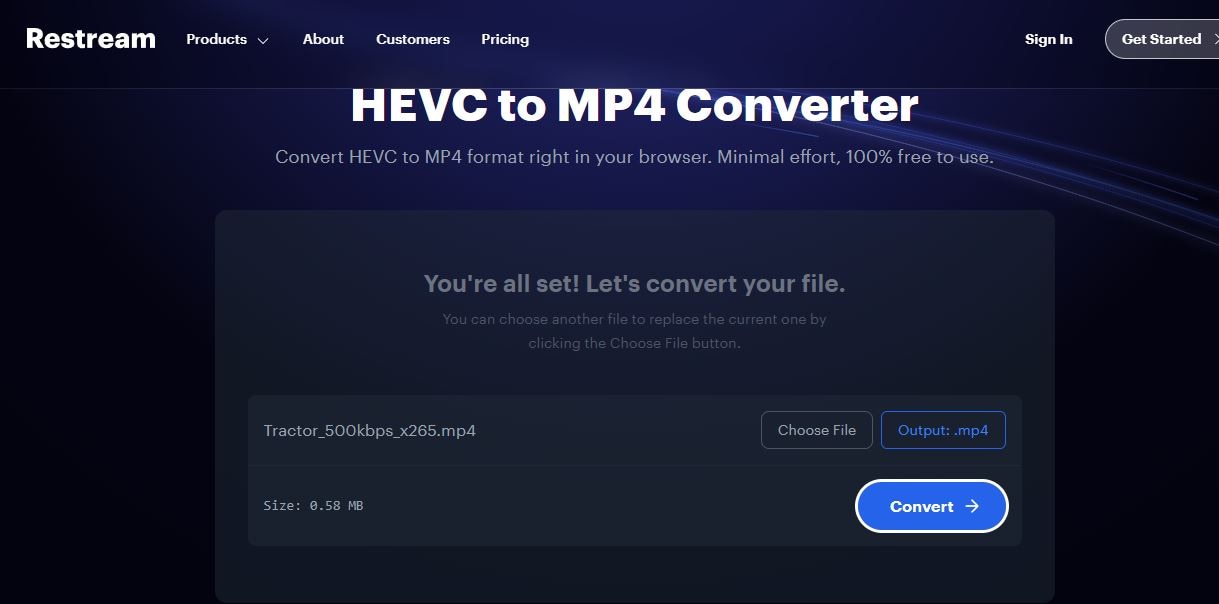
Step 5. Click "Download" to save the newly created file after finishing.
4. Use Proxy Editing for Large HEVC Files
If your HEVC videos are large and causing Premiere Pro to lag or freeze, proxy editing can help. It creates lower-resolution versions of your clips so you can edit without overloading your system. Once you're done editing, Premiere Pro will automatically switch back to the full-quality files for export.
Step 1. Open Premiere Pro and bring in your high-quality video clips.
Step 2. Click on the clips in the Project panel to unlock more options.
Step 3. Click "Create Proxies" to enter the proxy setup box after right-clicking on the clips you've chosen.
Step 4. In the Create Proxies window, choose the default preset or pick a low-resolution one for smoother editing. Click "Add Ingest Preset" to utilize your own preset if you have one.
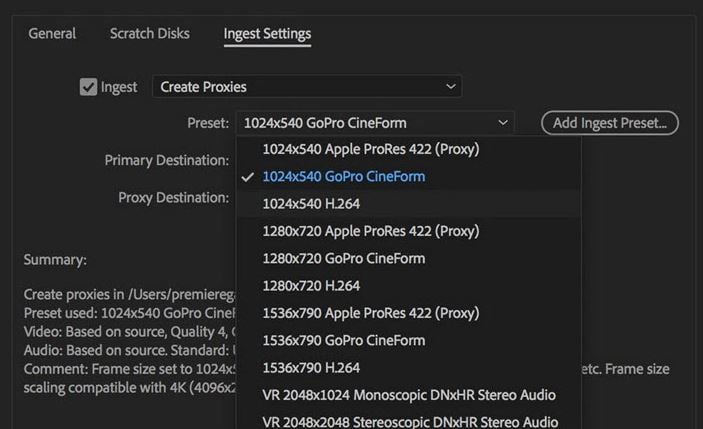
Step 5. Choose where to save the proxy files. You can keep them next to your original videos or pick another folder.
Step 6. Click OK to confirm. Premiere Pro will send your clips to Adobe Media Encoder, which will start making the proxy files.
Step 7. Watch the progress in Adobe Media Encoder or in the Progress panel inside Premiere Pro.
Part 4. Tech Specs of Premiere Pro Support HEVC Codec
Adobe Premiere Pro does support the HEVC codec, but there are a few important things to know before you can start working with H.265 videos. Support for HEVC was added in later versions of the software, and your computer also needs to meet specific system requirements
Supported Versions of Adobe Premiere
HEVC support in Premiere Pro was first introduced in Premiere Pro CC 2015.1 and has continued to improve in newer updates. However, for the best experience—especially with 4K and 10-bit footage—Adobe recommends using Premiere Pro 2020 or later. Newer versions not only support HEVC better but also provide faster performance and fewer playback issues.
If you're using an older version of Premiere Pro and can't import HEVC files, it could be due to limited codec support or the need for additional system updates.
System Requirements for HEVC Playback
To work with HEVC videos in Premiere Pro, your system needs the right hardware and software setup. Here are the basic requirements:
- Operating System: Windows 10 (version 1809 or later) or macOS 10.13 or later
- Processor: At least Intel 6th Gen or newer, or AMD equivalent with HEVC decoding support
- RAM: 16 GB (32 GB recommended for 4K editing)
- Graphics Card: GPU that supports hardware decoding (NVIDIA, AMD, or Apple M1/M2 chips)
Additionally, it might be necessary for Windows users to install the HEVC Video Extensions from the Microsoft Store. It's a small add-on that allows your system to recognize and play HEVC files properly in Premiere and other apps.
Windows vs. macOS Support Comparison
The way HEVC support functions on Windows and macOS differs slightly:
- Windows: Premiere Pro supports HEVC, but you may need to manually install the HEVC Video Extensions from Microsoft. Without this, you might see errors when importing H.265 footage. Also, hardware acceleration depends on your CPU and GPU model.
- macOS: HEVC is more supported out of the box—especially on Macs with Apple Silicon (M1 or M2 chips). These machines are optimized for HEVC playback and editing, which makes the process faster and more stable.
Part 5. What to Do When HEVC Codec Premiere PRO Are Corrupted?
Sometimes, even if everything seems to be set up correctly, your HEVC videos still won't play properly in Premiere Pro. Your videos might freeze, won't load, or show visual glitches. When this happens, the issue may be with the video file itself.
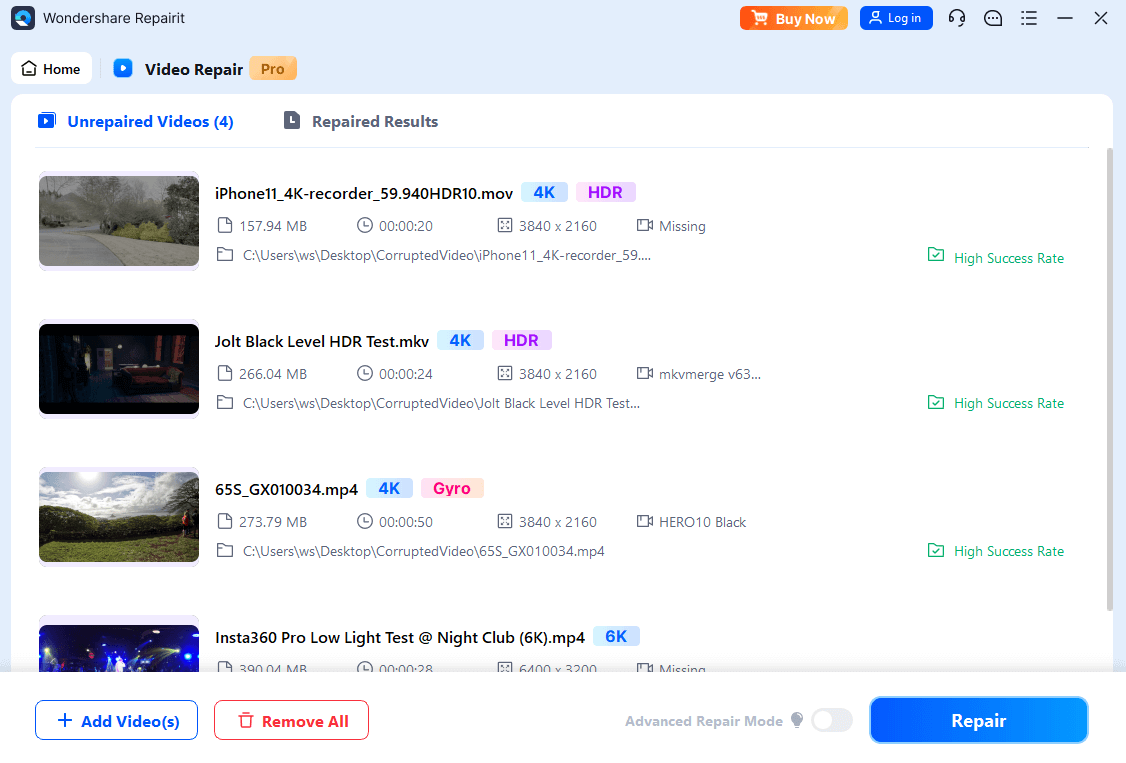
If your HEVC file is corrupted or damaged, you'll need more than just a codec fix. This is where a tool like Repairit Video Repair (Professional Mode) can help. Repairit is here to fix broken, unplayable, or distorted videos, including those recorded in HEVC format. If the HEVC is from an iPhone, GoPro, drone, or DSLR, Repairit scans the damaged video and restores it to a working file.
To make this guide more helpful, here are some real problems users face when working with HEVC files—and how Repairit Video Repair can help:
📍 Can't open HEVC videos in Premiere after moving them from iPhone to PC?
If you used apps like ShareIt, WeChat, or even AirDrop, your video's frame structure might have gotten damaged. Repairit can help fix those files so you can edit them again.
📍 Your exported HEVC video shows a black screen or has no sound?
This often means something went wrong with the file's format or timecode. Repairit can rebuild the broken parts and make the video playable again.
📍 Premiere Pro crashed while editing, and now your HEVC file won't open?
No worries. Repairit's advanced repair mode lets you use a healthy reference video to restore your damaged one—perfect for those tough recovery cases.
Here's how to use Repairit Video Repair (Professional Mode):
Step 1. Click "Start" to access the advanced repair mode after opening Wondershare Repairit and turning on "Professional Mode." Drag and drop your damaged video into the box or click "+Add" on the main page to upload it..
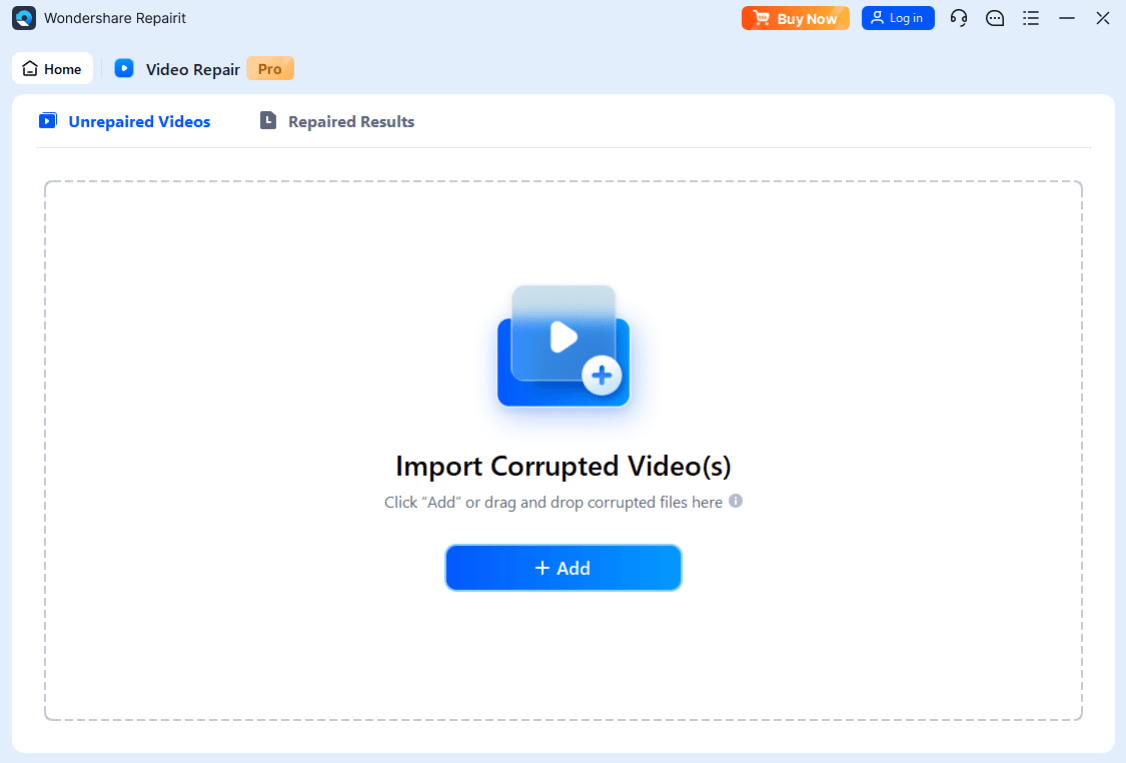
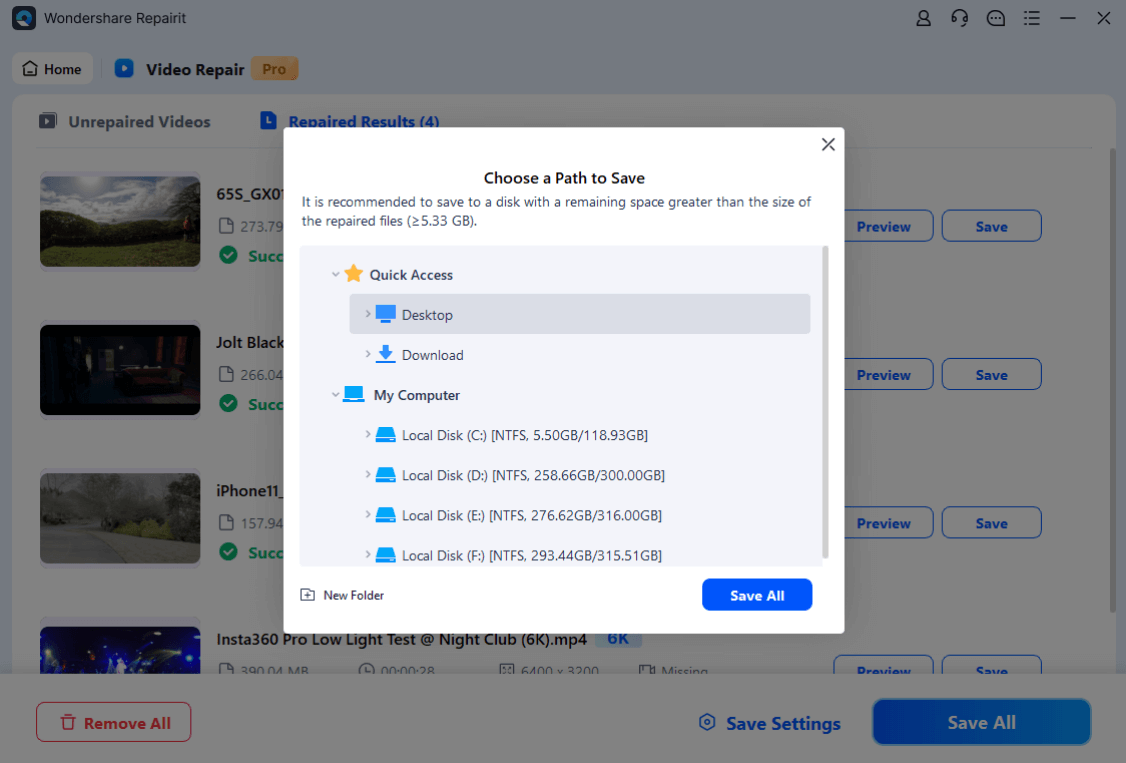
Step 2. Click the "Repair" button to begin the procedure after adding your videos. Click "Save" so that they are saved to your device.
Step 3. Click "Save" and choose a location to store the edited videos. Don't keep them in the same place where they were damaged or lost in the first place.
Fix HEVC Codec Premiere PRO Are Corrupted
 Security Verified. Over 7,302,189 people have downloaded it.
Final Thought
Working with HEVC files in Premiere Pro can feel overwhelming at first, especially when things don't go as planned. But with the right steps you can solve most issues without too much stress. Take your time, try each fix, and you'll be back to editing.
FAQ
-
How to export HEVC video in Premiere Pro?
Go to Export > Format: HEVC (H.265.Match Source. Adjust bitrate to suit resolution (e.g., 8 Mbps for 1080p, 25 Mbps for 4K). Use hardware encoding for best performance. -
What do I do if Premiere Pro is not importing my HEVC files?
Make sure your system has the HEVC Video Extension (Windows) and update Premiere Pro to 12.0.1 or higher. -
How can I fix washed out colors in HEVC video imported to Premiere Pro?
Check if your footage is HDR (Rec.2020) and interpret it as Rec.709 under Modify > Interpret Footage.
