

The PS4 black screen problem often appears out of nowhere. If this also happened to you, maybe you wonder what went wrong. In this article, you will learn what causes the blank screen. We will also provide 6 reliable fixes to bring your PS4 back working like nothing happened.
Table of Content
Part 1: Understanding the PS4 Black Screen Problem
When your PS4 turns on but nothing appears on the screen, it can be confusing and frustrating. The console’s power light may still glow, yet the screen remains blank or black, showing no home menu or video signal. This is what players often call the PS4 black screen or the PS4 black screen of death. It usually happens right after startup, during gameplay, or after a system update.
Here are some of the most common causes of the PS4 black screen problem:
- DMI connection issues. The HDMI cable is the most common culprit behind the PS4 black screen. Even a slightly bent connector or loose port can stop the signal from reaching your display. Sometimes, the cable might look fine but still fail to send a proper signal.
- Display setting mismatches. Has your PS4 ever been connected to a different screen? If so, its saved resolution may not match your current TV or monitor. When the console tries to display an unsupported resolution, the screen can stay completely black.
- System software glitches. Occasionally, a PS4 update or system crash can leave behind corrupted files that disrupt normal startup. When that happens, the console might power on but fail to load the interface, leaving only a black screen.
- Hard drive errors. The PS4’s internal hard drive stores all your games and essential system data. If the drive gets damaged or its data becomes corrupted, your console may freeze or show nothing on the screen.
- Hardware damage. In rare cases, the black screen points to deeper hardware trouble. A faulty GPU, power supply, or HDMI encoder chip can cause a total loss of display output. When this happens, it usually means professional repair is required.
Part 2: 6 Effective Ways to Fix the PS4 Black Screen
So, how can you bring your PS4’s display back to life? While the causes may differ, there are reliable solutions that can help restore your console’s screen and get you back to gaming again. Here are six proven fixes worth trying, starting from the simplest to the more advanced ones.
Fix 1. Check HDMI Connections and Try Different Ports/Monitors
A poor HDMI connection is one of the most overlooked causes of a blank PS4 screen. Even a slightly bent cable or loose port can break the video signal. You can check the cable for visible damage and test it with another device. Sometimes, switching to a different HDMI port or trying another TV or monitor helps confirm if the issue is display-related.
Step 1. Turn off your PS4 and your TV completely.
Step 2. Unplug the HDMI cable from both the console and the TV.
Step 3. Inspect the cable and ports for visible damage or dust.
Step 4. Plug the cable back in firmly, making sure both ends fit snugly.
Step 5. Try a different HDMI cable if you suspect the old one is damaged.
Step 6. Connect the PS4 to another HDMI port or a different monitor/TV to test if the screen works there.
Fix 2. Reset PS4 Display Settings
If your PS4’s resolution doesn’t match your display, the screen might stay black even when the console is working. Resetting your PS4’s display settings allows it to detect the correct resolution automatically. This often solves issues after moving your PS4 to a different TV or monitor.
Step 1. Turn off your PS4 completely. Do not use Rest Mode.
Step 2. Hold down the Power button until you hear a second beep of about 7 seconds.
Step 3. The PS4 will start in a low-resolution mode automatically.
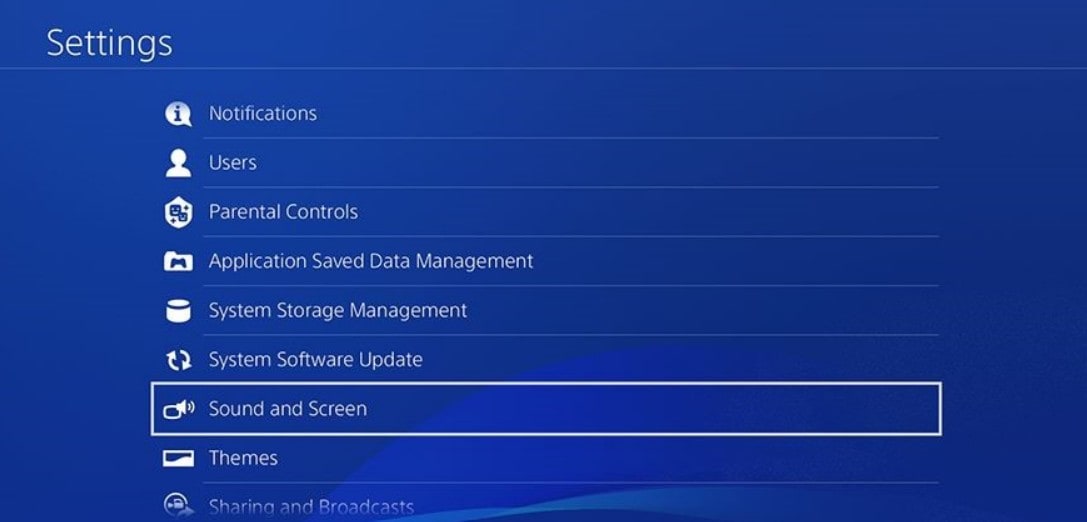
Step 4. Go to Settings.
Step 5. Choose Sound and Screen.
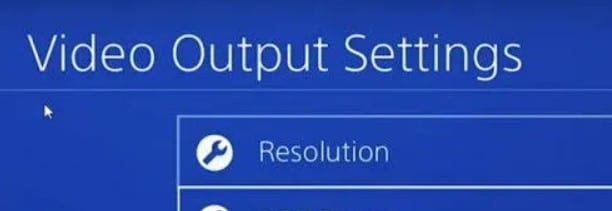
Step 6. Go to Video Output Settings and choose Resolution. Then, select Automatic to let the system detect the best match for your display.
Fix 3. Boot PS4 in Safe Mode
Safe Mode is a built-in troubleshooting environment that can help fix many display problems. When the PS4 starts in Safe Mode, it uses basic video settings that bypass potential display conflicts. This mode also allows you to perform tasks like rebuilding the database or changing resolution without entering the normal home screen.
Step 1. Turn off the PS4 completely.
Step 2. Hold down the Power button until you hear the second beep.
Step 3. Connect the DualShock 4 controller with a USB cable.
Step 4. Press the PS button on the controller to enter Safe Mode.
Fix 4. Update System Software
Sometimes, a system software bug causes the PS4 to freeze on a black screen. Updating the latest firmware helps eliminate errors that may be blocking the startup process. Keeping your console up to date ensures it remains compatible with your games and display devices.
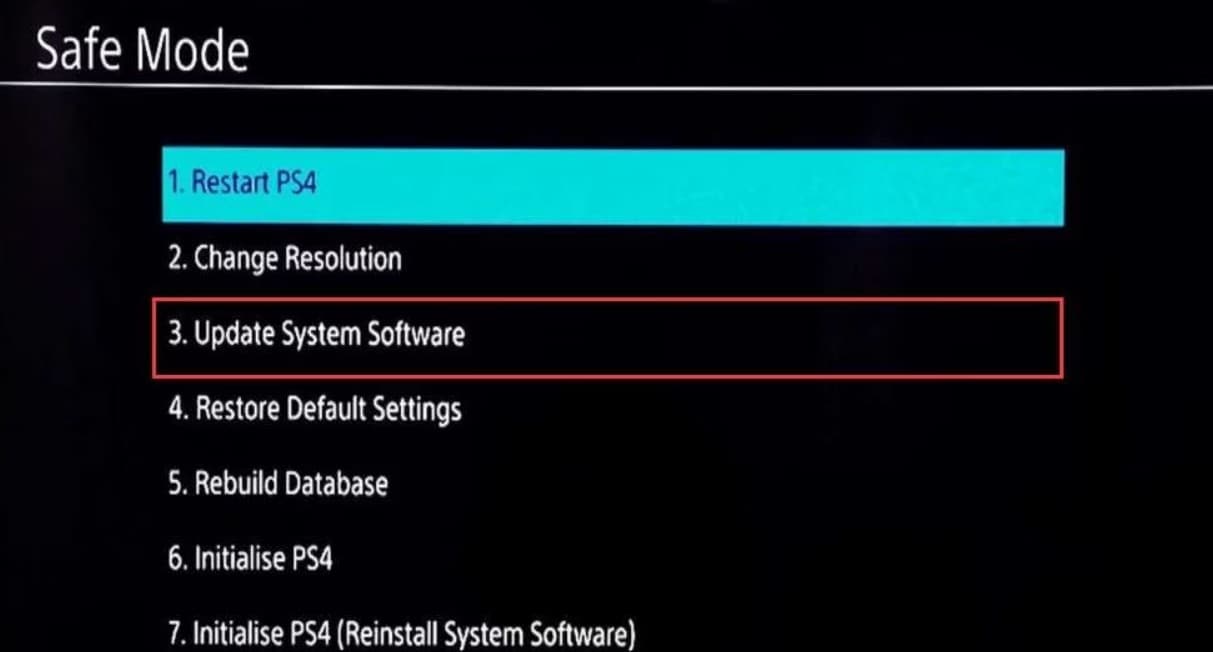
Step 1. In Safe Mode, select Option 3: Update System Software.
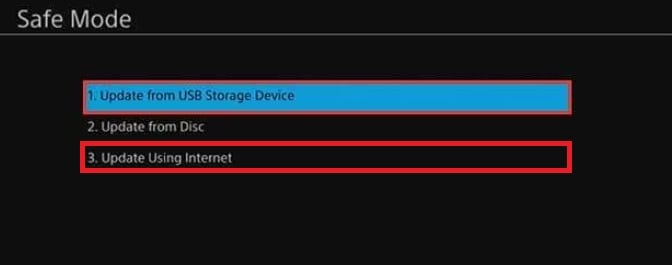
Step 2. Choose Update Using Internet or Update from USB Storage Device.
Step 3. If using USB, download the latest PS4 firmware from PlayStation’s official website and save it in the correct folder structure:
Create a folder named PS4, then inside it, another folder named UPDATE.
Save the firmware file as PS4UPDATE.PUP inside the UPDATE folder.
Step 4. Connect the USB drive to the PS4 and follow the on-screen instructions to complete the update.
Fix 5. Reinstall PS4 System Software (Initialize)
If your PS4 still won’t display anything after updating, the problem might lie in deeper system corruption. Reinstalling the PS4 system software resets everything to factory settings and replaces any damaged system files. It’s a more advanced fix but often effective when other methods fail.
Step 1. Enter Safe Mode again by holding the Power button until the second beep.
Step 2. Select Option 7: Initialize PS4 (Reinstall System Software).
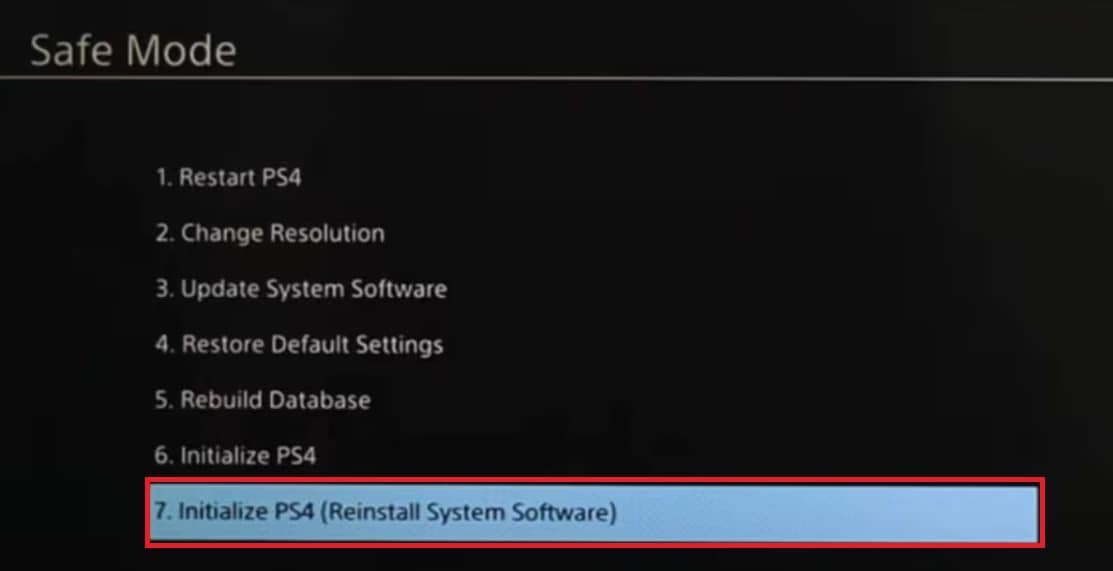
Step 3. Insert the USB drive that contains the PS4 firmware file PS4UPDATE.PUP.
Step 4. Follow the prompts to reinstall the system software completely.
Step 5. After completion, the PS4 will restart and display the setup screen.
Fix 6. Seek Professional Repair for Hardware Issues
When all else fails, the issue may be hardware-related. It could be something you can’t fix on your own. Internal damage, such as a faulty GPU or motherboard, can stop the PS4 from sending any video output. In this case, professional repair is the safest route. Trained technicians can diagnose and replace damaged parts properly without risking further harm to your console.
Part 3: Corrupted PS4 Game Recordings or Videos? Repair Them Easily
A black screen on PS4 doesn’t always end when your console restarts — it can also corrupt your recorded gameplay videos or saved clips. When your PS4 crashes, freezes, or loses power unexpectedly, the video files may become unreadable, showing only a black screen or refusing to play at all.
That’s where Repairit Video Repair becomes your go-to solution. This professional tool is built to repair corrupted or unplayable PS4 video files caused by sudden shutdowns, storage errors, or incomplete recordings. It automatically detects and restores damaged frames, missing data, and playback errors — ensuring your game highlights look just as sharp as before the crash.
Whether your PS4 gameplay clips show sound but no video, distorted playback, or blank screens, Repairit’s advanced algorithms fix the broken structure without reducing quality. You don’t need any technical expertise — just upload your damaged file, click “Repair,” and preview the restored version before saving.
Key features of Repairit Video Repair
- Fixes corrupted PS4 recordings caused by crashes or display errors.
- Supports multiple formats such as MP4, MOV, and more, making it ideal for console gameplay videos.
- Advanced repair mode for severely damaged files, ensuring maximum recovery.
- Batch repair support so you can fix multiple videos at once.
- Preview repaired videos before saving them, ensuring the result looks right.
Step 1. Open Repairit and click start Video Repair. Upload your corrupted PS4 video files by clicking the +Add button.

Step 2. Once uploaded, press Repair.

Step 3. After the repair is complete, preview the PS4 video files to check the results. When satisfied, click Save to store the repaired videos on your computer.

Conclusion
The PS4 black screen can be alarming, but it’s rarely the end of your console. From checking simple HDMI connections to reinstalling the system software, there are plenty of reliable ways to bring your screen back. If the problem turns out to be hardware-related, professional repair ensures your PlayStation 4 gets the proper care it needs.
And if your game recordings or clips get corrupted during the process, Repairit Video Repair gives you an easy, dependable way to recover them. With the right fixes and tools, you can keep both your PS4 and your favorite gaming moments safe and running smoothly again.
FAQs
-
Why is my PS4 turning on but showing a black screen?
It often happens because of a loose HDMI cable, a damaged port, or mismatched display settings. Sometimes, a system glitch or corrupted software stops the PS4 from showing an image. However, most of these issues are minor and can be fixed easily. -
Can a PS4 black screen be fixed at home?
Yes, most of the time. You can check your HDMI connection, reset the display settings, or start the PS4 in Safe Mode to rebuild the database. These simple fixes usually restore the screen without needing professional repair. -
What does Safe Mode do on PS4?
Safe Mode is a special startup option that helps your PS4 fix system and display problems. When you turn on the console in Safe Mode, it runs only the essential functions, allowing you to troubleshoot without loading everything else. This mode lets you change the screen resolution, rebuild the system database, and even reinstall the system software if needed.
