Every frame in a clip holds the potential to tell a moment’s story, and with DaVinci Resolve’s freeze frame, making it happen becomes easy. Pausing an action at the right moment lets you emphasize details and drama that would otherwise go unnoticed. More than merely freezing time, freeze frame in Resolve allows you to turn fleeting moments into a visual focal point.
Essentially, the technique doesn’t just stop the action, but it gives each important frame the attention it deserves. For such an impactful pause, reveal DaVinci's complete freeze-frame capabilities through the guide that follows.
Table of Contents
Part 1. DaVinci Resolve Freeze Frame Explained: Why Freeze Frame in DaVinci Is Essential for Modern Editing
A freeze frame in DaVinci Resolve pauses your video on one exact frame and holds it as a still image for as long as you choose. This also means that the original footage and media remain untouched in the background. In practice, you simply move the playhead to the moment you want to freeze and apply the relevant method for freeze framing.
Resolve offers multiple options for these tasks, including Retime controls and the Change Clip Speed. Since the freeze is generated from the source clip, it keeps the same resolution, sharpness, and color as your footage. This lets you treat that paused moment as a design canvas, adding labels, arrows, or transitions that guide the viewer's eye.
Why Freeze Frame DaVinci Resolve Techniques Matter for Clean Storytelling?
Besides highlighting pivotal moments with precision, this technique is explained briefly below:
- It provides space for on-screen text, helping people read comfortably while the picture remains still.
- They create clear, dramatic, or comedic pauses, stopping just before or after an impact.
- Lets you blend motion, slow motion, and hold into one clip to make pacing feel smooth.
- Keeps the edit non-destructive, because Resolve’s freeze options work as timeline instructions.
- Focus the viewer’s eye on one subject or area of the frame; useful for adding zooms in tutorials.
Part 2. Step-by-Step Guide: How to Add a Freeze Frame in DaVinci Resolve (Beginner to Advanced)
The learning process of DaVinci Resolve how to freeze frame, is a key step in creating professional video edits. To assist you, the following section covers important techniques involved in freezing a frame in Resolve:
Method 1: Create a Freeze Frame Using Retime Controls
Retime controls allow you to pause any frame in a clip while maintaining complete control over its duration. You can even adjust the speed ramp before or after the frozen frame to create a smooth transition, making edits appear seamless. To learn how to proceed, follow the provided guidelines to use Retime Controls:
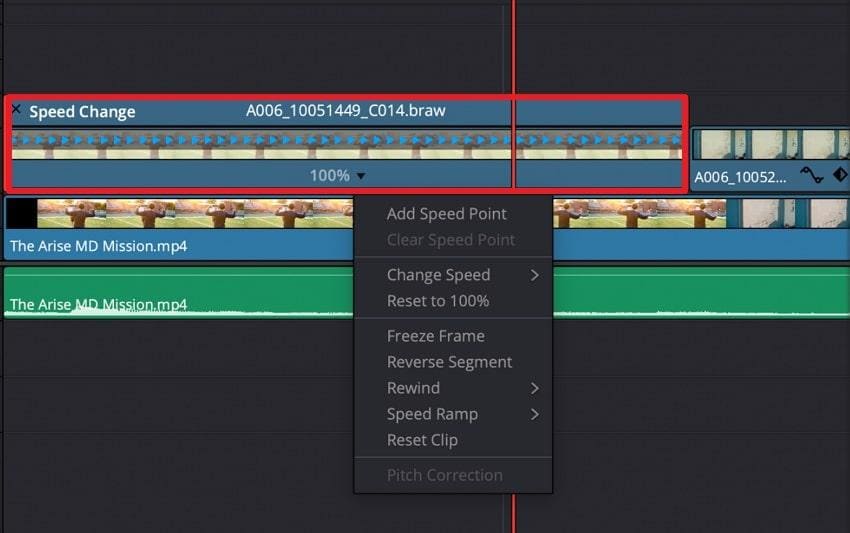
Step 1. Initially, right-click on your clip in the Edit tab and choose the “Retime Controls” option from the revealing menu. Alternatively, you can press “Command + R” on Mac and “Control + R” on Windows for quick access.
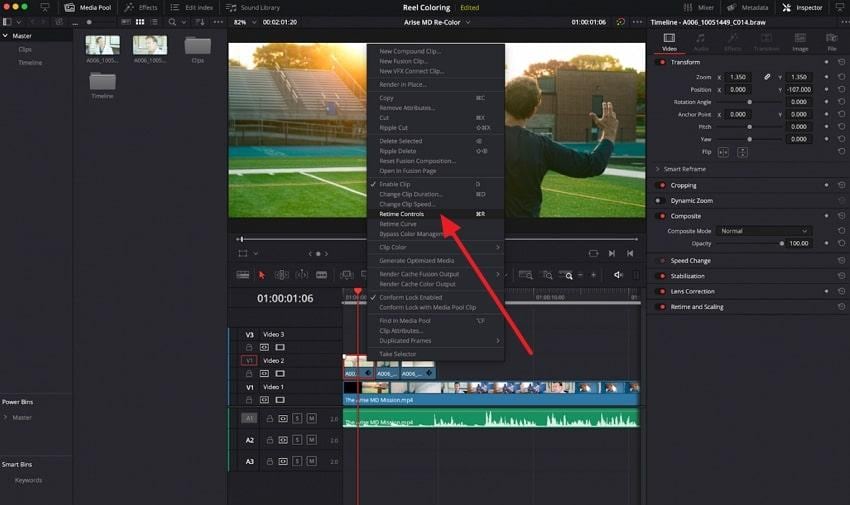
Step 2. Doing so, Resolve will create a frozen section; drag the edge of the freeze section to adjust its length.
Method 2: Freeze Frame Using Change Clip Speed
When you change the clip speed to zero, you can instantly freeze frame in DaVinci Resolve without affecting the surrounding timeline. It's effective when you need a clean pause, such as to highlight an action detail or add text overlays. For better understanding, explore the provided tutorial and make use of Change Clip Speed:
Step 1. On the Edit page, place your clip in the timeline and move the playhead to the frame you want to freeze. After this, right-click that spot and select the “Change Clip Speed” option from the menu.
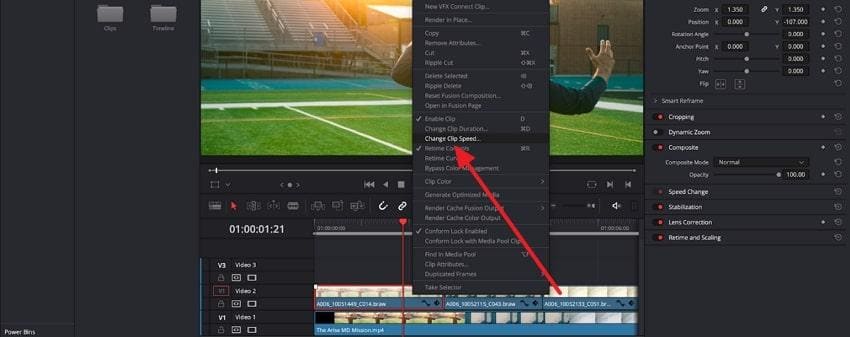
Step 2. In the Change Clip Speed window, check the box for "Freeze Frame" and make sure the playhead is on the exact frame. After this, press the "Change” button and turn that section into a frozen frame.

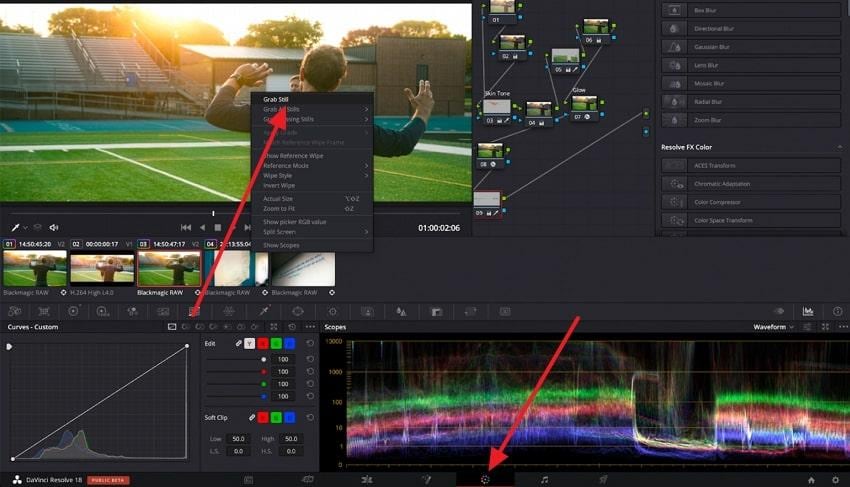
Method 3: Export Still Frame in DaVinci Resolve
This approach allows you to capture any frame as a separate high-resolution image that can be re-imported into your timeline. It offers maximum flexibility and ensures your freeze-frame sequence maintains top visual quality and professional finish. Dive into the manual and export a still frame in DaVinci Resolve for further customization accordingly:
Step 1. First, open the “Color” page, right-click your footage, and select the “Grab Still” option from the drop-down menu.
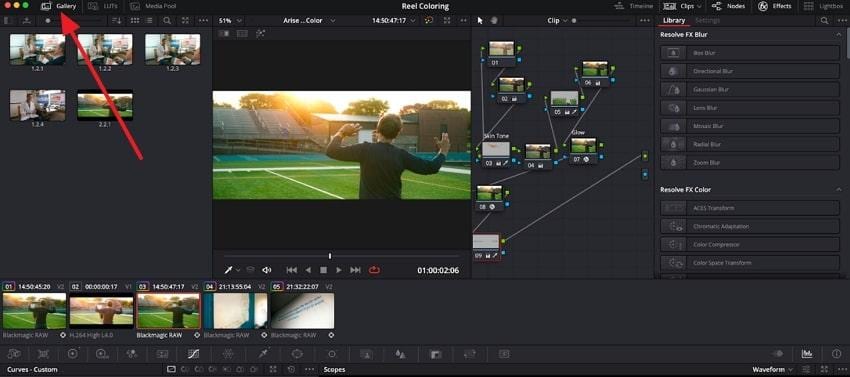
Step 2. Once done, navigate to the “Gallery” option and reveal all of your generated stills.
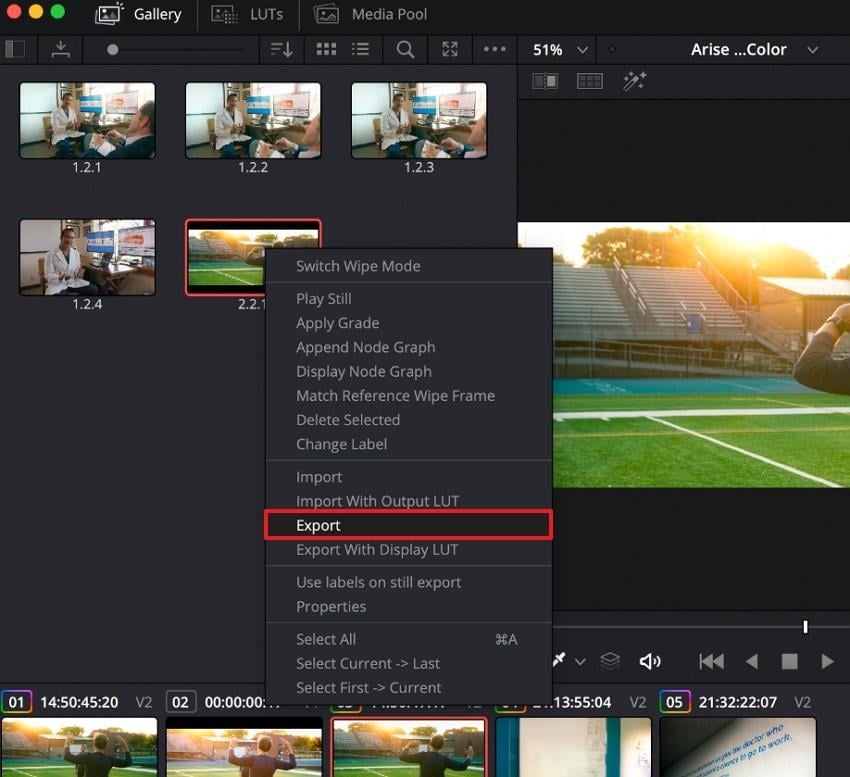
Step 3. Finally, right-click on your desired still and select the “Export” option from the menu.
Part 3. DaVinci Resolve Still Frame Tips: How to Get Clean, Crisp Freeze Frames Without Blur
For the best possible outcomes with freeze frame DaVinci Resolve, review the provided expert-backed tips for visual consistency:
| Practical Tips | How to Perform in Resolve | Key Advantages |
| Avoid Blur or Jitter in a Freeze Frame Clip | Choose a frame with minimal motion blur, then freeze it using Retime Controls instead of exporting a low-resolution screenshot. | Avoids extra resampling and reduces jitter or ghosting in held frames. |
| Best Settings for a Sharp Still Frame | Edit and export at the same resolution and frame rate as your source, with a suitable bitrate. | Prevents over-compression or interpolation so edges remain sharp. |
| Color Grade Without Causing Banding | Grade in 10-bit when possible and apply gentle adjustments to the freeze frame. | Strong gradients stand out more when frozen; subtle grading plus slight grain reduces banding. |
| Enhance a Freeze with Motion Graphics or Zoom-In Effects | Add titles, arrows, or shapes on a track above the freeze, and animate Scale/Position for a slow zoom-in. | The frame stays still while text movement keeps the moment visually engaging. |
| Use High-Quality Still Exports for Reusable Frames | Grab a still in the Color page and export it as PNG/TIFF for design work. | Color-page stills provide full internal processing, resulting in high-quality reusable images. |
Part 4. Clean Your Footage First: Perfect Freeze Frames in DaVinci Resolve Start with Healthy Clips
When working with freeze frames in DaVinci Resolve, the quality of your source clips shows how clean the final result appears. Any damage, corruption, or missing data in a clip can prevent Resolve from holding a sharp still; as explained ahead:
- Damaged frames or pixel glitches from the original clip are locked in when you freeze them.
- If the file structure is corrupted, Resolve can struggle to decode around that point.
- Clips with missing frames can cause jitter or jumping when converted to a freeze frame.
- When a footage with incomplete data is frozen, it reveals hidden brightness shifts or banding.
- Heavily compressed or corrupted sources might not match the surrounding frozen frames perfectly.
How Repairit Helps Before You Apply a Freeze Frame DaVinci Resolve Effect
A davinci resolve freeze frame effect works best when the footage itself is stable and intact. This is where Repairit Video Repair can be useful as a preparatory step.
Repairit Video Repair is designed to repair corrupted or damaged video files before editing. By restoring missing or unreadable data where possible, it helps ensure your clips play smoothly in DaVinci Resolve and produce cleaner freeze frames.
Key Features
- Broad Format Support: Works with common and professional formats used in DaVinci Resolve workflows, including MP4, MOV, MKV, and selected camera-specific formats.
- Advanced Video Repair Mode: Uses a reference (sample) file to help reconstruct heavily damaged clips while maintaining original encoding where supported.
- Support for High-Resolution Footage: Capable of repairing HD, 4K, and higher-resolution files depending on file condition and format.
- Batch Repair Capability: Allows multiple corrupted clips to be repaired in one session, saving time before editing.
- Preview Before Saving: Lets you review repaired footage to confirm playback stability before importing into DaVinci Resolve.
Tutorial to Repair Corrupted Clips Before Using DaVinci Resolve
Following the guided tutorial ensures your DaVinci Resolve still frame is stable and ready for further professional editing:
Step 1. To do so, access the “Video Repair” tab and press the “Start” button to begin adding videos.

Step 2. Move forward and proceed to the “Repair” button to get all your corrupt footage fixed.

Step 3. Once done, preview your repaired clips and hit the “Save All” button to secure them on your device.

Conclusion
In summary, well-captured stills make your content more intentional, and when created through DaVinci Resolve freeze-frame, the results become truly impressive. A single paused moment can draw viewers in, or underscore an important detail, regardless of the approach you use. With thoughtful execution and repaired footage through Repairit, each freeze frame adds refinement to your edits.
Frequently Asked Questions
-
Q1. Why does my freeze frame flicker when exporting?
It often occurs due to mismatches in frame rate, timeline settings, or corrupted source footage. To avoid this, make sure your project’s frame rate matches the clip, and using high-quality files can even eliminate most flicker issues. -
Q2. Can I add text or motion graphics to a freeze frame in DaVinci Resolve?
Yes, once you freeze frame in DaVinci Resolve, you can add overlay text titles and motion graphics just like any other clip. This is convenient for emphasizing key points, creating cinematic effects, and even adding instructional annotations. -
Q3. How do I fix a corrupted frame before freezing it?
To repair a damaged clip before applying a freeze frame, use dedicated video repair software such as Repairit. The program excels at restoring corrupted or glitchy footage, regardless of format or underlying corruption.