
DaVinci Resolve is one of the best video editing programs out there, but it’s not perfect. If you’re dealing with random crashes while launching the app, editing your project, or exporting your final video, keep still. In this guide, we’ll explain why DaVinci Resolve keeps crashing and share fixes to help you.
If you’re in a rush, try these quick solutions first:
- Make sure your computer meets DaVinci Resolve’s system requirements.
- Update your graphics card drivers (AMD/NVIDIA).
- Launch Resolve in Compatibility Mode.
- Clear DaVinci Resolve’s cache folder.
- Use standard video/audio file formats when editing.
- Match rendering frame rates with the source material.
- Turn off GPU acceleration if crashing during export.
- Reinstall the latest version of DaVinci Resolve.
If these don’t work, keep reading for a detailed fix for each situation.
In this article
Part 1. Common Situations When DaVinci Resolve Crashing
DaVinci Resolve keeps crashing at different points while working, and many users have shared their frustrations online. Based on real experiences from Reddit and forums, here are the most common crash scenarios:
- Startup Crashes: DaVinci Resolve fails to open or crashes while loading the splash screen.
- Editing Crashes: Crashes while dragging clips, applying effects, or previewing the timeline.
- Rendering/Export Crashes: Crashes during the export process, especially with higher resolutions like 4K.
- Random Freezes: The program freezes without warning and needs to be force-closed.
One user said:
Part 2. Why does DaVinci Resolve Keeps Crashing?
There are several reasons why DaVinci Resolve might keep crashing, even on good computers. Understanding these causes can help you fix the problem faster:
- Hardware Limitations. Even if you have a strong CPU or GPU, DaVinci Resolve demands a lot of system resources. Insufficient RAM, overheating, or hardware conflicts can still lead to crashes.
- Outdated or Incompatible Drivers. If your graphics card drivers (AMD/NVIDIA) are outdated or not properly installed, Resolve can become unstable.
- Software Bugs or Version Issues. Using an older version of Resolve or even certain newer updates can introduce bugs that cause random crashes.
- Unsupported Media Files. Trying to import, edit, or export video or audio formats that aren't fully supported can cause Resolve to crash mid-project.
- Third-party Plugins or LUTs. Some external plugins, LUTs, or effects may not be optimized for the current version of Resolve, leading to instability.
- System Compatibility Problems. Running DaVinci Resolve on an unsupported operating system or a computer that doesn’t meet minimum requirements can trigger frequent crashes.
- Corrupted Cache or Preferences Files. Over time, corrupted cache files, databases, or user settings can build up and cause Resolve to behave unpredictably.
Part 3. Fix DaVinci Resolve Crashing Due to Startup Crashes
If DaVinci Resolve crashes right after launch or during the loading screen, it’s likely a system compatibility or configuration issue. Try the fixes below:
1. Make Sure Your Computer Meets The System Requirements
One reliable way to stop DaVinci Resolve 18 from crashing is to make sure your computer meets the tool’s minimum system requirements.
Below are the recommended system requirements for DaVinci Resolve 18 on Windows and macOS:
For Windows:
- Windows 10 or newer
- Intel Core i7 or AMD Ryzen 7 processor
- At least 16 GB of RAM
- At least 2 GB of GPU memory
For macOS:
- macOS 11 or newer
- Intel Core i7 or better (for Intel Macs) / M1 chip or better (for Apple Silicon Macs)
- At least 8 GB of RAM
- At least 2 GB of GPU memory
2. Update the Graphics Driver (AMD/NVIDIA)
Drivers help your computer's parts work together. In this case, the graphics card needs drivers to talk to the motherboard and operating system. Without drivers, the graphics card won’t work.
Sometimes, these drivers get deleted, become outdated, or stop working properly. When that happens, DaVinci Resolve may not recognize your graphics card.
Use these procedures to upgrade your graphics card drivers:
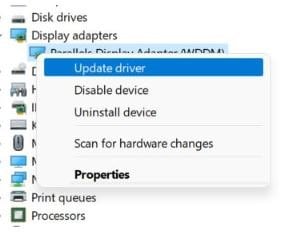
Step 1. Click the search icon (magnifying glass) on your taskbar and type “Device Manager.” Or, right-click the “Start” button and choose “Device Manager.”
Step 2. In Device Manager, find and expand “Display adapters.” Right-click each graphics card listed and select “Update driver.”

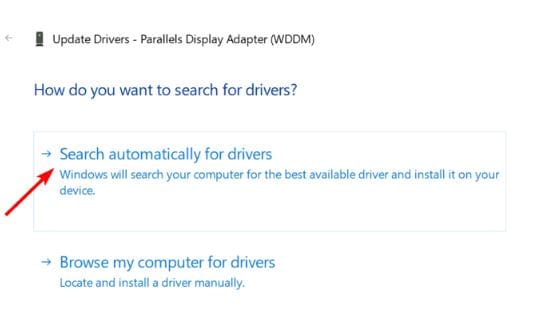
Step 3. Click “Search automatically for drivers.” Your computer will try to find and install the latest version.
It's nice if it states that your drivers are already current! But this method might not always give you the latest version from your graphics card maker. Windows usually installs the most stable version it finds, not necessarily the newest.
If you don’t use automatic update tools like GeForce Experience, your drivers may still be outdated.
To manually install the latest drivers:
Step 1. Open Google and search your GPU name + “driver download.” Example: “NVIDIA GTX 1650 driver download”
Step 2. The top result is usually from the official website (NVIDIA, AMD, etc.). Be sure the site is legit before downloading anything.
Step 3. Download the driver file. It should go to your “Downloads” folder.
Step 4. Double-click the file to start the installation. Follow the steps until it finishes.
Step 5. Restart your machine after installation, then launch DaVinci Resolve once again.
3. Use "Compatibility Mode" to Start Resolve
If DaVinci Resolve won’t open normally, it might not be fully compatible with your system. You can try running it in compatibility mode to fix the issue.
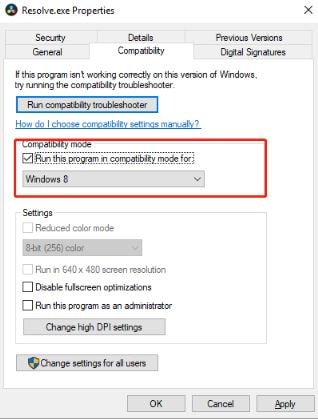
Step 1. You may either right-click the DaVinci Resolve shortcut on your desktop or choose the DaVinci Resolve file by going to the folder where it is installed. Then choose Properties.
Step 2. In the window that appears, click the Compatibility tab. Next, choose the "Run this program in compatibility mode" checkbox.
Step 3. From the list, select Windows 8. Click Apply and then OK to save the changes.

Now try opening DaVinci Resolve again and see if it works properly.
4. Try Clearing the Application Cache Folder
If DaVinci Resolve is lagging or not working properly, clearing the cache might help. Follow these steps to delete the cache files:
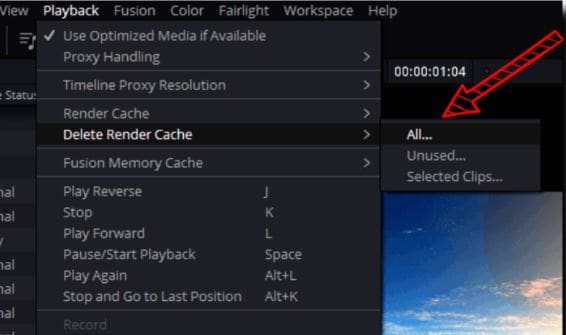
Step 1. Open DaVinci Resolve and load your project.
Step 2. Select "Playback" from the menu at the top.
Step 3. Select "Delete Render Cache" and then choose "All."
This will remove all the cache files from your current project and may improve performance.
More related articles
Best 9 Solutions to Fix DaVinci Resolve Playback Lag Issue
MXF DaVinci Resolve: How to Import, Edit, and Export Files
How to Stabilize DaVinci Resolve Video: A Complete Guide
Part 4. Fix DaVinci Resolve Crashing During Editing or Timeline Use
Besides, DaVinci Resolve keeps crashing during start-up; you may also experience a crash while editing. To solve this issue, this section will guide you through simple fixes to keep the program stable during editing.
1. Use Compatible Video/Audio File Formats
If DaVinci Resolve keeps crashing because of file format problems, it's a good idea to convert those files into a format that works well with the program. For example, if you're having issues with MP4 videos, changing them to a format supported by DaVinci Resolve can fix the problem right away.
DaVinci Resolve is compatible with the following video formats (codecs):
- ProRes
- H.264 and H.265
- MPEG-2
- QuickTime
- AVCHD
2. Move Media Files to the Root Directory of the Local Disk
Sometimes, DaVinci Resolve 18 crashes because the folder where your video files are saved doesn’t have the right permissions. This can be frustrating, but it’s easy to fix.
Just move your video files to a different folder on your computer. Then, open DaVinci Resolve and use the “Import Media” option to add the videos from the new folder.
3. Turn off Real-time Preview Rendering Acceleration.
When you’re rendering a video in DaVinci Resolve, turning off viewer updates can help speed things up and reduce the load on your computer.
Step 1. Go to the “Delivery” tab.
Step 2. Click the three dots (“•••”) above the viewer screen.
Step 3. Select “Updates During Renders” and choose either “Off” or “Minimal.”
This will make rendering faster and easier on your computer.
Part 5. Fix DaVinci Resolve Crashing During Rendering/Export
If DaVinci Resolve crashes while you're rendering or exporting this part is for you. This part will show you simple ways to fix those crashes and finish your export.
1. Set the Rendering Frame Rate to Match the Source Material
To avoid crashes or glitches during export, it's important to set your rendering frame rate to match the frame rate of your original footage. This helps DaVinci Resolve render your project without dropping frames.
Step 1. Choose a frame rate based on where you’ll share your video. For example, 23.976 fps is common in the US, while 25 fps is used in Europe.
Step 2. Open DaVinci Resolve and go to File > Project Manager. Click New Project, name it, and hit Create. Before adding any clips, click the gear icon, go to Master Settings, and set your Timeline and Playback Frame Rate. Click Save.
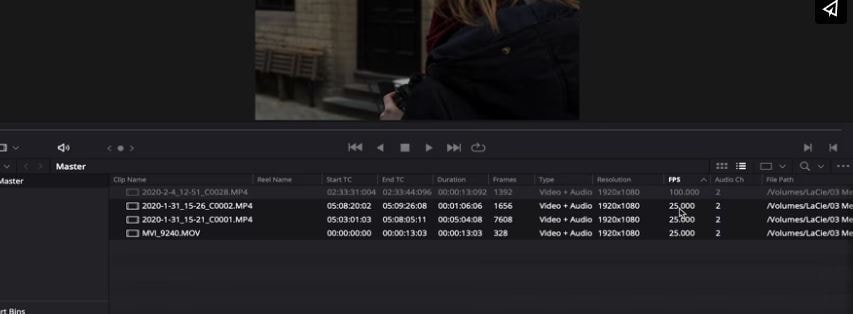
Step 3. If your clips have a different frame rate, Resolve adjusts them automatically. But for better control, adjust the frame rate manually in the Media Pool. Right-click the clip > Clip Attributes, then change the Video Frame Rate to match your project.

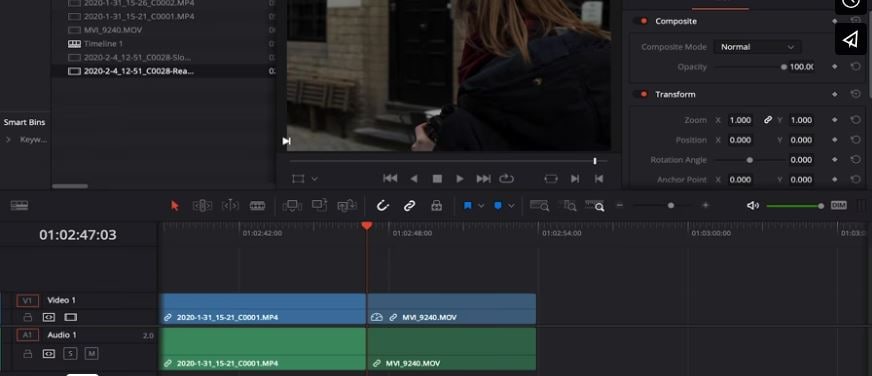
Step 4. To speed up or slow down a clip, go to the Edit tab. Select the clip and press Ctrl + R. Click the arrow by the speed %, then choose Change Speed and set the new value like 50% or 200%.
Step 5. Duplicate the clip in the Media Pool using Ctrl + C and Ctrl + V. Rename each one to know the difference. Adjust each clip’s frame rate separately, then add them to your timeline where needed.
2. Try Turning off the GPU Acceleration Option
Once your system meets the basic requirements, the most important part for running DaVinci Resolve is the GPU. If you’re using an integrated GPU and DaVinci Resolve won’t open, it’s best to switch to a dedicated GPU, like the GeForce 1070, 1060, or similar AMD models, which usually offer better graphics performance.
If your computer has both integrated and dedicated graphics cards, make sure DaVinci Resolve is using the dedicated one. You can do this by turning off the integrated GPU. Here’s how:
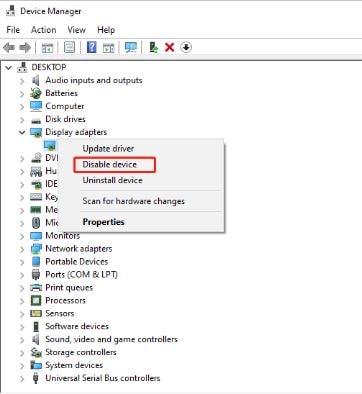
Step 1. Right-click the Start button and select Device Manager.
Step 2. Double-click Display adapters to open the list.
Step 3. Right-click on your integrated GPU and select Disable device. Then click OK to confirm.
3. Reinstall the Latest Version of Resolve
Blackmagic often releases updates for DaVinci Resolve 18 to fix bugs and improve performance. These updates help stop the app from crashing or not working properly. That’s why it’s important to keep both DaVinci Resolve and your operating system up to date. Using old versions can lead to errors and other issues.
Part 6: Fix Damaged Video Files After DaVinci Crashes
If DaVinci Resolve crashes while exporting or rendering, it can leave you with a corrupted or unplayable video file. These issues happen when the software closes unexpectedly or the rendering process is interrupted. To solve this, you can use Repairit Video Repair, a reliable tool made to fix damaged video files. It supports many formats, including MP4, MOV, and AVI, which are commonly used in DaVinci Resolve.
In more severe cases where basic repair doesn't work, Repairit also offers an Advanced Repair option. This feature uses a sample video with the same settings to help fix deeper file issues more accurately.
Let’s look at a few common scenarios and how Repairit Video Repair helps fix them:
Scenario 1: The video won’t open after rendering crashes
After DaVinci crashes, you try to open the exported file, but your media player says it's “unsupported” or “corrupt.” This means the file structure is incomplete or unreadable.
🍩 How Repairit fixes it: Repairit scans the file and rebuilds the missing or damaged headers. It restores the correct format structure so the video can be read properly by players like VLC or QuickTime.
Scenario 2: The video plays but has no sound
You might find that the video loads fine, but there’s no audio. This usually happens if the audio track wasn’t fully written during export due to a crash.
🍩 How Repairit fixes it: Repairit resolves it by separating and examining the audio and visual streams. If it detects damage in the audio stream, it reconstructs it using available metadata. In many cases, it restores clear, synchronized sound without needing to re-edit the project.
Scenario 3: The video shows black frames or glitches
Sometimes, the video plays with strange colors, blocks, or black areas, especially during certain parts of the clip. These are signs of corrupted frames or incomplete rendering.
🍩 How Repairit fixes it: Repairit goes frame-by-frame to detect visual inconsistencies. It then attempts to fix or replace damaged frames using data from surrounding healthy frames. This makes the final video smoother and visually stable.
Scenario 4: The video freezes or stops partway
A crash during export might leave your video only partially rendered, causing it to freeze at a certain point or stop playing entirely.
🍩 How Repairit fixes it: Repairit analyzes the playback stream and works to recover the remaining data. It reconstructs missing segments if possible, or stabilizes playback up to the crash point so you can at least use the playable portion.
Fix Damaged Video Files After DaVinci Crashes
 Security Verified. Over 7,302,189 people have downloaded it.
Conclusion
DaVinci Resolve crashes are common but fixable. If the crashes start during startup, editing, or export, the key is compiled in this article. With a few fixes, your trouble can be fixed easily.
FAQ
Why does DaVinci Resolve crash when rendering 4K videos?
Your GPU may be overloaded. First, try rendering at 1080p or less, and then gradually raise the resolution. Also, match the export frame rate with your footage.Can plugins or LUTs cause DaVinci Resolve to crash?
Yes. Unstable or outdated plugins and LUTs often cause editing or export crashes. Remove or update them if crashes persist.Which is more stable, DaVinci Resolve on Windows or macOS?
Both platforms are supported well, but some users find DaVinci Resolve more stable on macOS, especially with M1/M2 chips.
