

Video editing is a time-consuming operation that demands a great deal of patience and skill. When laggy video playback interferes with the creative process, frustration can quickly build. There are many potential causes for video lag, which can be a significant issue for editors. However, this issue can arise with any widely used video editing software, including DaVinci Resolve.
Are you facing playback lagging on your DaVinci Resolve? How to solve this issue? This article will explain nine methods to fix DaVinci Resolve playback lagging issues to help you have a smooth playback experience while editing.
In this article
- Way 1: Check DaVinci Video Corruption
- Way 2: Lower Playback Resolution
- Way 3: Enable Render Cache
- Way 4: Use Proxy Media Files
- Way 5: Change Timeline Resolution
- Way 6: Disable Color Grades
- Way 7: Upgrade DaVinci Resolve to Studio
- Way 8: Optimize Memory and GPU Settings
- Way 9: Generate Optimized Media
Part 1: How to Tell If DaVinci Resolve is Lagging?
Here are a few common scenarios to check for DaVinci Resolve is whether lagging or not:
1. After the video editing project loads on the DaVinci Resolve, when you hit play, does it play without being choppy on the timeline?
2. During the editing process, when you try to play the preview, does the timeline play immediately?
3. Do you feel that there is a slight buffering before the preview starts to play during video editing?
4. Is there any stuttering when you try to play on the timeline?
4. Have you experienced a reaction time difference between each edit you apply?
5. Does each deletion or cropping of the clip show a delay in applying?
6. You also feel that importing video clips to the timeline is taking forever to load?
Part 2: 9 Best Solutions for DaVinci Resolve Slow Playback Issue
DaVinci Resolve lagging playback is a frequent problem, and many users seek methods to prevent lag and achieve smooth playback. Here are the best nine solutions to address the issue:
Way 1: Check DaVinci Video Corruption
Before addressing DaVinci Resolve solutions, ensure that the video clip you are trying to edit is not damaged or corrupted, as this could cause DaVinci laggy playback issues. Start by playing the video file in a media player to confirm it works properly without errors. If the file does not play, it may be corrupted or damaged. In this situation, third-party solutions such as Repairit Video Repair software can help you recover the damaged video file quickly.
Here is how you can repair a damaged video file using Repairit:
Step 1: Launch the application and click the "+Add" button at the center, or simply drag and drop the damaged video file or multiple files into the program window.

Step 2: Next, click the "Repair" button at the bottom to initiate the repair process.

Step 3: Once the repair action is completed, a pop-up window appears to save and preview the repaired videos. Click the "OK" to save the repaired videos.

Fix Corrupted DaVinci Video Files Now
 Security Verified. Over 7,302,189 people have downloaded it.
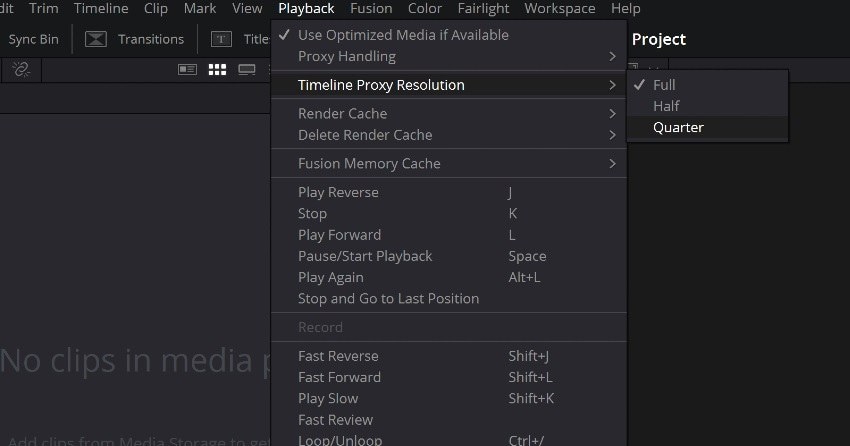
Way 2: Lower Playback Resolution
To have a smooth playback while editing, you should reduce the playback resolution. However, reducing playback resolution will not affect the final render quality of the video, it only affects the DaVinci laggy playback.
To increase the speed of your playback in DaVinci Resolve:
Step 1: Click on the “Playback” menu at the top, after you open your project in DaVinci Resolve.
Step 2: Select the “Timeline Proxy Resolution” and set the playback resolution to “Half” or “Quarter” option.
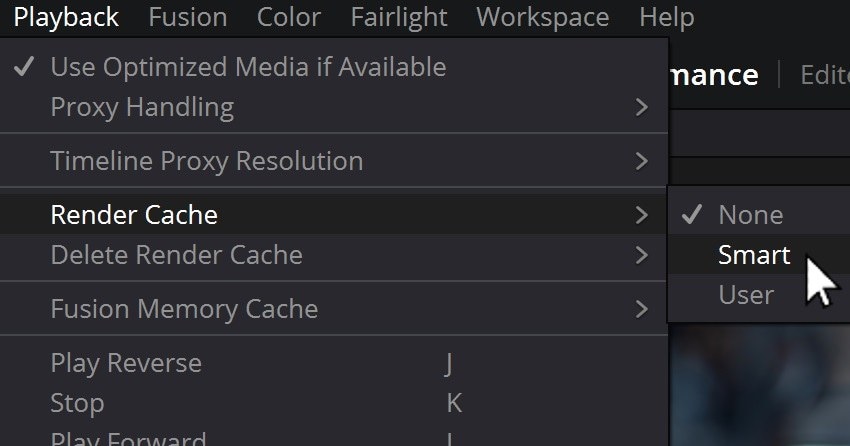
Way 3: Enable Render Cache
During the rendering process of a clip, the app produces the render cache file that saves the rendering frames. The cache file helps the rendering faster and enhances playback performance during the editing of the video. By enabling the render cache option during the Davinci Resolve laggy playback, you can solve the issue and also have smooth and quick playback.
Follow the below steps to enable the render cache file:
Step 1: Click on the “Playback” menu and select the “Render Cache” option.
Step 2: From the three options displayed: None, Smart, and User. Select the “Smart” option. The DaVinci Resolve will automatically select which clip needs to be cached to have faster render speed and playback.
Way 4: Use Proxy Media Files
To resolve the DaVinci Resolve playback lag issue, another method is to use the proxy media during the editing process. A proxy media file is a downsized copied version that is transcoded from the large original video for smoother rendering and playback. When working with a large video file in DaVinci Resolve, you should consider using a proxy file to enhance the playback performance.
Here is how you can create a proxy file for large video files in Davinci Resolve:
Step 1: Navigate to the "Media Pool" on the application and right-click on the video file you want to create a proxy file.
Step 2: Select the "Generate Proxy Media" option from the menu.
Wait for the proxy file to be generated on DaVinci Resolve. The duration of creating a proxy file depends on the size of your video file.
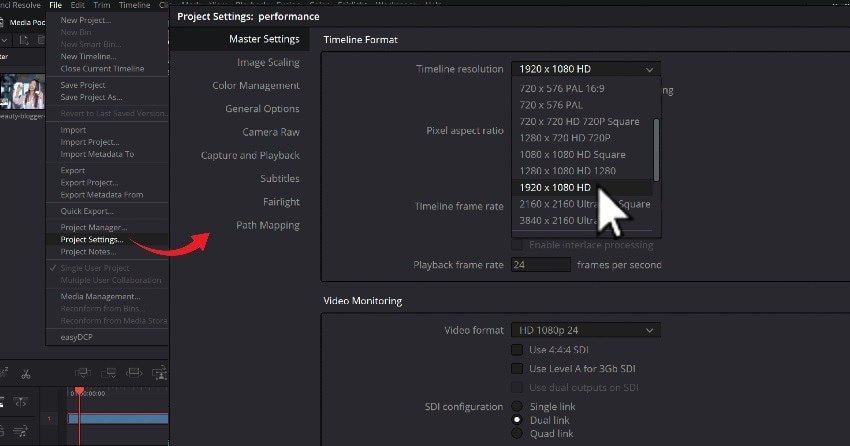
Way 5: Change Timeline Resolution
Although DaVinci Resolve supports working with high-resolution video footage including 4K UHD or higher. However, depending on the system resources, working with higher-resolution files can result in DaVinci Resolve preview playback lag issues. Thus, during the editing process, you can reduce the timeline resolution down to a 1080p timeline, to speed up the system and avoid choppy playback.
Here is how you can reduce timeline resolution to fix Davinci Resolve preview lag:
Step 1: Click on the “Settings” option at the bottom right corner to open the “Project Settings” window.
Step 2: Expand the “Timeline resolution” menu and select the “1920x1080 HD” option. Click on the “Save” option to apply the changes. Choose this resolution option if you are working with a 4K or higher resolution footage, or else you can select lower resolution as well.
Step 3: Alternatively, you can change the timeline resolution by right-clicking on the timeline in the Media Pool and selecting the “Timelines” option.
Step 4: Next, click on “Timeline Settings” and enable the “Use Project Settings” checkbox. Pick the desired resolution from the list and click “Ok” to save.
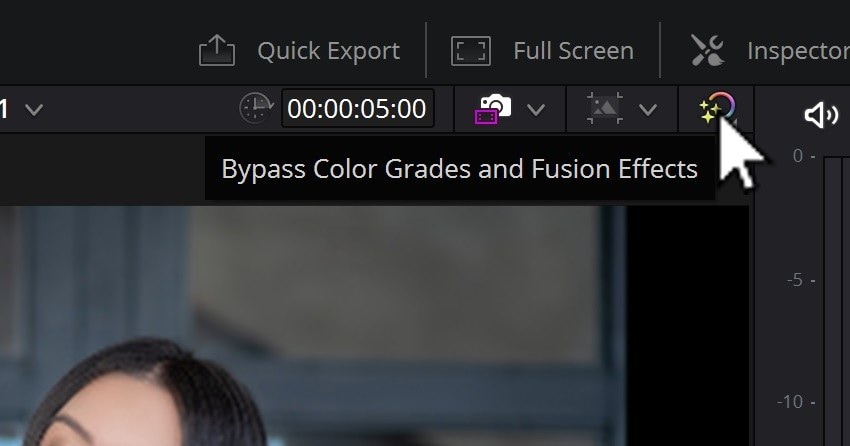
Way 6: Disable Color Grades
Sometimes, the color grades and other effects or filter options during editing also can cause timeline preview playback issues. Especially for high-resolution and large video files. Therefore, you can disable the color grades and other effects options to stop the DaVinci Resolve preview lag problem.
To disable color grades and other effects, simply click on the “Bypass Color Grades and Fusion Effects” button at the top right of the DaVinci Resolve Edit page.
Way 7: Upgrade DaVinci Resolve to Studio
Although both free and paid versions support GPU acceleration, the Studio version additionally offers hardware-accelerated decoding and encoding for formats like H.264 and H.265. Making the Studio version significantly speeds up the editing and rendering processes, reducing the time considerably. It also helps improve the preview playback performance compared to the laggy speed on the free version.
In case you are experiencing DaVinci Resolve lagging playback issue consistently in the free version. You should consider upgrading to the paid Studio version for better performance and smooth playback experience.
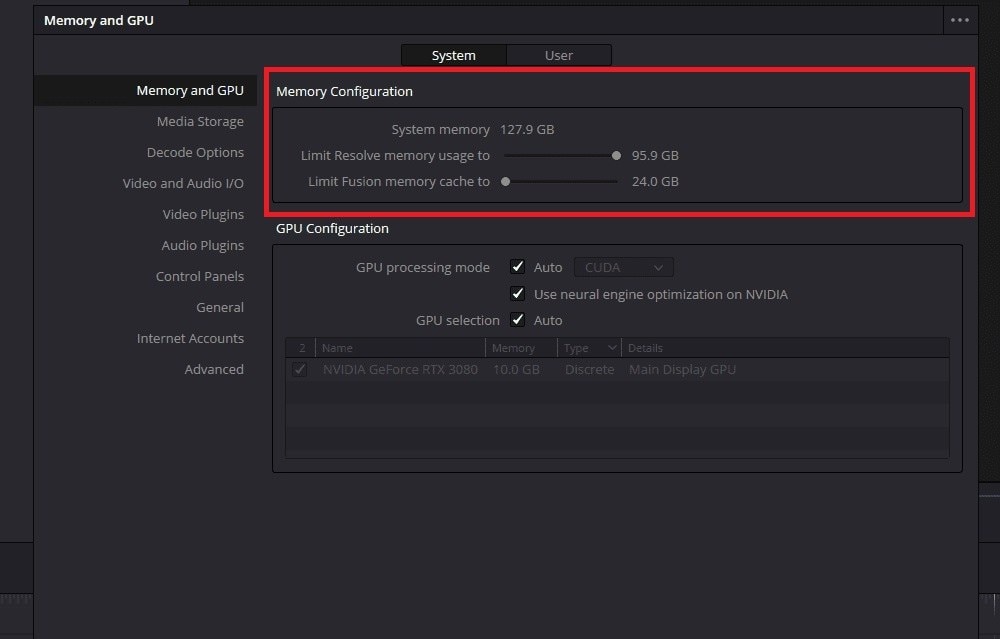
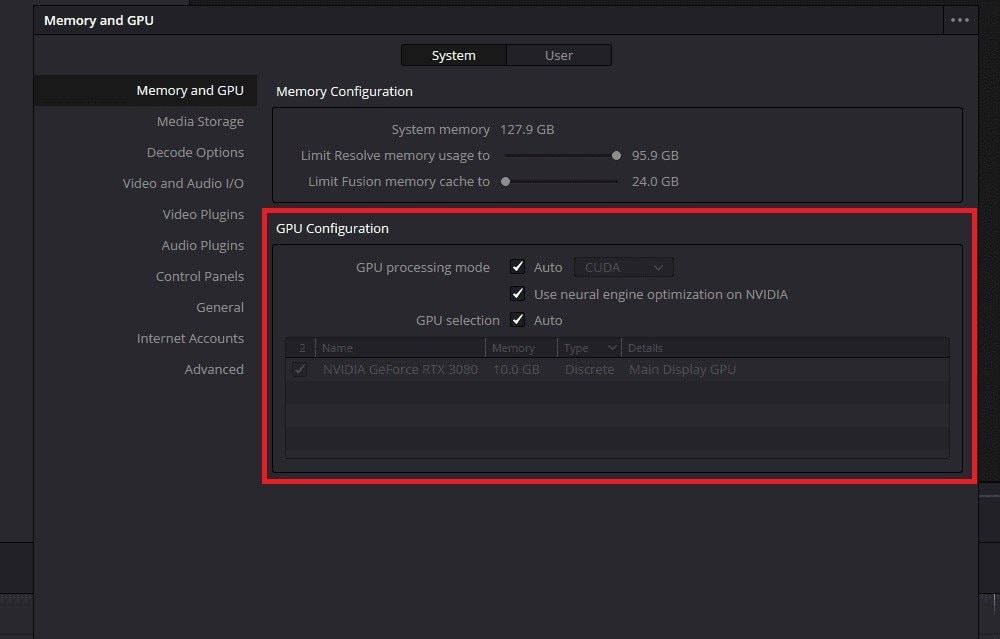
Way 8: Optimize Memory and GPU Settings
You can resolve the DaVinci Resolve laggy playback issue by tweaking its system preferences to improve GPU performance. Follow the below steps to optimize the memory and GPU settings of DaVinci Resolve:
Step 1: Click on the "Menu" option and select the "Preferences" option from the list.
Step 2: Under the “Memory Configuration” section, increase the “Limit Resolve memory usage to” option to allocate the higher amount of system memory.
Step 3: Under the “GPU Configuration” sedition, make sure the “GPU processing mode” and “GPU selection” options are set to “Auto”.
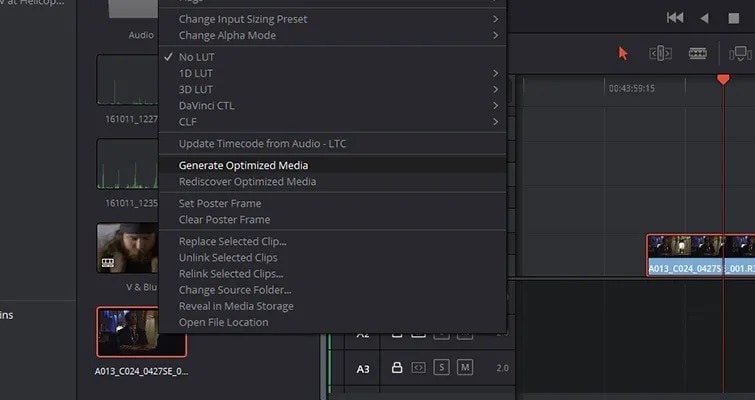
Way 9: Generate Optimized Media
Although DaVinci Resolve supports a range of video file formats, not all are optimized for playback performance. If you are using unsupported or rare video file formats, and facing preview playback lag problem. To improve playback speed, you can consider converting your video files to more efficient formats that DaVinci Resolve processes better, such as DNxHR, ProRes, or Cineform.
Here is how you can convert your video file format to efficient formats on DaVinci Resolve:
Step 1: Select all the video files you want to convert in the "Media Pool".
Step 2: Next, right-click on the selected files and choose the "Generate Optimized Media" option from the list. The app will automatically convert the files to an optimized format.

Part 3: Common Causes of Editing Playback Issues
While the DaVinci laggy playback can be a problem for all editors, however, understanding the most common causes for this issue can help figure out the problem quickly and apply the relevant fix effectively. Here are some of the most common causes of DaVinci lagging playback issues:
- Hardware: As the DaVinci Resolve constantly updates with new versions, a common cause of lagging or stuttering playback is due to the hardware's inability to handle the demands. To ensure a seamless workflow, make sure your system specifications match the DaVinci Resolve system requirements.
- Too Many Programmes Open: The more programs you have open and running, the slower your computer will be. As a result, the DaVinci Resolve play lag issue arises due to insufficient system resource availability. Thus, consider running minimum programs while video editing for smooth playback.
- Referencing Different Drives: Another common cause of delayed DaVinci playback is using external drives without considering how the drive's performance affects video editing. When choosing hardware for your projects, it's always best to go with a fast hard drive.
- Different Frame Rates: Video frame rates can cause multiple kinds of complications while editing, especially during playback. This frequently happens when working with multiple footage from different sources. For example, if your timeline has a different frame rate than your video, issues might come up. Frame rates must remain consistent throughout the project, including the sequence, footage, and outputs.
Conclusion
To address the laggy playback problem in DaVinci Resolve, it is important to first identify the cause. Once the cause is understood, you can implement the appropriate solution. The solutions mentioned earlier are straightforward to apply and can help restore smooth video playback during editing. Before attempting any troubleshooting steps, ensure that your video clip is not damaged.
FAQ
1. Why is my video playing slow in DaVinci Resolve?
Your video might be playing slowly in DaVinci Resolve because of insufficient system resources, high-resolution footage, complicated effects, or unoptimized media. You can also try lowering the playback resolution, creating proxies, or checking system requirements.2. What is the render cache in DaVinci Resolve?
In DaVinci Resolve, the render cache is used to temporarily store processed video frames and increase playback smoothness by caching produced effects, color adjustments, and other changes, which reduces your workload on the system.You can enable it under Playback > Render Cache and select "Smart" or "User" modes for more efficient editing.
3. How to render in DaVinci Resolve for smooth playback?
To have a smooth playback during render on DaVinci Resolve, follow below steps:1. Reduce timeline resolution to improve performance.
2. Create proxy media for faster editing.
3. Enable render cache for background rendering of effects and transitions.
4. Optimize media management to reduce system load.
5. Ensure your system meets the recommended specs.
