
When working on high-quality video projects, creators often come across MKV files, a format known for its features. While people prefer using this format for multiple audio tracks, accessing it in Premiere Pro evokes another obstacle. Once you try to use MKV in Premiere Pro, you might quickly realize that it's not completely supported, leading to playback errors.
This restriction might be disturbing, but the article that follows covers every aspect and workaround you might need to know. Most importantly, you’re guided through step-by-step import solutions for using this format in Premiere Pro.
Table of Contents
Part 1. Does Premiere Pro Support MKV?
Adobe Premiere Pro only possesses limited support for MKV files as of the 2025 release. Version 25.2.0 reportedly allows importing MKV containers only if the video is encoded with H.264 and the audio with AAC. Older versions, and even some recent builds, do not support MKV at all, making direct import unreliable for many.
A major reason for the MKV into Premiere failure is that its container format holds different codecs and standards. The program might sometimes access the MKV wrapper, but struggles or fails when the internal codecs aren’t natively supported. This complexity means even if an MKV opens, you may face missing audio, unsupported compression errors, and playback issues. Hence, the broad versatility of the MKV format is what leads Premiere to fail.
Part 2. Common MKV into Premiere Errors (And What Causes Them)
Either it's due to codec incompatibilities or missing file components, explore the provided reasons for why MKV in Premiere Pro runs into issues:
- File Import Failure: A frequent issue that most users often face when trying to use MKV in Premiere is that the file format is not supported. Even if the file plays fine in a media player, Premiere might fail to interpret its structure correctly.
- No Audio or Missing Subtitles: This error typically occurs when the embedded audio track or subtitle format isn’t supported by Premiere Pro. MKV files, by nature, contain audio codecs like DTS or AAC variations that the software doesn’t decode natively.
- Lagging and Shuttering Playback: The MKV files often come with high-bitrate or variable frame rate (VFR) encoding, overloading Premiere’s playback capability. This is why the program struggles to keep up with decoding such complex data in real time.
- Rendering or Export Errors: When editing MKV in Premiere Pro, users might face export crashes or incomplete renders. These problems arise from hidden data inconsistencies within the MKV file or from unsupported codec parameters that interfere.
- Sync or Timing Issues: MKV with variable frame rates might cause the audio and video to desynchronize after being imported into Premiere Pro. Since software expects a constant frame rate for playback, the irregular frame pacing in MKV can throw off timing during editing.
Part 3. How to Use MKV in Premiere Pro: Step-by-Step Import Solutions
While the program doesn’t support MKV, the following tested solutions are proven to import MKV to Premiere successfully:
1. Remux MKV into MP4 (No Re-Encoding, Fastest)
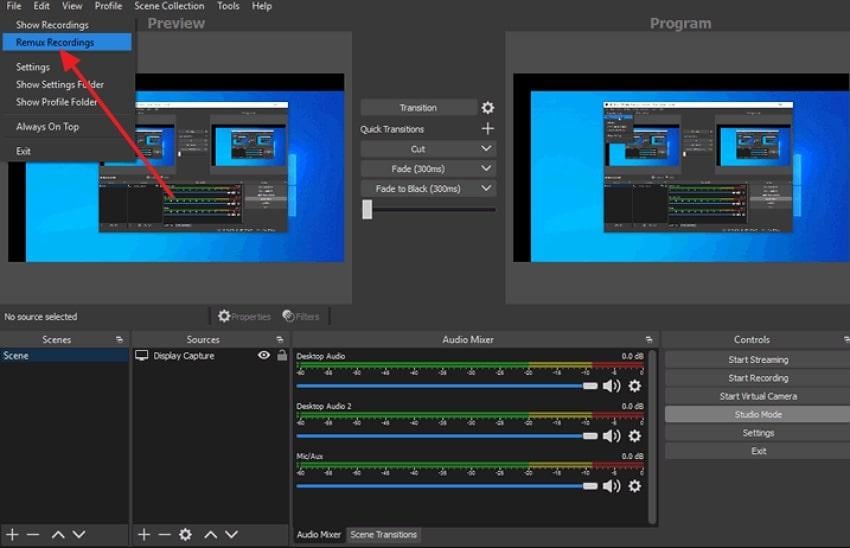
To edit MKV in Premiere Pro, many users choose the remux option, which rewraps the video/audio streams into a new MP4 file. You can use programs like OBS Studio to complete this process in 100% original quality, making the file compatible with Premiere. For more clarity, explore the provided tutorial and remux MKV into MP4 through OBS, a lossless fix:
Step 1. Commence OBS Studio, access the “File” menu, and select the “Remux Recordings” option from the extended menu.
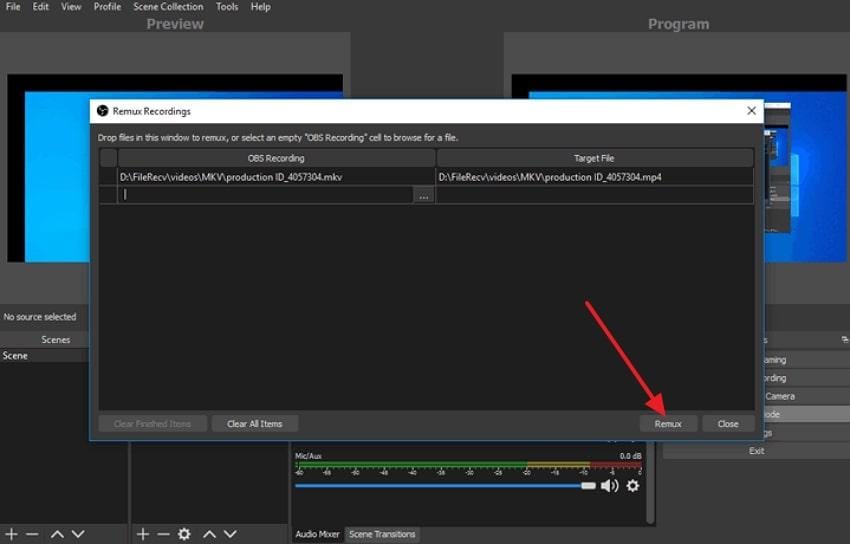
Step 2. Use the “Add" button to import an MKV file and access the “Three Dots” icon of “Target File” to add an MP4 file. Once done, press the “Remux” button to start remuxing MKV to MP4 in OBS.
2. Convert MKV to MP4 or MOV (Best Practice)
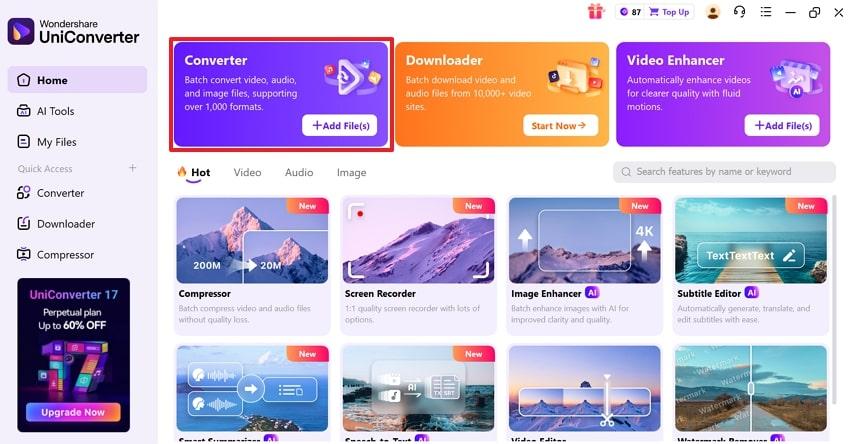
When your MKV uses uncommon codecs, you can try converting it into MP4 or MOV, formats that Premiere handles seamlessly. For these tasks, consider using UniConverter, which supports over 1,000 formats and enables batch processing. To integrate MKV in Premiere, conversion through UniConverter allows users to set the resolution and frame rate as well. Adhere to the tutorial and understand how to convert MKV to MP4:
Step 1. Access the upgraded version of UniConverter, then press the “+ Add File(s)” option of the Converter tool to insert your MKV file.
Step 2. Here, expand the menu for “Convert To” and choose the “MP4” format from the options provided. Next, navigate to the “Convert All” button to begin converting your MKV to MP4.

3. Rename the File Extension from MKV to MP4
Another import solution is to rename your file extension from “.mkv” to “.mp4” to see if Premiere recognizes it. Whereas this trick only works when the MKV’s internal codecs are already compatible with Premiere Pro. For MKV in Premiere Pro insertion, this quick test is worth trying before moving on to more time-consuming conversion methods. Read the instructions and rename your file extension to check if Premiere accepts your MKV file:
Instructions: Open your File Manager, locate the MKV file, and right-click it to reveal further options. Afterward, select the “Rename” icon and change the extension name from “.mkv” to “.mp4” for seamless import in Premiere.
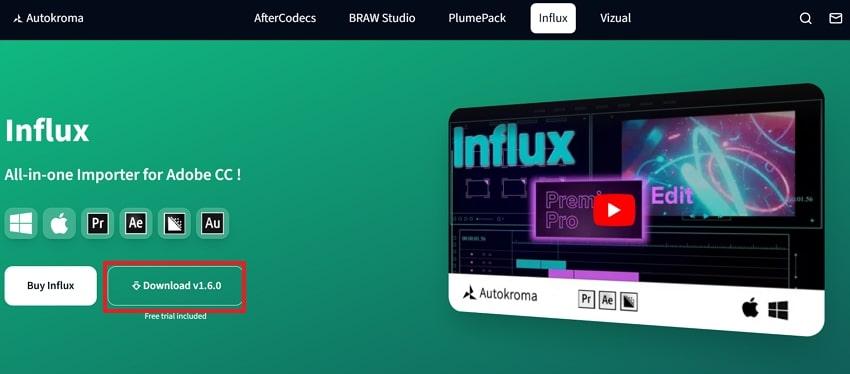
4. Try a Plugin
For editors who frequently work with MKV files, installing a plugin can make Adobe Premiere MKV import much easier. These plugins extend Premiere Pro’s decoding capabilities, allowing it to read MKV files directly without conversion.
In fact, just make sure the plugin version aligns with your Premiere build for optimal performance and compatibility. Go through the instructions and learn how to try a plugin for MKV import in Premiere:
Instructions: Visit the official Autokroma Influx website and download the latest version of the plugin, along with its Premiere connector. Run both installers, then restart Premiere Pro and activate the plugin to import your MKV file.
Part 4. MKV Imports but Won’t Play / Crashes? Repair Corrupted MKV First
If your MKV file imports into Premiere Pro but won’t play, lags, or causes random crashes, the issue often isn’t Adobe — it’s the file itself. MKV is a flexible but complex container format that can store multiple codecs for video, audio, and subtitles. When any of these data tracks are corrupted or improperly encoded, Premiere may fail to decode them, resulting in black screens, freezing, or playback errors.
Instead of spending hours converting or reinstalling codecs, the best fix is to repair the MKV file itself before re-importing it. That’s where Repairit Video Repair comes in. This professional tool restores damaged, unplayable, or partially corrupted MKV files while maintaining their original quality and structure.
You can repair multiple MKV videos simultaneously — whether they were damaged during recording, transfer, or storage. Once repaired, the files import and play smoothly in Premiere Pro without crashing or desyncing.
Key Features
- Fixes Unplayable MKV Files: Resolves corruption, header issues, and missing index data that prevent playback or cause Premiere to crash.
- Professional Repair Mode: Handles complex footage like RAW, HDR/LOG, and multi-codec MKV files while preserving original encoding and resolution.
- Advanced Repair with Sample File: Uses a similar working file as a reference to recover severely corrupted MKV videos.
- Preview Before Saving: Check the repaired video quality before exporting it back to your workflow.
Before attempting to edit your MKV in Premiere, follow the step-by-step guidelines and repair the corruption problem:
Step 1. Once the program is launched, access the “Video Repair” section and press the “Start” button to incorporate MKV files.

Step 2. When all the MKV files are added, proceed to the “Repair” button and get them fixed.

Step 3. Soon, when the process completes, review your MKV video files and press the “Save” button in the prompt window.

Part 5. Best Export/Transcode Settings for Smooth Editing
When the process to import MKV to Premiere Pro is completed, follow these recommended configurations for professional-level editing:
Consider the Appropriate Container: MP4 or MOV: Though MKV is great for storage, Premiere works best with MP4 or MOV containers. When transcoding, export your video in MP4 (H.264) or MOV (ProRes), as these are universally acceptable formats.
- Match Frame Rate and Resolution: Prefer matching your video’s original frame rate (FPS) and resolution during export to prevent jitter or motion inconsistencies. If your MKV was recorded in 60FPS at 1080p, keep those same settings in Premiere’s export panel to retain clarity.
- Set the Bitrate for Quality Balance: Adjust your bitrate settings, depending on your editing needs, for efficient compression without visible quality loss. For standard HD, a target bitrate of 8-12 Mbps is ideal, while 4K videos perform best between 35-45 Mbps.
- Optimize Your Audio Settings: To avoid sync issues, set your audio format to AAC, with a sample rate of 48 kHz and 320 kbps bitrate. This guarantees high-quality sound that aligns precisely with your video output during editing and playback.
- Utilize Smart Rendering (Optional): Enable the Smart Rendering option if your source and export codecs match each other. It allows Premiere to skip unnecessary re-encoding, immensely reducing export time, keeping the original quality preserved.
Conclusion
In conclusion, working with an MKV in Premiere can be both rewarding and challenging due to its limited native support. Whether you prefer remuxing, converting, or referring to a reliable plugin, you can unlock MKV files in Premiere Pro. When an MKV file report crashes during import, it might indicate corruption and require Repairit for its complete video repair.
Frequently Asked Questions
-
Q1. What’s the difference between remux and transcode?
The terms Remux and Transcode serve different purposes when working with video formats like MKV. Remux simply rewraps the existing audio and video data into a new container without altering the codec or quality. On the other hand, Transcode re-encodes video and audio into different codecs, such as converting an H. 265-encoded MKV file to an H. 264-encoded MP4 file. -
Q2. Why is my MKV audio out of sync?
MKV audio out of sync is usually due to variable frame rate (VFR) encoding or corruption in the file's timestamps. Various MKV files, especially those captured from a screen recording, use VFR, which Premiere Pro doesn't handle. For this, you can convert the MKV to a constant frame rate format before you import the MKV to Premiere Pro. -
Q3. Is there a Premiere Pro MKV plugin? (Autokroma Influx caveats)
There is a Premiere Pro MKV plugin called Autokroma Influx, which extends Adobe’s native import capabilities. Although it's a paid plugin and not officially developed by Adobe, it still works well with most codecs in MKV files.
