
If you're new to video editing, one of the most searched questions is: "How do I export MP4 in Premiere Pro?" Many Reddit threads feature beginners asking the same question, primarily because Premiere Pro's export options can be overwhelming at first.
In this guide, we’ll guide you through everything you need to know about Premiere Pro export MP4. Like why it matters, how to do it properly, and what to do if your final video doesn’t play or gets corrupted. Let’s break it down into simple steps.
Table of Contents
Part 1. Why Export Premiere Pro to MP4?
MP4 is one of the most widely used video formats in the world and for good reason. When you export Premiere Pro to MP4, you're creating a video file that’s highly compatible across various devices, platforms, and video players.
Another reason why MP4 is the top choice for you is its balance between quality and file size. Unlike uncompressed formats that require huge amounts of storage, MP4 compresses the video. Plus, the MP4 format uses the H.264 codec, which Premiere Pro supports natively.
Part 2. How to Export Premiere Pro MP4?
Exporting a video in MP4 format is a common step after editing in Adobe Premiere Pro. In this section, let's follow the simple steps to export Adobe Premiere Pro to an MP4 file using the right settings.
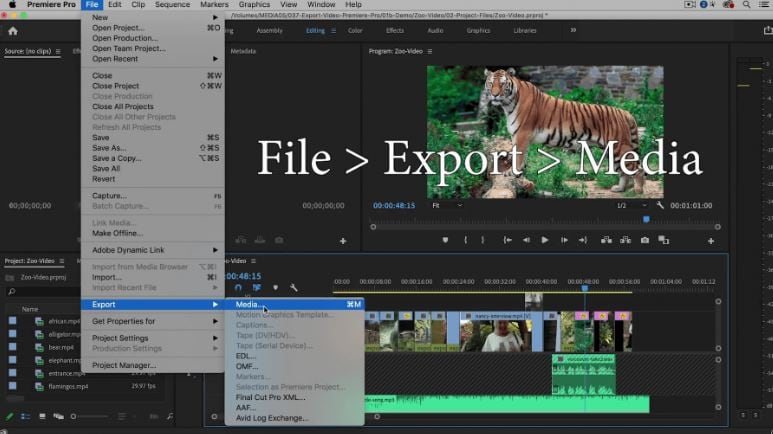
Step 1: Open the Export Settings Panel
Click File > Export > Media from the top menu. Or just press Ctrl + M (on Windows) or Command + M (on Mac) to open the export window.
Advice: Verify that the Timeline panel's sequence selection is correct. To choose which part of the video you want to export, use the Mark In and Mark Out buttons.
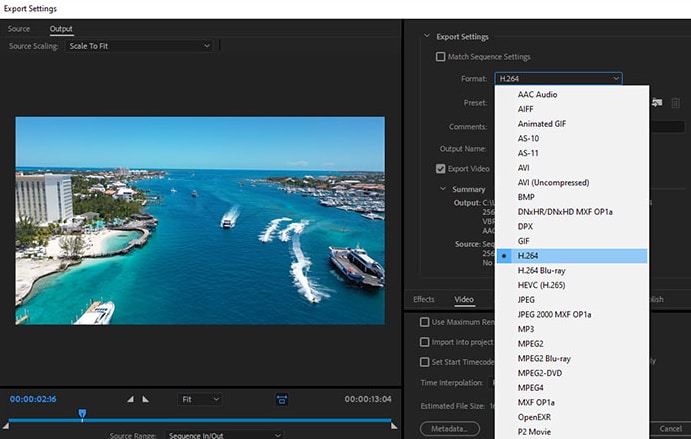
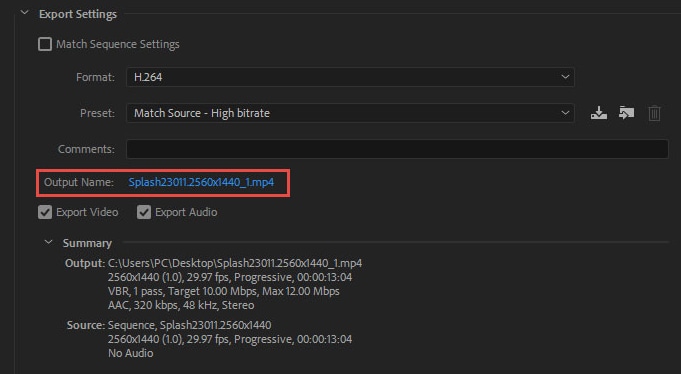
Step 2: Choose MP4 Format
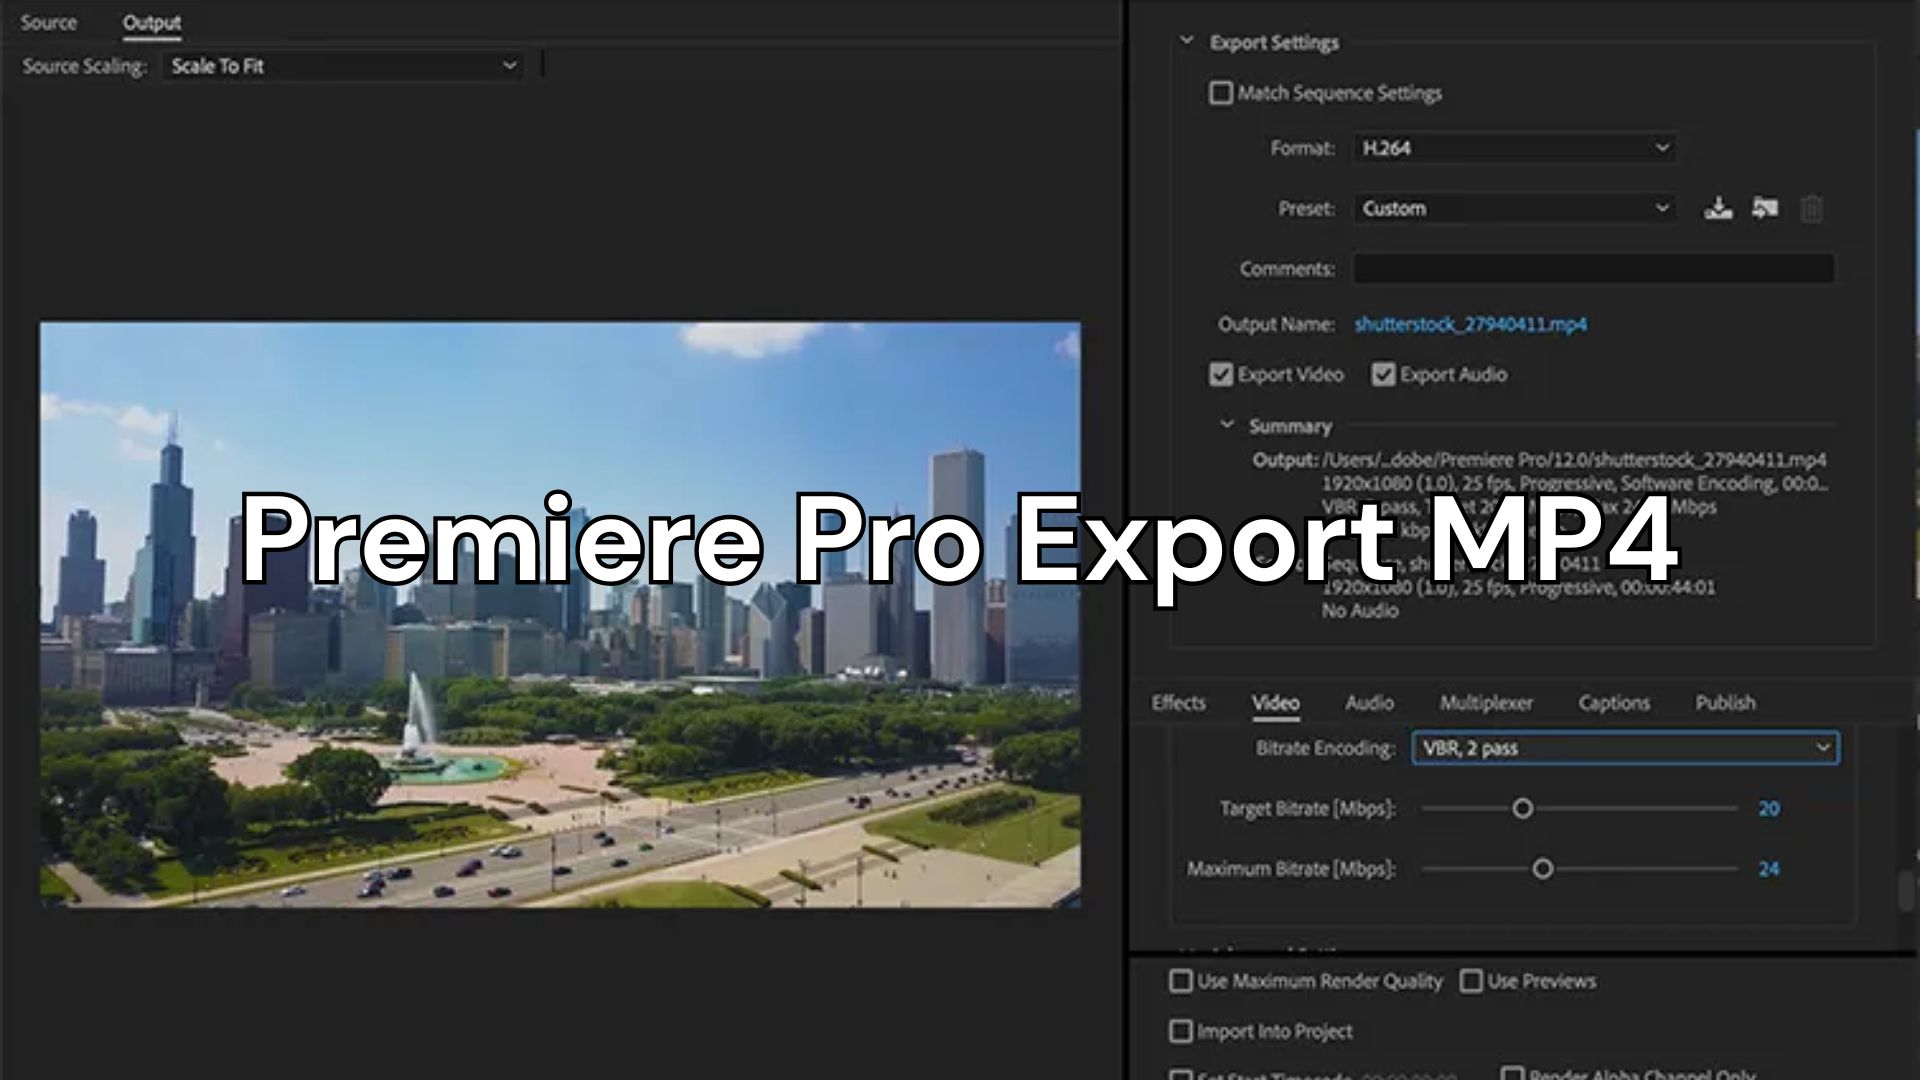
Click the Format dropdown option in the Export Settings box, then choose H.264. This setting exports your video as an MP4 file. Don’t choose MPEG4—it’s not the same as H.264.
Step 3: Pick a Preset for Your Video
H.264 already gives good video quality, but if you’re exporting for YouTube, social media, or a 4K screen, you can choose a matching preset from the Preset menu.
Premiere Pro includes many options like:
- Facebook 720p HD
- YouTube 1080p Full HD or 4K Ultra HD
- Vimeo 480p SD
- Mobile device settings like 720p HD
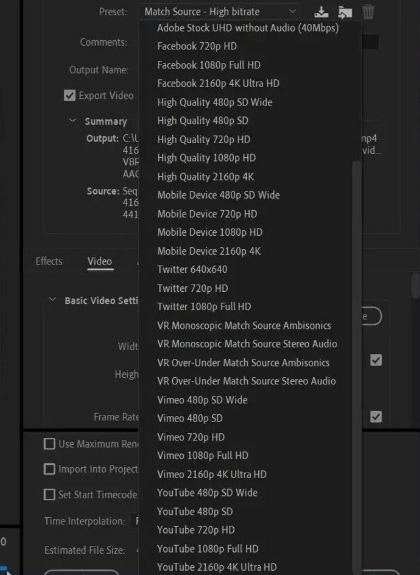
Simply select the option that best suits where you want to upload or watch your video. Keep in mind that higher-quality presets may take longer to export and produce larger files.
Step 4: Name Your File and Choose Where to Save
Click the blue file name in the export window to bring up the save box. You can now type a name and choose where to save your video.
Step 5: Export Your Video
Click the Export button to start saving your MP4 file. If you want to export it later or do batch exports, click Queue to send it to Adobe Media Encoder.

Part 3. Common Issues After Exporting Premiere Pro to MP4
Even if you follow all the export steps correctly in Premiere Pro, you might still face some problems with your final MP4 file. The following are a few of the most frequent issues customers face:
- MP4 File Won’t Play: Sometimes, the video may not open in any media player, or it might display a black screen with no sound. This typically occurs when the file becomes corrupted during export or when the export process is interrupted.
- Audio and Video Out of Sync: You may notice that the sound plays before or after the video or the audio is completely missing. This often occurs because of incorrect export settings, insufficient system memory, or technical issues in Premiere Pro.
- Video Appears Glitchy or Choppy: After export, the video might freeze, skip frames, or show strange colors and lines. This could be due to rendering issues or file damage that occurred during the saving of the MP4.
- Corrupted MP4 File: In some cases, the MP4 file becomes unreadable and won’t open at all. This may be the result of a crash during export, unstable power, or saving to a faulty drive.
Part 4. Best Way to Fix Problematic MP4 Video of Premiere Pro
If your exported Premiere Pro MP4 isn’t working properly, there’s a simple solution you can try.
Repairit Video Repair is a fixer tool that can repair corrupted or unplayable video files. This includes those export Premiere Pro MP4 videos. It supports MP4, MOV, M4V, and other popular formats. If the exported video is freezing, missing audio, showing black screens, or won’t open at all, Repairit can help you recover it without needing to re-export or re-edit the whole thing.
Key Features of Repairit Video Repair:
- Supports MP4 files exported from Adobe Premiere Pro.
- Fixes issues such as stuttering playback, audio sync problems, and black screens.
- Allows for the batch repair of multiple video files simultaneously.
- Offers Advanced Repair using a sample file from the same camera or project.
- Simple 3-step process: Add > Repair > Preview & Save.
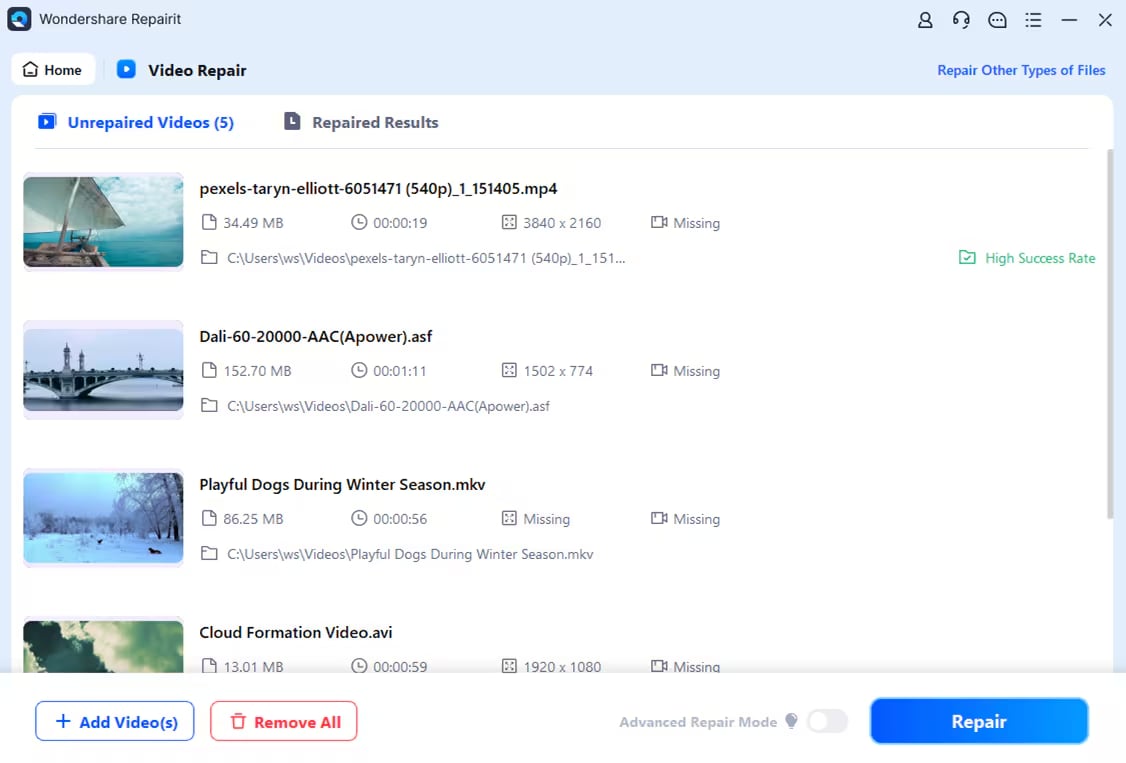
Here’s how to repair corrupted MP4 file:
Step 1. Get Wondershare Repairit. After that, press the +Add button within the Video Repair section to add MP4 video in the repair list.
Step 2. The correction button can be clicked to start the MP4 video correction process.
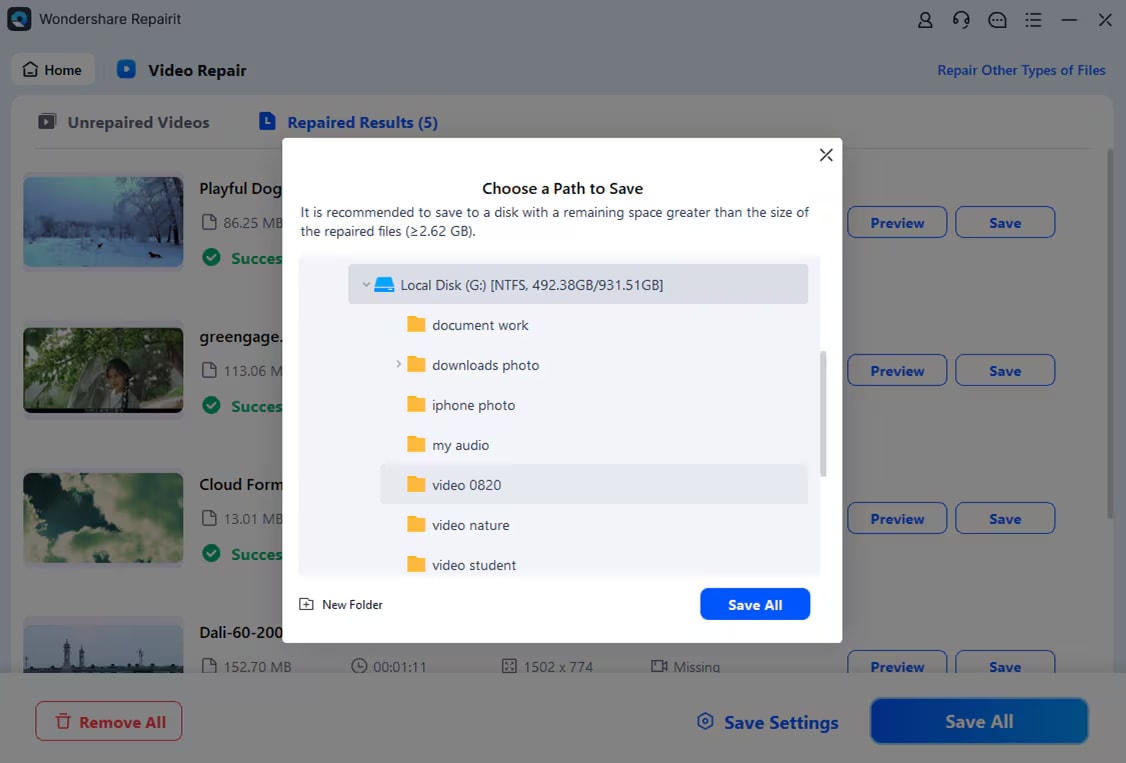
Step 3. If you're satisfied with the way the restored MP4 video files appear, click store and choose where to save them. Don't take them back to where they were hurt in the first place, though.
Best Way to Fix Problematic MP4 Video of Premiere Pro
 Security Verified. Over 7,302,189 people have downloaded it.
Final Thought
Exporting Premiere Pro to MP4 can feel a bit much when you’re just starting, but it’s really just about knowing which buttons to press and why they matter. Once you figure that out, you’re in control. And if the exported video doesn’t behave the way it should, freezes, glitches, or just won’t open, you’re not out of options. There are ways to fix that file. Hopefully, with this guide by your side, exporting won’t confuse you anymore.
FAQs
-
Why won’t my Premiere Pro MP4 export play properly?
This could happen due to interrupted export, incorrect settings, or file corruption. If your MP4 shows a black screen, is missing audio, or doesn’t open, use a video repair tool like Repairit to fix the file. -
Can I export Premiere Pro to MP4 using Adobe Media Encoder?
Yes. When you click “Queue” instead of “Export” in the export settings, Premiere Pro sends the job to Adobe Media Encoder. This lets you export in the background or batch multiple exports. -
What’s the difference between H.264 and MPEG4 in Premiere Pro?
H.264 is the format you should choose when exporting MP4 from Premiere Pro. MPEG4 is an older format and not the same as H.264. Choosing H.264 ensures compatibility and better compression quality.
