
Many editors struggle with audio and video falling out of sync, which disturbs the flow of their projects. A slight delay can make dialogue appear unnatural and make overall storytelling feel disconnected. These issues can happen due to various reasons like frame rate mismatches, recording delays, or even corrupt files.
Luckily, mastering audio sync Premiere Pro techniques can help you achieve flawless results. So, this guide explores the key reasons behind this sync issue and provides detailed methods to fix them. Along with that, it discovers an expert tip that shows how you can repair your corrupted video file.
In this article
Part 1. Understanding Premiere Pro Audio Sync Issues in Detail
As we all know, achieving perfect synchronization is important for professional editing, but issues can still arise unexpectedly. In this section, we will explore the root causes of Premiere Pro audio sync problems and how they impact video projects:
1. Common Causes of Audio Sync Problems in Premiere Pro
- Frame Rate Mismatch: These issues occur when the frame rate of the footage differs from the sequence settings. For example, a 30fps video placed in a 24fps timeline will cause gradual desynchronization.
- VFR Footage: Many smartphones and action cameras record with a Variable Frame Rate to optimize storage. That’s also the reason Premiere Pro struggles with VFR and leads to audio drift or misalignment.
- Damaged Media Files: In this case, your file can cause missing frames or delayed playback and affect audio sync. This may happen for reasons like incomplete file transfer or recording failures.
- Heavy Effects: Applying too many effects or layers can overload your CPU and GPU. Thus, Premiere Pro may struggle with real-time playback and make audio seem out of sync.

2. Impact of Audio Sync Issues on Video Projects
- Poor Viewing Experience: When the sound doesn’t match the visuals, it reduces engagement and overall impact. Even minor delays can make conversations or actions seem out of place and make the content difficult to follow.
- Reduced Professionalism: In professional video production, small sync problems can make a project look amateurish. Plus, viewers expect smooth audio and video alignment, so any mismatch can harm a brand’s reputation.
- Increased Editing Time: Editors may need to manually adjust clips, resync audio, or even reprocess footage. This adds unnecessary workload, delaying project completion and increasing production costs.
- Issues in Broadcast: For online streaming, audio sync problems can lead to negative feedback and poor retention. Some platforms may even reject such videos, which require mastering audio sync in Premiere.
Part 2. 3 Methods for Premiere Pro Sync Audio and Video in 2025
After knowing the causes of the sync audio problem and its impact, you should need to understand how to resolve this issue. Therefore, the following section provides you with 3 effective methods to achieve Premiere Pro audio sync quickly and accurately.
Approach 1. Automatic Synchronization Using Premiere Pro's Built-in Features
With advanced features, you can let the software handle synchronization effortlessly. Using Premiere Pro sync audio to video automatically ensures accuracy without manual work. Thus, let’s explore 2 powerful methods to align audio and video seamlessly:
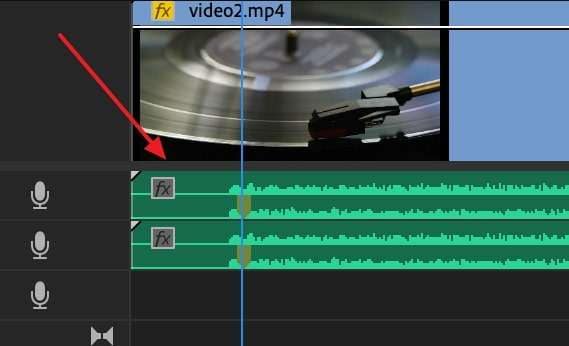
Method 1. Merge Clips
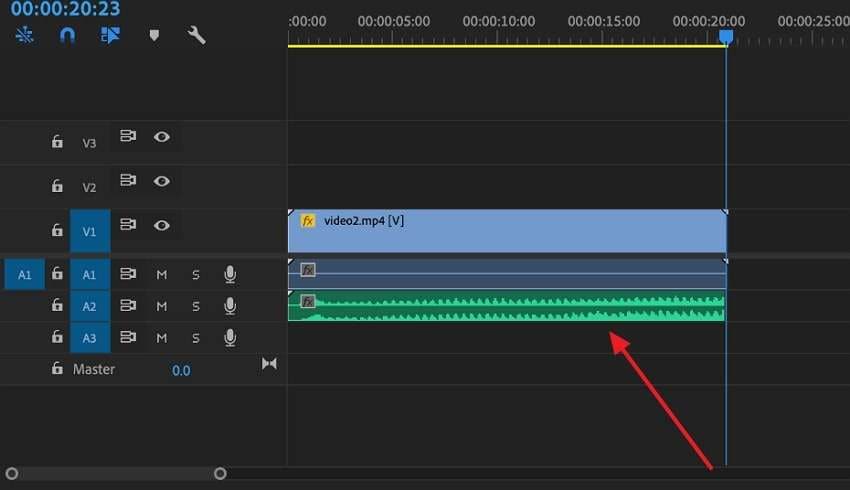
The easiest way to sync audio and video is by merging clips. This technique works best when both tracks contain matching audio waveforms. By combining them into a single file, you eliminate misalignment issues and streamline the editing process.
Using Premiere Pro, synchronizing audio and video functions like Merge Clips ensures precise adjustment. Hence, follow the steps below to learn how to use this feature to resolve your issue:
Step 1. Upon accessing the editing interface, select the video and audio clips and right - click it to choose the "Merge Clips" option.
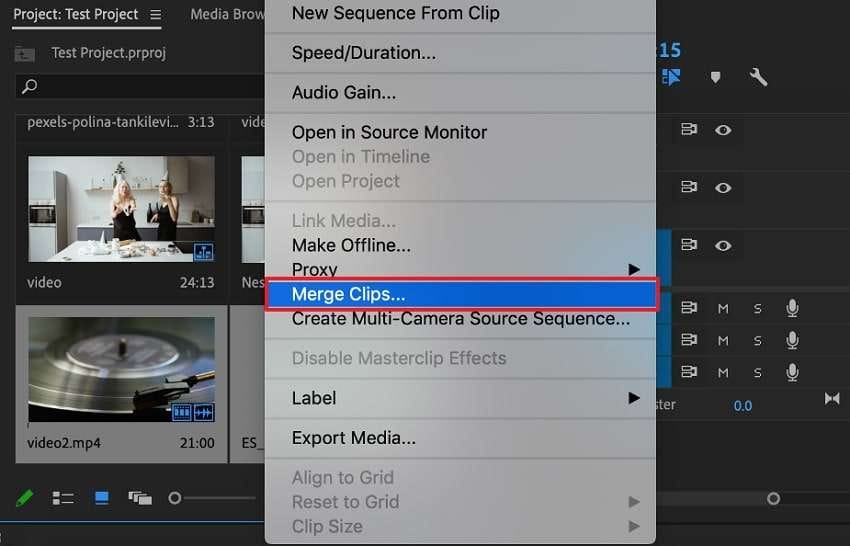
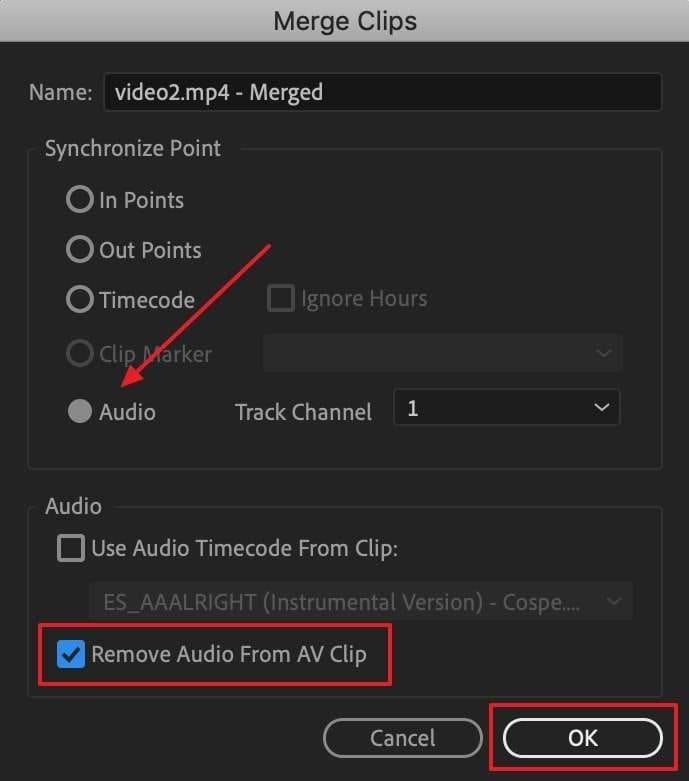
Step 2. Afterward, enable the “Audio” and “Remove Audio from AV Clip” checkboxes, and hit the "OK” button. Now, the tool will analyze the waveforms and align them automatically.
Method 2. Synchronize
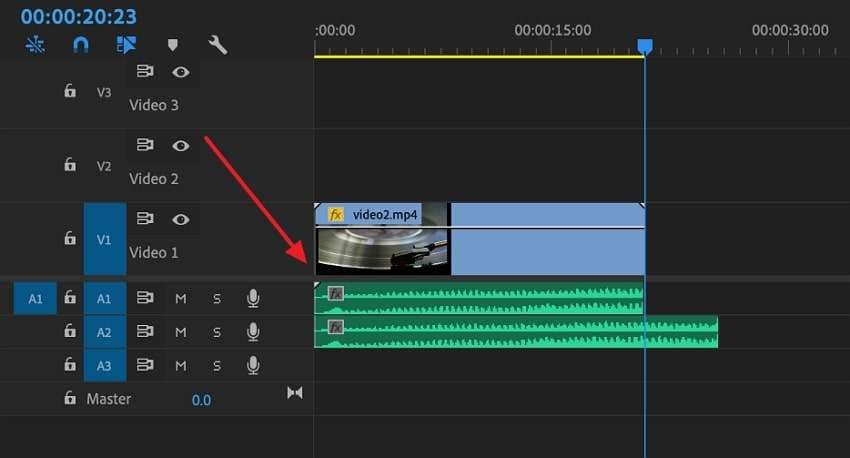
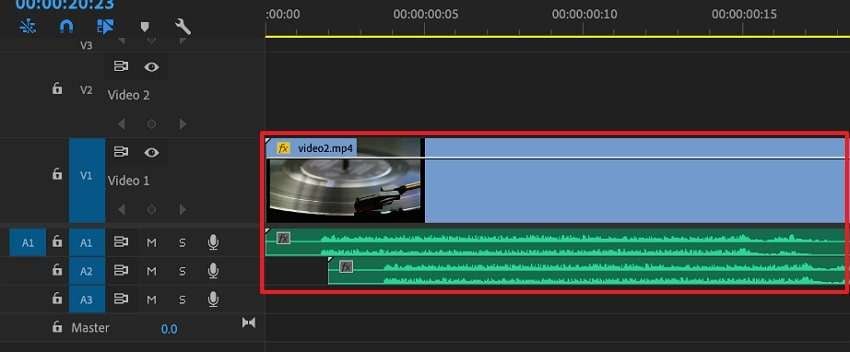
In case merging clips isn’t the right fit, the Synchronize tool offers another way to align audio and video. This process uses AI to align an independent audio file with an AV file present on your timeline without combining them.
Along with that, it is perfect when dealing with multiple clips or complex timelines. Thus, go through the steps below to use sync video and audio Premiere Pro’s Synchronize function:
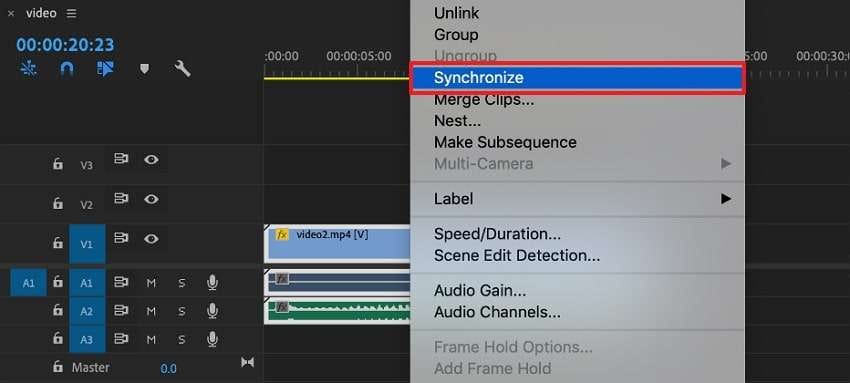
Step 1. Import your audio and video into the tool's timeline by ensuring the audio file is positioned directly below or above the video file.
Step 2. Afterward, select both tracks you want to sync and click the right mouse button to choose the “Synchronize” option from the menu.
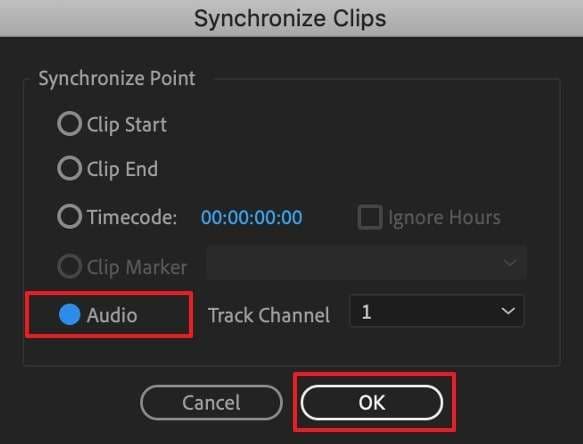
Step 3. In the sync settings, select the "Audio” option as the alignment method and pick the reference audio track. Next, click the "OK” button, and Premiere Pro will automatically sync the audio and video using waveforms.
Approach 2. Manual Synchronization Techniques in Premiere Pro
Automatic tools work well, but they aren’t always perfect, especially with unclear waveforms. In such cases, manual synchronization is the best solution to this problem. You can sync video audio Premiere with precision by carefully adjusting clips on the timeline.
Plus, this approach requires attention to detail but offers full control over alignment. Let's explore the key techniques to achieve perfect synchronization manually:
Step 1. Initiate by adding both your audio and video tracks to the timeline and ensure that they are placed on separate tracks.
Step 2. Following that, zoom into the timeline to get a detailed view of the waveforms and look for a distinct reference point in both audio tracks.
Step 3. Moving forward, find a matching audio point in both tracks and mark it by selecting the clip and pressing the “M” key on your keyboard. Afterward, align the markers and play the timeline to check synchronization.
Approach 3. Synchronizing Audio and Video Using Timecode in Premiere Pro
Those who don’t prefer manual adjustment can use the tool’s timeline for a more precise solution. This method is ideal for professional projects where accuracy is very important. Users can achieve effortless audio sync in Premiere by matching timecodes from cameras and audio recorders. Moreover, keep in mind that you have to record the audio by using the respective or supported timecode device like DTT C1.
These devices generate and distribute timecode signals, ensuring that all recording devices are running on the same synchronized clock. Thus, the following section discovers how to use timecode for perfect synchronization in your video edits:
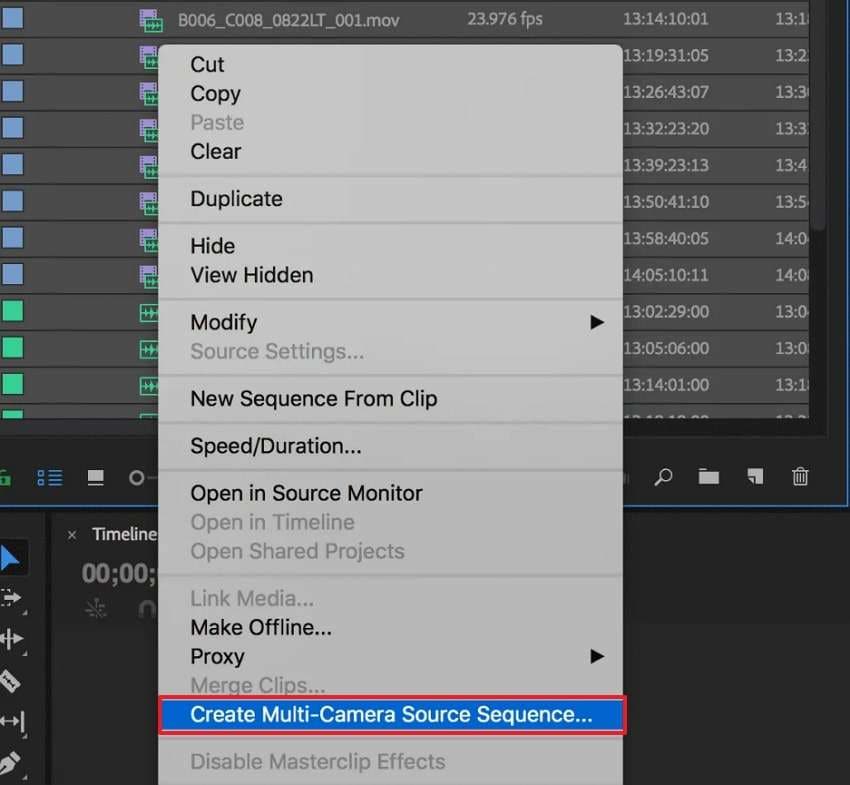
Step 1. Start by bringing all the clips into the software’s project panel and select all the ones you need to synchronize. Next, right - click the highlighted clips to select the “Create Multi-Camera Source Sequence" option.
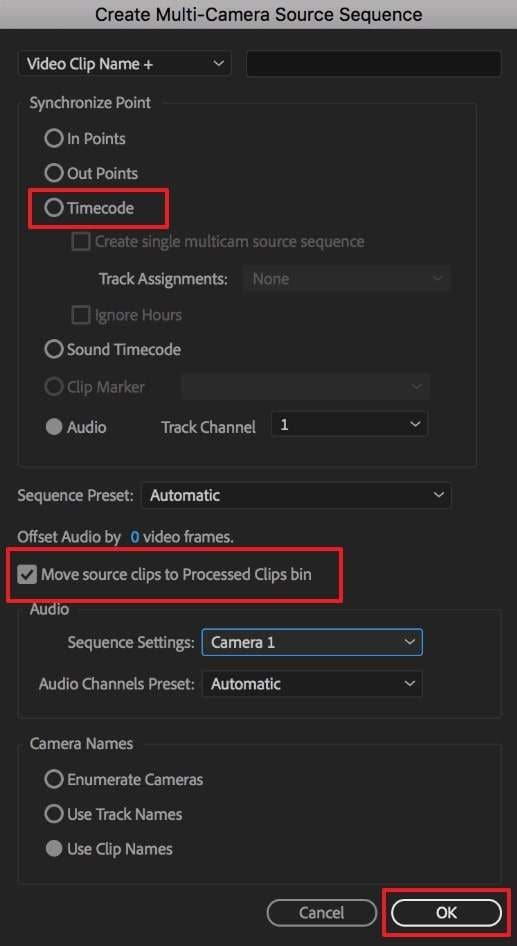
Step 2. A new settings window will pop up where you need to ensure that the "Timecode” option is selected as the synchronization method. Then, uncheck the "Move source clips to Processed Clips Bin" option to keep the original clips and hit the "OK” button.
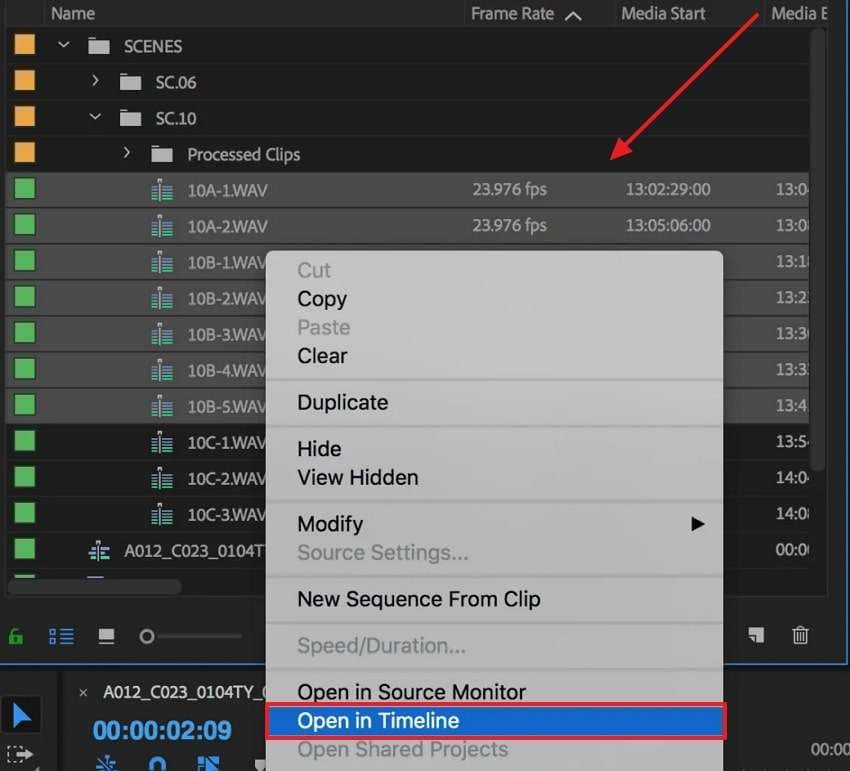
Step 3. Once Premiere Pro processes the clips, the synchronized sequence appears in the media browser. Now, right - click on this new sequence and select the “Open in Timeline" option.
Step 4. Afterward, the software will show all your clips precisely arranged and prepared for additional editing.

Part 3. Repairing Corrupted Video Files to Fix Sync Audio and Video Issues with Repairit
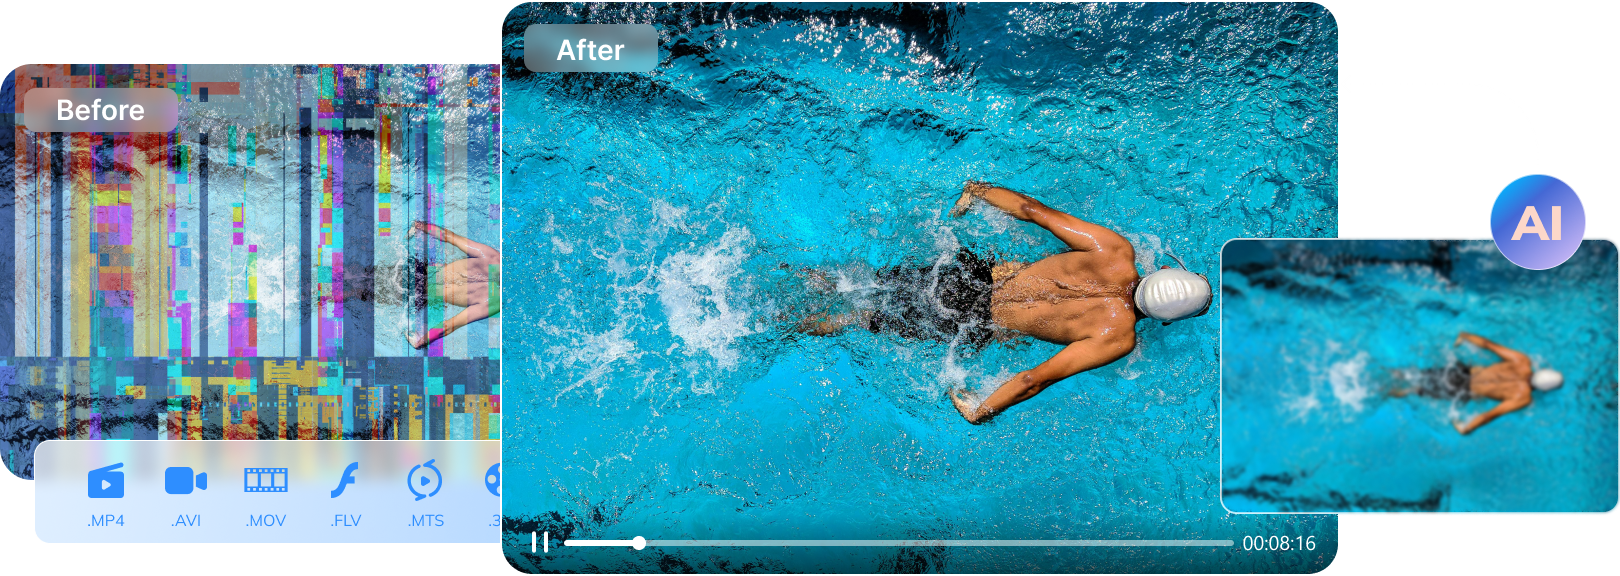
Even with the best synchronization techniques, you might struggle to sync audio and video Premiere due to file corruption. When your video file is damaged, no method will align the audio properly. That’s why we recommend you use Repairit and fix your video file before synchronization. It is a professional software designed to repair damaged or corrupted video files across multiple formats, including MP4, MOV, M2TS, and more.
The tool’s Quick Repair Mode instantly fixes minor video errors while preserving original quality. For files that are more seriously corrupted, the Advanced Repair Mode examines a sample video to rebuild the missing information. These capabilities of Repairit ensure a higher success rate for even complex repairs. Along with that, it lets you preview your fixed files before saving them on your device, which makes it a stand-out tool.
Key Features

-
Repair damaged videos with all levels of corruption, such as video not playing, video no sound, out-of-sync video or audio, playback errors, header corruption, flickering video, missing video codec, etc.
-
Repair full HD, 4K, and 8K videos and support 20+ popular formats, including MOV, MP4, M2TS, MDT, RSV, WMV, MPEG, DAT, etc.
-
Repair damaged or corrupted videos caused by video compression, system crashes, video format changes, etc.
-
Repair critically damaged or corrupted RAW/LOG/HDR videos from professional cameras such as Blackmagic Design, RED Digital, ARRI, etc.
-
Repairit has a quick and advanced scanning mode. You can use either depending on the level of corruption the video file has undergone.
-
No limit to the number and size of the repairable videos.
-
Repaired videos are more compatible with professional editing software such as DaVinci, Composer, Final Cut Pro, and Premiere Pro.
-
Support Windows 11/10/8/7/Vista, Windows Server 2003/2008/2012/2016/2019/2022, and macOS 10.12~macOS 15.
Detailed Guide to Repair Damaged Video Files to Fix Sync Audio and Video Issues
Step 1. Access Repairit to fix corrupted video file

Step 2. Now, use the “Repair” button to begin the restoration process.

Step 3. Download fixed video files to your PC

Repair Damaged Video Files to Fix Sync Audio and Video Issues Now
 Security Verified. Over 7,302,189 people have downloaded it.
Conclusion
To conclude, ensuring perfect synchronization between audio and video is important for a smooth viewing experience. We have explored several methods that can help you resolve this annoying problem. Along with that, you may struggle to sync audio and video Premiere when your video is damaged. In such a case, Repairit offers a quick way to fix your damaged or broken videos, regardless of format or device.
FAQ
-
Why does my audio gradually go out of sync in Premiere Pro?
When a video’s frame rate differs from the sequence settings, audio drifts over time. To fix this, convert VFR footage into a constant frame rate before importing it into this editing software. Along with that, ensure that both video and audio clips are recorded at the same frame rate to avoid sync issues. -
Is there a way to repair a damaged MP4 file before syncing it in Premiere Pro?
You can fix your damaged file before you sync Premiere Pro by using a video repair tool like Repairit. This dedicated software helps restore broken video files to ensure smooth editing. Once repaired, you’ll be able to sync audio and video effortlessly without any issues. -
Can audio sync issues occur due to slow hardware performance?
Yes, when your device struggles to process video and audio in real time, playback delays can create an illusion of sync issues. This happens when CPU, GPU, or RAM resources are maxed out. Therefore, lowering playback resolution, enabling proxies, or clearing cache files can improve performance.
