While NVIDIA is known for its quality graphic cards that provide high performance, users can run into problems that can arise with its complementary services. One such problem is NVIDIA HDMI audio not working when you try to stream sound to an output device. This problem especially disturbs users who rely on it for gaming purposes.
The good thing is it is an easily fixable problem, and you don’t need technical skills to resolve it. Therefore, this guide will explore the best and simplest solutions to resolve this audio issue. Apart from the generic solutions, we will also share a bonus tool that will make it easier to solve the NVIDIA HDMI sound not working problem.
In this article
Part 1: A Complete Overview of NVIDIA High-Definition Audio
It is a built-in audio driver that comes with NVIDIA GPUs to deliver sound output through HDMI connections. The driver allows users to transmit both video and audio signals through a single HDMI cable. This particular feature makes it a simple solution for home theaters, gaming setups, and presentations. Additionally, its ability to support HD audio formats on audio-capable devices ensures an immersive audio experience.
The driver also helps in relieving pressure from the CPU by taking the audio load on itself. Additionally, you can use it to stream multiple audio files on different devices simultaneously. Apart from its advantages, the driver can suffer from connectivity and problems related to the software. These issues often arise during system updates or when switching between multiple audio devices.
Part 2: What Can Be the Reasons Behind NVIDIA HDMI Audio Not Working
As said above, issues with this driver often arise from system misconfigurations or hardware faults. These problems are usually caused by incorrect default settings, outdated drivers, or cable failures. In this section, we will explore the most common reasons for NVIDIA HDMI audio not working problem:
- Incorrect Audio Device: Sometimes, the HDMI output is not set as the primary audio source. As a result, the sound routes incorrectly from other sources.
- Driver Problems: You can face this problem due to faulty or outdated drivers. Usually, when a driver gets corrupted, it can lead to compatibility issues and result in no audio output.
- BIOS Settings: Some systems disable HDMI output in BIOS, which can block the sound transmission entirely.
- Physical Damage: This issue can also arise if your HDMI port or the cable has a fault. When this issue occurs, it disrupts both video and audio signals between both devices.
- Audio Settings Misconfiguration: Users can face this issue if the Windows settings are not properly configured.
Part 3: 6 Best Efficient Ways to Fix NVIDIA HDMI Audio Not Working
After learning about the reasons, we can employ their solutions to resolve the problem. In the following section, you can find some reliable solutions to the NVIDIA HDMI sound not working problem:
Way 1. Confirm the Default Audio Output Device
Since you can have more than one audio device, there is a chance that the computer automatically selects a default one. Additionally, it can happen due to system updates or driver conflicts, and this solution often resolves such issues without additional steps. You can follow the given steps to change your default audio output to resolve the NVIDIA HDMI sound not working problem:
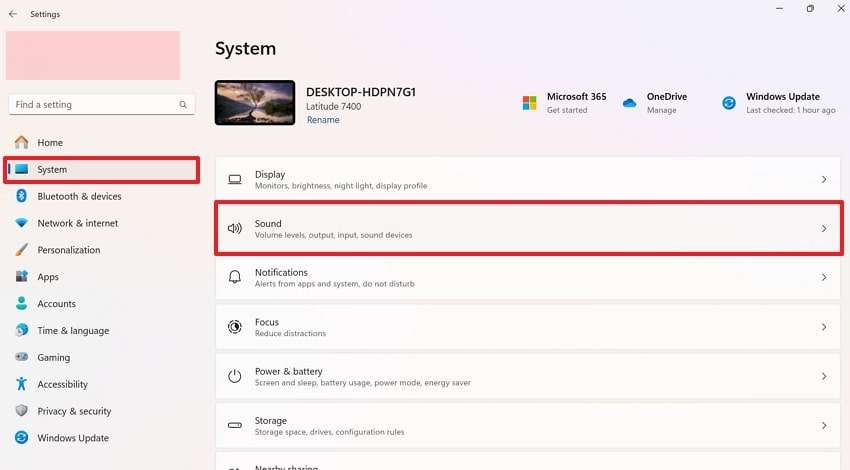
Step 1. Start the process of changing the default audio device by going to the “System” tab in the settings. Then, click the “Sound” option to access its features and settings.
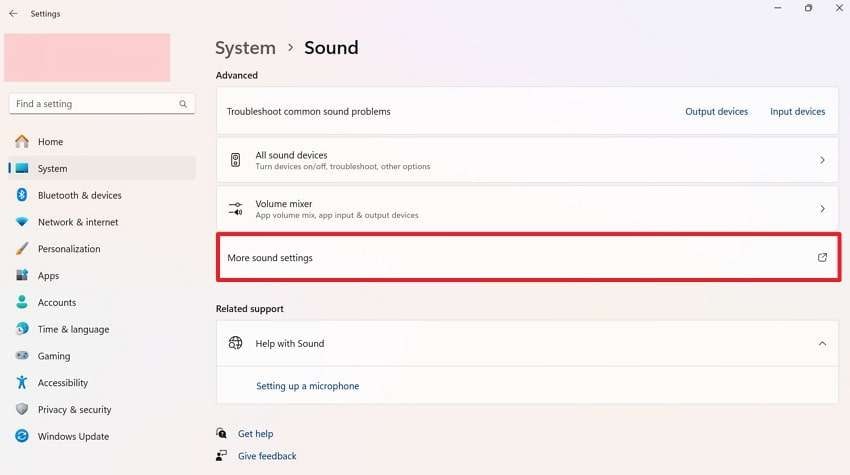
Step 2. When you reach the new screen, press “More sound settings” from the given options.
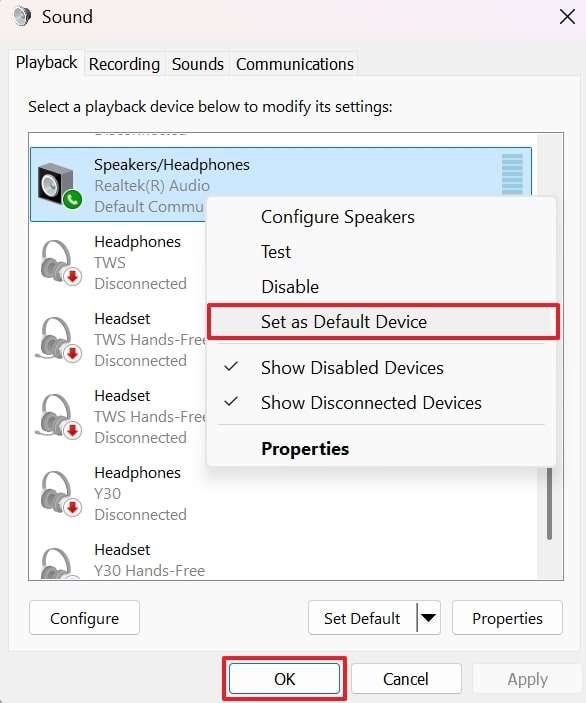
Step 3. From the small pop-up screen that appears, locate the HDMI device under the playback section. Right-click on it and press the “Set as Default Device” option. After making this selection, press the “OK” button and see if the problem is resolved.
Way 2. Try the Audio Troubleshooter
Windows offers many troubleshooters to identify and fix various problems related to the system quickly. For issues related to sound, the audio troubleshooter runs different tests to identify and fix problems. As a result, it also saves time and effort for those with no technical background. By following the given steps, you will be able to use this tool to solve the NVIDIA HDMI audio not working issue:
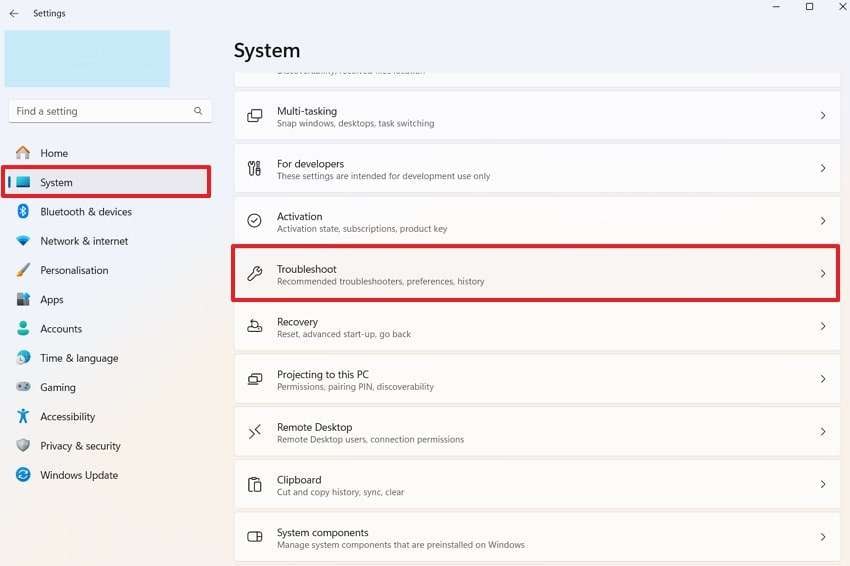
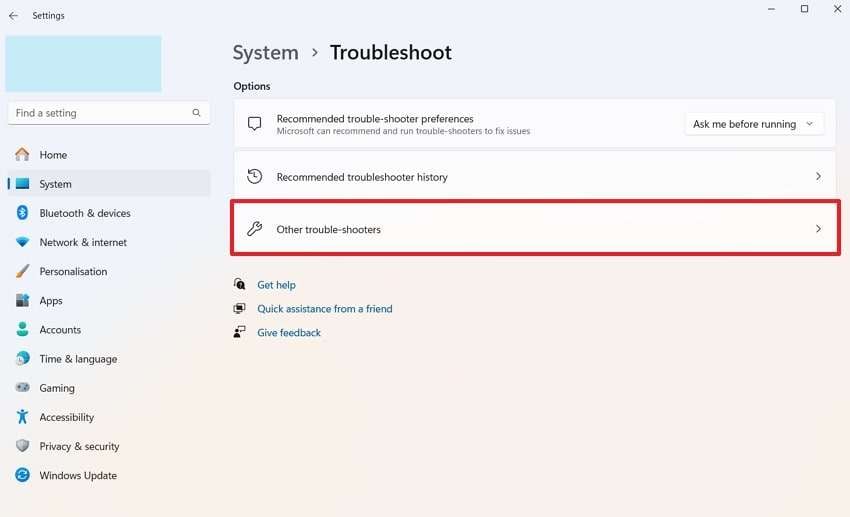
Step 1. Proceed to the “System” tab within your computer’s settings. Scroll down and locate the “Troubleshoot” menu for accessing the audio troubleshooting system.
Step 2. When the menu appears on the new screen, tap the “Other troubleshooters” option. By doing so, you will be able to access all the troubleshooters provided by Windows.
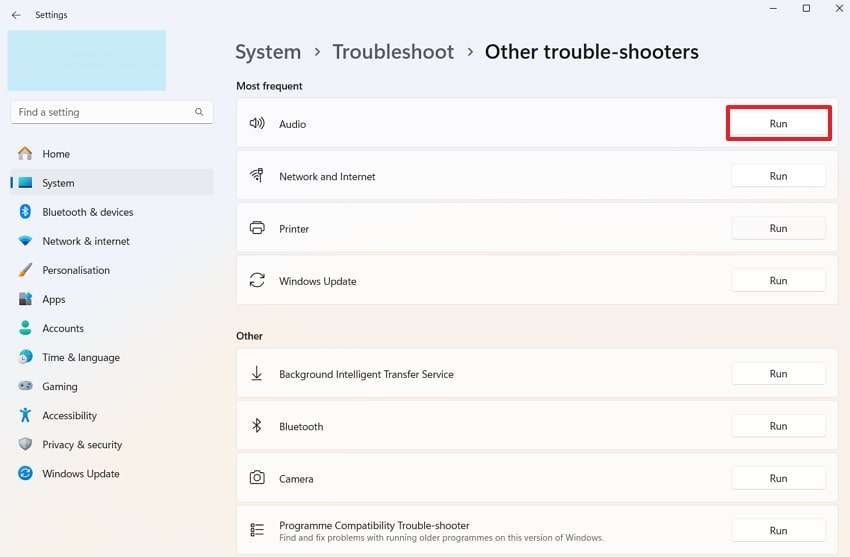
Step 3. On the new screen, you need to press the “Run” button beside the “Audio” option. This will launch the audio troubleshooter, which will provide further instructions on what to do.
Way 3. Reinstall or Update the Audio Drivers
In many cases, outdated or faulty drivers lead to HDMI sound failures in computers. To prevent such issues, installing the latest updates ensures the drivers are optimized for current system configurations. Additionally, you can choose to reinstall the driver if existing drivers are corrupt. For a detailed guide to update or reinstall the drivers to resolve the NVIDIA HDMI audio not working problem, you can follow these steps:
For Update
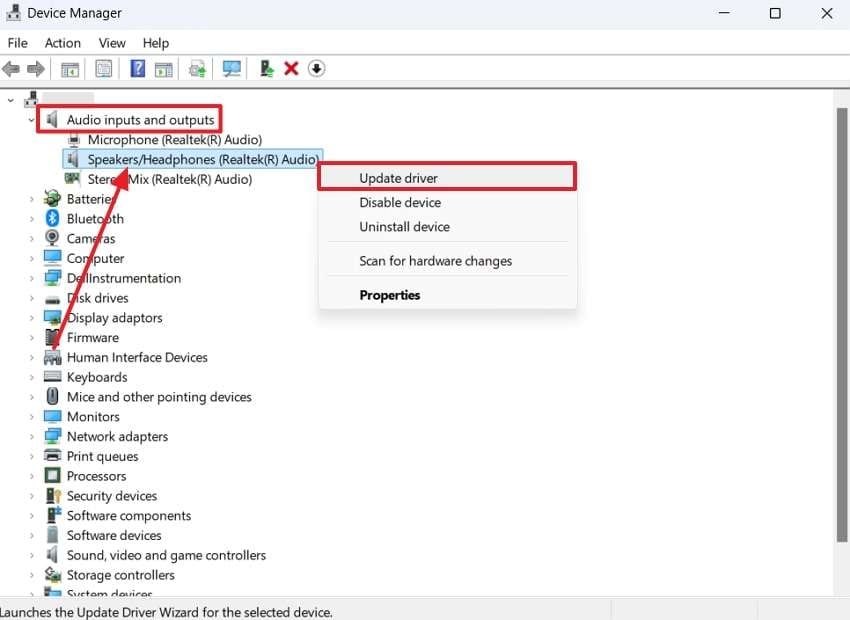
Step 1. Launch “Device Manager” on your PC and right-click the “Audio Inputs and Outputs” option. From the drop-down, right-click the audio driver that needs updating or repair. When the small pop-up appears, select the “Update driver” option.
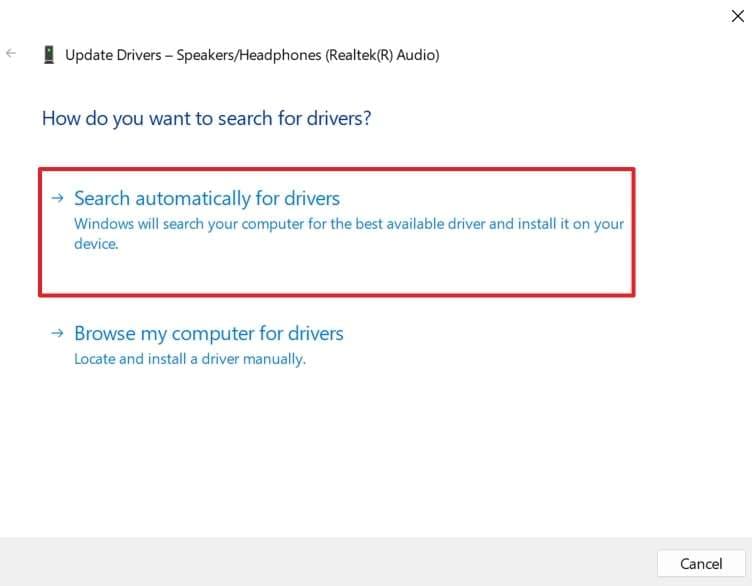
Step 2. A small screen will appear that will provide two options for updating the driver. Here, you need to press the “Search Automatically for Drivers” option to finalize the process.
For Reinstall
Step 1. Before reinstalling, you need to uninstall the driver first. By following the same instructions as given above, access the audio driver in the Device Manager and right-click on it. Now, press the "Uninstall" option from the small pop-up to remove the driver from the device.
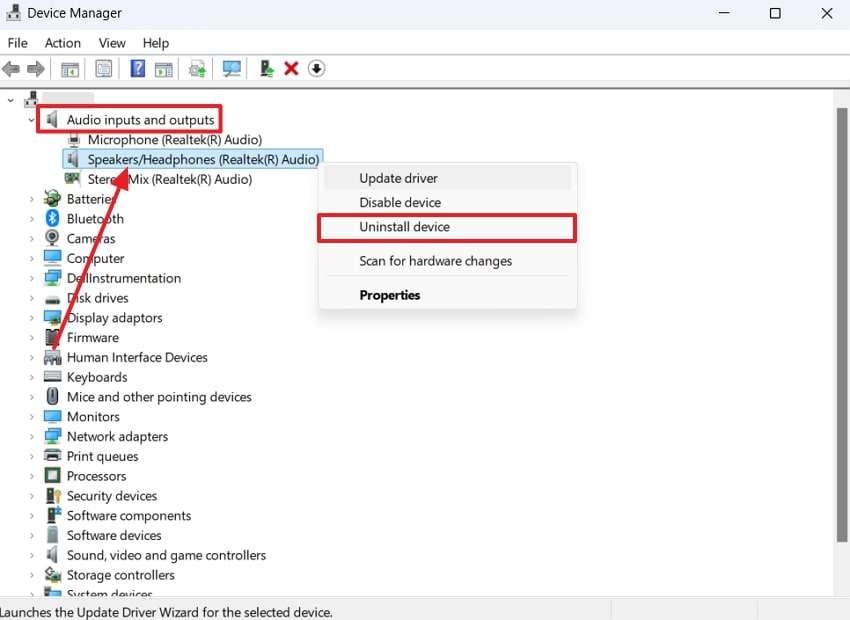
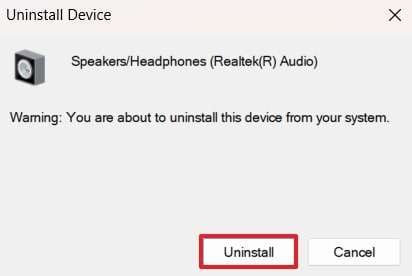
Step 2. The next pop-up will confirm your decision to uninstall the drivers. Proceed ahead by pressing the “Uninstall” button to remove the audio driver. Afterward, restart your PC, and the system will automatically reinstall the newer version of the driver.
Way 4. Reinstall the NVIDIA Graphics Card
In addition to audio, a corrupt graphics driver can also affect HDMI audio functionality. That’s why reinstalling the NVIDIA driver is a good idea, as it ensures compatibility and replaces broken files with a cleaner version.
This method is effective after system updates or crashes that may damage driver configurations. To resolve the NVIDIA HDMI audio not working problem by reinstalling the graphic card driver, you can follow these steps:
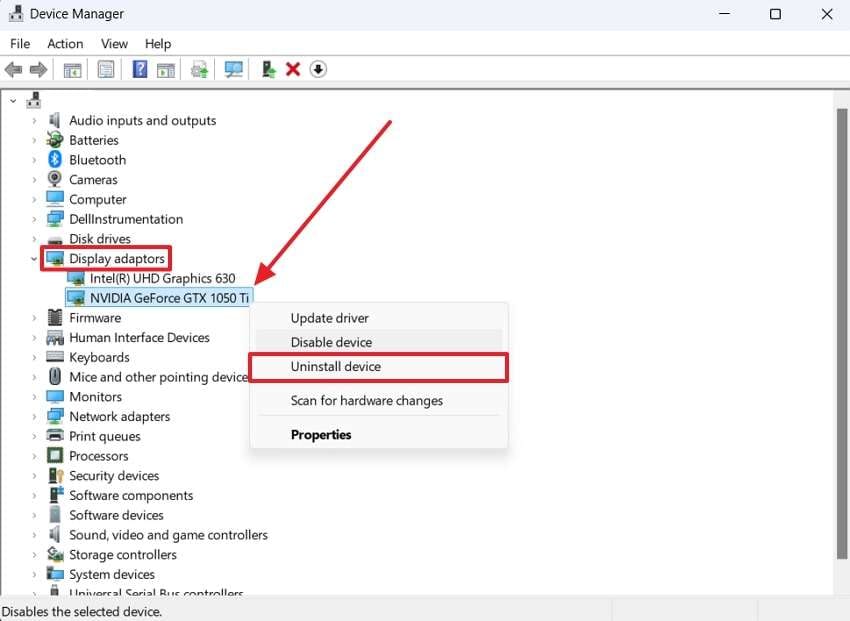
Step 1. On opening the “Device Manager,” right-click on “Display adaptors” option for opening all graphics cards details. Right-click on the NVIDIA graphics card and choose “Uninstall device.”
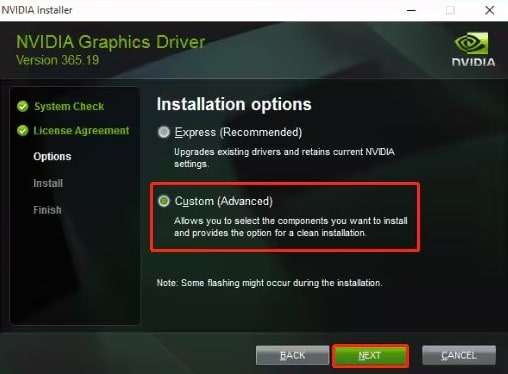
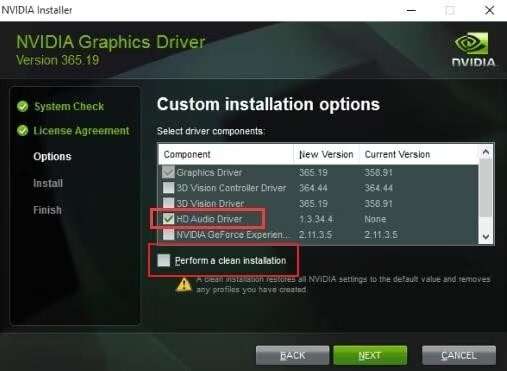
Step 2. Find the respective driver on NVIDIA’s site and download it to your PC. On opening the installation window, you need to select the “Custom (Advanced)” option and press the “Next” button.
Step 3. During the custom installation, check the “HD Audio Driver” and “Perform a Clean Installation” options. Finally, complete the driver installation process by pressing the “Next” button.
Way 5. Disable NVIDIA HDMI Sound Adapter via BIOS
When even reinstallation fails to resolve the NVIDIA HDMI audio not working issue, you should try disabling the adapter in BIOS. By doing so, you can resolve audio conflicts caused by multiple output sources. Additionally, the error can happen when systems prioritize onboard audio over HDMI. That's why turning off unused adapters eliminates such conflicts and restores audio transmission. To disable the HDMI adapter, follow the steps below:
Step 1. To access the BIOS menu, restart your computer and press the “F2” key as soon as the screen lights up. Once in BIOS mode, you need to go to the “Advanced” section.
Step 2. Here, choose “NVIDIA HDMI Sound Adapter” under the “Onboard Devices.” After selecting the adapter, change its status to “Disabled” and save the changes by pressing the relevant key on the keyboard.
Way 6. Enable Onboard Sound Device in BIOS Settings
Sometimes, the onboard sound device automatically turns off when you connect an HDMI audio device. The same can also happen when you install a new graphics card on your PC. By enabling it in BIOS, you can access its functionality while dealing with faulty HDMI adapters. You can follow the given steps to enable this sound device and see if it resolves the NVIDIA HDMI sound not working issue:
Step 1. Following the same steps as above, enter BIOS mode and go to the “Advanced” tab.
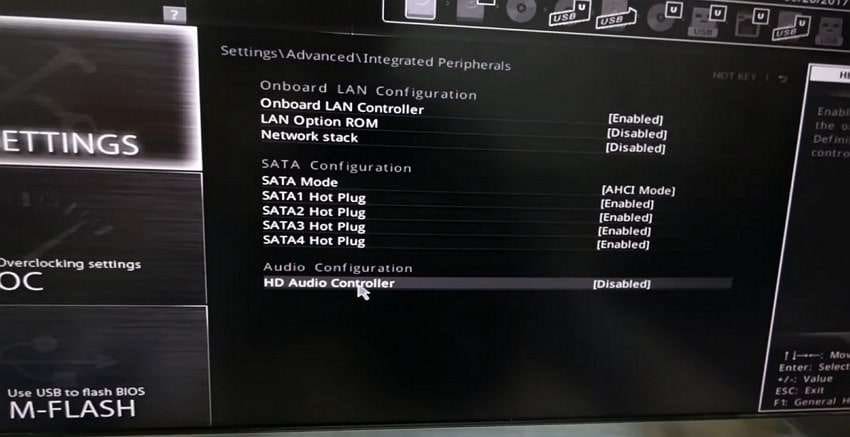
Step 2. Here, you need to go to the “Integrated Peripherals” tab to access the “HD Audio Controller” option. Now, turn its status to “On” and save changes by pressing the “F10” key on your keyboard.
Part 4: Uncover the Most Advanced Video Repair Tool to Fix No Sound Problem
When all these fixes fail to resolve the NVIDIA HDMI audio not working issue, you should see if the problem is with the video file. If the issue is with the video file, it is recommended that advanced repair tools be used to remove the audio problem. For this purpose, we highly recommend using Repairit since it removes corruption for most file types.
You can utilize this tool to remove corruption from over twenty types of video formats. The tool has a vast library of video samples, which it uses as a reference to make corrupted videos playable. For users who have a library of corrupted videos, the tool allows batch repair. Apart from videos, you can use this tool to repair audio in modern file extensions.
Key Features
- Gyroscope Repair: Professionals can use this tool to bring stability to their videos by adjusting the frames with extreme precision.
- AI Enhancements: The tool uses advanced artificial intelligence to convert the quality of your videos to HD with more stability.
- ZIP File Repairs: Users can utilize this tool to remove corruption from compressed files and make their components accessible.
- Online Version: For users who can’t install the software, Repairit is also accessible as a web tool through browsers.

-
Repair damaged videos with all levels of corruption, such as video not playing, video no sound, out-of-sync video or audio, playback errors, header corruption, flickering video, missing video codec, etc.
-
Repair full HD, 4K, and 8K videos and support 18 popular formats, including MOV, MP4, M2TS, INSV, M4V, WMV, MPEG, ASF, etc.
-
Repair damaged or corrupted videos caused by video compression, system crash, video format change, etc.
-
Repair critically damaged or corrupted videos available on SD cards, mobile phones, cameras, USB flash drives, etc.
-
Repairit has a quick and advanced scanning mode. You can use either depending on the level of corruption the video file has undergone.
-
No limit to the number and size of the repairable videos.
-
Support Windows 11/10/8/7/Vista, Windows Server 2003/2008/2012/2016/2019/2022, and macOS 10.12~macOS 13.
Steps to Repair Video Sound Using Repairit Video Repair
As the fixes above couldn’t resolve the NVIDIA HDMI sound not working issue, let's go through the steps of repairing the video file in Repairit:
Step 1. Import the Video with Sound Issues in Repairit
After downloading and opening Repairit on your PC, go to the "Video Repair" section. Here, you need to press the "+ Add" button to import the damaged video into the tool.

Step 2. Start the Video Repair Process
When the corrupted videos are successfully imported into the tool, press the "Repair" button at the bottom of the screen to repair them.

Step 3. Save the Repaired Video on Your PC
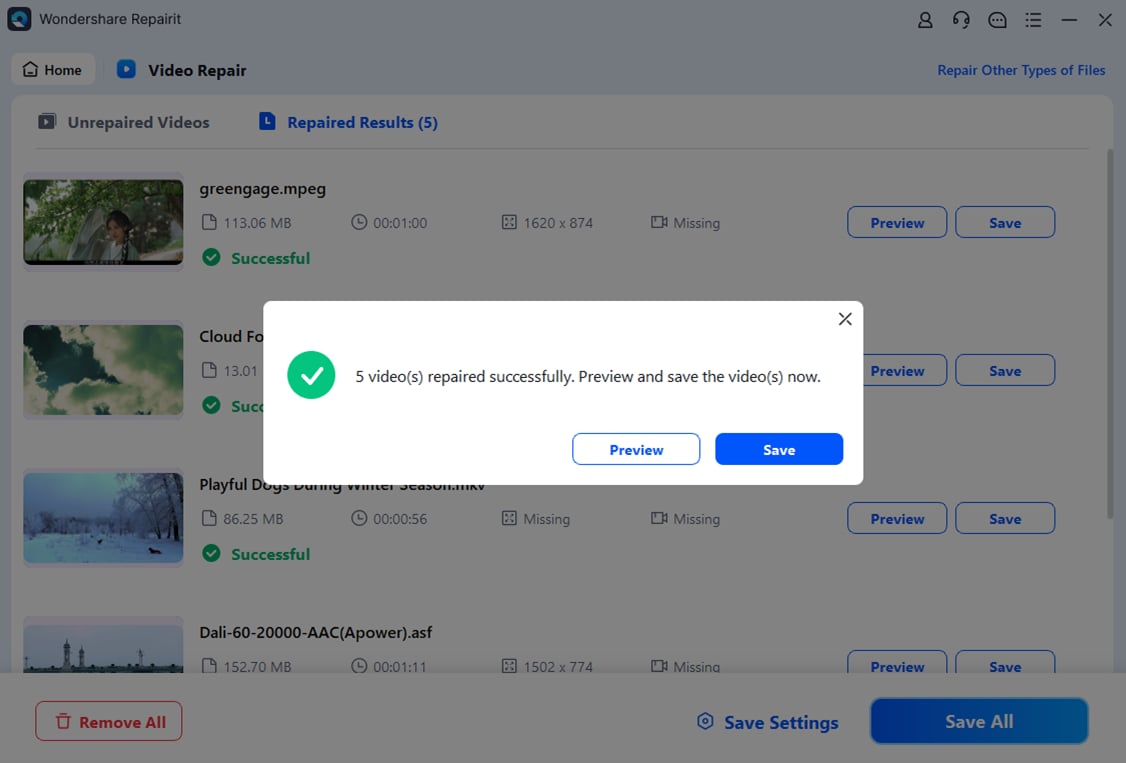
Once the repair process is completed, you will be able to preview the videos. After confirming the sound issue is resolved, press the "Save All" button. When the small pop-up appears, hit the "Save" button once again to store the videos on your device.
Repair Corrupted Video Files

Conclusion
In short, while NVIDIA's audio drivers are a great way to properly enjoy gaming sounds on output devices, they can face various issues. Usually, the NVIDIA HDMI audio not working issue happens due to incorrect default audio device selections or corruption of the drivers. Depending on the root cause, you can either update the drivers or make changes to the BIOS settings to resolve this issue.
However, usually, the sound problem happens due to issues with the video file itself. In such cases, you will need to repair the video and remove corruption to make it playable. For this purpose, tools like Repairit are easy and reliable options due to their advanced file-repairing features.
FAQ
-
1. Can a faulty HDMI cable cause a sound problem?
When an HDMI cable gets faulty, it can disturb the audio and video signals between the source and receiver devices. As a result, you may face sound problems when playing videos using such cables. -
2. What should I do if the HDMI port is physically damaged?
When your HDMI port gets damaged, inspect it for debris or leftovers of the meta pins from cables. After that, clean it carefully or try a different port if available. However, if it's still not working, you should either get it repaired or replace it with a new one. -
3. Can BIOS updates affect HDMI audio output?
Yes, such updates can sometimes reset settings or disable audio outputs. Therefore, make sure to check BIOS settings after every update to ensure HDMI audio is enabled.


 ChatGPT
 Perplexity
 Google AI Mode
 Grok
Grok

