Moving a video from your camera to your laptop should be simple, but it can be really frustrating when the file won't play properly. Sometimes the video becomes choppy, blurry, or won't open at all after the transfer.
This usually happens for a reason. When a video gets damaged during transfer, it's often because something interrupted the process. It could be a weak Wi-Fi connection, a bad USB cable, or unplugging the device too soon. Even small issues like these can mess up how the video file is put together.
The good news is that understanding what causes the problem can help you fix it and avoid it next time. In this guide, we'll explain the common reasons videos get corrupted and show you simple ways to recover your files and keep your transfers safe.
In this article
Part 1. Why Video Files Break During Transfer
A video file isn't just one simple file; it's made up of many small pieces of data that work together. When you transfer a video from one device to another, your computer rebuilds those pieces on the new device. If even a small part is missing or damaged, especially the "header" (the part that tells the video player how to open the file), the video might not work at all.
Knowing the signs of a damaged file can help you figure out if it's truly broken or just a small playback issue.
Common Reasons Videos Get Corrupted
Most of the time, the issue occurs due to problems that happen during the transfer process
- Interrupted Connection - This is the most common cause. If your Wi-Fi drops or a cable gets unplugged, the transfer stops halfway. The file may look complete but is actually missing data.
- Damaged Storage (Bad Sectors) - If your SD card or hard drive has damaged areas, it may not read or copy the video properly.
- Software Crashes - If your file transfer app or file explorer freezes, the video may not be saved correctly on the new device.
Part 2. How Corruption Shows Up
Sometimes, a video transfer looks successful, it says "100% complete", but the file is actually damaged. That's because videos need all their data in the right order to play properly. Even a tiny missing piece can cause noticeable problems when you try to watch it.
Here are the most common ways a damaged video shows up:
1. Strange Visual Problems - One of the easiest signs to notice is poor image quality. This happens because parts of the video data are missing or broken.
2. Frozen Video but Sound Still Works - Sometimes the video gets stuck on one frame, but the audio keeps playing normally. This usually means the video part of the file is damaged, while the audio is still okay.
3. File Info Looks Wrong (Metadata Problems) - In some cases, the video won't even start. You might notice that the file size shows as 0 bytes or the video length is wrong (e.g., 1 hour shows as 14 seconds).
4. Media Player Crashes - If your video player suddenly freezes or crashes when opening a specific file, that's another warning sign. It means the player ran into damaged data it couldn't understand, causing it to stop working.
Part 3. Fixes to Repair Damaged Videos
If your video won't play, don't delete it right away. In many cases, the file isn't completely lost; it just needs a small fix. Before using complicated recovery tools, try these simple steps first.
Try these simple steps to get your video back on track:
Fix 1. Perform a "Fresh" Transfer
It sounds obvious, but the most effective fix for why file transfer corrupts videos is simply to try again.
Step 1. If the original source (like an SD card or a phone) still has the file, delete the corrupted version on your computer and re-copy it.
Step 2. This time, use a different port or a different cable to rule out hardware interference.
Fix 2. Use the "Index Repair" Feature in VLC Media Player
VLC is famous for its ability to play slightly broken files. It has a built-in tool that can temporarily rebuild the "index" of a video, the map that helps the player navigate the file.
Step 1. Open VLC and go to Tools, then Preferences. Click on Input / Codecs. Go to the Damaged or Incomplete AVI file setting and choose Always fix.
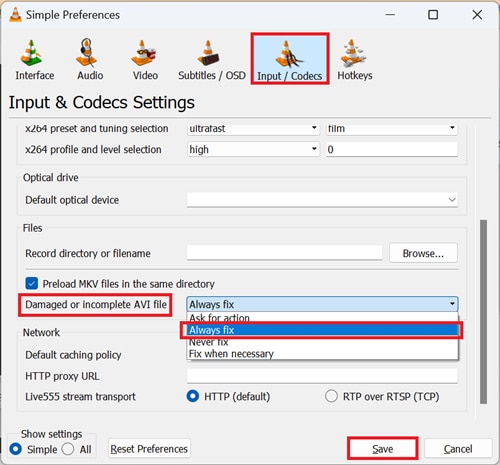
Step 2. Try opening your damaged video; VLC will attempt to repair the file structure in memory so it can play.
Fix 3. Change the File Extension
Sometimes, a transfer error causes the system to mislabel the file type, leading to a "Format Not Supported" error. If you know the video was recorded as an .mp4, but it's showing up without an extension or as something else, you can manually rename it.
Step 1. Right-click the file, then choose Rename.
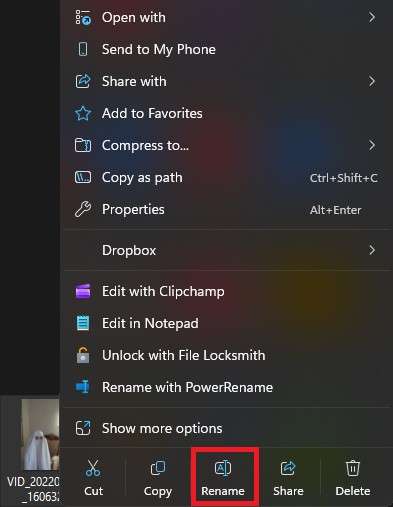
Step 2. Change the suffix (e.g., from .mov to .mp4).
⚠️ Note: This doesn't convert the file, but it can occasionally force a media player to use the correct "engine" to read the data.
Fix 4. Optimize the Destination Drive (CHkdsk)
If the transfer failed because of "bad sectors" on your hard drive, your computer might be struggling to read the file it just wrote. You can use your operating system to fix these file system errors.
Step 1. On Windows: Right-click your drive in File Explorer.
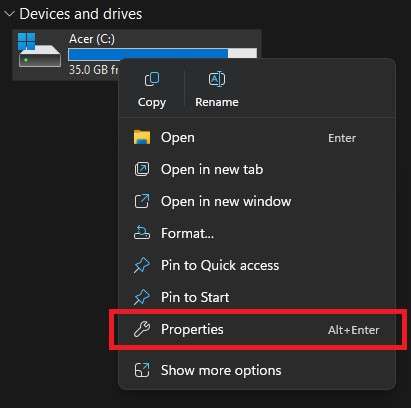
Step 2. Open Properties, go to the Tools tab, then run a check.

This tool scans the drive for logical errors and attempts to "move" your video data to a healthy part of the disk, which can sometimes resolve playback stutters.
Fix 5. Disable Hardware Acceleration
Sometimes the video isn't actually damaged; your computer is just struggling to render it because of a conflict with your graphics card.
Step 1. Go into your media player's settings and change Hardware Acceleration to "Disable".
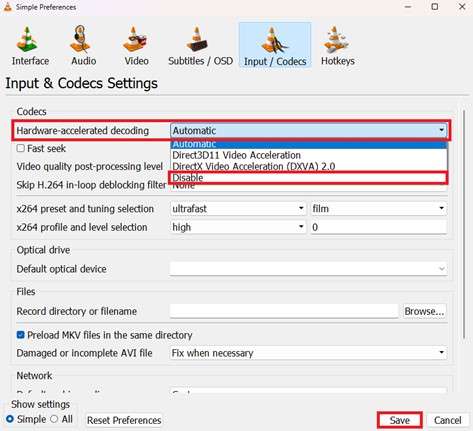
Step 2. Check the video, and if the video suddenly plays smoothly, the "corruption" was actually just a playback glitch caused by your system's hardware settings rather than a transfer failure.
Part 4. Advanced Fixed for Severely Corrupted Videos
Before committing to advanced tools, you need to verify if the file itself is physically compromised or if your system is just struggling to read it. You can tell a file is truly damaged when:
- The "VLC Test" fails
- Persistent Errors Across Devices
- Disproportionate File Size
- Hex Editor Inconsistency
Video repair software is powerful, but it isn't magic. It works by comparing your broken file to a "reference file", a healthy video shot on the same device with the same settings, to figure out what the missing metadata should look like.
It CAN:
- Reconstruct the Header: Fix the "map" that tells the computer the video's resolution, frame rate, and length.
- Repair the Index: Re-enable the ability to seek or "scrub" through the timeline without the video freezing.
- Fix Frame Corruption: Resolve minor pixelation or "stuck" frames by bypassing the unreadable bits of data.
It CANNOT:
- Create Data Out of Thin Air: If a transfer was cut off at 50%, a repair tool cannot "guess" what the second half of your video looked like. It can only fix the 50% you actually have.
- Improve Original Quality: It won't turn a blurry, low-resolution transfer into a 4K masterpiece; it only restores the file to its original state.
- Recover Overwritten Files: If you have already recorded new data over the "bad sectors" of an SD card, repair tools cannot reach the old, deleted footage.
If you confirm the video is corrupted, a repair tool can safely restore its functionality. One example is the Repairit Video Repair, which works with common file types like MP4, MOV, MKV, and AVI.
Step-by-Step (Optional)
Step 1. Upload the corrupted video file.

Step 2. Start the Repair process.

Step 3. Preview and save the restored file to a new location.

Part 5. Best Ways to Avoid File Corruption
Here are some simple habits to keep your files safe:
- Always "Safely Remove" your device
- Use cables instead of Wi-Fi
- Use good-quality hardware
- Always keep backups (3-2-1 rule)
- Format the SD card directly using the camera
Instead of deleting files on your computer, use your camera's Format option. This resets the card properly and helps prevent errors in future recordings and transfers.
Conclusion
Discovering that your videos were damaged during transfer can be very frustrating, especially if they contain important memories or work files. Most of the time, this happens because something interrupted the transfer, like a weak connection, unplugging the device too early, or a problem with the cable or storage device.
To avoid this problem in the future, it's important to use safe transfer habits. Always copy files instead of moving them directly, and make sure to safely eject your device before unplugging it.
FAQs
-
Can a corrupted video harm my computer or media player?
No. A corrupted video will not damage your computer. At worst, it may cause a video player to freeze or crash because it can't read the file properly. -
Why does my video play on my camera but not on my laptop?
This usually means the original file on your camera is fine, but something went wrong when copying it to your laptop. The best fix is to delete the broken copy and transfer it again using a different cable or port. -
Will changing the file name (like .mp4 to .mov) fix the problem?
Sometimes it helps if the file type is labeled incorrectly. But it does not truly fix a damaged video. If parts of the file are missing, you will still need a repair tool. -
Can a video that was only half copied be fixed?
Only partly. You may be able to recover the part that was successfully copied, but the missing part cannot be restored because it was never transferred in the first place.