
Transferring videos to computers is a seamless task that most people seek to do, whether to free their space or edit the footage on a bigger display. Regardless of the need, there are various professional approaches to moving video data from one system to another without causing any damage.
In this guide, we have mentioned 4 wireless and 3 wired methods for your assistance. From using iCloud Drive to the Photos App, you will get to know every approach in detail with a step-by-step guide. So, to determine how to transfer videos from an iPhone to a computer, read the given article.
In this article
Part 1. How to Transfer Videos from iPhone to Computer Wirelessly?
Since no one wants to use tangible cables just to share iOS videos with a PC, this section has covered 4 wireless methods for you. Through these, you can quickly move the data without having connectivity and compatibility issues.
Method 1. Download Videos from iCloud Photos
Being a cloud storage service offered by Apple, iCloud Photos can automatically store photos and videos while syncing them across all devices. Not only that, but this method frees up your iPhone storage and ensures backup and easier editing on wider displays. Hence, if you want to know how to send videos from iPhone to computer, here is the detailed stepwise guidance:
Step 1. Head to the "iCloud" settings and tap the "iCloud" option to access the "Photos" from save to the iCloud section. After that, toggle the "Sync this iPhone" option so your videos on your iPhone can be synchronized on all devices.
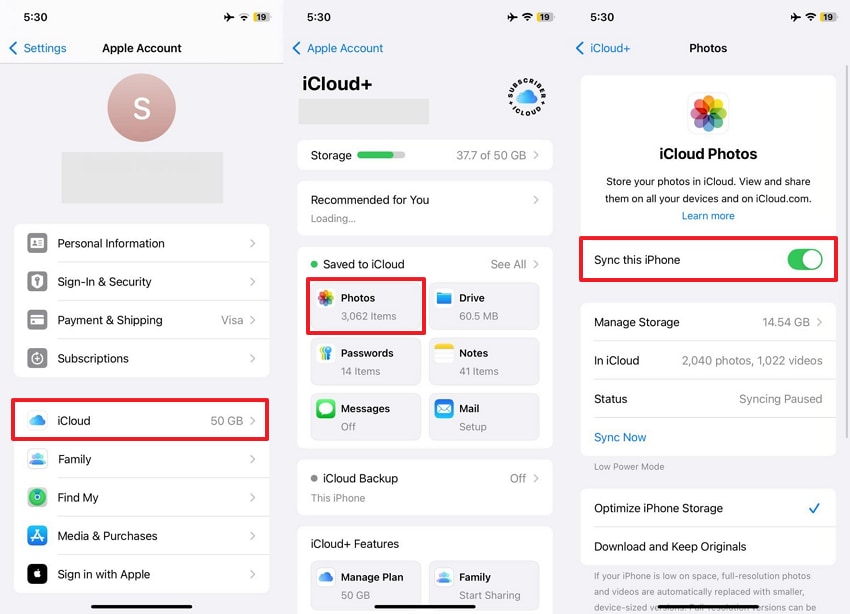
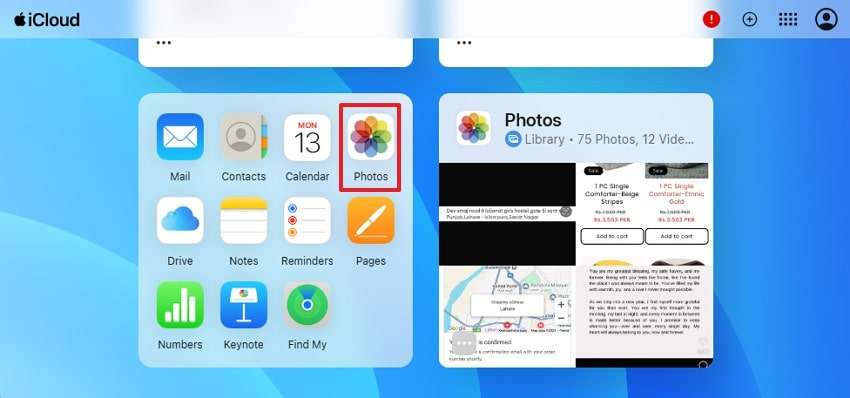
Step 2. Afterward, start by signing in to your iCloud Web and scroll down to choose the “Photos” app from the main interface.
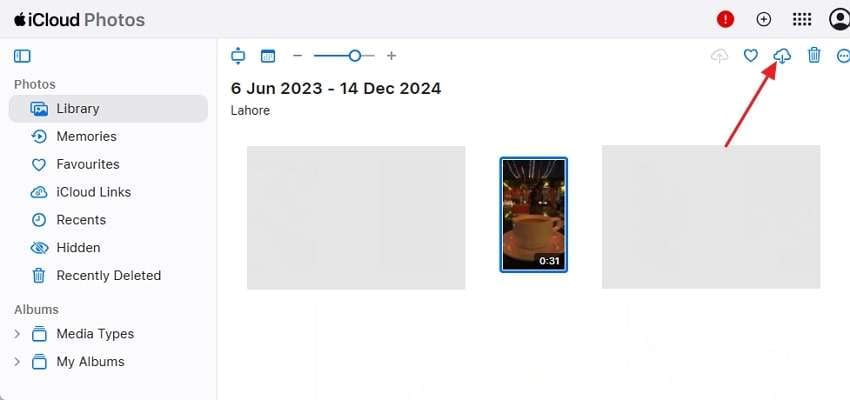
Step 3. After that, locate the video you seek to share and click on it to pick the “Download” option from the top right corner. Wait for a while, and the media will be successfully saved to your File Explorer.
Method 2. Using Cloud Storage Options
Most of the time, people forget their Apple ID and look for other versatile solutions to share videos across platforms. In this case, try using a cloud service like Google Drive since it offers you 15GB of free storage to store and manage the data. Using this method, you can easily share files and folders, eliminating the manual effort. Hence, follow the steps below and learn how to transfer videos from an iPhone to a PC:
Step 1. From your gallery, pick the image and hit the “Share" icon from the bottom left corner. This will fetch a bottom pop-up menu where you have to choose the "More” option if you don’t see the Drive option.
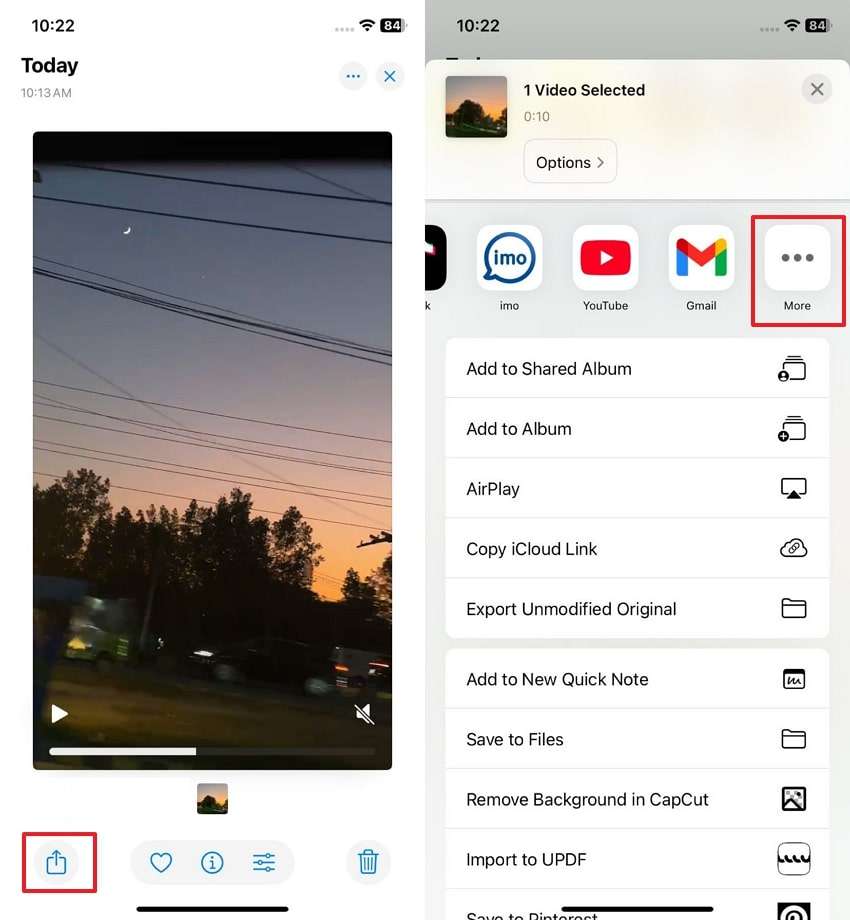
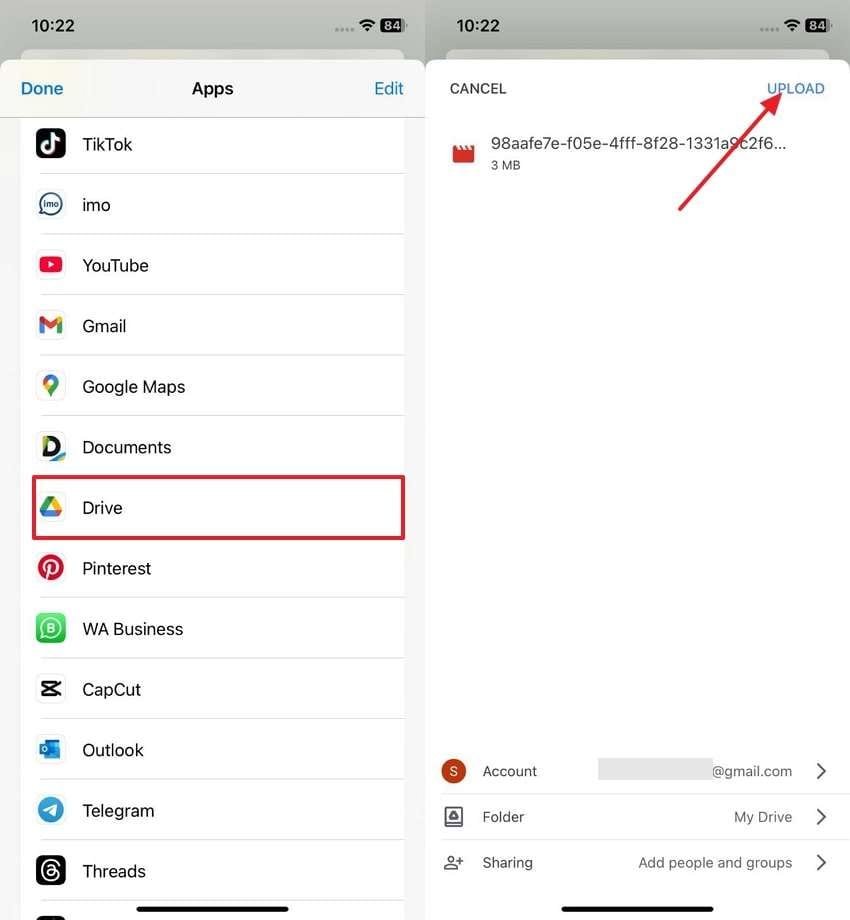
Step 2. Now, on the appearing list, select the “Drive” option and press the “Upload” option from the new screen to upload the video to Google Drive.
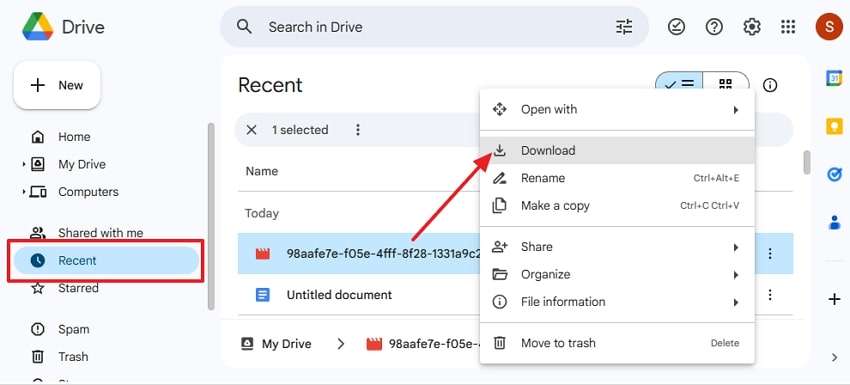
Step 3. Using the same credentials, sign in to Google Drive and tap the “Recent” tab to access the uploaded video. As you locate it, right-click and choose the “Download” option to save the media to your PC.
Method 3. Try a Remote Desktop Service
If you are on a trip and want to share your reel with the video editor's PC, you can use a remote desktop service like Avica Remote Desktop. The foremost aspect of this tool is that it allows you to share files of any size and format 100 times faster than FTP/HTTP. Moreover, while accessing it on your phone, users can enjoy clear HD and ultra-HD visuals.
Other than that, AnyDesk provides you with cloud solutions for seamless service or allows you to install it on servers for full independence. While creating sessions to share media, users can leverage its privacy mode to blacken the screen of their remote devices.
Method 4. Utilize an App Like WeTransfer
When it comes to applications, WeTransfer is a versatile solution since it allows you to securely share video to other platforms via links and email. Using this app, you can preview the video before sending it, and the receiver will be notified once it is shared with them. Hence, if you have a video file of 200 GB, here is how you can transfer video from an iPhone to a PC:
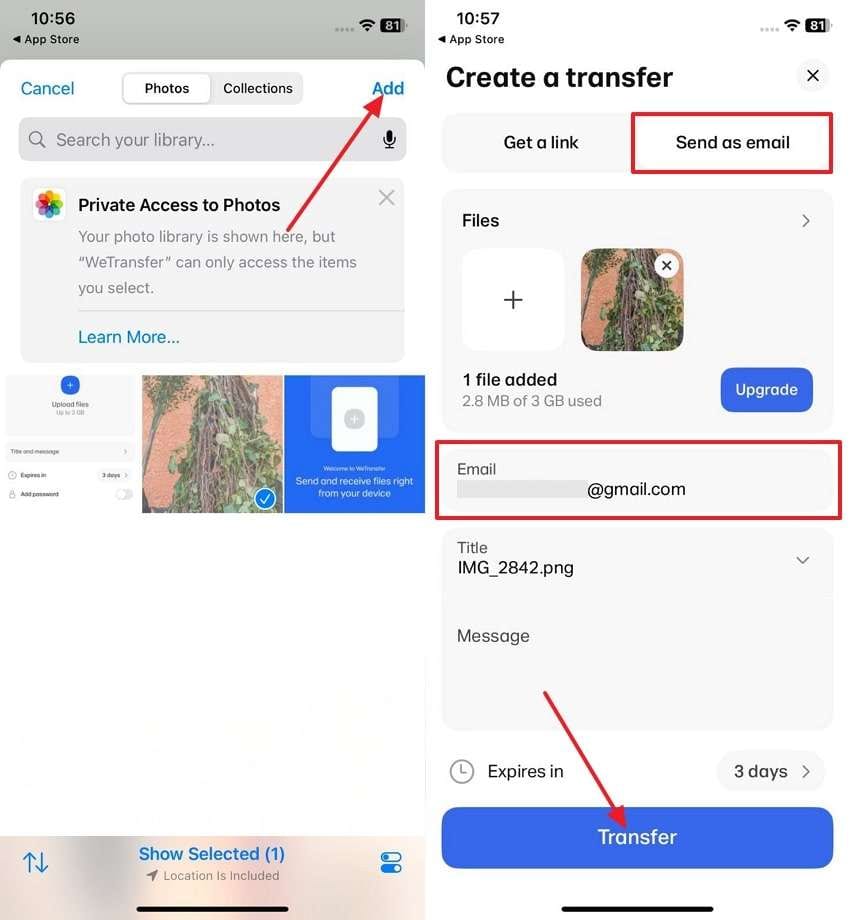
Step 1. Launch the WeTransfer application on your phone and hit the “+” icon to create the transfer. After that, on the new screen, press the “+Upload Files" option to import the video.
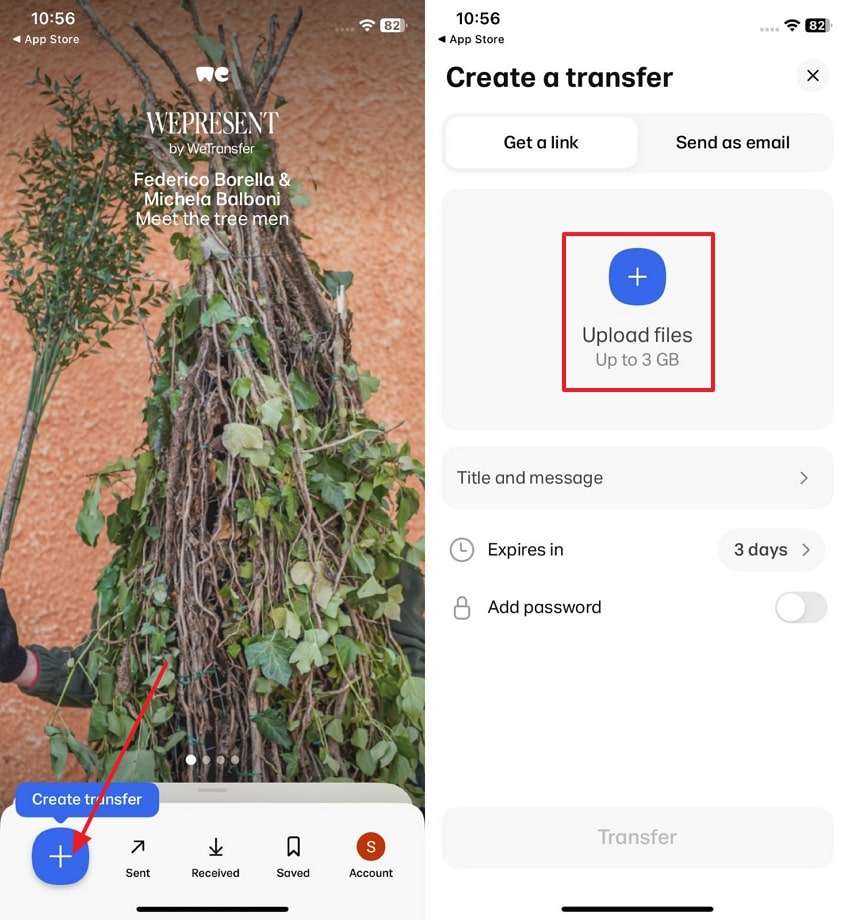
Step 2. From the bottom pop-up menu, pick the video file and choose the “Add” option from the top right corner to import. When it's done, select the “Send as Email” option, enter the email, and tap the “Transfer” button to send the file.
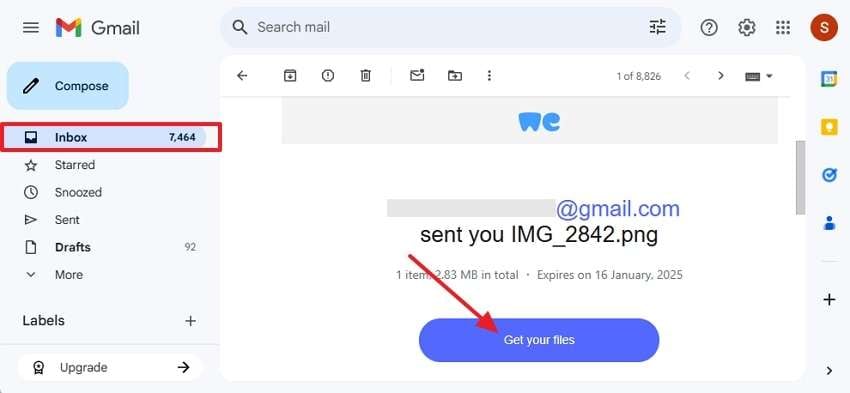
Step 3. Now, on the receiver’s end, access your email client and fetch the received WeTransfer mail from the “Inbox” section. Once there, press the “Get Your Files” option from the mail to process further.
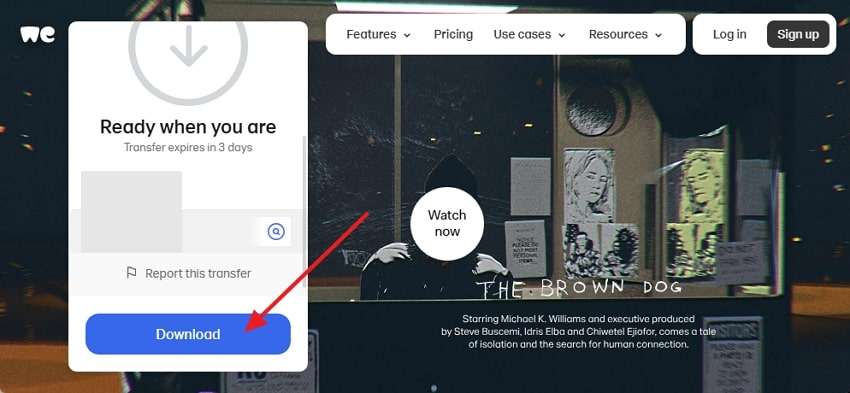
Step 4. This will open a new screen where you have to pick the “Download” button on the given pop-up menu and save it on your PC.
Part 2. How to Send Videos from iPhone to Computer with a Wired Connection?
Other than wireless methods, there are numerous wired ways to move iOS video files to computers. In this section, we have highlighted 3 of them with detailed guidance on how to access and use them easily.
Method 1. Use MobileTrans
Being a reliable solution, MobileTrans features a phone transfer feature that enables you to share over 18 types of data across the platforms. Using this tool, you can easily transfer videos, photos, or any other media from Android or iOS devices to computers. Unlike other solutions, it supports more than 6000 mobile devices running on Android and iPhones.
Besides compatibility, you can move 5 different types of data, including video and images, from computers to any mobile device. The foremost aspect of MobileTrans is that it eliminates the need to factory reset the devices or erase the existing data. Designed for non-tech-savvy, access this solution on Windows 11/10/8/7/XP/Vista and explore how to transfer videos from iPhone to laptop.
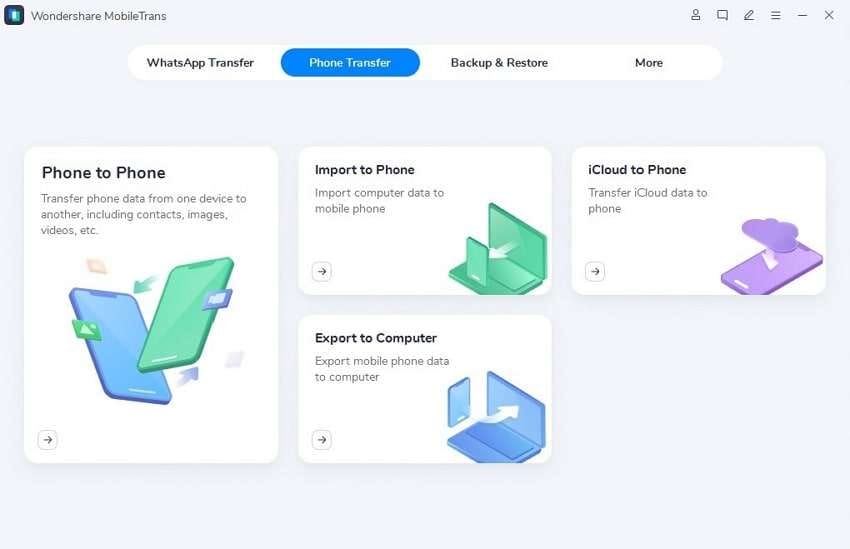
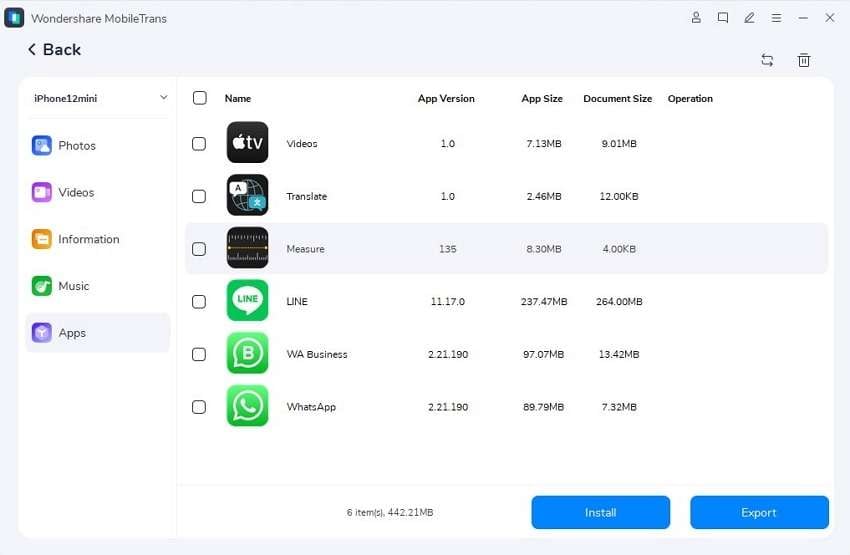
Step 1. Launch the Tool and Pick Export to Computer Option
To begin with, launch the tool on your PC and connect the iOS via a USB cable to start sending the iOS video files. After the connection is built, pick the “Export to Computer” option from the “Phone Transfer” section.
Step 2. Choose the Video and Export it to a PC
This will display a new screen where you have to choose the “Video” section from the left side and pick the media file to share. Once done, hit the “Export” button to access the media on your PC.
Method 2. Copy Folders from File Explorer
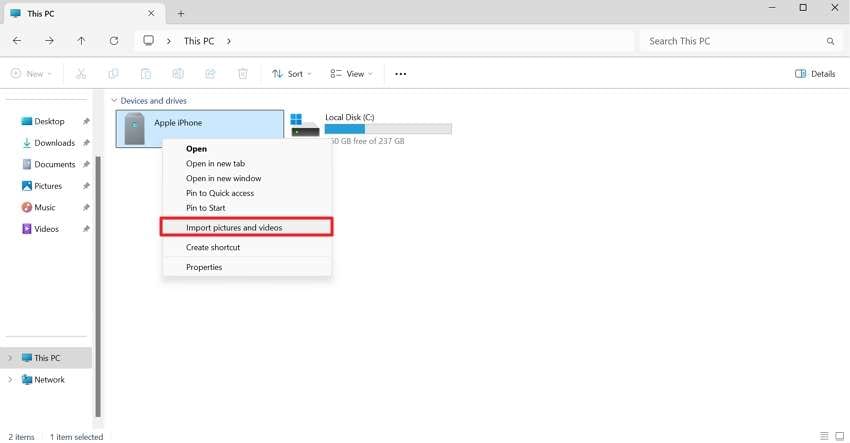
Other than that, you can simply copy and paste the video files from File Explorer by connecting the devices through a USB cable. This method removes the hassle of installing applications, making data sharing straightforward. Hence, by following the guide mentioned here, see how to copy videos from iPhone to PC in bulk and by picking a particular media individually.
Step 1. Connect the devices via USB cable and open the File Explorer to locate your device. As you find it, right-click to pick the “Import Pictures and Video" option to export all the media.
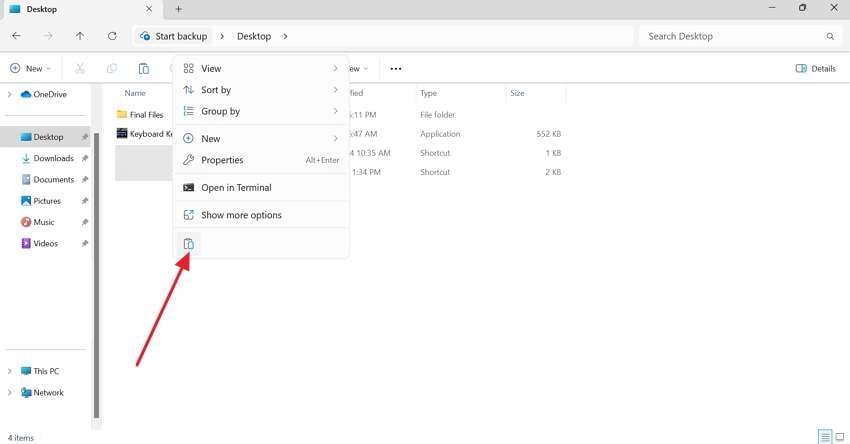
Step 2. However, if you want to share certain videos, access the folder from the Internal Storage of your Apple iPhone and right-click to choose the “Copy” option from the list.

Step 3. Now that it's copied, you have to pick the folder and right-click on it to select the "Paste" icon to save the iOS video to your PC.
Method 3. Import Videos with the Photos App
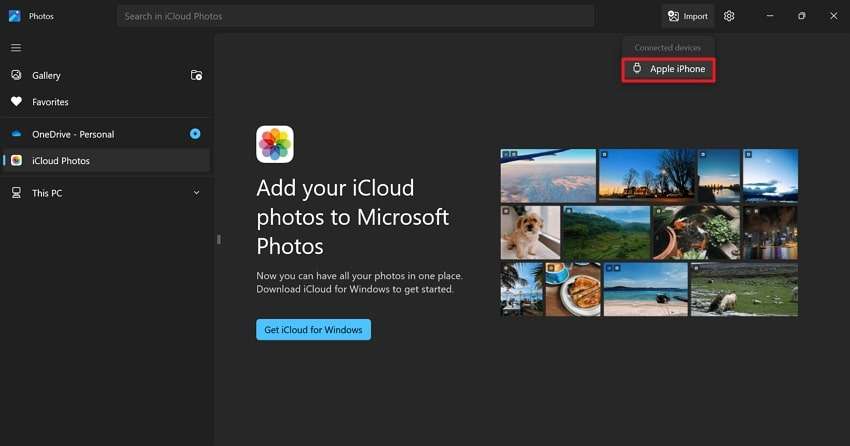
Finally, the Photos App on the PC is a built-in Windows tool that assists you in managing and organizing images and videos. Moreover, it lets you import videos from the iOS in bulk by creating folders, reducing the manual effort and time. So, to learn how to do it, here is a detailed guide on how to send videos from an iPhone to a computer.
Step 1. Open the Photos App on your laptop and connect the iPhone to your PC using a dedicated USB-C or lightning cable. Once it gets detected by the PC, press the “Import” button from the top right corner to select the “Apple iPhone” name.
Step 2. Upon doing that, the tool will start syncing the gallery, after which you can pick the desired video and press the “Add Item” button.
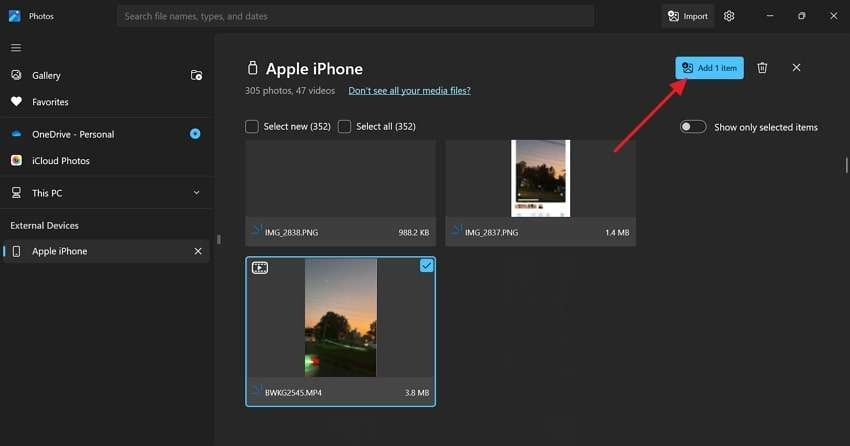
Step 3. This will open a pop-up menu where you have to choose the folder to save the media. When it's done, hit the “Import” button to fetch the preferred video for your PC.

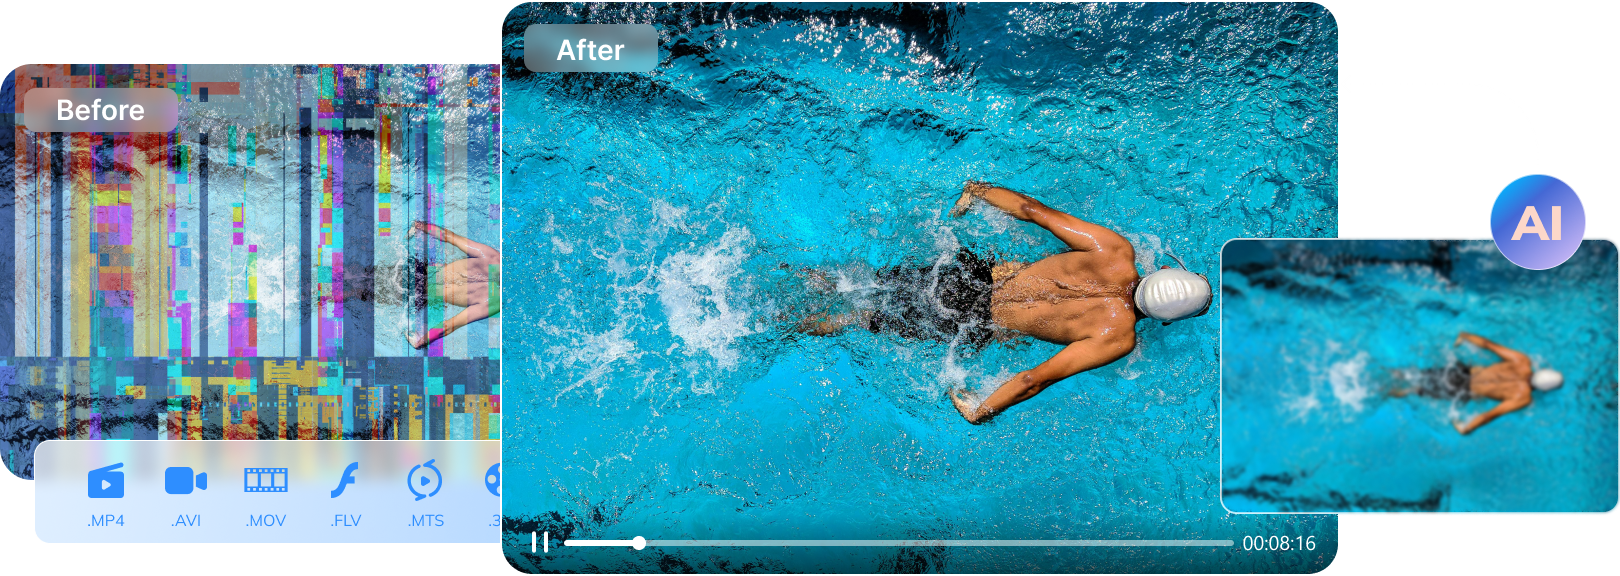
Pro Tip. How to Fix Corrupted or Damaged Videos Transferred from iPhone to Computer?
When you transfer video from an iPhone to a PC, there are chances that it might get corrupted or the quality gets compromised. In this case, Repairit allows you to repair corrupted videos in up to 20 formats, including MOV, MP4, MKV, and 3GP.
Besides that, intelligent repair technology detects the damage in the video to ensure fast fixing. Instead of putting effort into setting up, Repairit offers three simple modes. Using these, one must upload the damaged file, after which it will analyze the damage and save, allowing you to export the secured file easily.
Regardless of the video file you import to save, this tool ensures you offer 98.15% restoration success. Whether you have HD, 4K, and 8K quality video or simple shot clips, this tool is simple and easy to use, making it an ideal option for amateurs.
Key Features

-
Repair damaged videos with all levels of corruption, such as video not playing, video no sound, out-of-sync video or audio, playback errors, header corruption, flickering video, missing video codec, etc.
-
Repair full HD, 4K, and 8K videos and support 20+ popular formats, including MOV, MP4, M2TS, MDT, RSV, WMV, MPEG, DAT, etc.
-
Using its advanced repairing mode, users can add sample files to save the corrupted source file accurately.
-
Repair critically damaged or corrupted RAW/LOG/HDR videos from professional cameras such as Blackmagic Design, RED Digital, ARRI, etc.
-
Repairit has a quick and advanced scanning mode. You can use either depending on the level of corruption the video file has undergone.
-
Before saving the repaired videos to the device, users can also preview them to determine their accuracy.
-
This AI-powered tool allows you to instantly import numerous damaged and corrupted videos to repair.
-
Support Windows 11/10/8/7/Vista, Windows Server 2003/2008/2012/2016/2019/2022, and macOS 10.12~macOS 15.
Simple Step-by-Step Guide to Fix Corrupted or Damaged Videos with Repairit
Besides learning how to transfer videos from an iPhone to a PC, here is how you can repair your corrupted file through Repairit.
Step 1. Hit the “+Add” button and import your damaged video to repair it instantly.

Step 2. Hit the "Repair” button to let the tool analyze the level of corruption.

Step 3. You can pick the “Save All” button to save the repaired file.

Repair Corrupted Video Files
 Security Verified. Over 7,302,189 people have downloaded it.
Conclusion
In essence, learning how to transfer videos from an iPhone to a computer is essential, which is why this guide got you covered. Additionally, we have explained various wired and wireless methods to share iOS videos easily on PCs. However, if your data gets corrupted while sharing, we recommend using Wondershare Repairit, which supports up to 20 video formats.
FAQ
-
What are the easiest methods to transfer videos from my iPhone to a computer?
The easiest way to transfer video from iPhone to PC is by considering wireless methods like iCloud or cloud storage apps like Google Drive. By using these solutions, you can get rid of the effort of setting up devices to share video files from one platform to another. -
How can I transfer large video files wirelessly from iPhone to PC?
For large video file sharing, you can use the WeTransfer application since it allows you to upload 200 GB files easily. Moreover, while transferring the videos, you can also insert a secret code to prevent unauthorized access. -
What should I do if the video I transferred from my iPhone gets corrupted?
In case your video file gets corrupted or damaged, use Wondershare Repairit, as it offers you 3 steps of a simple repairing process. Most of all, this tool supports almost 20 formats, including MOV, MP4, MKV, and 3GP.
