
Whenever your screen recorder suddenly fails, it can completely ruin your workflow and content creation. Whether you were trying to capture a game or record a presentation, finding out your screen record is not working is a frustrating setback. Despite sitting back and letting these moments slip away, look for reliable solutions and get back to capturing every action.
More importantly, knowing what's causing the screen not recording issue will help you take the necessary action at the right time. For this, the following article covers all essential aspects, including possible reasons and workable fixes with guided tutorials. Whether this failure showed up during OBS or GeForce Experience crashes mid-recording, you're covered throughout. Finally, iPhone users are provided with the best fixes for the screen recorder not working problem.
In this article
Part 1. Why Is My Screen Record Not Working? All the Reasons
Prior to resolving the "my screen record is not working” issue, adhere to the given section and determine the reasons behind it:
Recorded Permission Not Granted: An overlooked reason is a lack of proper permission because now operating systems require access for apps to record screens. Ultimately, when your screen recorder lacks this access, it may silently fail or capture a black screen.
Using Unsupported Recorder or OS Version: Having an outdated screen recorder or a newer OS version that your recorder doesn’t yet support might evoke compatibility issues. This eventually results in a crash at launch, a failed recording, or poor video quality.
App-Specific Limitations: Periodically, certain applications, such as streaming services or specific games, have built-in protection against screen capture. When a user tries to record such apps, they often end up with a black screen or no audio output.
Recorder Settings Misconfigured: If your recorder's configurations, such as resolution or frame rates, exceed your system's capacity, it may refuse to record footage. Even minor misconfigurations, like saving in an unsupported format or selecting the wrong audio input, can cause the recording to break silently.
Limited Storage Space: When your storage drive is nearly full, the recorder might stop midway or not save anything at all. Besides, a system with minimal available space can even lead to performance lags or incomplete video encoding.
Part 2. GeForce Experience Not Recording? Top 3 Fixes
When you’re in the middle of a game and realize “screen record not working,” head to the fixes provided in the following section:
Fix 1. Alter ShadowPlay Settings
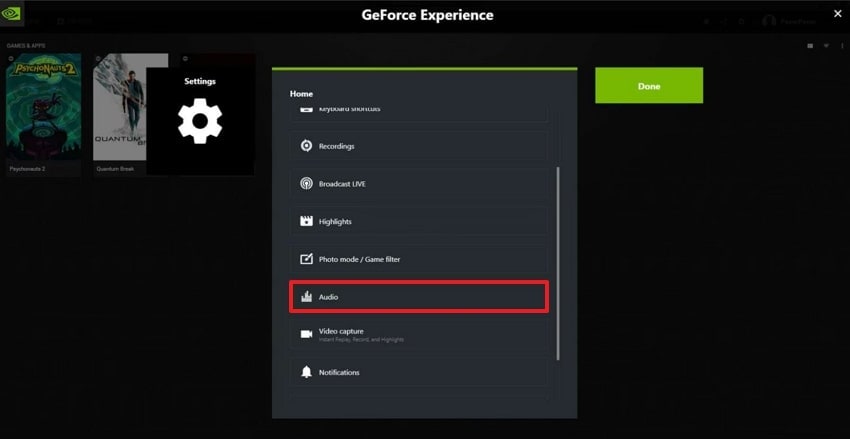
Misconfigured audio settings may be the reason behind GeForce Experience not recording, as it relies on background recording in the in-game overlay. Additionally, NVIDIA's recorder features its audio panel, allowing you to select system sound and microphone devices. For better understanding, explore the tutorial provided and alter ShadowPlay settings:
Step 1. Commence ShadowPlay first and press the “Settings” icon available on the right side of your screen. After this, look for the “Audio” option from the settings list and click it.
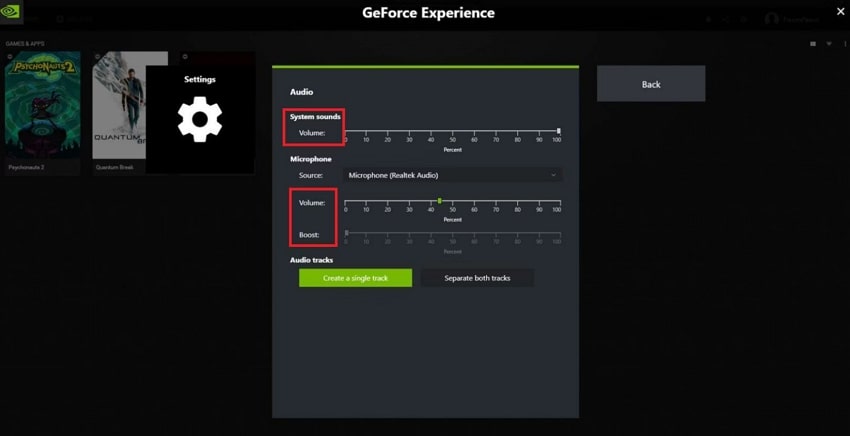
Step 2. Examine if ShadowPlay is using the appropriate microphone source and adjust the “Volume”, “Boost,” or “System Sounds” settings accordingly.
Fix 2. Enable Privacy Controls
At times, the "my screen record is not working” issue emerges when privacy controls within GeForce Experience restrict screen capture. Where these settings are made to protect users' data, they can interfere with legitimate tools like ShadowPlay. Follow the tutorial to give it proper access and function without restrictions:
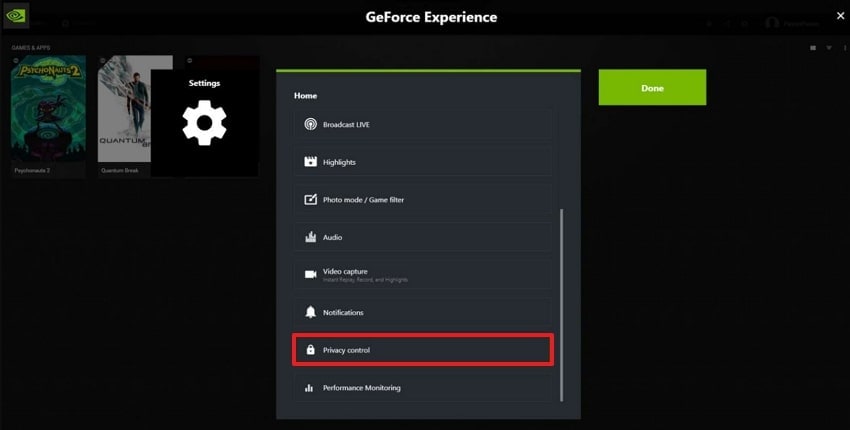
Step 1. Access ShadowPlay, click the “Settings” icon, and scroll down to find the “Privacy Control” option from the list.
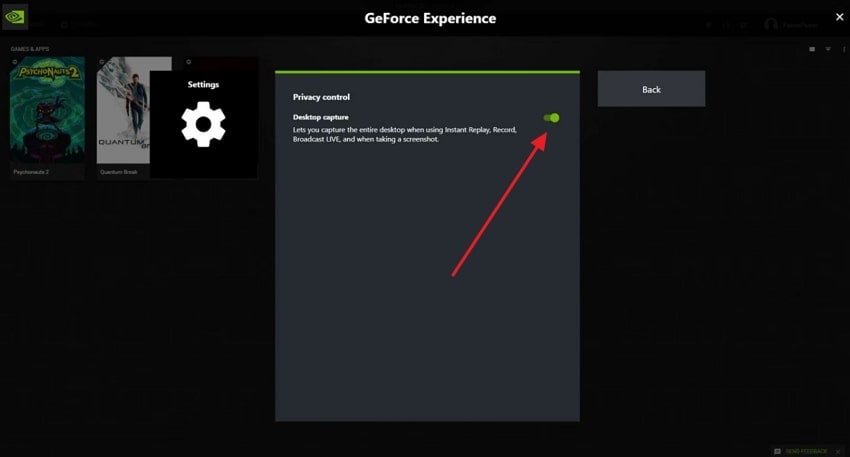
Step 2. Entering the new screen, if “Desktop Capture" is disabled, toggle it to the right to turn it on.
Fix 3. Reinstall GeForce Experience
If you still face the screen record not working issue, even after altering ShadowPlay settings, it's time for a full refresh. Over time, GeForce Experience can encounter a hidden bug, outdated components, or corrupted files that ultimately break the recording functionality. To overcome this, follow the manual and reinstall GeForce Experience for a new start:
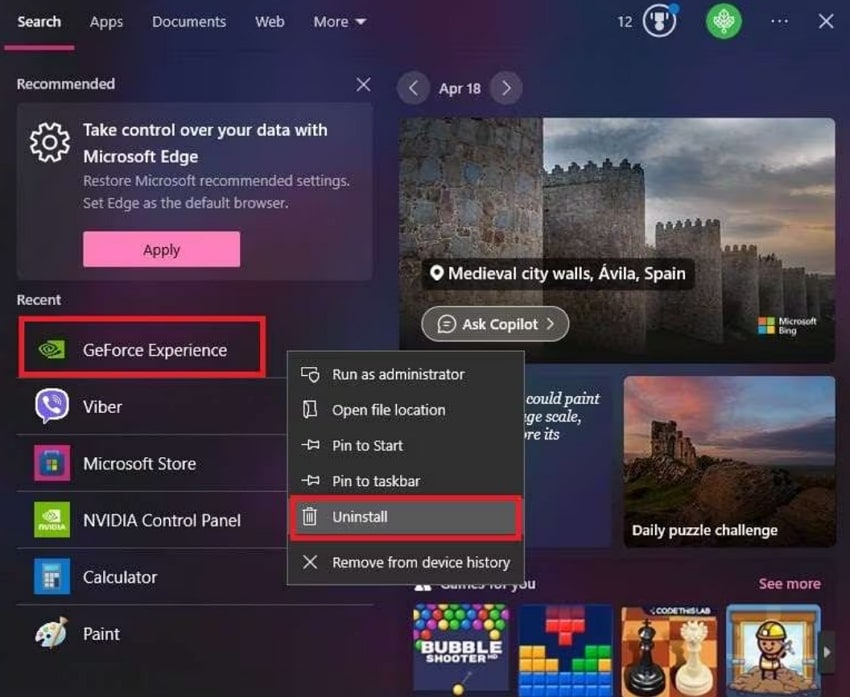
Step 1. At first, find the “NVIDIA GeForce Experience” in your “Start” menu and then right-click the app. Now, press the “Uninstall" option from the drop-down menu for a complete removal of the app from the desktop.
Step 2. Once the app is uninstalled, visit NVIDIA’s official website and click the “Download Now” button from the main interface.

Part 3. OBS Won't Game Capture? Use These Solid Solutions
For OBS won’t game capture problem, a few quick solutions are explained in the following section to get things working again:
Way 1. Deactivate Game Mode in Windows
Windows Game Mode, designed to optimize system performance, can sometimes interfere with third-party apps like OBS. When you disable Game Mode, it removes restrictions, including screen record not working, giving OBS better access to render. Explore the tutorial below and restore smooth capture performance through OBS:
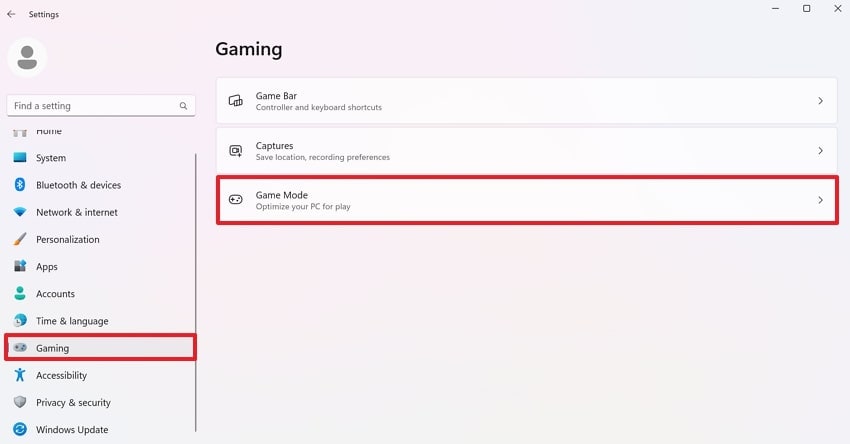
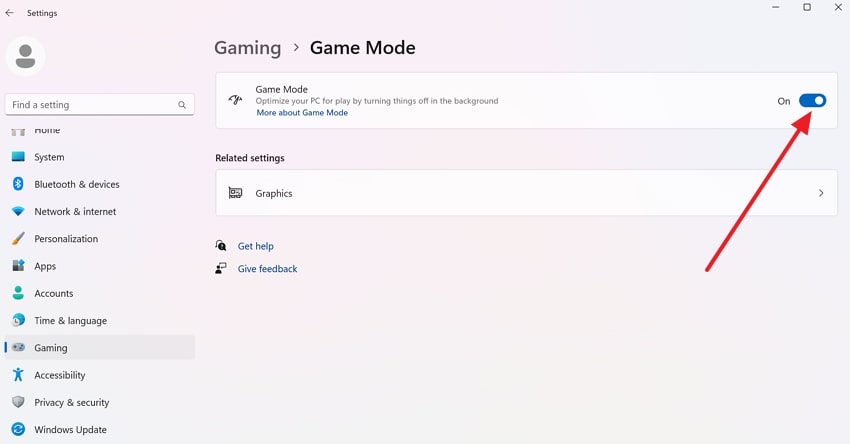
Step 1. To access Windows Settings, hit the “Windows” and “I” keys together on your keyboard. From the panel at left, press the “Gaming” tab and access the “Game Mode” later.
Step 2. In the Gaming window, switch off the option for “Game Mode” and try to re-record your game.
Way 2. Alter Graphic Preferences to Switch to GPU
When your PC has both integrated and dedicated graphics, OBS might be running on one GPU while your game runs on another. This ultimately fails screen recording and requires aligning both OBS and the game to the same GPU. To address the OBS won't game capture problem, follow the tutorial and alter Windows Graphics Preferences:
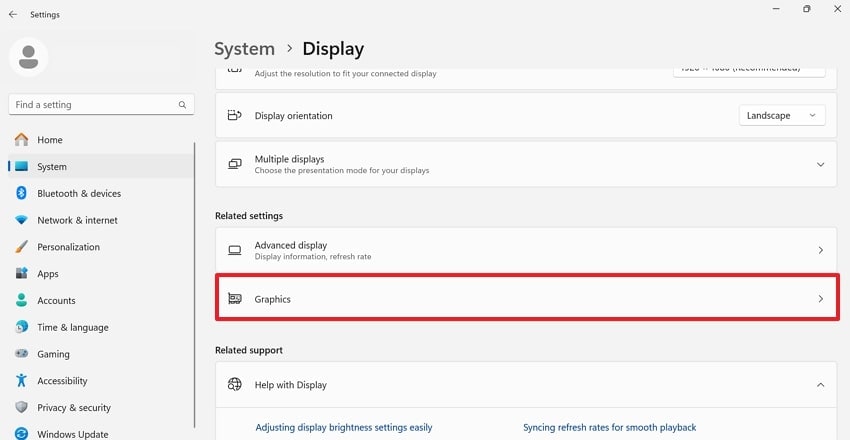
Step 1. Go to your system's settings, choose the “Display" option, and navigate to the "Graphics” option later.
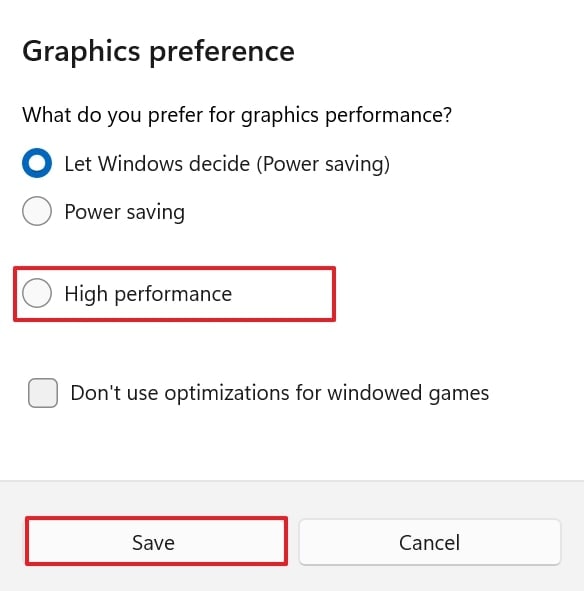
Step 2. After this, find the OBS app and press the “Option” button to reveal the Graphic Preferences window. Move forward, tick the “High Performance” options from the list, and click the “Save” button to finalize changes.
Way 3. Move to DirectX 11
Plenty of modern games default to DirectX 12, which can be incompatible with OBS’s Game Capture mode. Thus, when you move your game to Direct 11, it often resolves such issues because it's the most widely supported API. Dive into the instructions below and solve this recurrent screen record not working issue:
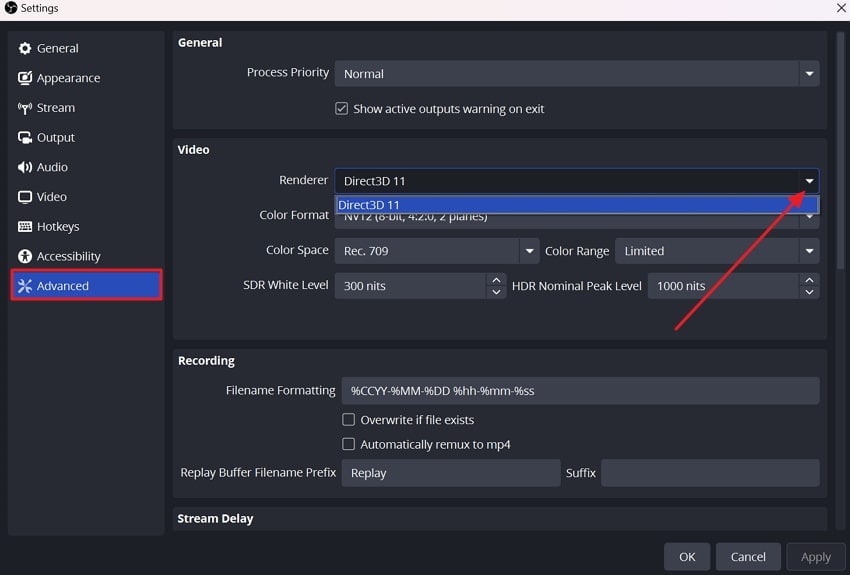
Step 1. Install OBS on your desktop and navigate to the “File” tab to choose the “Settings” option from the drop-down menu.
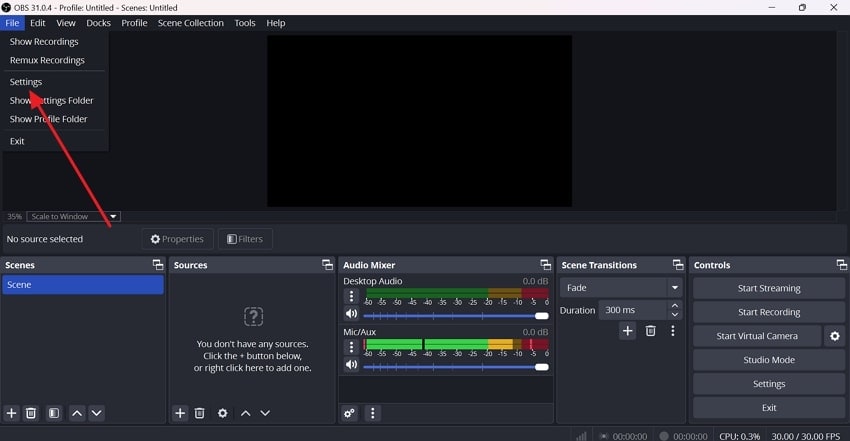
Step 2. Here, access the “Advanced” tab from the left panel and expand the menu for “Renderer” under the “Video” section. From the menu, select the “Direct 3D 11” option and attempt to re-record your screen.
Part 4. Xbox Game Bar Recording Not Working: Top 3 Solutions
This common glitch of Xbox Game Bar recording not working can be overcome through the listed reliable ways to restore its performance:
Method 1. Reinstall Graphics Drivers
For the “my screen record is not working” issue, outdated or corrupted drivers are often to blame. Since the Game Bar heavily depends on your GPU for real-time screen capture, any instability in the driver can lead to recording errors. To address this, it's better to reinstall the graphics drivers through the instructions given:
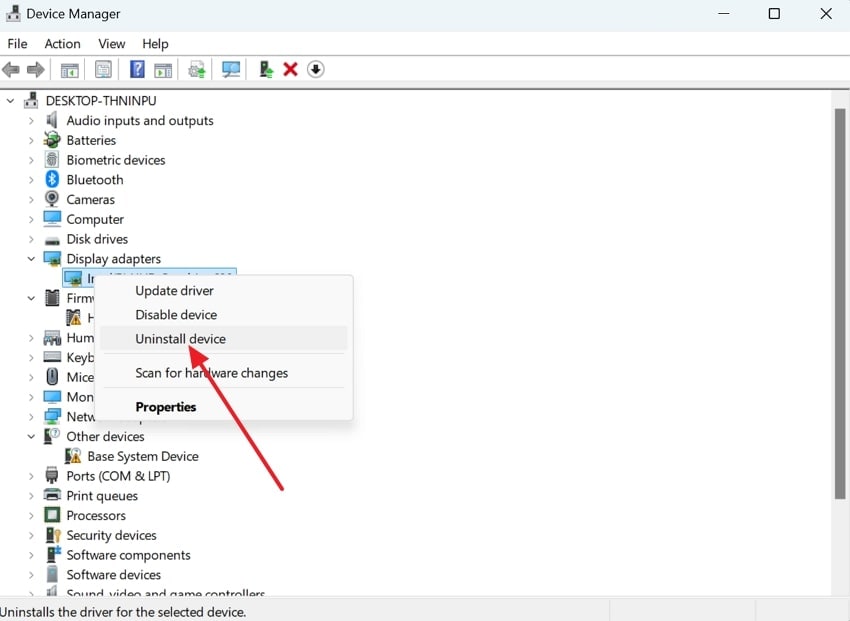
Instructions: To do so, look for “Device Manager” in your Windows and expand the “Display Adapters” section to locate your graphics card. Once found, right-click on your GPU and choose the “Uninstall Device” option from the drop-down menu. After uninstalling, visit the official NVIDIA website and search for your GPU model on the driver’s page to reinstall the updated driver.
Method 2. Repair or Reset the Xbox Game Bar
When you face crashes or unresponsive shortcuts, repairing or resetting the app via Windows Settings can help clear underlying glitches. The repair option preserves your data while fixing minor issues, and the reset function helps restore Game Bar's default performance. For more, explore the provided tutorial and solve the screen record not working issue:
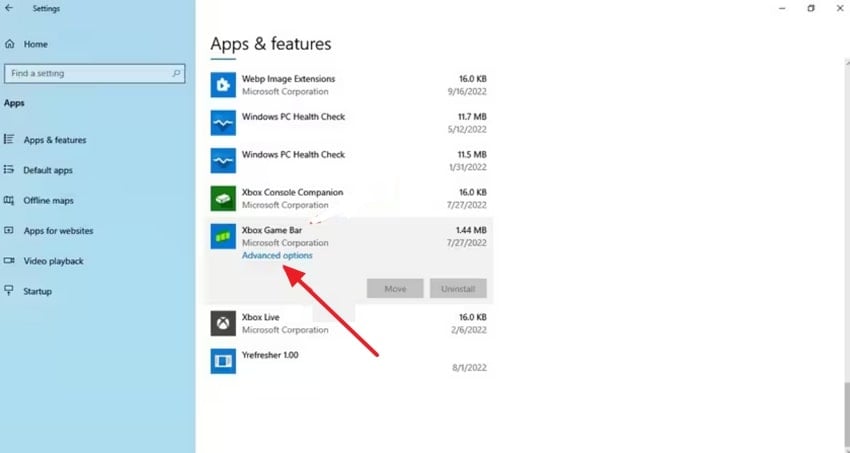
Step 1. Visit your Windows Settings, access the “Apps” option, and then select “Apps & Features” to choose “Xbox Game Bar.” After this, press the “Advanced Options” option provided under Xbox Game Bar for repair and reset.
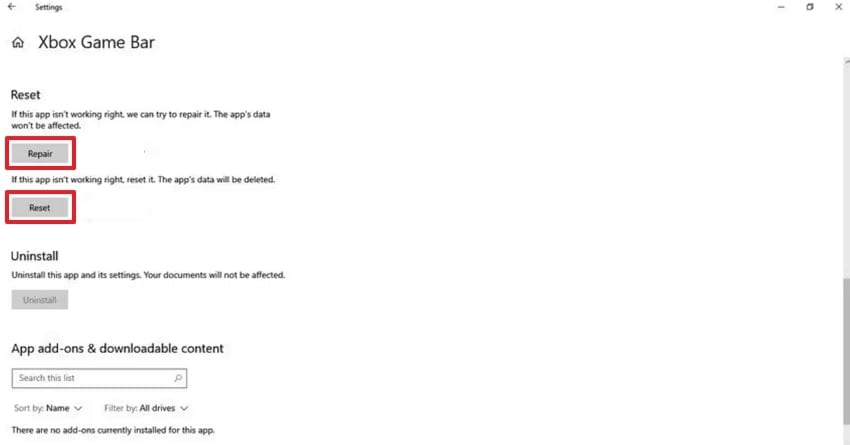
Step 2. Now, first click the “Repair” button and check if the Game Bar works after repairing. Alternatively, press the “Reset” button if the issue persists, but create a backup beforehand to avoid data loss.
Method 3. Install Xbox Game Bar Again
For instance, when everything else fails and the Game Bar is still not recording, reinstalling the app may be your best solution. A fresh reinstall erases all broken components, registry conflicts, and leftover files that could be interfering with its ability to record. Follow the tutorial and learn how to reinstall the Xbox Game Bar recording not working issue:
Step 1. To start, visit your Windows Settings and select the “Apps” option, and then click the “Apps & Features” option. At this point, please find the app called the “Xbox Game Bar” and press the icon named the “Three Dots” to select the “Uninstall” option in the menu.
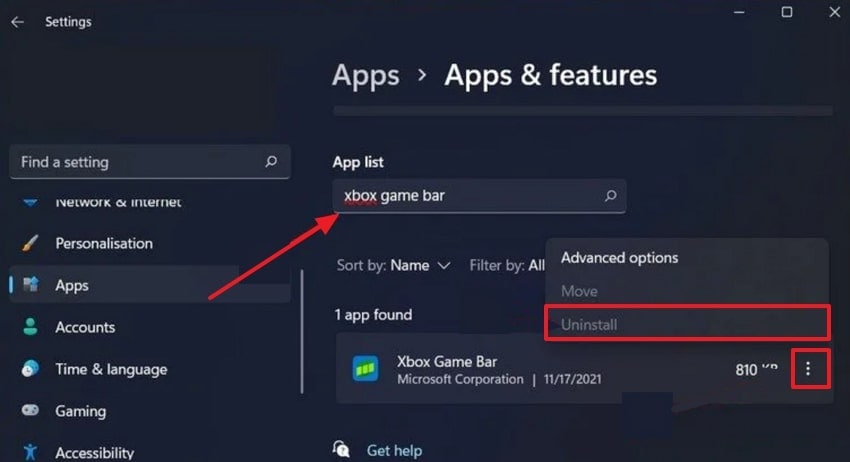
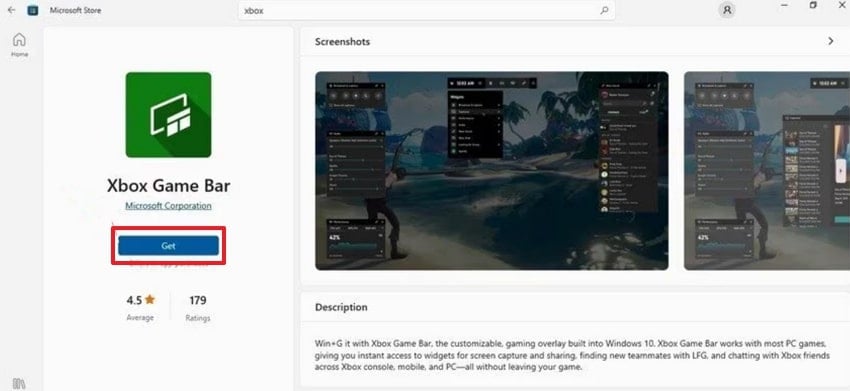
Step 2. Once done, restart your PC and visit the official Microsoft Store website to search for Xbox Game Bar. When found, press the “Get” button to reinstall the app on your Windows for smoother recording this time.
Part 5. iPhone Screen Recording Not Working: 3 Best Fixes
For a consistent iPhone screen recording not working issue, let's dive into the best solution and begin recording in a matter of seconds:
Solution 1. Check Screen Time Settings
When you have Screen Time restrictions enabled on your iPhone, this can be a common reason behind screen recording failures during gameplay. This function silently blocks screen recording without a warning when Content& Privacy Restrictions are turned on. For the problem of screen recording not working, learn how to enable screen recording restriction:
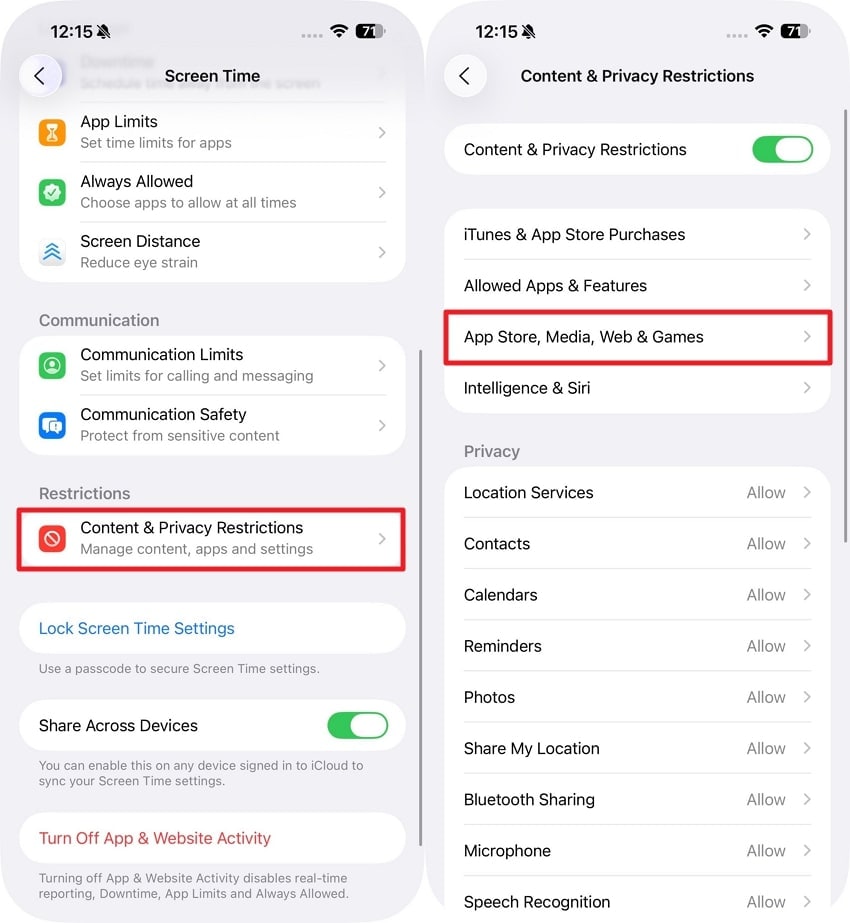
Step 1. Open iPhone Settings, visit the “Screen Time” screen, and press the “Content & Privacy Restrictions” option. After this, hit the “App Store, Media, Web & Games” option from the new screen.
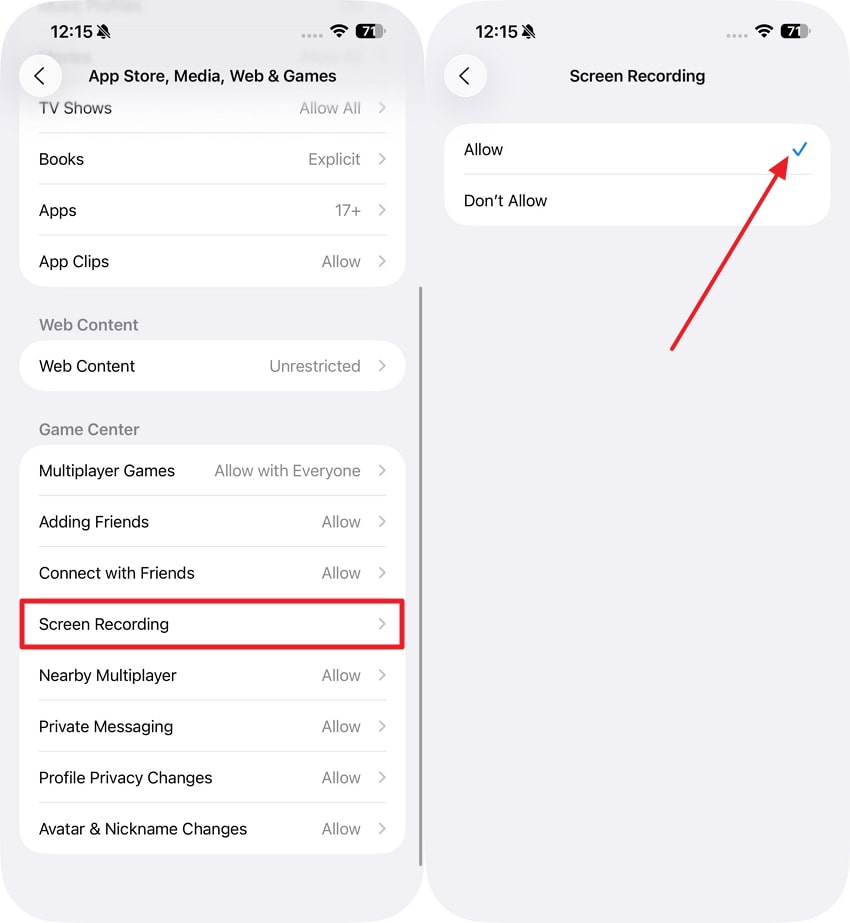
Step 2. Choose the “Screen Recording” option from the list and press the “Allow” option to remove the restriction.
Solution 2. Force Reboot iPhone [iOS 26 Support Devices]
Periodically, minor iOS glitches or memory overloads can prevent screen recording from functioning properly. In such circumstances, a simple force reboot often works by resetting background processes and resolving the "my screen record is not working" issue. Adhere to the instructions given and explore how to reboot the iPhone:
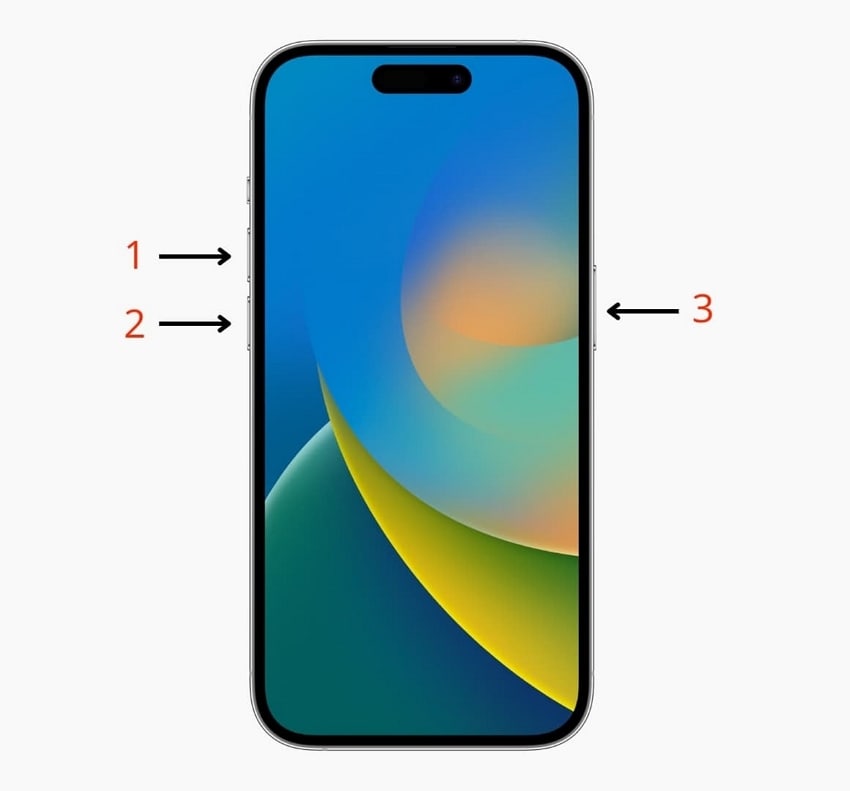
Instructions: First, press and release the "Volume Up" button and repeat it quickly for the "Volume Down" button. One done, press and hold the "Side" button until the Apple logo appears on your screen.
Solution 3. Reset All Settings
If there's no apparent cause for the iPhone screen recording not working problem, resetting all settings can resolve this issue without deleting data. This option reverts all system settings back to factory defaults while keeping your apps and other media intact. To clear out misconfigured settings, explore the provided step-by-step tutorial:
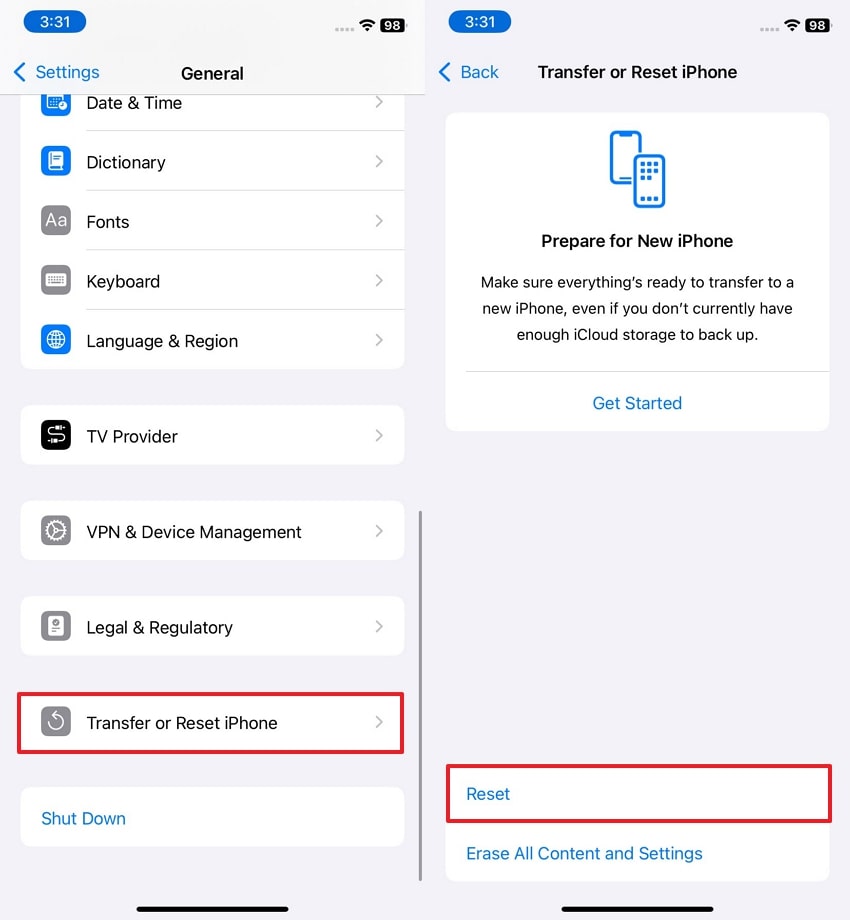
Step 1. Gain access to your iPhone’s settings and find the “General" option from the menu. Afterward, scroll down and look for the "Transfer or Reset iPhone” option to press the “Reset” button later.
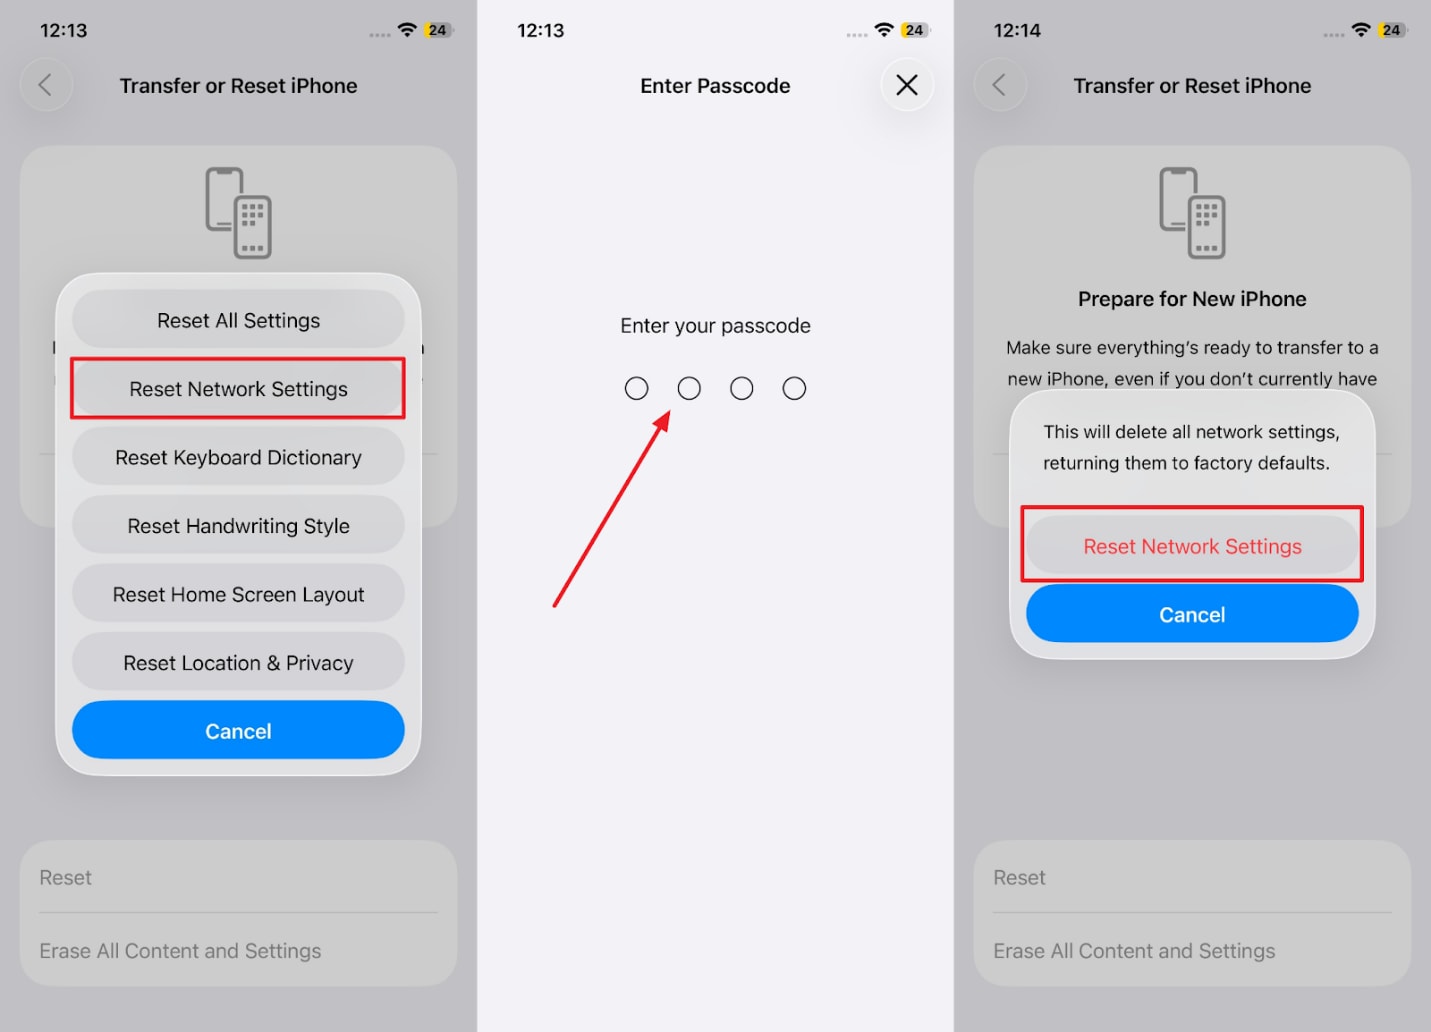
Step 2. Proceed ahead, tap the “Reset All Settings” option from the list, enter the prompted passcode, and hit the "Reset All Settings” button again to confirm the process.
Part 6. Want to Turn Low-Quality Screen Recordings into Something Stunning? Use Repairit
Do you notice your recordings look choppy or pixelated after addressing the "my screen record is not working” issue? If so, consider Repairit as an ultimate savior that retrieves the best visual appeal through AI video enhancement functionality. Be it landscapes or portraits, this video enhancer makes it easy to convert blurred videos into something interesting. In addition, you can add several low-quality videos simultaneously, irrespective of their formats.
The enhancer can help you make all the small details of your videos sharper and make all the frames clearer. This program can even handle videos of varying lengths; whether it's a short clip or a lengthy recording, AI has covered all. Other than this, the program is very useful in supporting a wide variety of popular video formats, such as MP4 and MOV.
Key Features

Wondershare Repairit - Reocording Enhancer
1,010,994 people have downloaded it.
-
Denoise Videos to Visual Purity: It helps the user to denoise grainy videos and has an impact on the overall visual presence, leaving the content clear.
-
Upscale Videos to 4K Resolution: You can enhance the video quality up to 4K, and that is a cinematic experience like never before.
-
View Enhanced Videos: After enhancing videos, you can watch them first before saving them to your device.
-
Support Windows 11/10/8/7/Vista, Windows Server 2003/2008/2012/2016/2019/2022, and macOS 10.12~macOS 15.
Simple Step-by-Step Manual to Enhance Low-Quality Screen Recordings
If your screen record is not working results in poor-quality footage, explore the manual provided below and enhance the video at once:
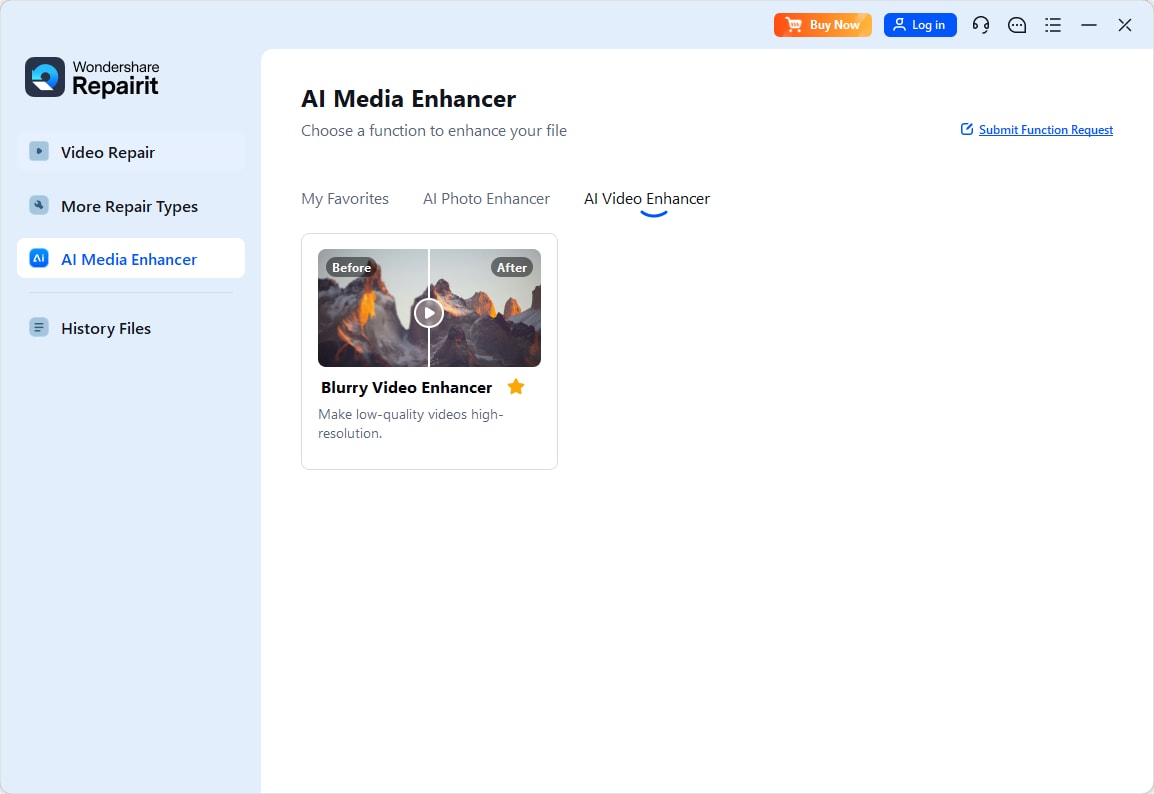
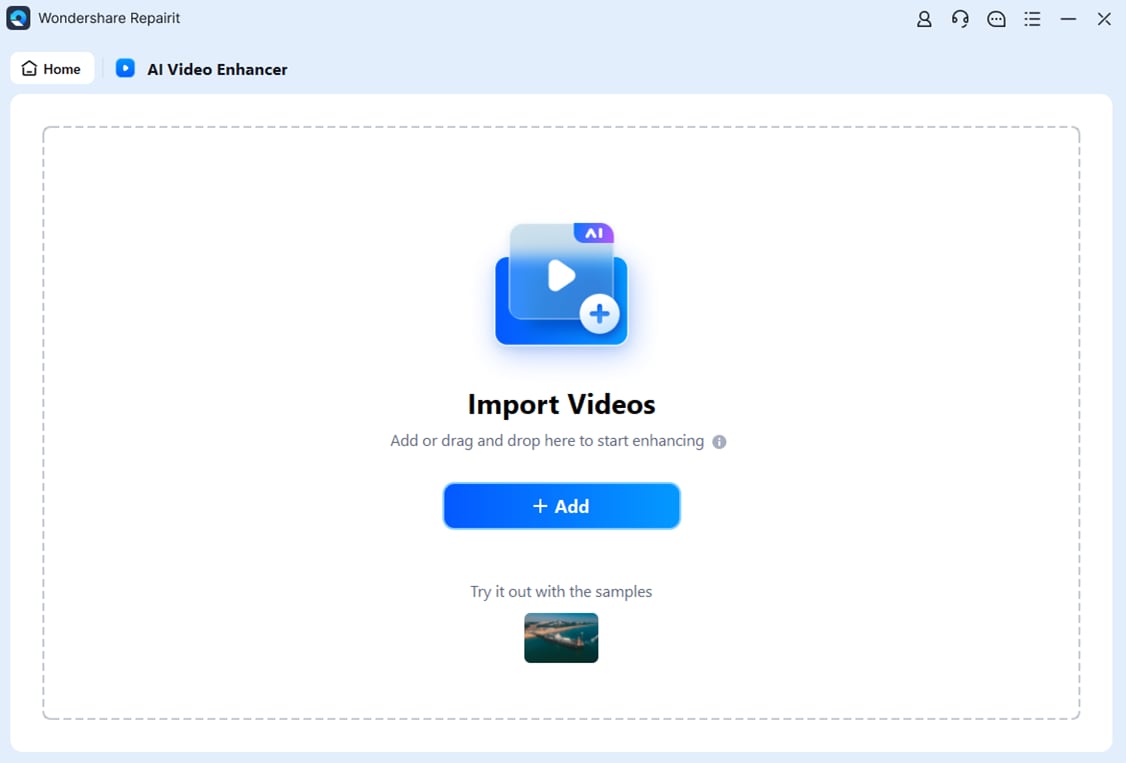
Step 1. Deploy the Program and Choose AI Video Enhancer
Download Repairit on the device, access the "More Types Repair” tab, and press the “AI Video Enhancer” option from the main interface.
Step 2. Insert All the Low-Quality Screen Recordings
Move forward and press the “Add” button to insert all the low-quality recorded videos into the program.
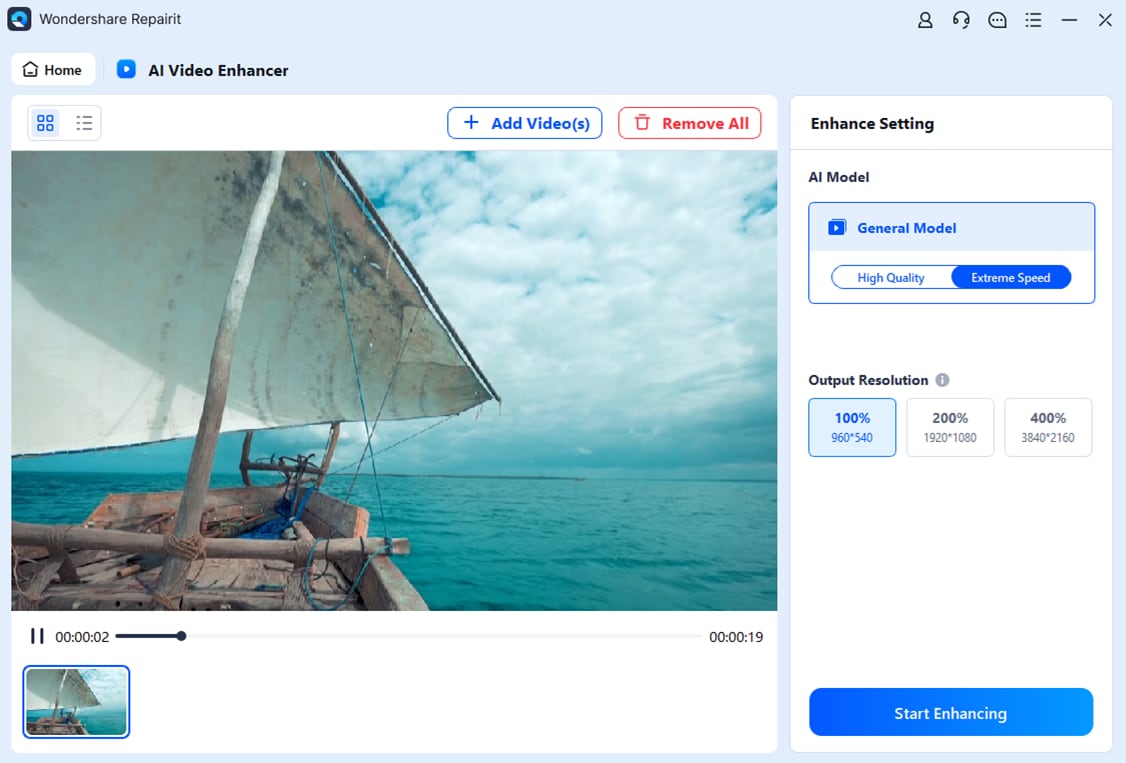
Step 3. Initiate the AI Video Enhancement Process
Choose the “Output Resolution” from the options provided and click the “Start Enhancing” button for video enhancement. Following this, export your enhanced clips using the “Save All” button that appears after successful enhancement.
Repair Your Blurry Recordings Now
 Security Verified. Over 7,302,189 people have downloaded it.
Conclusion
In closing, the moment you encounter the screen record not working issue, you’re likely to miss valuable content from the gameplay or a presentation. The solutions discussed ahead explain how to resolve this problem either on GeForce Experience, iPhone, OBS, or Xbox Game Bar through guided tutorials. In the end, if you’re left with a low-quality screen recording, Repairit proves to be a valuable source for AI enhancement.
FAQ
-
Q1. What can I do if my recordings are laggy or stutter?
Whenever you face laggy or stuttering recordings, try reducing the recording resolution or bitrate in the overlay settings. Besides, free up system resources by closing unnecessary programs or saving recordings to a faster drive. -
Q2. Why are my game highlights not being saved?
To understand why your game highlights are not being saved, remember that NVIDIA supports only certain game highlights. Additionally, verify that your overlay is enabled and that highlights are configured for the game. -
Q3. Can GeForce Experience record desktop and non-game applications?
By default, GeForce Experience is optimized for game capture, and to record your desktop, you’ll need to enable Desktop Capture. Therefore, the screen record not working on non-game apps can be resolved by ensuring the settings in the Privacy Control feature.
