

 TL;DR:
⚡ Quick Fix: Fix OBS Recording Stutter
Run OBS as Administrator: Open OBS in admin mode so it can access enough system resources and reduce crashes, lag, or recording interruptions.
Optimize OBS Settings: Set FPS between 30 and 60, match output resolution to 720p or 1080p, adjust bitrate properly, and raise OBS process priority in Advanced settings.
Reduce GPU Load: Close background apps, lower in-game graphics or resolution, and enable VSYNC to prevent GPU overload during recording.
Repair Stuttering Videos: If the recorded OBS video still stutters, freezes, or becomes corrupted, use a video repair tool to repair, preview, and save a smooth playable version.
Ask AI for a summary
 ChatGPT
 Perplexity
 Gemini
 Claude
 Grok
Grok
OBS is an open-source tool designed to record your videos and help you go live effectively. Millions of people from around the globe have been using this software for a while. However, many have claimed that they face OBS recording stutter as soon as they start recording a video, and it seems like their computer is stuttering.
Are you undergoing the same problem? This guide presents several different ways to get out of trouble.
Part 1: Why OBS Recording Stuttering?
The main reason why you experience OBS stuttering is the encoding lag. While using OBS, all actions for every frame of processing must occur within the time constraints of a framerate, which seems to be the output because this software operates in real-time.
Also, faulty configurations (e.g., change in bitrate) and hardware issues may cause OBS recording stutter. There are a few more reasons behind these problems, including but not limited to the system's network issues, audio/video synching challenges, and outdated drivers. In addition, the firewall can also result in video lagging by blocking your system’s connection.
Part 2: Common 6 Methods to Fix the "OBS Recording Stuttering" Issue
Are you constantly facing OBS issues like dropped frames, video lagging, or stuttering? Want to get rid of these problems? Are you looking for some reliable and trusted solutions? This section presents 6 simple yet effective ways to fix your OBS stuttering. Let’s take a look at how helpful each method is.
1. Run OBS in Admin Mode
Running OBS in the admin mode could be one of the easiest and decent solutions to your problems. Doing this will prevent any program from crashing your system and stop giving too many resources to a single application. Don't know how to run OBS in admin mode? No worries. All you need to do is to follow a few steps listed below.
Step 1: Go to the Start menu from your laptop or computer.
You can do it by clicking on the Windows button from the bottom-left corner of your screen.
Step 2: Type “OBS Studio” in the search bar.
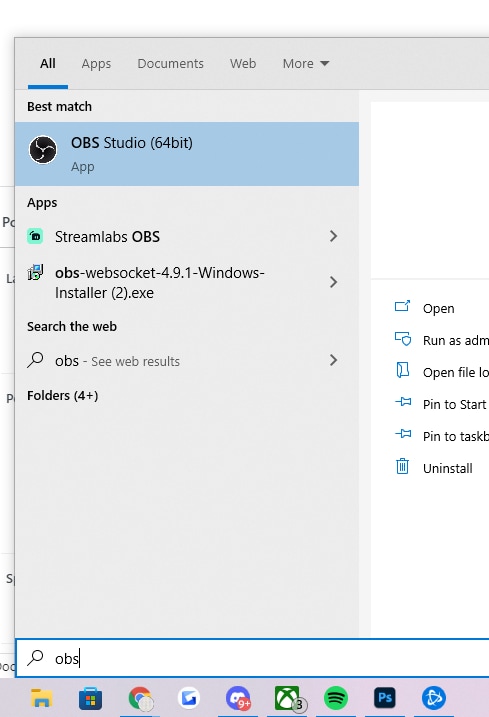
Step 3: Right-click on the application and tap on “Run as administrator”.
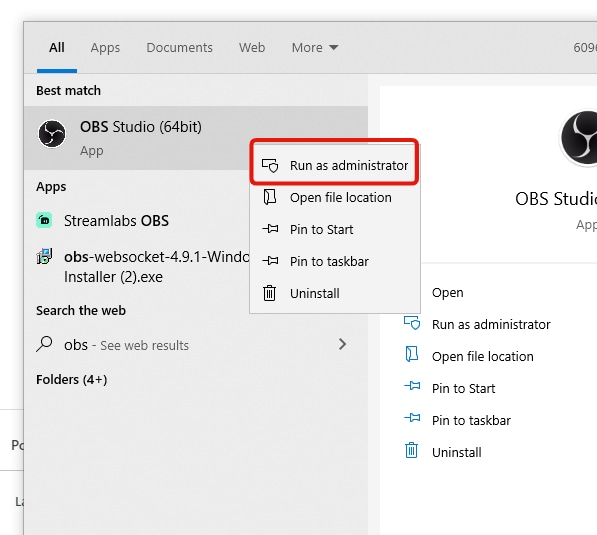
Step 4: As soon as you tap on “Run as administrator”, a new popup will appear on your system’s screen. It will ask you whether or not you want to allow this software to make changes to your device.
Step 5: It is time to hit the “Yes" option, and OBS will open in Admin mode.
2. Improve Frame Rate
The frame rate is measured in Frame Per Second (FPS). FPS means the number of pictures or frames displayed in one second. It is an important metric that determines video quality. High FPS means high video quality and little to no OBS stuttering. If you set the frame rate to 60 fps or above, your video will become smoother and more responsive. You can quickly adjust your frame rate to 60 fps by following the steps below.
Step 1: Launch OBS on your laptop or computer, go to the “Settings" option and click on it.
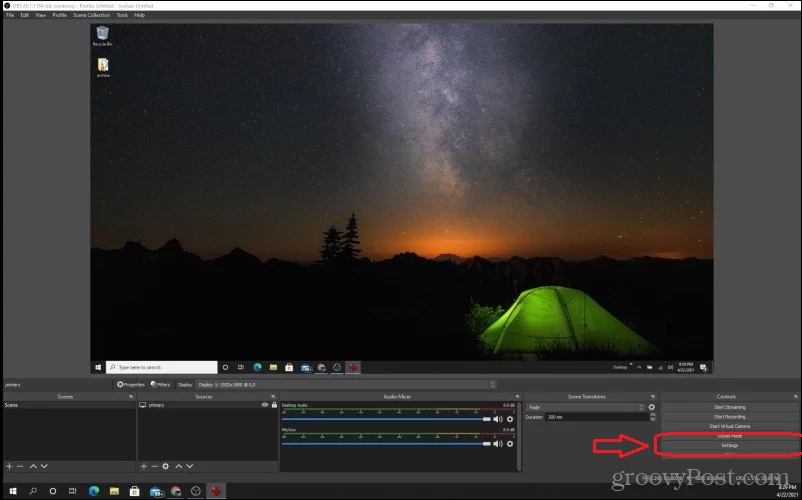
Step 2: As soon as you enter Settings, a new window will appear. Tap on “Video” from the left menu.
Step 3: Click on the "Common FPS Values" dropdown menu option and select 60 from the list as shown below.
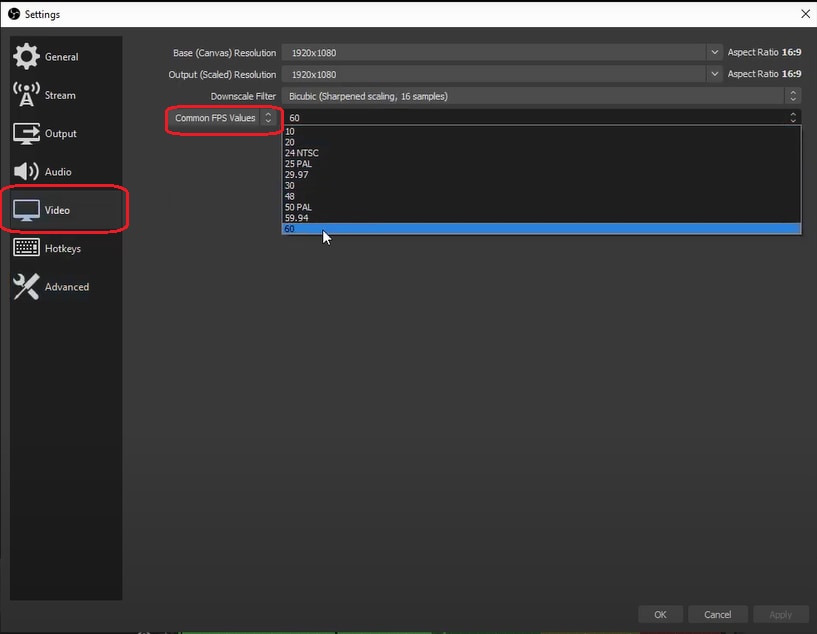
Step 4: Just press “OK” and you are done with setting your frame rate.
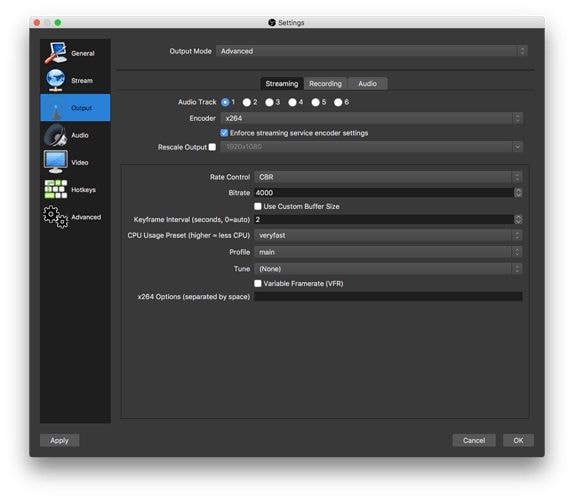
3. Change OBS Setting
Changing the OBS setting could be another possible solution to make your video play smooth. Though it is very important, many users take it for granted. If your system's resolution is 720p or 1080p, you must customize your OBS settings. To change the settings, do nothing but follow the below steps.
Step 1: Launch your OBS and go to its “Settings”, click on the “Output” option from the left menu bar.
Step 2: It is time to change a few parameters given below.
If the resolution is 720p:
Set FPS between 30 and 60
Scale the output to 1280 x 720
Set the bitrate to a maximum of 800,000
If the resolution is 1080p:
Set FPS between 30 and 60
Scale the output to 1920 x 1080
Set the bitrate to a maximum of 500,000
4. Lower GPU Settings in Game
You don't need to worry if the temperature is normal and GPU usage is high. But, if high GPU usage creates troubles without much ado, try lowering the GPU settings in-game. For this, do the below settings.
Disable 3rd Party Applications
If an application is running in the background, it may increase your GPU usage. To get out of this issue, you can disable all the applications running in the background to lower your GPU usage.
Make Changes To Game’s Settings
If you are playing a game and find that the GPU usage is at its peak, you can play with the settings a bit. For example, you can lower the special effects and reduce the resolution to bring the GPU usage down.
Enable V-Synch
As soon as you cap the frame rate, the rendering will slow. As a result, the GPU will have a minimum load. But, the fluidity will get reduced in the game.
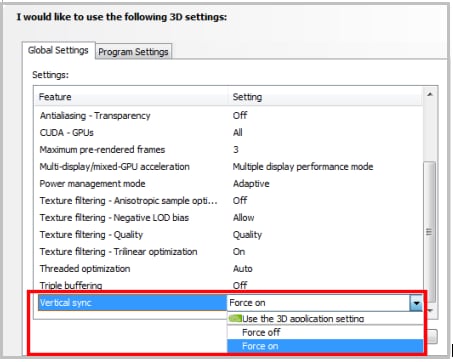
5. Enable In-game VSYNC
The VSYNC option controls whether Windows allows different games to display graphics at a higher frame rate than the refresh rate. If you play a game and the VSYNC option is disabled, you may experience visual effects and other concerns. A few steps to enable in-game VSYNC are:
Step 1: Go to the game’s “Settings” and the “Video” option.
Step 2: Find VSYNC and turn it “ON”.
For instance, if you are playing NVIDIA, the steps to be followed are listed below.
Step 1: Go to the search bar of your system, type “NVIDIA control panel”, and press enter.
Step 2: Hit the option "Manage 3D settings” from the available options.
Step 3: Search for “Vertical Sync”, click on it, and select the “Force on” option from a dropdown list.
6. Change Process Priority in "Advanced"
One of the most important things you must do to eliminate OBS recording stutter problems is to change the process priority. Don’t know how to do that? No worries. Keep following the steps below to get the job done.
Step 1: Open OBS on your device, search for the “Settings” option on the main window and tap on it.
Step 2: Once you enter Settings, you will see a new window on your screen. Go to the “Advanced” option.
Step 3: Tap "Process Priority” and choose “High” from there, then hit the "Apply" button.
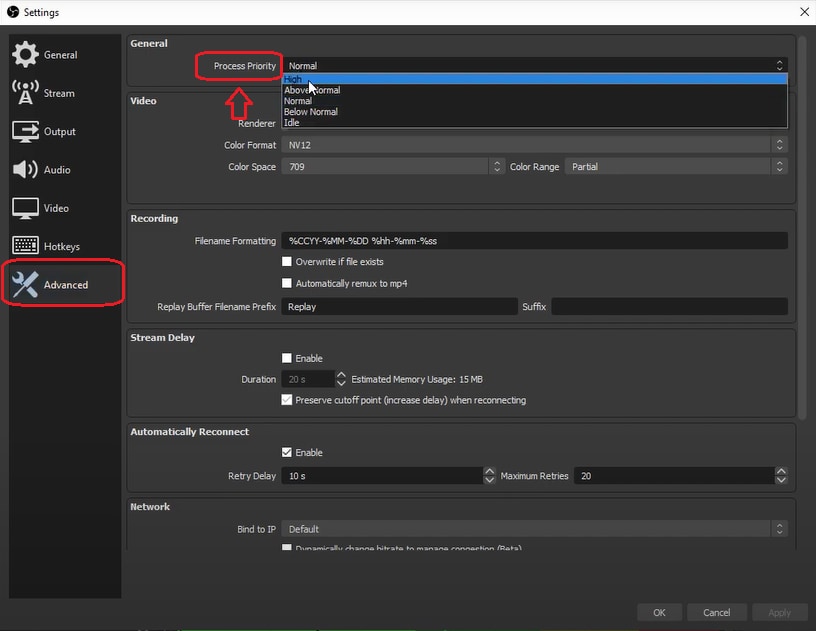
Note: You can also select “Above Normal" for better performance.
Part 3: Fix Stuttering OBS Video with Video Repair Tool
If you are still experiencing OBS stuttering, especially for those downloaded videos with a stuttering issue, using a 3rd party tool could be a decent solution. We have shortlisted a top-grade tool to help you in this regard.
Wondershare Repairit
Wondershare Repairit is a professional video repairing software to fix any video issue without any hassles, whether stuttering or damaged. No matter why your video is damaged, this tool can repair it without any hassles. Repairit supports all popular video formats, its advanced repairing feature lets you fix the worst-damaged files due to system crashes, power outages, etc.
One of the distinct abilities of Video Repair is to fix unlimited videos simultaneously at a blazing-fast speed. You can repair longer videos within minutes.

-
Repair damaged videos with different corruption issues, such as video not playing, video no sound, video stuttering, video black screen, etc.
-
Repair videos of 15+ diverse formats, including MOV, MP4, M2TS, MKV, MTS, 3GP, AVI, FLV, MXF, KLV, INSV, M4V, WMV, MPEG, ASF, etc.
-
Repair damaged or corrupted videos caused by video compression, system crash, video format change, etc.
-
Repair critically damaged or corrupted videos available on SD cards, mobile phones, cameras, USB flash drives, etc.
-
Repairit has a quick and advanced scanning mode. You can use either depending on the level of corruption the video file has undergone.
-
No limit to the number and size of the repairable videos.
-
Support Windows 11/10/8/7/Vista, Windows Server 2003/2008/2012/2016/2019/2022, and macOS 10.10~macOS 14.
Repairit works in 3 easy steps to fix stuttering OBS video as listed below.
Step 1: Download, install and launch Repairit on your laptop or computer.
Then, click on the "Add” button to upload the video(s) you want to repair.

Step 2: As soon as you upload the desired video(s), press the “Repair” button.
After the stuttering videos are uploaded, Repairit will display the relevant information of each video on the screen. Then start the repair process by clicking the “Repair” button.

Step 3: Preview the repaired videos.
Once the repairing process finishes, you can preview the file to ensure it is correct by clicking the “Preview” button. If you are satisfied with the result, click on the “Save” button and save it on your device.

If you're not satisfied with the result, try the "Advanced Repair" feature to make a more professional repairing process. See a more detailed guide here.
Attention:
Wondershare Repairit is a desktop software, if you do not want to download a software on your computer and your damaged video is no more than 3GB, you can use the online version of Repairit Video Repair.
Part 4: FAQs about OBS Recording
1. How to fix "OBS recording lags but the game doesn't"?
As you have seen, a slow motion video error can occur due to various reasons. This article has outlined some common causes of video lagging and their simple fixes. Now, implement the tips mentioned above to ensure a smooth visual experience whenever your videos are playing in slow motion.
2. Why is OBS using too much GPU?
If you struggle with too much GPU usage, you can reduce the frame rate and lower your output resolution to fix this issue.
3. How to fix OBS recording freezes every few seconds?
Some steps involved in resolving OBS recording freezes are:
Step 1: Run OBS in the admin mode, go to settings -> gaming -> turn Game DVR off and Game Mode on.
Step 2: To change OBS settings, go to advanced -> replace Color Space with Partial.
Step 3: Go to OBS settings -> Output -> Recording Tab -> change “Profile to High”, “CPU Preset to Very Fast”, “Rate Control to CRF”, Encoder setting to x264, and “set CRF between 16 and 23”.
Step 4: Set the format of your recording to .MKV. Right after recording, go to the main window of OBS -> File -> remux recordings for .MP4 conversion.
Step 5: It is much better to cap the frame per second to a multiple of 60.