Premiere Pro lag is a common problem. Uninstalling and reinstalling the program doesn't always work. The solution depends on the cause. Sometimes, the cause has nothing to do with the Premiere Pro app. So, please read this guide to know the possible causes of the problem and ways to fix it.
In this article
- Possible Solution 1. Repair Corrupt Premiere Pro Video
- Possible Solution 2. Delete Media Cache Files
- Possible Solution 3. Lower Playback Resolution
- Possible Solution 4. Turn Off High-Quality Playback
- Possible Solution 5. Turn on GPU Acceleration
- Possible Solution 6. Use Proxy Videos
- Possible Solution 7. Mute FX
- Possible Solution 8. Optimize Rendering for Performance (For older versions)
- Possible Solution 9. Render Preview Videos
- Possible Solution 10. Close Unnecessary Software (Lumetri scopes panel)
Part 1. What Causes Adobe Premiere Pro Lag?
Generally, fixing technical issues, such as Premiere Pro playback lagging, requires a lot of trial and error. The good thing is that the more informed you are about the root of the issue, the less experimenting you'll need to do.
With that in mind, it's best to start by learning the potential problem's causes. Based on our experience, a Premiere Pro lag can occur if:
- You're using the highest possible option on the playback resolution setting.
- There are accumulated media cache files.
- You're using original video files instead of proxy files
- Playback is with unrendered video effects
- You've not enabled the GPU Acceleration in Project Settings
- You're dealing with a damaged or corrupted file
Part 2. How to Fix the Premiere Pro Lag Issue?
When your video isn't smoothly playing in Premiere Pro, try the possible solutions below to fix it.
Possible Solution 1. Repair Corrupt Premiere Pro Video
As you already know, video file corruption is one of the causes of the Premier Pro lagging playback. In most cases, Premier Pro will not play corrupted video files. And that's particularly true for severely damaged videos. Luckily, you can repair the footage using a dedicated video repair tool.
Repairit Video Repair is one of the best tools for repairing all kinds of video corruption. It's robust video repair software that can concurrently fix multiple damaged video files regardless of their formats. Whether the formats are identical or varied, Repairit easily handles them.

-
Repair damaged videos with all levels of corruption, such as video lag, video not playing, video no sound, out-of-sync video or audio, playback errors, header corruption, flickering video, missing video codec, etc.
-
Repair full HD, 4K, and 8K videos and support 18 popular formats, including MOV, MP4, M2TS, INSV, M4V, WMV, MPEG, ASF, etc.
-
Repair damaged or corrupted videos caused by video compression, system crash, video format change, etc.
-
Repair critically damaged or corrupted videos available on SD cards, mobile phones, cameras, USB flash drives, etc.
-
Repairit has a quick and advanced scanning mode. You can use either depending on the level of corruption the video file has undergone.
-
No limit to the number and size of the repairable videos.
-
Support Windows 11/10/8/7/Vista, Windows Server 2003/2008/2012/2016/2019/2022, and macOS 10.12~macOS 15.
Users fix their damaged videos using Repairit in three simple steps. Check them out below:
Step 1: Download and install Repairit on your Mac or Windows computer. After that, open the software and go to Video Repair > +Add to the damaged videos you want to repair.

Step 2: Once uploaded, click the Repair button to start the repair process.

Step 3: After a short while, Repairit will complete repairing your corrupt videos. A window will pop up, prompting you to preview and save. Choose Preview to preview your repaired videos.
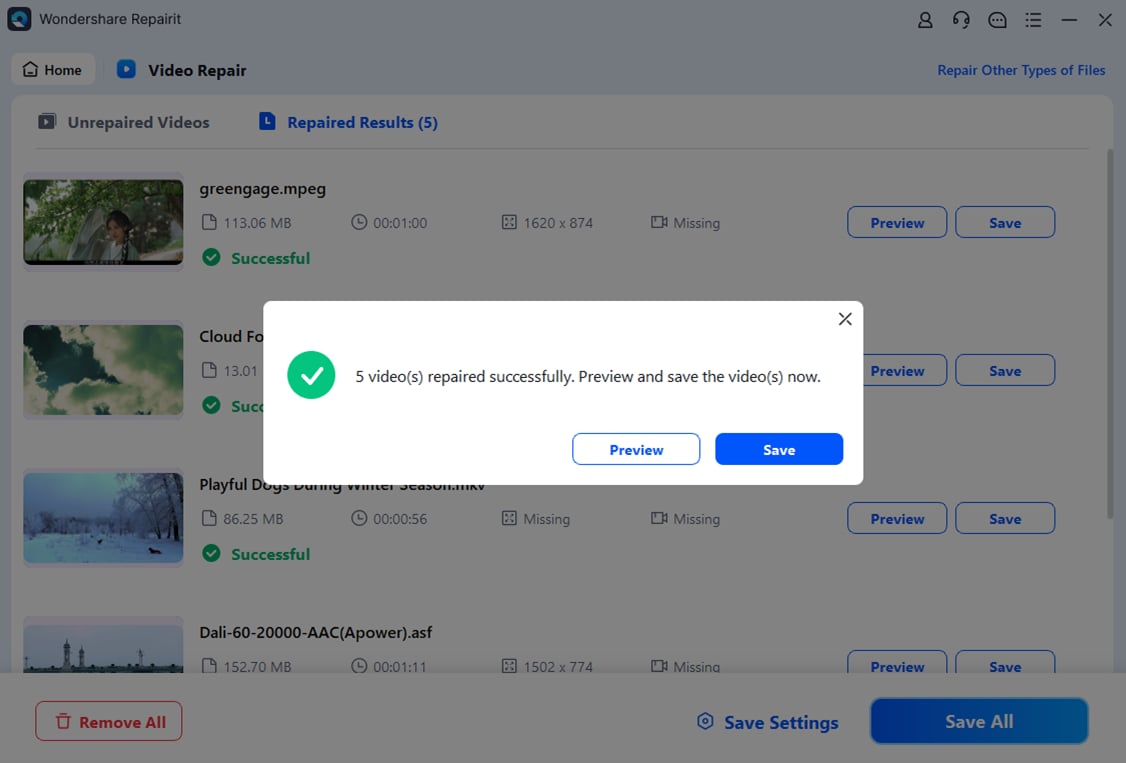
After previewing, “Save all” your corrupt-free videos to your desired location. You can now edit them on Premiere Pro without lagging.
Repair Corrupt Premiere Pro Video to Fix the Premiere Pro Lag Issue

Possible Solution 2. Delete Media Cache Files
Too many cache files can take up significant space, impacting the app's performance. Clearing these files can optimize efficiency and resolve the annoying playback issue.
To clear Premiere Pro cache files, follow the steps below:
Step 1: Close your project, then hit the Edit button at the top menu.
Step 2: Choose Preference and click Media Cache from the drop-down menu.
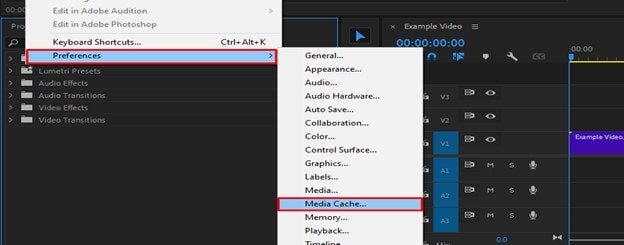
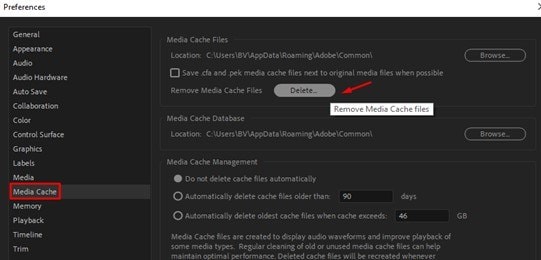
Step 3: Click the Delete button, which is next to ‘Remove Media Cache Files’.
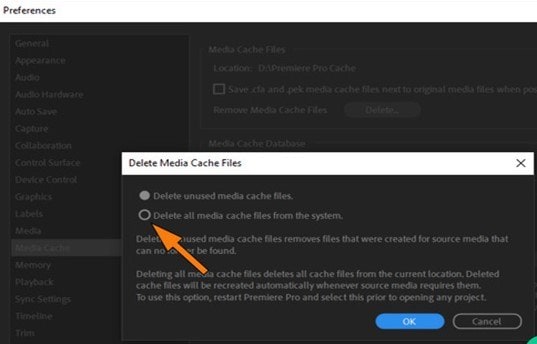
Step 4: Choose ‘Delete unused media cache files’, then click OK.
Possible Solution 3. Lower Playback Resolution
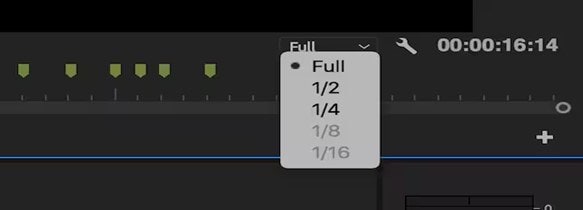
Another fix to the "playback lag Premiere Pro" issue is to lower the playback resolution. The problem may occur if your computer has insufficient space for high-resolution videos. Premiere Pro lets you quickly adjust the video playback resolution when needed.
If you need to be aware of the feature, it's the button(Full) right below the preview window. If it's set to "Full," you preview videos at the exact resolution they were captured in. That can be very demanding on your computer, especially when working with high-resolution videos, such as 4K or 8K.
So, simply click the button and choose something like 1/2 or 1/4. Set the lowest possible quality.
Possible Solution 4. Turn Off High-Quality Playback
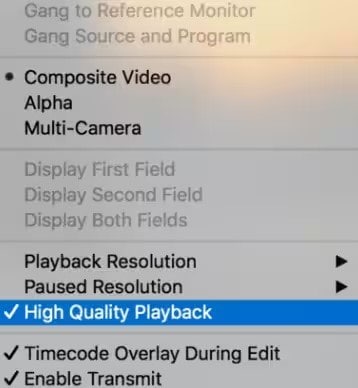
By default, the High-Quality Playback feature is turned on in Premiere Pro. That ensures you have the best experience watching videos. However, when you have an issue with lagging playback, you can turn it off.
Follow these steps to disable this feature:
Step 1: Click the Settings icon next to the playback resolution menu.
Step 2: De-select the "High Quality Playback" option.
Possible Solution 5. Turn on GPU Acceleration
Is playback in Premiere Pro still choppy? Check that you've set the Render to GPU Acceleration. Here's how:
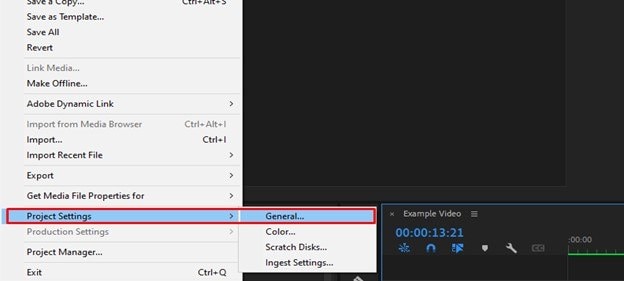
Step 1: Go to File > Project Settings, then choose General.
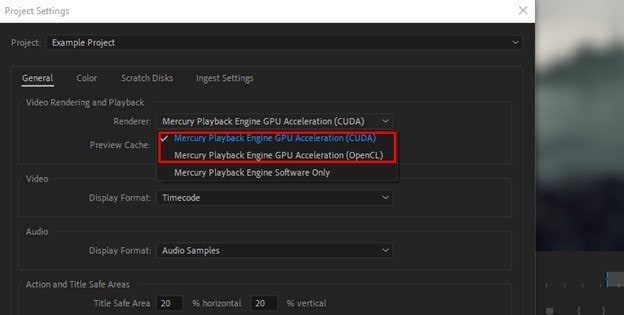
Step 2: Under "Video Rendering and Playback," click Renderer.
Step 3: Select the option that includes GPU Acceleration.
Possible Solution 6. Use Proxy Videos
Proxy videos in Premiere Pro are low-resolution video copies of the original files. If you're unable to smoothly play your videos, create a proxy to fix the lagging issue during playback. You can do that using these steps:Step 1: In the project panel, choose your video and right-click on it.
Step 2: Select Proxy, then click Create Proxies.
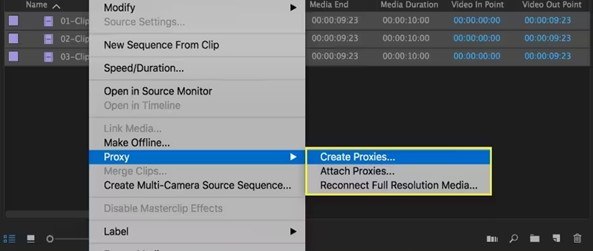
Step 3: Choose a media format, configure the Preset (choose lower-resolution proxy), then click OK. That will open Media Encoder to automatically change your footage to proxy.
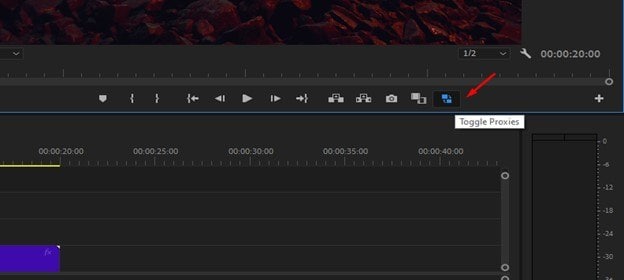
Turn on the button editor to ensure you use a proxy instead of the original file. Select Proxy then set it on the button bar.
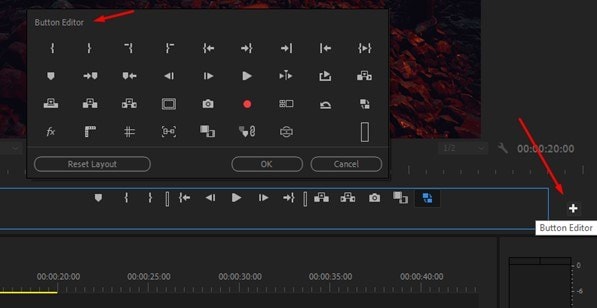
After that, click on it, and it will turn blue. When the proxy button is blue, know you're using proxies and are good to go!
Possible Solution 7. Mute FX
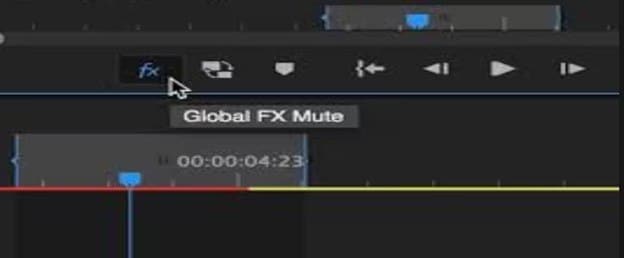
Audio and visual effects can significantly increase the working size of your video file. You should consider turning off effects to improve playback quality. It might be all you need to do to eliminate the Premiere Pro preview lag.
Here are the steps:
Step 1: Click the Global FX Mute button. This button is one of the icons on the play toolbar, right below the playback screen.
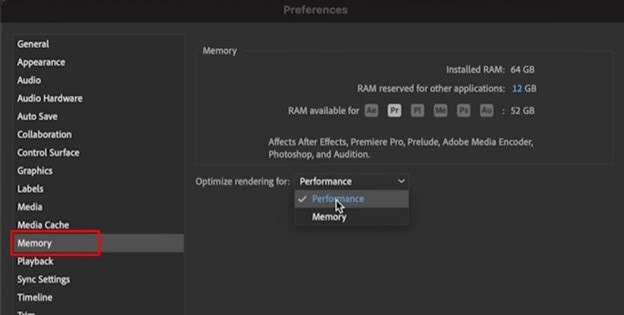
Possible Solution 8. Optimize Rendering for Performance (For older versions)
You can also fix the Premiere playback lag by optimizing rendering for performance. It's straightforward:
Step 1: Click Edit, then go to Preferences > Memory.
Step 2: From the pop-up window, open the Memory drop-down. Next to "Optimize rendering for," select the Performance option, then click OK.
Possible Solution 9. Render Preview Videos
Premiere Pro color codes your video timeline to show whether playback is real-time. Green implies that playback is real-time, while red and yellow show that it isn't. Lag and choppiness increase when playback is not real-time.
Rendering preview videos of parts or all of your footage can reduce playback lag. To do that, set in and out points for the preview video you want to create. From the sequence menu, select ‘Render in to out’.
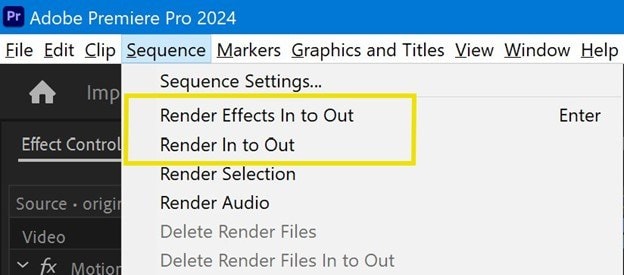
When rendering is completed, the color of the timeline ought to change to green.
Possible Solution 10. Close Unnecessary Software (Lumetri scopes panel)
Premiere preview lag can also occur if several apps run in the background. You can close unnecessary ones to boost Premiere Pro's performance and fix the lagging issue.
Programs like Facebook and music can significantly affect your Premiere Pro experience, so close them. While at it, the Lumetri Scopes Panel is another thing to close down. Lumetri in Premiere Pro helps support compliance with industry standards.
If it's turned on during playback, it analyzes the lighting and color of the footage. However, the feature isn't always needed. It can increase Premiere Pro's work during playback, resulting in performance problems.
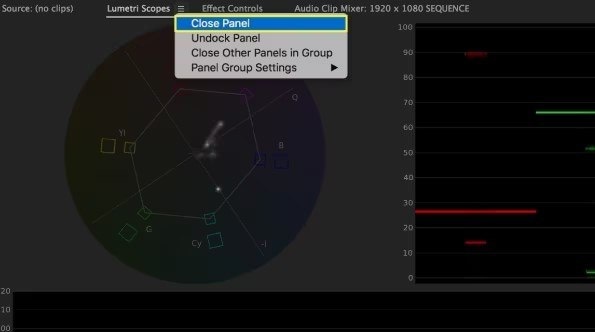
Closing the Lumetri panel can reduce the lag in the playback. To close it, click the menu button next to the panel's name, then choose “Close panel”.
Conclusion
The Premiere Pro lag issue is truly annoying. It could happen due to video file corruption or damage. But the problem of corrupted videos shouldn't worry you. You can use Repairit Video Repair, which repairs videos in a few clicks.
Yet, if the lagging isn't caused by a corrupted file, troubleshoot the problem using the other practical tips discussed. Enjoy smooth playback!
FAQ
Why is Adobe Premiere Pro Stuttering?
Premiere Pro stutter playback can occur if you're using an outdated Premiere Pro version. To fix this problem, update the app. Click Help, then choose Updates in the Creative Cloud Desktop app, and see if any updates are available.How much RAM is ideal for Premiere Pro?
For optimal performance, you need at least 32GB of RAM. However, the precise amount of RAM ideal for Premiere Pro will depend on several factors, including the codec, length, and complexity of your project.


 ChatGPT
 Perplexity
 Google AI Mode
 Grok
Grok

