Do you want to reduce digital noise in your videos without losing quality? Many creators face this challenge. It is particular when working with grainy footage or older editing software. Noise can ruin the clarity of your videos, but the right tools can fix it.
Premiere Pro offers effective ways to reduce noise while keeping your videos sharp and professional. This guide will show you how to denoise video in Premiere Pro to make noise reduction even easier.
In this article
Part 1: Premiere Pro: Your Go-To for Noise Reduction
Premiere Pro is a trusted video editing software widely used by creators and professionals. It stands out for its ability to enhance video quality, including removing unwanted noise.
One of Premiere Pro’s strengths is its range of built-in tools. The Lumetri Color panel lets you fine-tune settings like exposure, shadows, and highlights, making it easier to adjust video brightness and reduce noise. The software also supports external plugins, such as Neat Video, which offer even more advanced noise reduction for challenging footage.
Premiere Pro is designed to handle both basic and complex edits. This makes it suitable for a variety of projects, from casual video editing to professional filmmaking. Its flexibility and adaptability make it one of the best tools for improving video quality.
Key Features of Premiere Pro for Noise Reduction
- Provides advanced controls to adjust exposure, contrast, and color settings.
- Allows integration with third-party tools like Neat Video for deeper noise reduction.
- Lets you see changes instantly while editing, ensuring accurate adjustments.
- Offers sliders and filters to refine video quality according to your preferences.
- Handles various video formats, such as MPEG-2, WMV, ProRes, RED, etc. This makes it versatile for different editing needs.
- Works well with other Adobe Creative Cloud apps, like After Effects, for enhanced workflows.
Part 2: How to Denoise a Video in Premiere Pro?
Reducing noise in your videos can make them look more professional and visually appealing. Premiere Pro, combined with plugins like Neat Video, provides a reliable way to clean up grainy footage. You can effectively remove unwanted noise and enhance the overall quality of your videos. Here are the steps on how to denoise a video in Premiere Pro.Step 1. Download and install Neat Video. Restart Premiere Pro to enable the plugin after installation.

Step 2. Open Premiere Pro and import your video file into the project panel. Place the video on the timeline to begin editing.

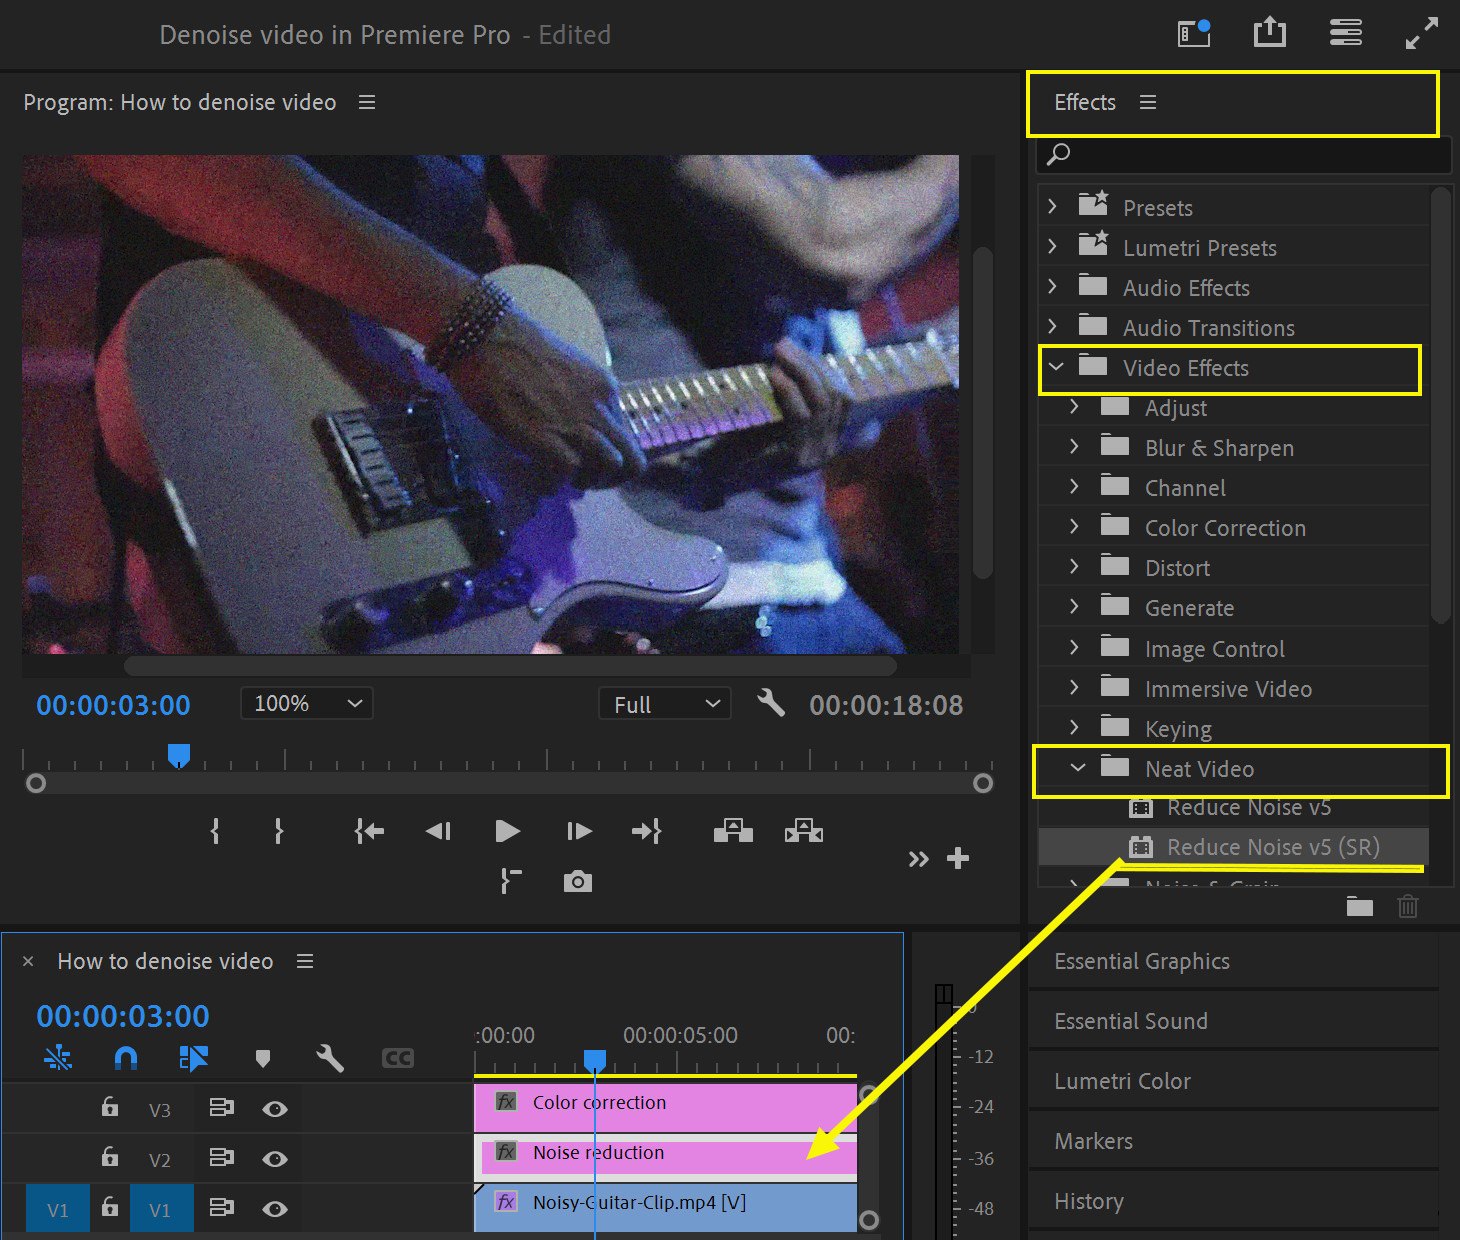
Step 3. Go to the Effects panel and look for Neat Video. Place the Reduce Noise v5 (SR) effect onto the adjustment layer in the V2 track, designated for the denoiser.
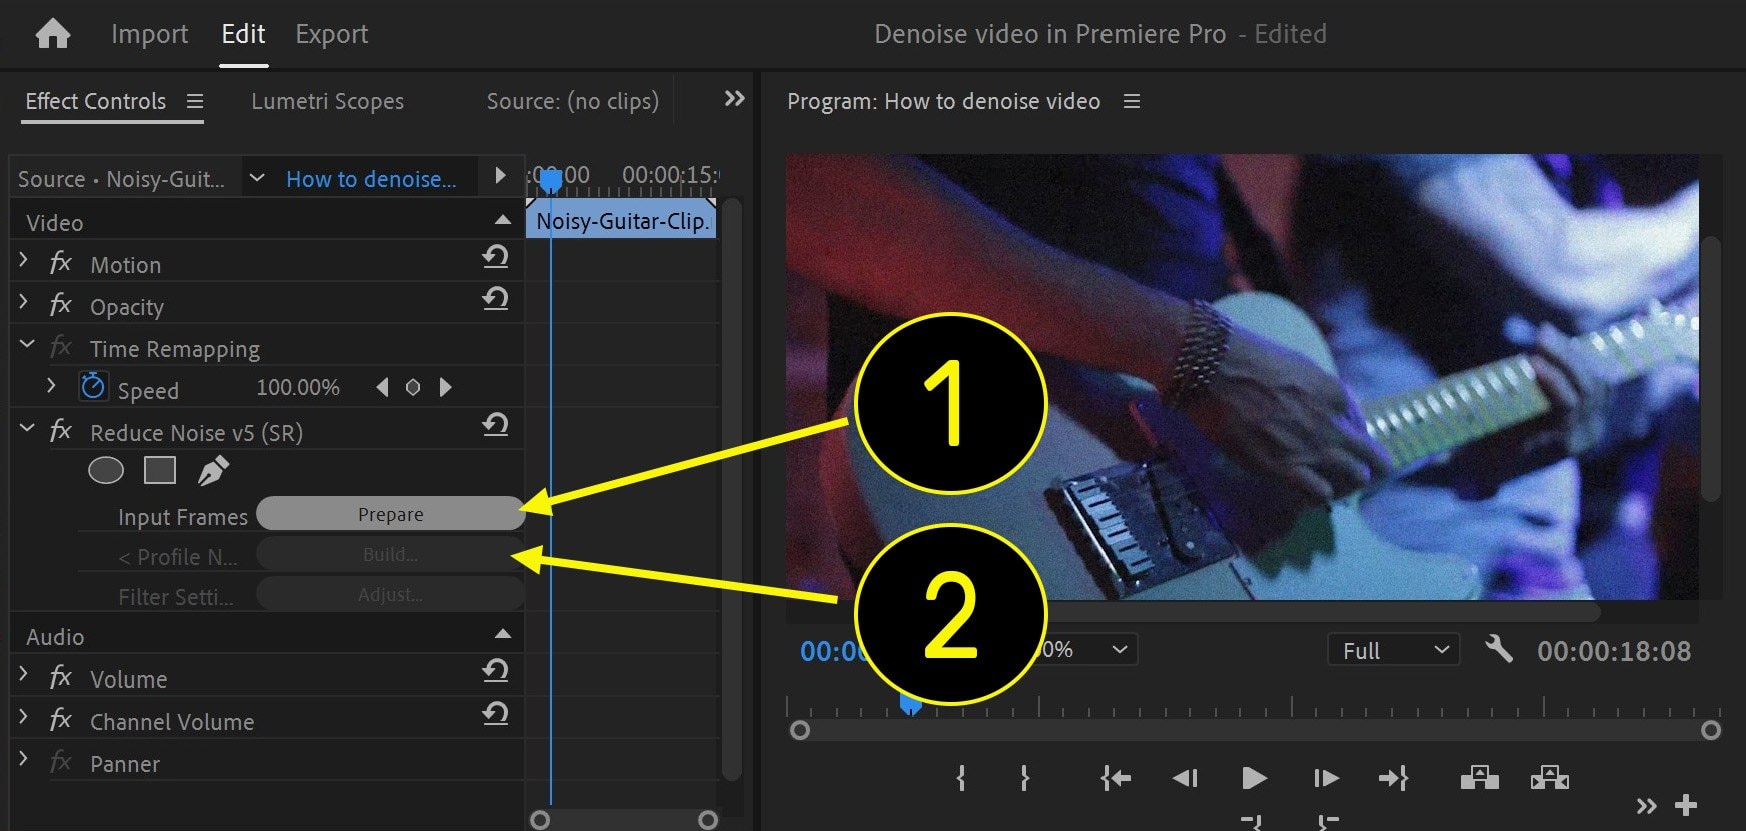
Step 4. Navigate to Reduce Noise v5 effect. Click the Prepare, and then hit Build.
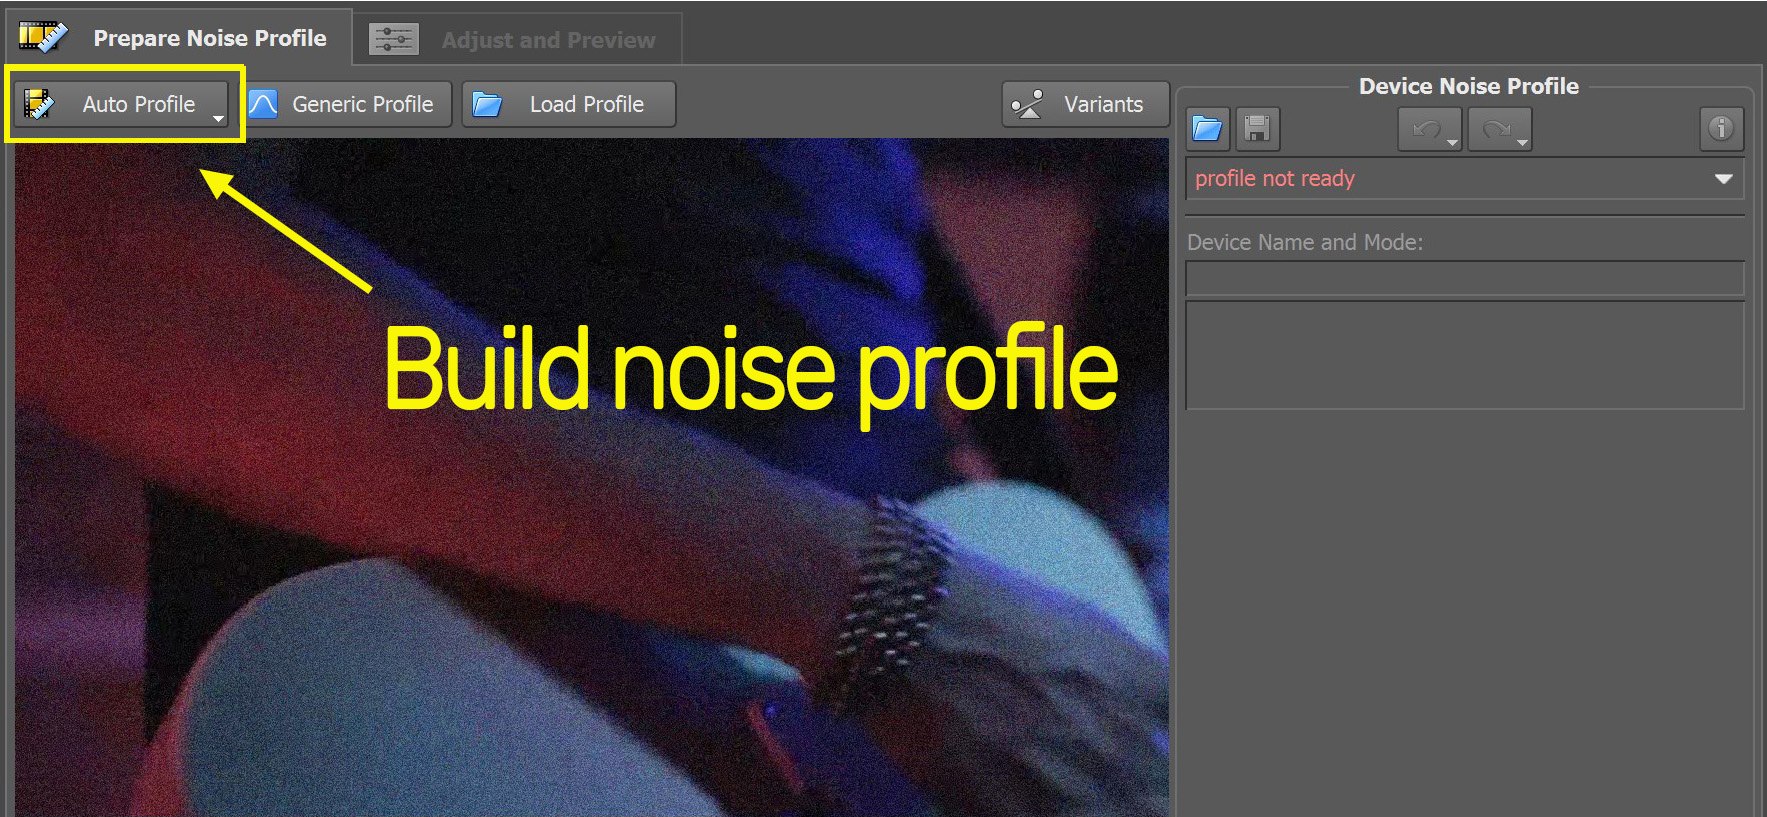
Step 5. In the Neat Video interface, select Auto Profile. Neat Video identifies a smooth, detail-free section of the footage containing noise and creates a noise profile automatically from that sample.
Step 6. Once you’re satisfied, click Apply to save the changes and return to Premiere Pro.

Part 3: The Best Alternative Premiere Pro to Denoise Video

Using Premiere Pro’s tools can be a bit tricky, especially if you’re new to editing or need quick results. For a simpler and faster solution, you can try a tool like Repairit Video Enhancer. This tool is designed to provide high-quality results effortlessly.
What makes Repairit Video Enhancer stand out? It’s an AI-powered solution that not only removes noise but also enhances your videos with better clarity and vibrant colors. Whether you're fixing a single clip or working on multiple files, its batch processing feature saves time. The intuitive interface ensures anyone can achieve high-quality results without technical skills.
Key Features of Repairit Video Enhancer
- AI-Powered Denoising. It automatically detects and reduces noise for a cleaner video.
- Improved Video Quality. Enhances sharpness, brightness, and color balance.
- Batch Processing. Repairit allows you to enhance multiple videos at once, saving time.
- User-Friendly Interface. It has a simple design for easy navigation and editing.
Here’s how to denoise your video using Repairit Video Enhancer:
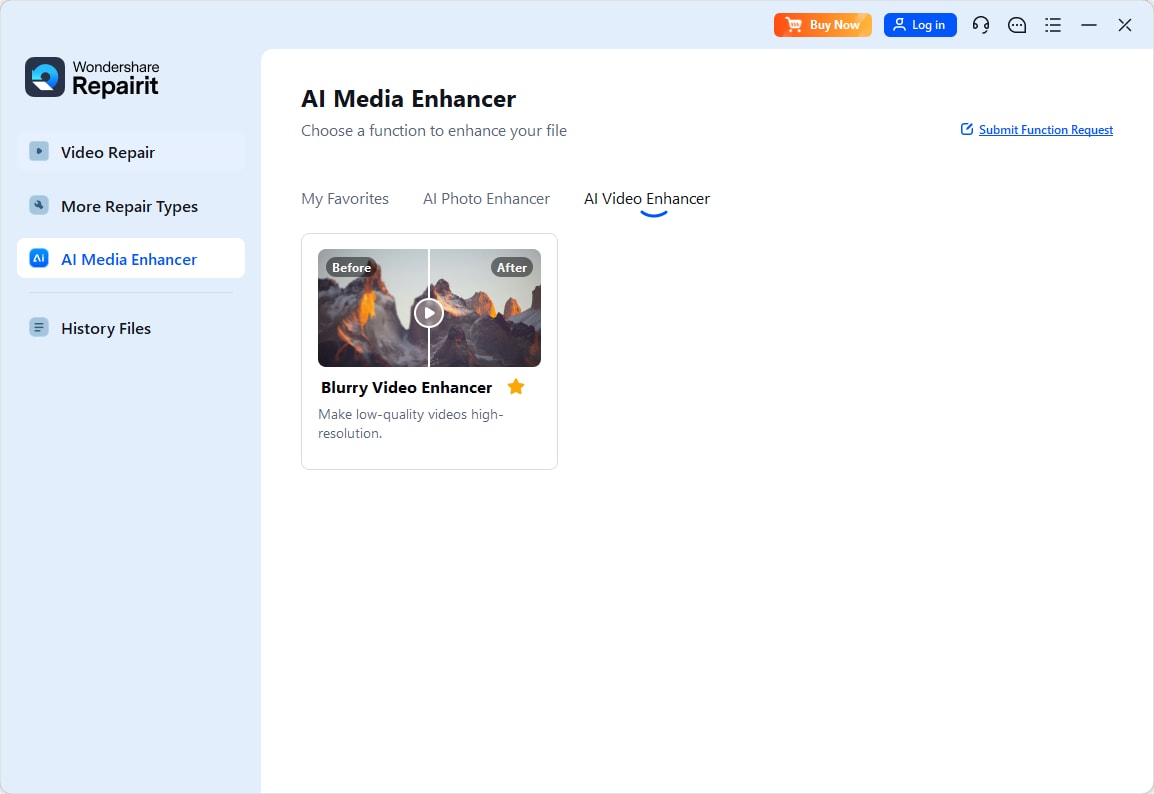
Step 1. Open Repairit after installing it on your PC. Navigate to More Types Repair and select AI Video Enhancer.
Step 2. Upload the video you want to enhance. Just click +Add or drag and drop the file into the window.
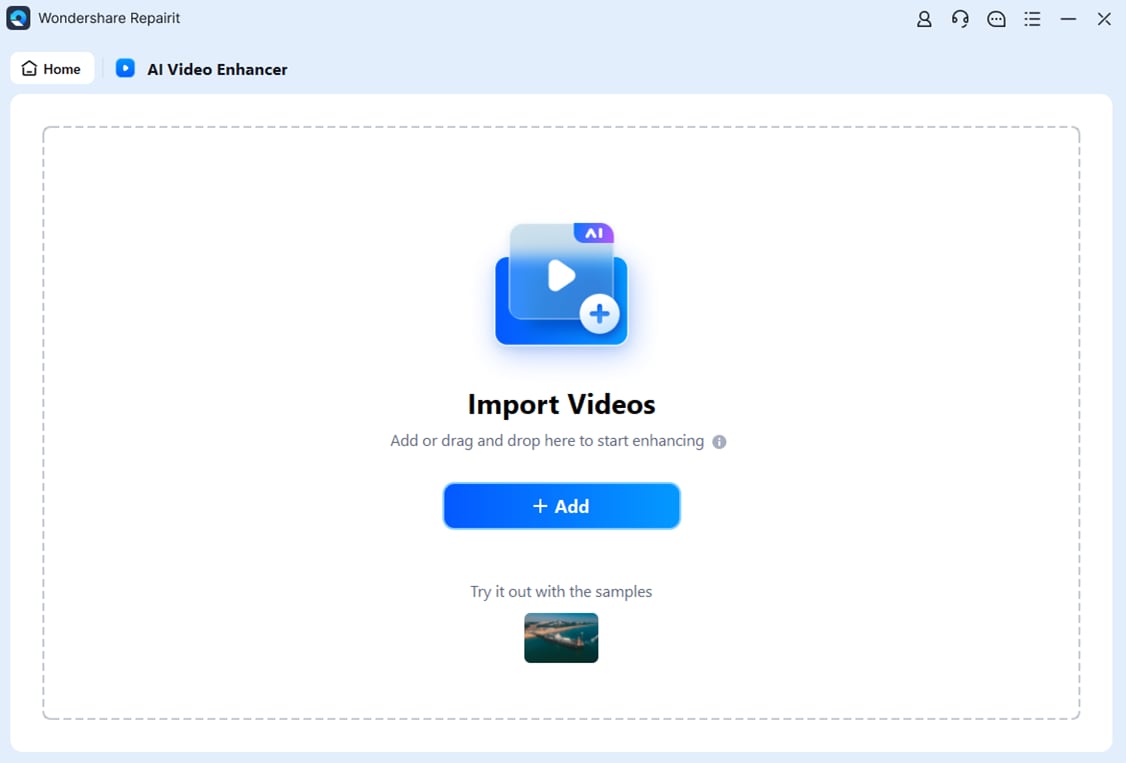
Step 3. Choose your desired output resolution for the enhanced video. Then, hit the Start Enhancing button.

Step 4. Once the enhancement process is complete, preview the improved video to ensure it meets your expectations. If satisfied, click the Save All button to export the enhanced video to your preferred location.

Use Repairit Video Enhancer to Denoise Videos

Premiere Pro vs. Repairit Video Enhancer
| Feature | Premiere Pro | Repairit Video Enhancer |
| Noise Reduction Tools | Built-in & plugin-supported | AI-powered automatic denoising |
| Ease of Use | Moderate learning curve | Intuitive and beginner-friendly |
| Advanced Editing Options | Comprehensive editing features | Limited to enhancement tasks |
| Batch Processing | Not available | Available |
| Time Required for Results | More time-consuming | Quick and efficient |
While Premiere Pro is a robust tool for editing, Repairit Video Enhancer offers a simpler, faster way to denoise videos, making it a perfect alternative for straightforward tasks.
Conclusion
Reducing noise in videos is crucial for creating professional-quality content. Premiere Pro offers powerful tools for denoising and enhancing footage, but its complexity may not suit everyone. For an easier, more efficient solution, Repairit Video Enhancer provides AI-powered features that deliver excellent results with minimal effort.
By combining the strengths of Premiere Pro and Repairit Video Enhancer, you can tackle noise reduction tasks effectively. Also, you can ensure your videos look their best. Why settle for less when both tools can elevate your content to the next level?
FAQ
What is video noise, and why does it happen?
Video noise is the grainy or speckled look that appears in videos, especially in darker or low-light scenes. It happens because the camera's sensor struggles to capture enough light, leading to random variations in brightness and color. It can also occur due to high ISO settings, small sensor sizes, or compression during file storage. Reducing video noise is essential to make your footage look clearer and more professional.Can I use Premiere Pro and Repairit Video Enhancer together?
Yes, you can use both tools to improve your video quality. Premiere Pro is ideal for detailed edits, offering control over exposure, contrast, and plugins like Neat Video for advanced noise removal. After using Premiere Pro, Repairit Video Enhancer can refine the results further with AI-powered enhancements like sharpness and color balance. This combination is especially helpful when you want both advanced editing options and quick improvements.Is using Neat Video complicated for beginners?
Neat Video might seem a bit overwhelming at first because it has many advanced settings. However, it’s designed to help beginners with features like Auto Profile, which automatically detects and removes noise. It also offers tutorials and guides to explain the process step by step. Once you get familiar with it, you’ll find it easy to use, and its powerful results make it worth the effort to learn.


 ChatGPT
 Perplexity
 Google AI Mode
 Grok
Grok

