Open Broadcaster Software is a popular tool among content creators and streamers due to its flexibility. However, some users have been experiencing lags while recording their stream, which disrupts the quality of output and has a negative impact on your audience's experience. As you address these issues, you ensure a smoother stream and maintain professionalism to keep your viewers engaged.
Fixing lag in OBS is essential to deliver high-quality content without interruptions. Therefore, understanding how to fix lag in OBS can significantly enhance performance and prevent technical interruptions. It helps the users to maximize the platform’s potential. This guide provides actionable methods you can apply to resolve the lag and achieve a smooth and professional-quality streaming and recording procedure.
In this article
Part 1. Discover the Reasons Why Your OBS is Lagging
As you can get frustrated with the lag issue, figuring out the root cause is a must to eliminate this problem. Several factors can contribute to this issue, and by identifying those causes, you will be better equipped to have a smooth experience. Below are some of the most common causes of why you need to learn how to fix lag on OBS:
- Hardware Limitations: Older or less powerful hardware can struggle to keep up with the OBS demands. If your CPU is outdated, the rendering process of uploading your streams can be slowed down.
- Poor Internet Connection: A weak or unstable internet connection often leads to dropped frames in live streams. Without sufficient upload speed, OBS struggles to send data to your streaming platform, creating buffering issues for viewers.
- Incorrect OBS Settings: Improper configuration of OBS settings can cause lag. Using a high bitrate, resolution, or frame rate beyond your system’s capabilities will result in performance drops. Thus, matching settings to your hardware is crucial.
- Outdated Drivers of Software: New updates often fix bugs and improve performance; thus, running old versions can make your streams laggy. Outdated GPU drivers or OBS versions can lead to compatibility issues.
- Background Processes: Applications running in the background or excessive network activity can interfere with OBS performance. Streaming while downloading large files on the same network divides the resources. You can reduce the network load and close unnecessary apps to resolve this issue.
Part 2.Best Methods to Fix Lag in OBS
Now that you know what causes OBS lag, it's time to focus on fixing it. Below are 6 tested and workable solutions and adjustments to ensure smooth streaming and recording with OBS.
Method 1. Flush DNS Cache
Flushing the DNS cache involves clearing the local cache of domain names stored by your computer. This can improve your internet speed by ensuring your system accesses the most up-to-date DNS information.
By clearing the outdated or corrupted data stored by the DNS cache, you reduce the risk of network delays during streaming. Look at the steps below to help you understand how to fix OBS lagging through the flush DNS cache procedure:
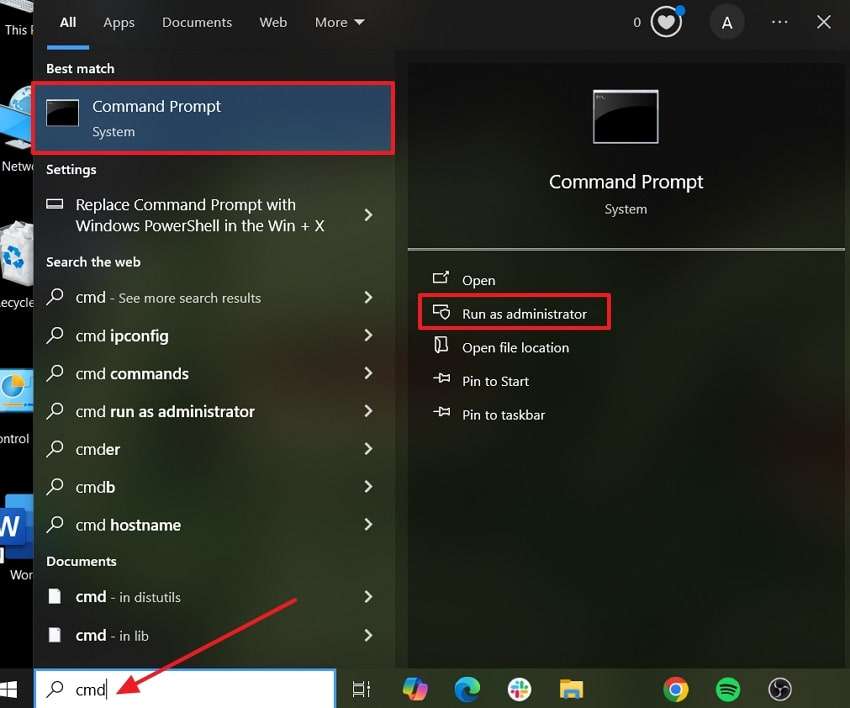
Step 1. Initiate the process by navigating to "Windows Search" in the text box, writing "cmd," and selecting the "Command Prompt" system for your device. Then, choose the "Run as Administrator" option from the ones provided.
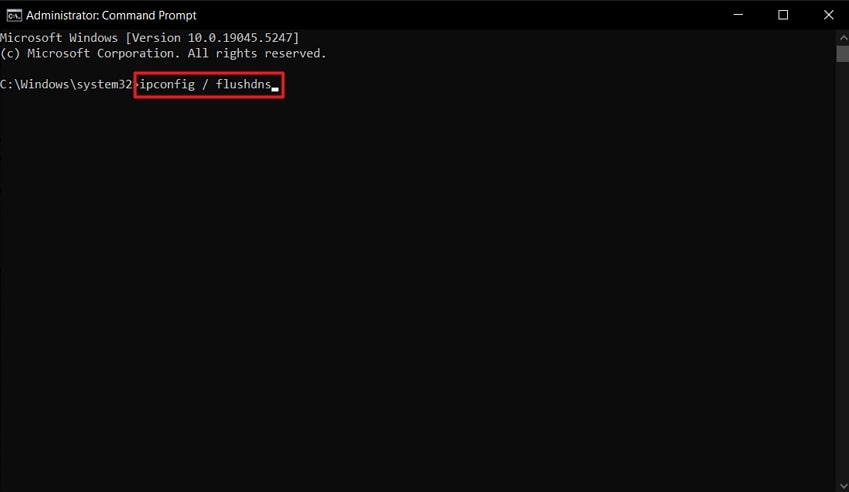
Step 2. Once the Administrator Command Prompt opens, type in the “ipconfig /flushdns” prompt and hit the “Enter” key on your keyword.
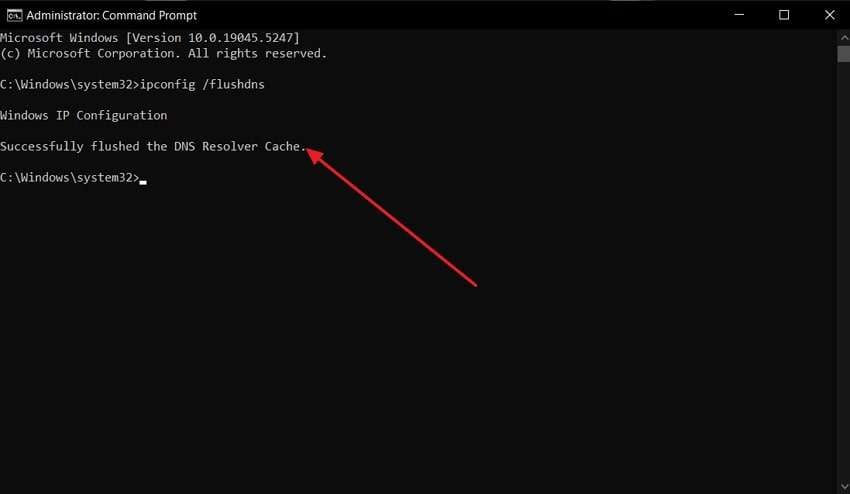
Step 3. Lastly, a confirmation message will appear that will confirm that your DNS Resolver Cache has been flushed.
Method 2. Decrease the Video Bitrate
The video bitrate determines how much data is sent per second in your stream. A high bitrate may exceed your internet upload speed or overwhelm the processing power, which causes the content to buffer.
As you reduce the bitrate, you get to reduce the lag by lessening the strain on your system and internet connection. The steps below will guide you in how to make OBS not lag by decreasing the video bitrate:
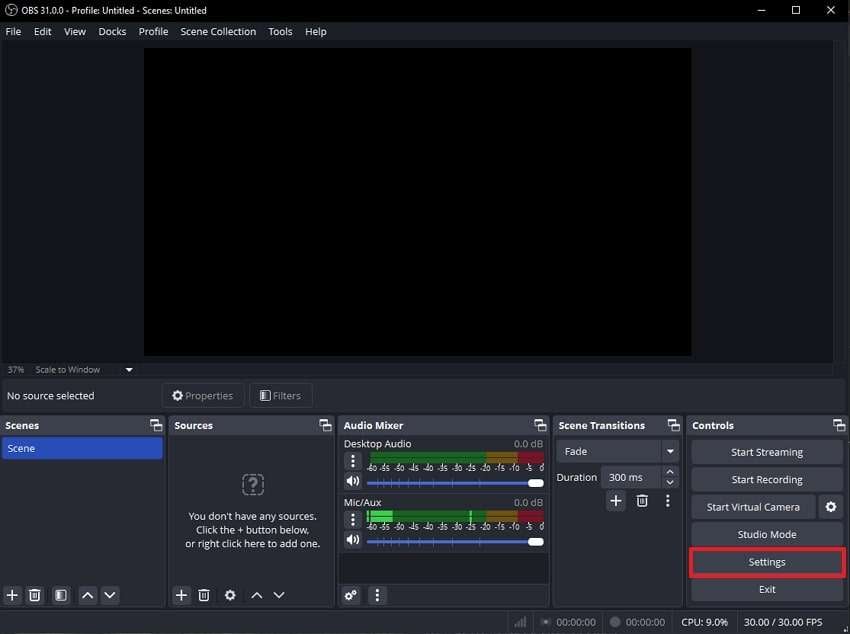
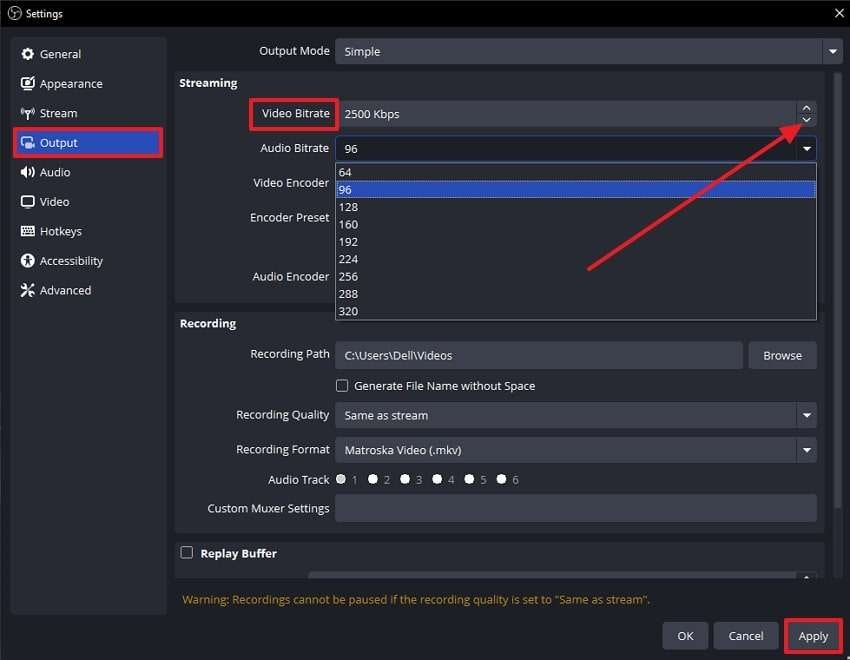
Step 1. Search and launch OBS software using the Search feature on your computer. From the main interface, select the "Settings" option from the right side of the screen.
Step 2. Within the Settings panel, select the “Output” tab from the left menu bar. Then, lower the “Video Bitrate” by hitting the “Downward Arrow” button. Once done, hit the “Apply” button at the bottom right corner to ensure the settings stay the same.
Method 3. Update Network Adapter Drivers
Updating your network adapter drivers ensures that your network hardware is running the latest software to improve compatibility and performance. Outdated drivers may cause your internet connection to slow down, which leads to poor streaming quality.
By updating the drivers, it can lead to faster and more reliable network connections, improving your streaming stability. By adhering to the steps below, you can understand how to stop lag on OBS.
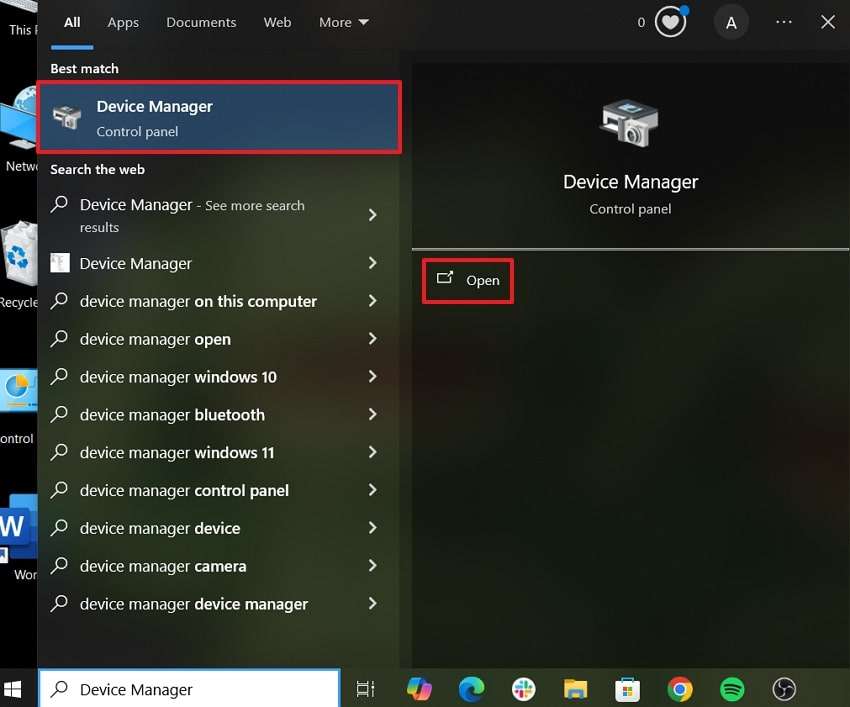
Step 1. Launch “Device Manager” on your desktop using the “Open” button that appears after searching Device Manager from the Start Menu.
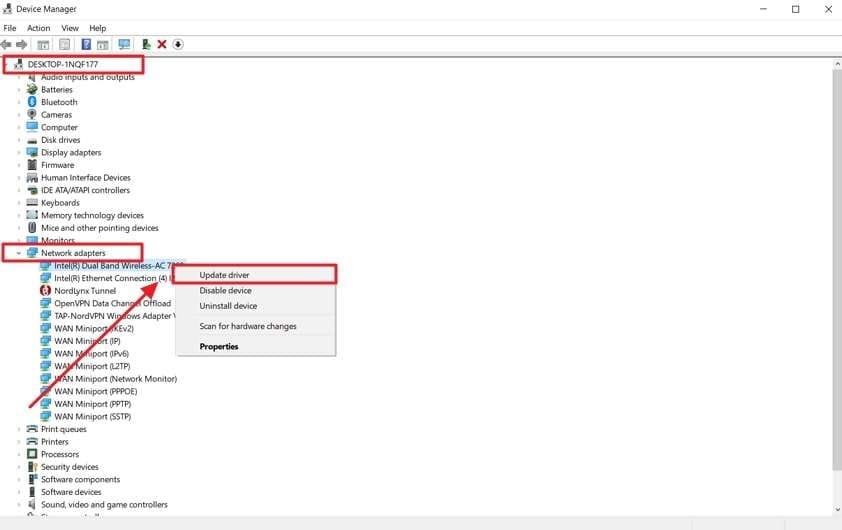
Step 2. Now, hit the downward arrow button on your desktop name. Next, locate the required “Network Adapters” drivers and right-click the option to tap the “Update Device” option from the drop-down menu. Here, you will have to follow the on-screen instructions to complete the network adapter driver update process.
Method 4. Modify the OBS Settings
Incorrect settings can demand more from your CPU or GPU than they can handle, which leads to dropped frames and lag. Thus, tailoring these settings optimizes OBS performance for your setup. Besides, adjusting its settings involves changing parameters to better match your hardware capabilities. With the help of the steps below, you will figure out how to stop OBS from lagging:
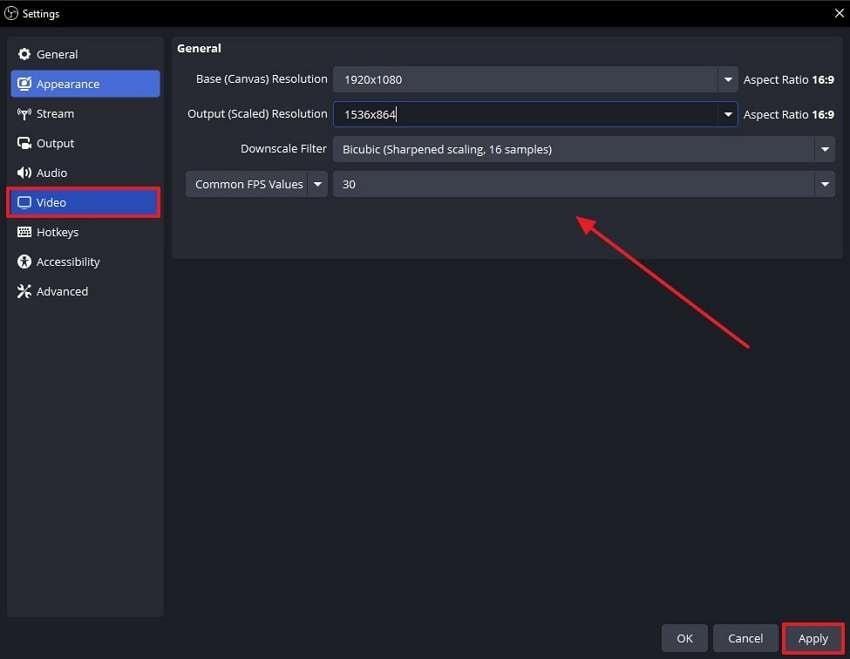
Step 1. Once you access the OBS software on your PC, click the “Settings” option from the bottom right-side menu to enter its complete in-depth settings.
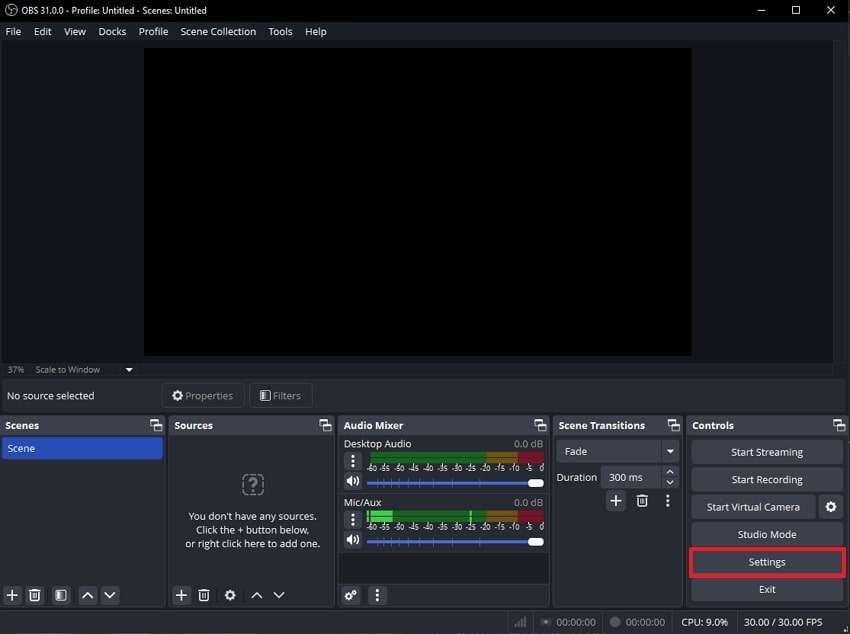
Step 2. From here, click the "Video" tab from the list on the left side of the window. You can now adjust the video settings such as Base Resolution, Output Resolution, and FPS value so that you can easily fix the lag issue from the streaming video.
Method 5. Allow OBS via Firewall Settings
Firewalls may block OBS’s communication with your streaming platform or other services, which causes connectivity issues. Allowing OBS through the firewall ensures smooth data flow. It ensures that the software has uninterrupted access to the Internet, reducing the chance of dropped frames.
Configuring your firewall to allow OBS can prevent interference that might cause network issues during the streaming process. Go through the step-by-step guide below to learn how to stop lag in OBS:
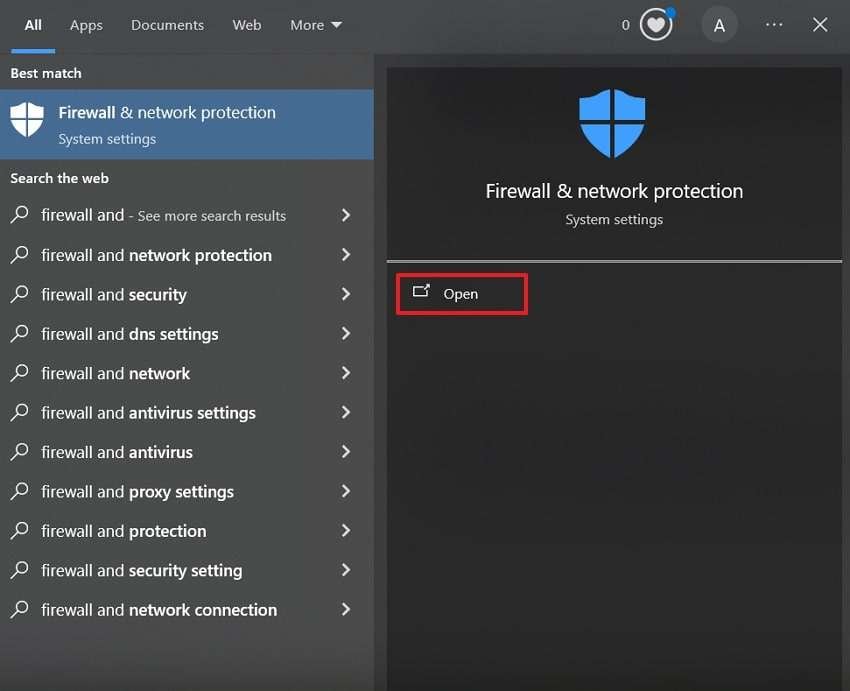
Step 1. Locate the "Firewall and Network Protection" system settings from the Windows search bar and click "Open" to get access to it.
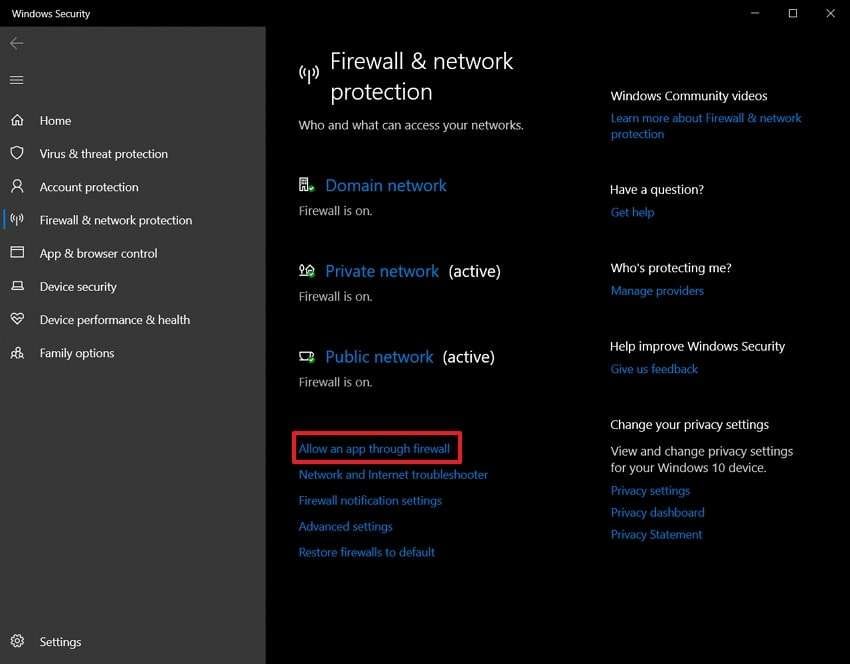
Step 2. Once you are in the “Firewall and Network Protection” panel of your device, choose the "Allow an App Through Firewall" option and move to the next step.
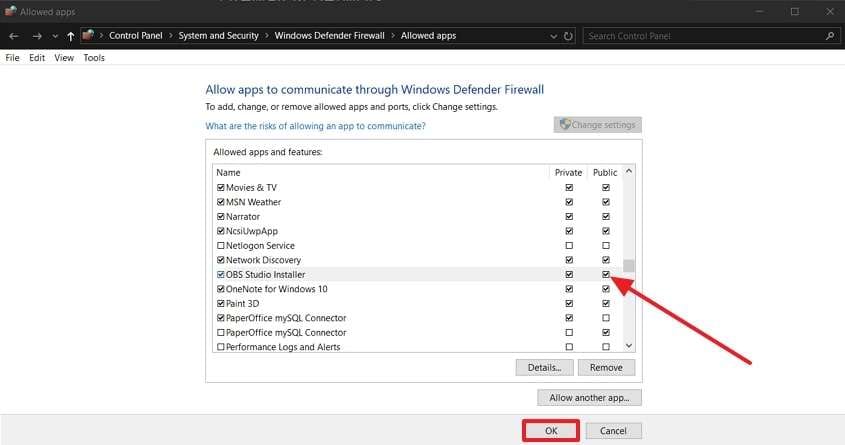
Step 3. Now, locate the OBS software and tick the “Private” and “Public” checkboxes. Then, hit the “OK” button to finalize the changes made.
Method 6. Reduce Load on Your System
Reducing the load on your system involves closing unnecessary applications and background processes that consume resources. This frees up valuable CPU and RAM resources, allowing OBS to perform optimally. Running too many programs simultaneously can slow down your system, leading to a lag in OBS.
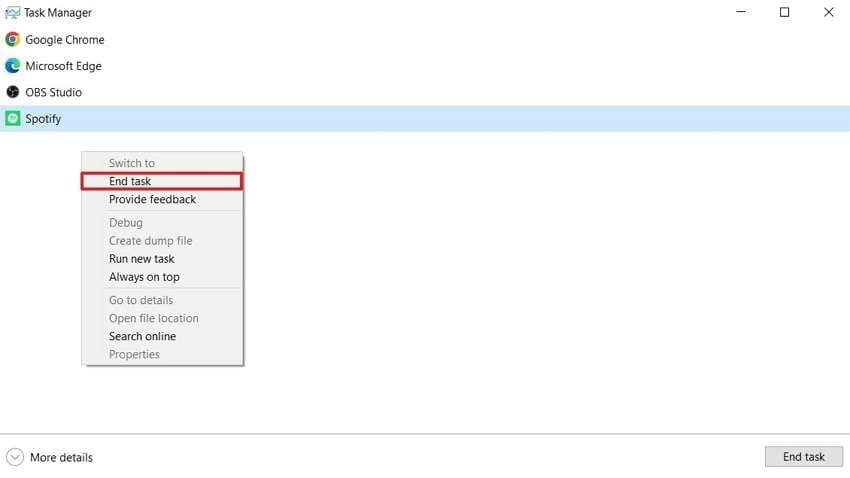
As you minimize the background tasks, it ensures that OBS has the resources to run smoothly. Here are the steps regarding how to stop lag in OBS through the reducing load process:
Instructions: Once you get access to the Task Manager on your desktop, choose which software is extra and needs to be closed. Afterward, right-click on the selected software and hit the "End Task" option from the drop-down menu.
Part 3. How to Fix Laggy OBS Recordings with Repairit Video Repair?
When you're dealing with corrupted OBS recordings, a third-party repair tool like Repairit can be a game-changer. Its simple interface simplifies the process to help you repair damaged video files with just a few clicks. For this purpose, this tool supports a wide range of file formats and offers the flexibility to add multiple videos for simultaneous repair.
Beyond video repair, it extends its capabilities to fix corrupted images, audio, and other files. Apart from that, its AI-powered enhancement tools can even improve the overall quality of your media. Additionally, this tool works seamlessly with videos recorded on any device, which ensures compatibility and efficient restoration of your OBS recordings.
Key Features of Repairit
- Batch Processing Capability: Users can add multiple damaged OBS files at once and repair them in one go. Overall, this can help them save time and effort to speed up the workflow.
- Preview of Results: Repairit allows users to preview the fixed OBS video and audio file results before exporting them on their Windows PC or MacBook.
- AI Models: Users can utilize the integrated AI features to repair images or enhance the videos in a single click.

-
Repair damaged videos with all levels of corruption, such as video not playing, video no sound, out-of-sync video or audio, playback errors, header corruption, flickering video, missing video codec, etc.
-
Repair full HD, 4K, and 8K videos and support 18 popular formats, including MOV, MP4, M2TS, INSV, M4V, WMV, MPEG, ASF, etc.
-
Repair damaged or corrupted videos caused by video compression, system crash, video format change, etc.
-
Repair critically damaged or corrupted videos available on SD cards, mobile phones, cameras, USB flash drives, etc.
-
Repairit has a quick and advanced scanning mode. You can use either depending on the level of corruption the video file has undergone.
-
No limit to the number and size of the repairable videos.
-
Support Windows 11/10/8/7/Vista, Windows Server 2003/2008/2012/2016/2019/2022, and macOS 10.12~macOS 13.
Walkthrough Guide on Fixing Lag OBS Recordings Through Wondershare Repairit
Follow this simple step-by-step guide to effortlessly repair your damaged recordings with Repairit’s intuitive interface:
Step 1. Install and Open Repairit for Video Repair
After installing and launching this tool, navigate to the “Video Repair” section on the main interface. Now, click the “+Add” button to add the corrupted OBS recordings you wish to repair.

Step 2. Click Repair to Move Damaged Files to Repaired Results
Once your videos appear in the “Unrepaired Videos” section, select the “Repair” button located at the bottom right corner. This action will process the files and transfer them to the “Repaired Results” section for further review.

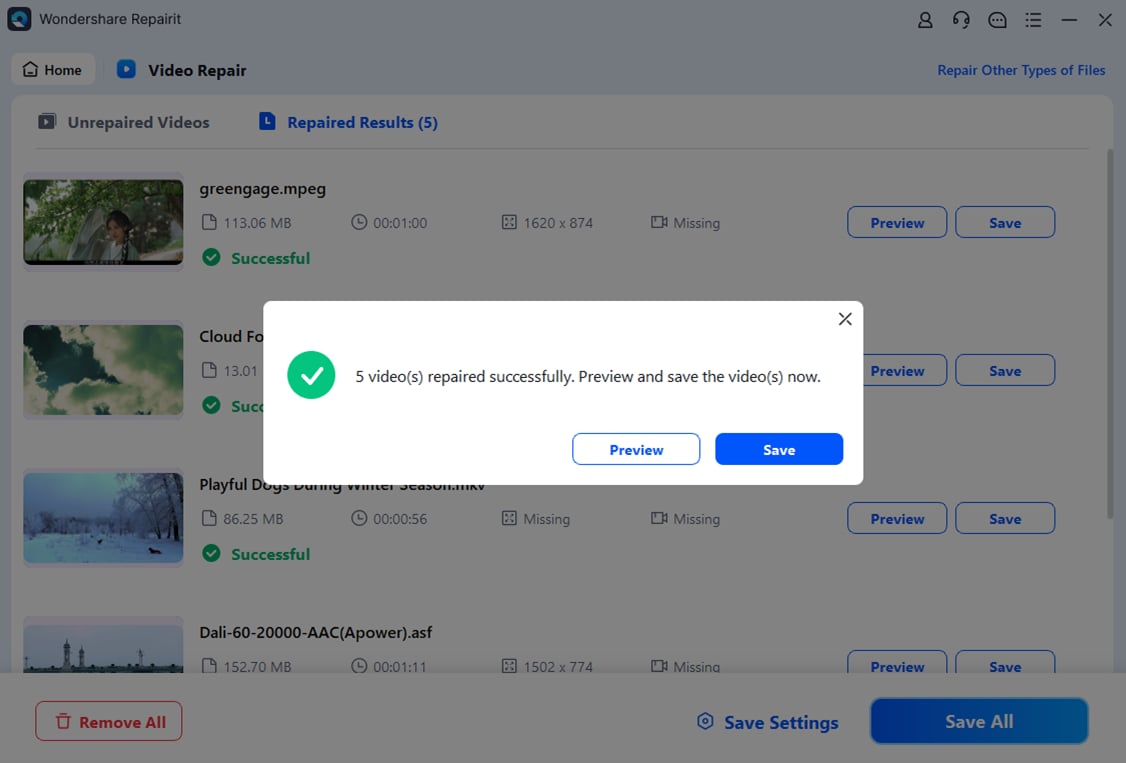
Step 3. Preview and Save the Repaired OBS Recording to Your Device
In the results section, a popup will appear, allowing you to preview the repaired video by tapping the "Preview" button. Once satisfied, click the "Save" button to export the fixed OBS recordings directly to your device.
Fix Your Laggy OBS Recordings Now

Conclusion
In conclusion, this article has discussed various reasons that can cause your OBS file to get damaged and start lagging. Then, we also looked into the top 6 methods to apply in order to learn how to fix lag in OBS. After fixing the lag issue, we discussed using third-party software to repair the damaged files. Wondershare Repairit is the most optimized toolbox we need to opt for to fix any of our corrupted files.
FAQ
-
Q1. How do I automatically optimize OBS?
You can use the Auto-Configuration Wizard in OBS to optimize settings based on your hardware and streaming goals. It adjusts settings like resolution, bitrate, and encoder for the best performance. -
Q2. Is OBS using CPU or GPU?
OBS primarily uses the CPU for software encoding and the GPU for rendering and specific effects. You can choose hardware encoding (GPU) for less CPU usage or software encoding for higher quality. -
Q3. How to optimize OBS streaming?
Lowering the resolution and bitrate, enabling hardware encoding, and using the optimal output settings can enhance OBS streaming performance. Additionally, ensure you have a stable internet connection and updated drivers.


 ChatGPT
 Perplexity
 Google AI Mode
 Grok
Grok

