
A freeze frame turns one moment in your video into a still image that stays on screen for as long as you want. It’s an easy way to highlight action, emphasize emotion, or add a clean visual pause.
Adobe Premiere Pro offers several simple ways to create a freeze frame. Below, we’ll cover four of the most useful methods you can use in your video projects. Plus, this post also includes the simple fixes if the Adobe Premiere Pro freeze frame feature doesn’t work.
Table of Contents
Part 1. What Is a Freeze Frame in Premiere Pro?

A freeze frame is a creative video editing technique where you take one single frame from your clip and hold it on screen so it looks like a still photo. It’s like hitting “pause,” but in a smooth and intentional way that’s built into your edit.
A popular example is the final shot in Harry Potter and the Prisoner of Azkaban, where the scene freezes as Harry flies off on his Firebolt.
Editors use freeze frames to highlight important moments, focus on emotions, or guide the viewer’s attention. They also work well for adding text, character introductions, or fun stylistic effects.
Part 2. How to Create a Freeze Frame in Premiere Pro (4 Easy Methods)
Learning how to freeze a frame in Premiere Pro gives you a simple but powerful effect to use in your edits. It’s very easy. Here are four quick methods to create a freeze frame in Premiere Pro:
1. Add Frame Hold Option (Quickest Way)
The quickest way to make a freeze frame is directly in the timeline.
Step 1: Move the playhead to the exact moment you want to freeze.
Step 2: Right-click your clip and choose Add Frame Hold.
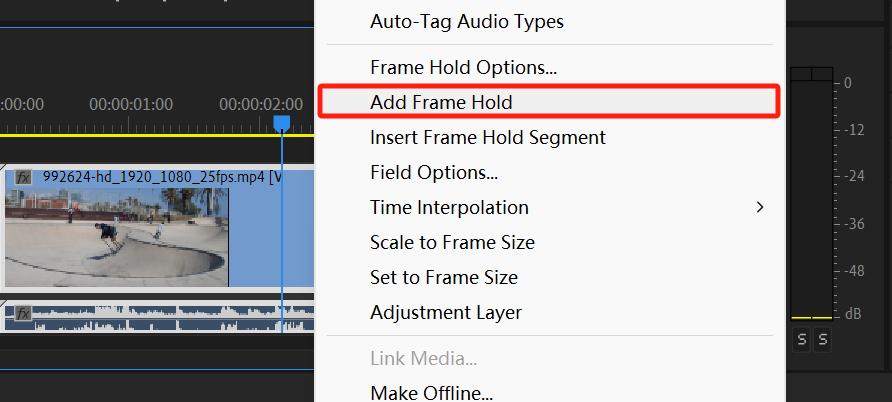
Step 3: Premiere Pro will split the clip, and everything after the playhead becomes a still image. This creates a freeze frame from that point to the end of the clip.
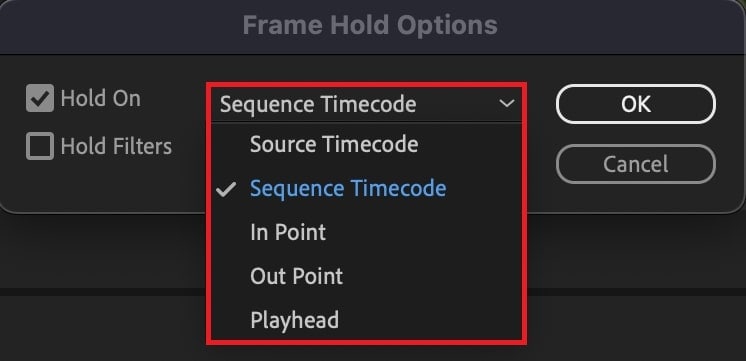
Step 4: You can now move or edit like any other clip. If you right-click the clip again and open Frame Hold Options, you can choose where the freeze starts, where it ends, or set it at the exact position of your playhead.
2. Frame Hold Options (More Control)
Frame Hold lets you capture a still image from your clip.
Step 1: Move the playhead to the exact frame you want to freeze. Right-click the clip and choose Insert Frame Hold Segment.
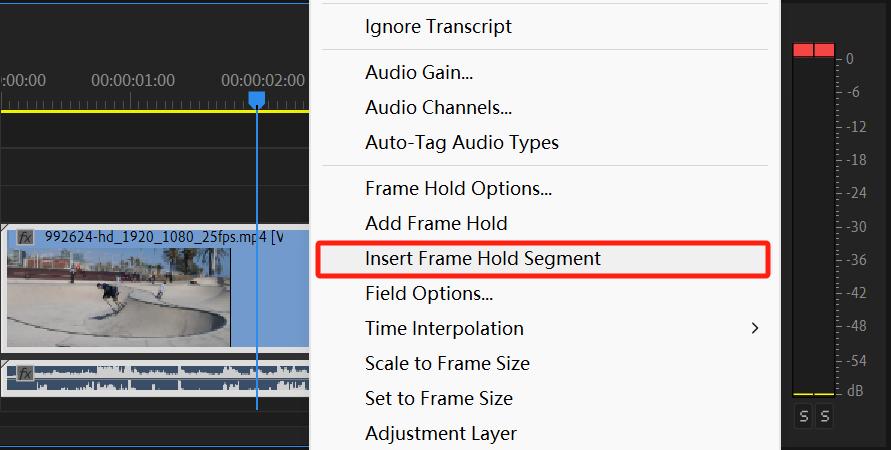
Step 2: Premiere Pro will split the clip into three parts:
- the part before the freeze,
- a 2-second frozen frame,
- and the part after the freeze.
The frozen section comes from the frame where your playhead was positioned.
3. Export a Still Image (Manual Method)
Another way to create a freeze frame is to export a single frame as an image and add it back to your timeline. The Export Frame method is perfect if you want your freeze frame as a separate image. This is helpful for social media posts or creating thumbnails.
Step 1: Move the playhead to the frame you want to freeze.
Step 2: In the Program Monitor, click the Export Frame button or use Cmd + Shift + K (Mac) / Ctrl + Shift + K (Windows).
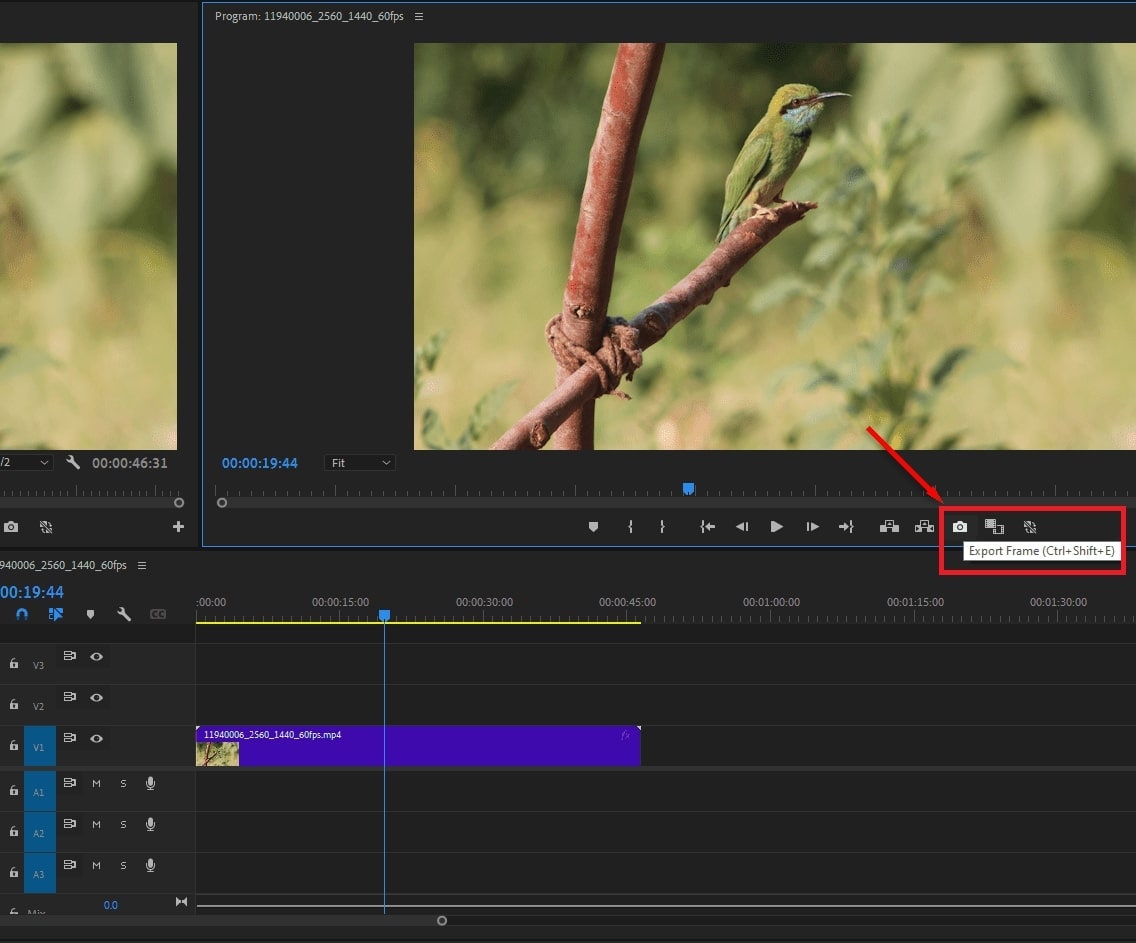
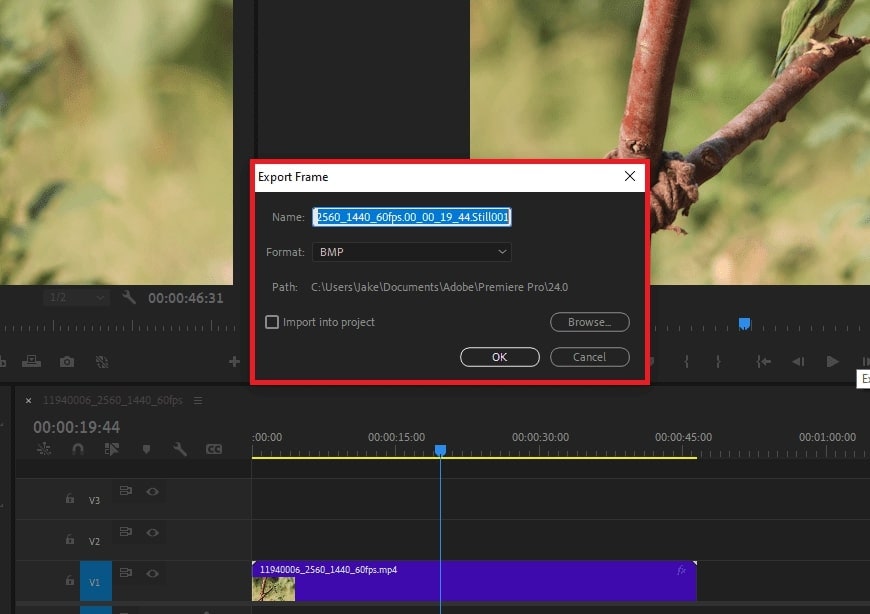
Step 3: Move the playhead to the frame you want and click Export Frame. Name the file and choose where to save it.
Step 4: Drag the saved image back into your timeline as a clip.
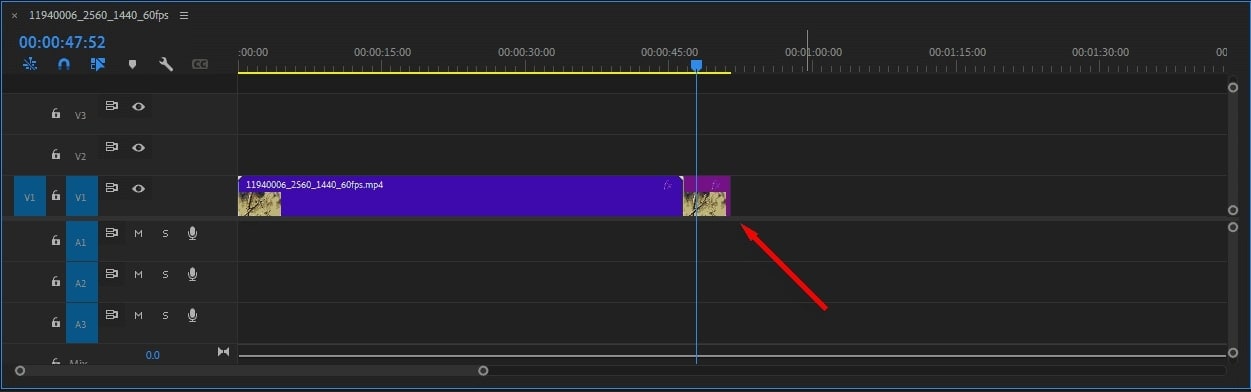
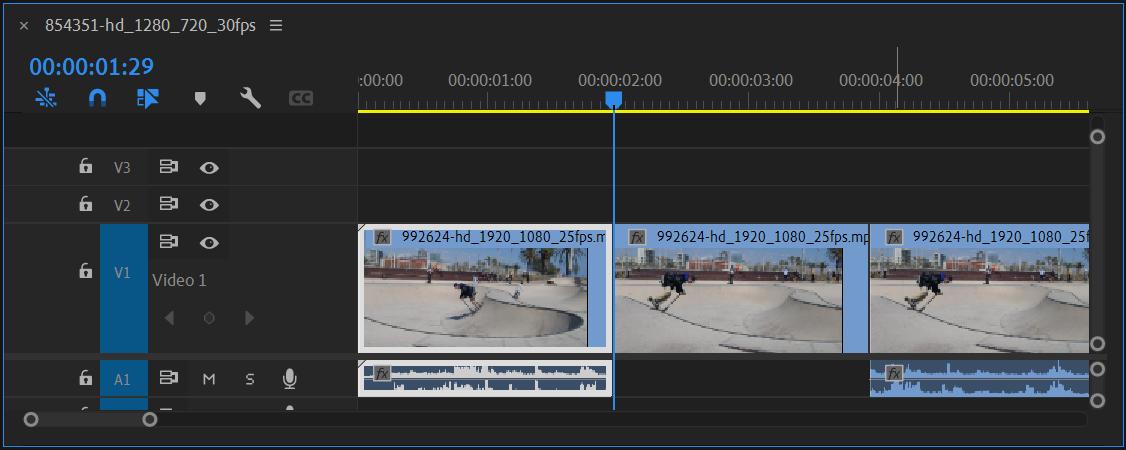
Note: Exported stills appear with a lavender color on the timeline, making them easy to identify.
4. Time Remapping Technique (Dynamic Style)
Time remapping is a more advanced way to create freeze frames and control clip speed.
Step 1: Right-click the clip’s FX badge and choose Time Remapping.
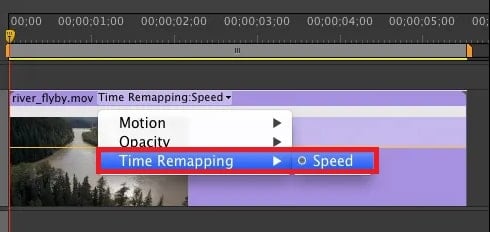
Step 2: A rubber band will appear showing the clip’s speed.
Step 3: Create a keyframe at the frame you want to freeze by Control/Command-clicking.
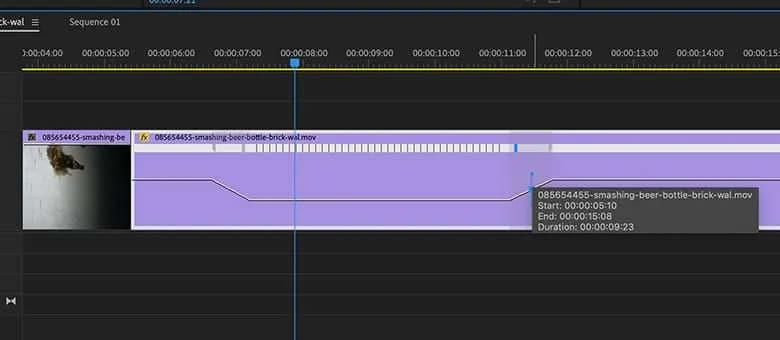
Step 4: Add a hold section: Control + Alt + Click (Windows) or Option + Command + Click (Mac). Then, drag the keyframe to where you want the freeze to end. The held section will appear as vertical lines.
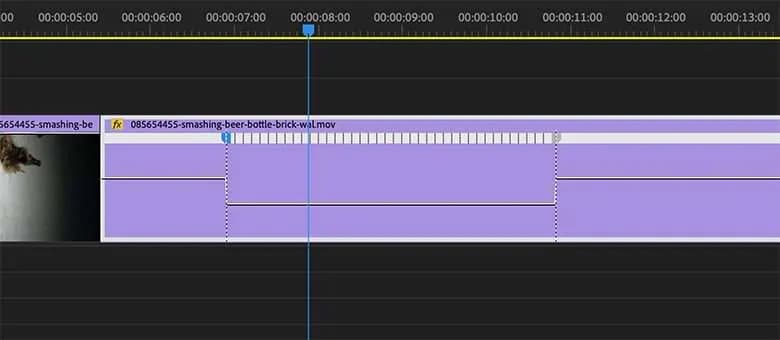
Step 5: Adjust the freeze:
- Drag the left half of the first keyframe left and the right half of the second keyframe right to create a ramp.
- Click and drag the gray section of the keyframe to change which frame is frozen and how long it lasts.
- This lets you hold a specific frame while controlling how long it stays on screen.
Pro Tip: Use Freeze Frame Templates or Presets
You can also use premade Premiere Pro templates that include freeze frames along with effects, transitions, and color grading. Here are three examples from the Storyblocks library:
1. Ink Freeze Frame Promo
This template creates artistic freeze frames with an ink splash effect. It’s ideal for trailers, promos, or credit sequences. Simply freeze a dramatic moment, add titles or captions, and adjust colors to match your theme.

2. Action Freeze Frame Effects Presets
This template is best for fast-paced sequences. It has three freeze frame styles: Glow (adds luminescence), Comics (comic book style), and Standard (simple pause). You can choose dynamic versions with animations or static versions that simply freeze the action.

3. Cool Minimal Freeze Frame
This template includes eight minimalistic freeze-frame scenes with 3D graphics and professional text effects. All text and media placeholders are customizable, and a video tutorial guides you through the process.

Part 3. How to Fix Freeze Frame Not Working in Premiere Pro
Sometimes, the freeze frame feature in Premiere Pro doesn’t work as expected. This can happen due to corrupted media cache, mismatched sequence settings, GPU issues, or problems with your footage itself. Below are effective fixes to get your freeze frames working again.
1. Clear Media Cache
Premiere Pro stores temporary files in a media cache to speed up editing. Over time, these data can become corrupted and cause effects like freeze frames to fail. These files can take up a lot of hard drive space, especially in large projects, which may slow down your workflow.
Deleting the cache can free up space and improve performance. Here are the steps:
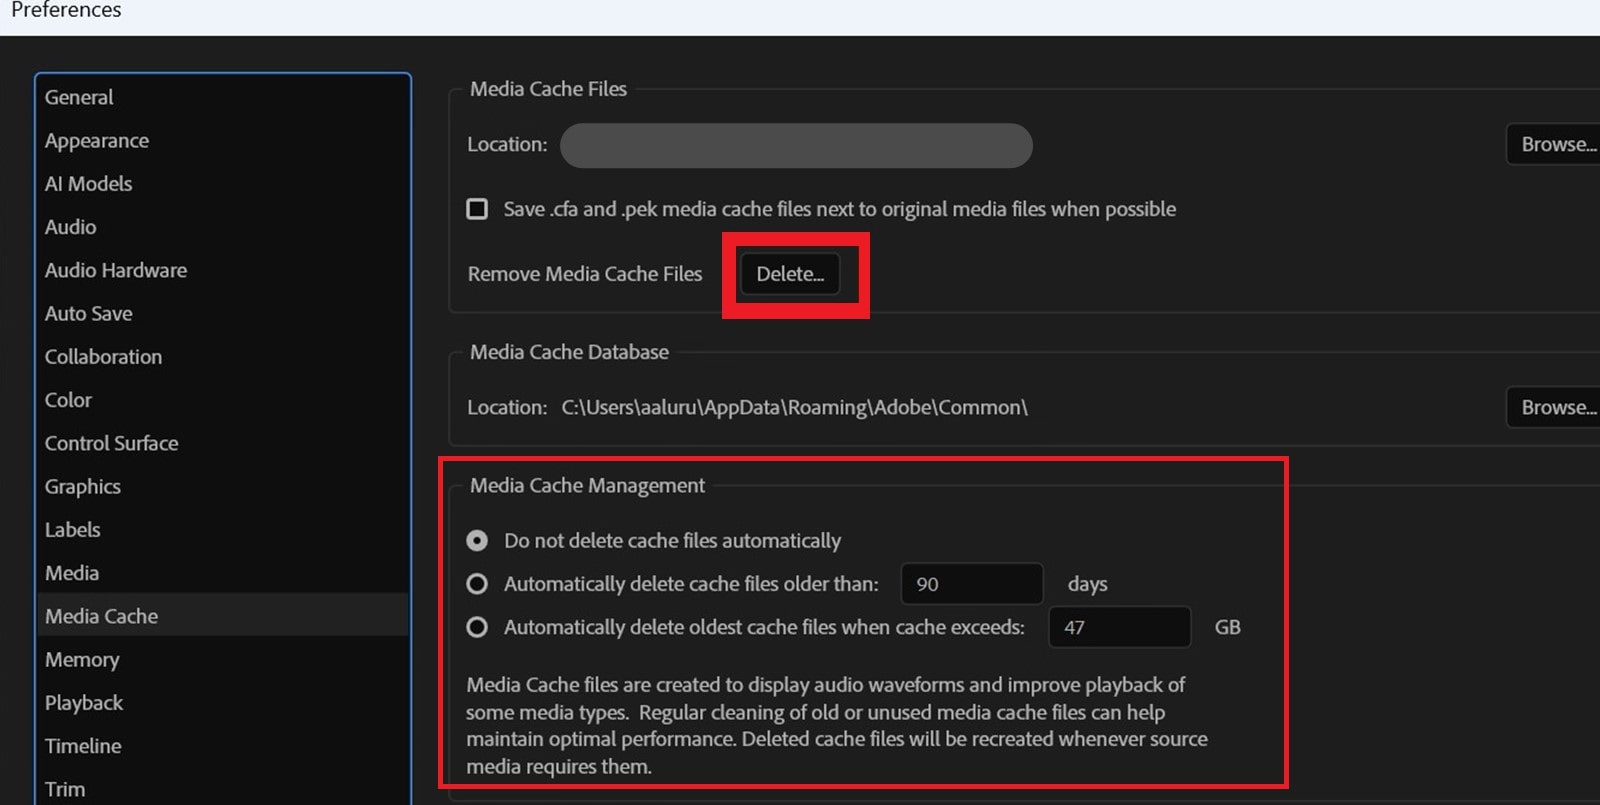
Step 1: Go to Edit, Preferences, and Media Cache.
Step 2: Click the Media Cache Management options:
- Do not delete cache files automatically: Enabled by default. Prevents automatic deletion of peak (.pek), audio (.cfa), and index (.ims) files.
- Automatically delete cache files older than: Default is 90 days. You can change this to your preferred time period.
- Automatically delete oldest cache files when cache exceeds: Default is 10% of the drive’s size. Adjust to limit disk usage.
Step 3: Restart Premiere Pro and try the freeze frame again.
2. Re-link or Re-import Footage
If Premiere Pro can’t read your video properly, freeze frames may not work. This can happen when files are moved, renamed, or corrupted. Re-linking or re-importing your footage ensures Premiere has the correct path and readable file, which usually fixes the problem.
Step 1: Right-click the clip in the timeline and choose Link Media.
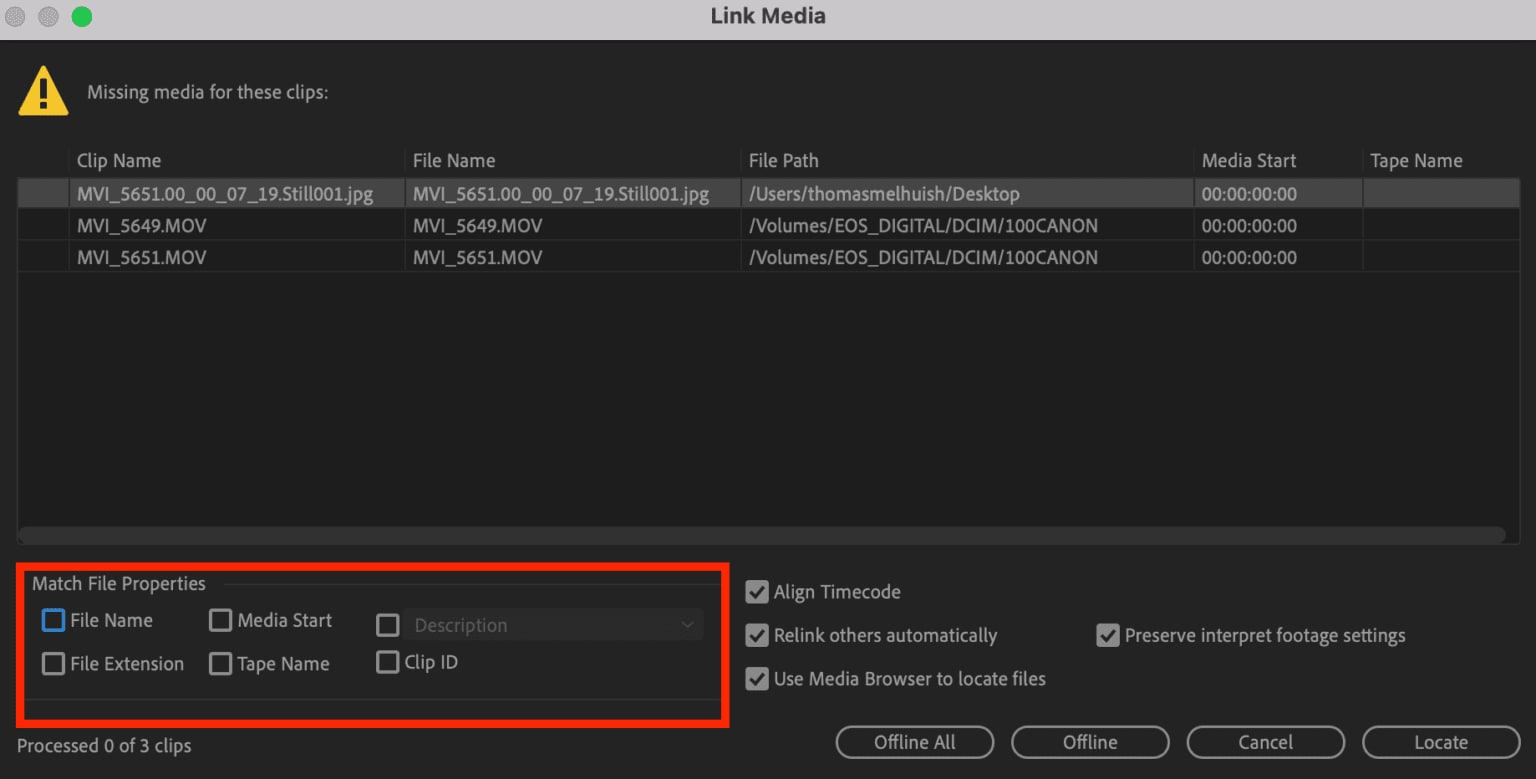
Step 2: Navigate to the original file location and re-link the clip.
Step 3: If re-linking doesn’t work, remove the clip from the timeline and import it again.
3. Check Sequence Settings
Freeze frames can fail if your sequence settings don’t match your footage. Differences in frame rate, resolution, or codec can prevent the effect from applying correctly. Double-check your sequence settings and adjust them to match your clip.
Premiere Pro lets you adjust key settings for an existing sequence, such as frame size, timebase, pixel aspect ratio, audio format, preview codec, and color management. But be careful, as changing these can affect playback or quality.
Step 1: Go to Sequence and Sequence Settings.
Step 2: Adjust the settings to fit your project and click OK.
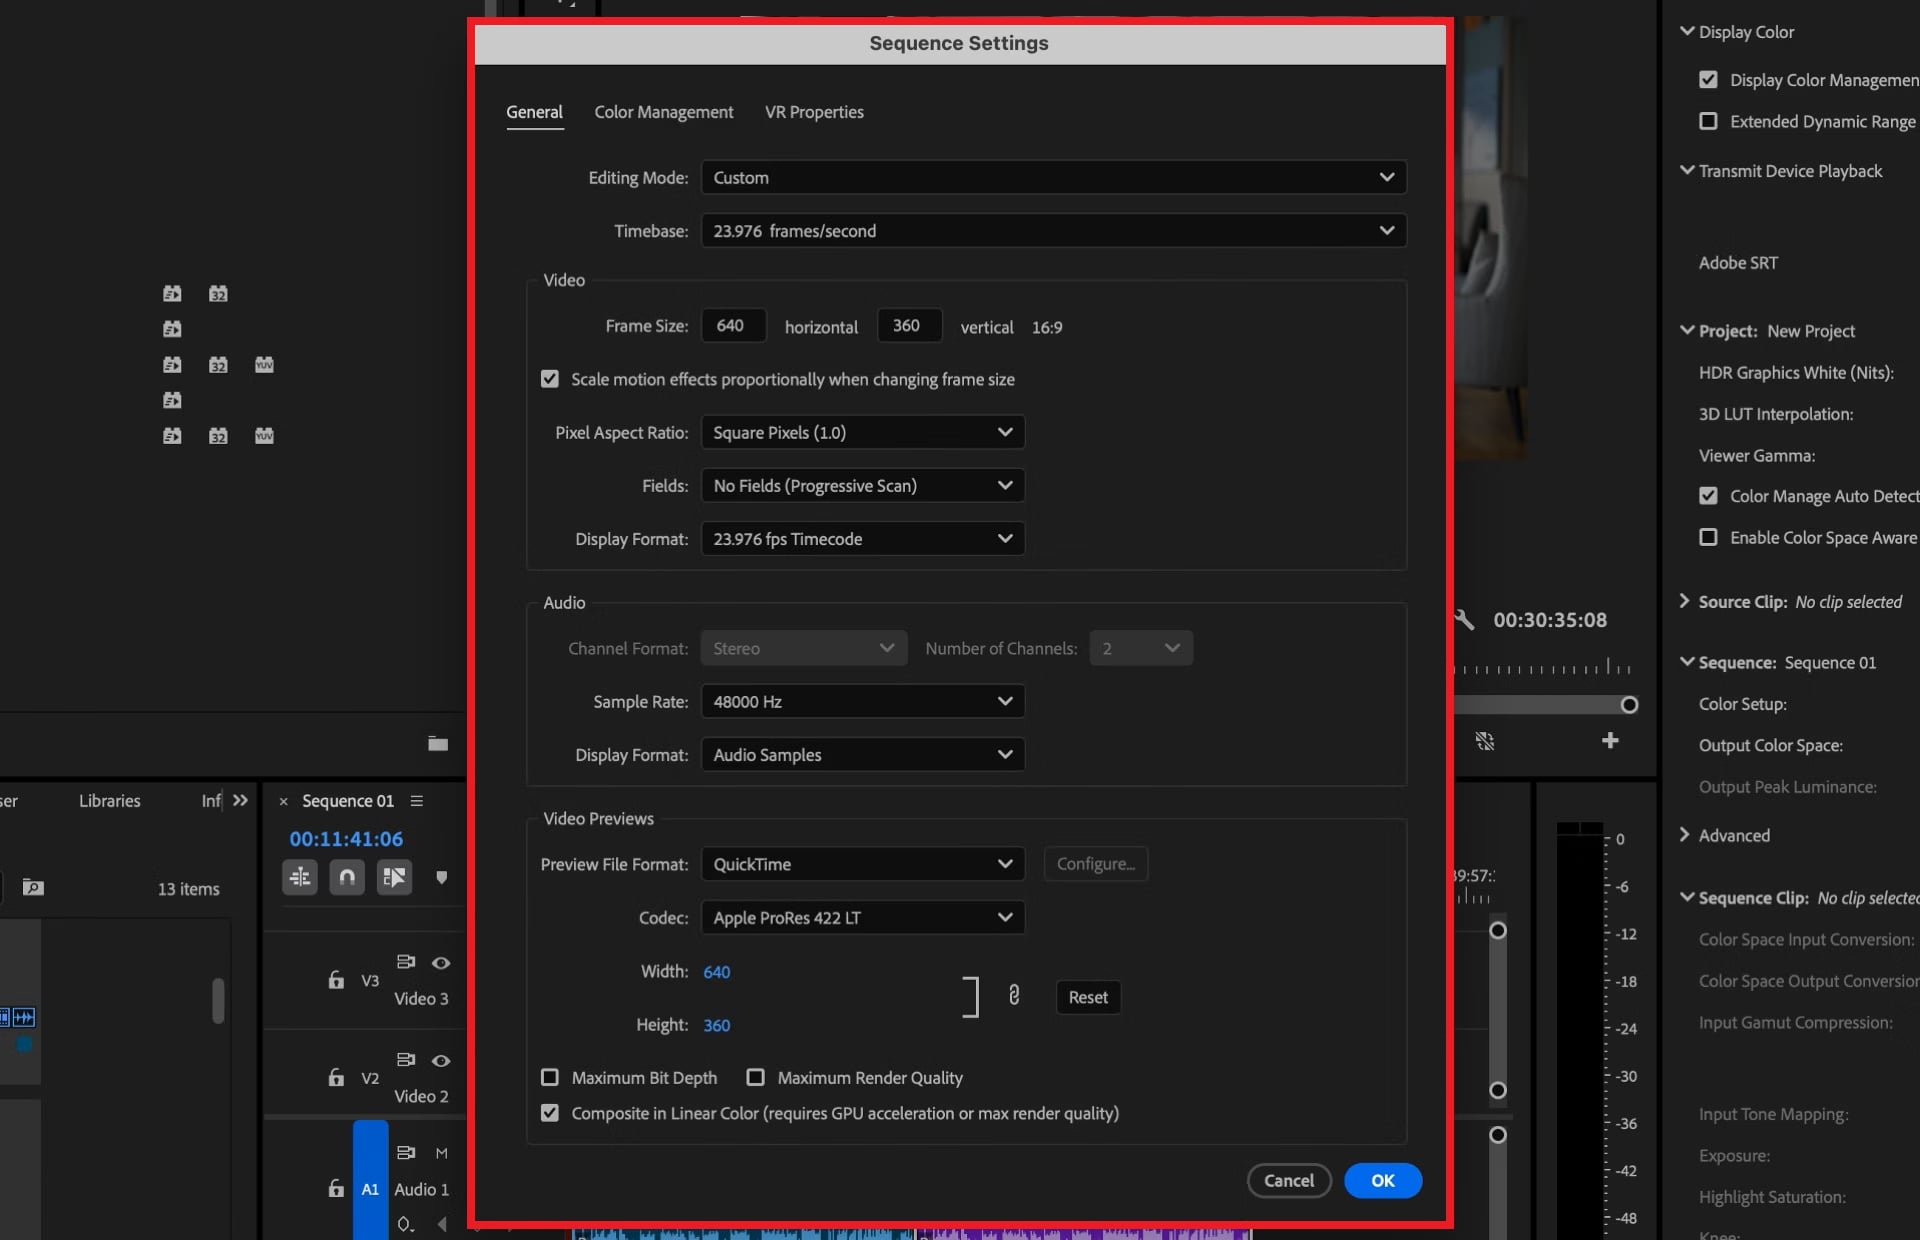
Step 3: If needed, create a new sequence that matches your footage and move your clip into it.
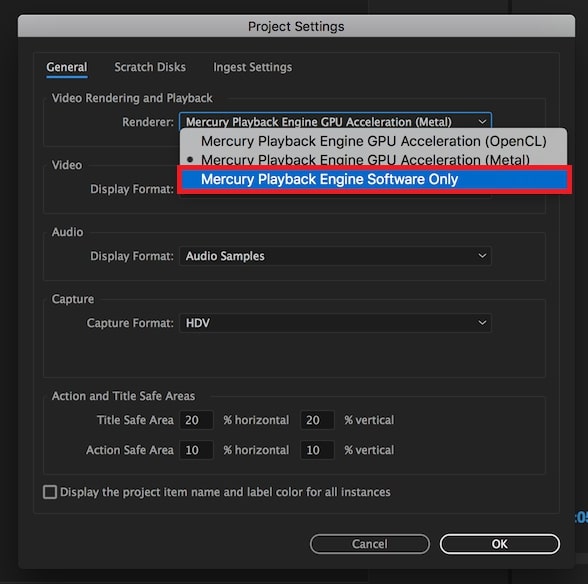
4. Disable GPU Acceleration Temporarily
GPU acceleration helps Premiere Pro render effects, play back video, and export faster. But if your GPU driver is buggy, your VRAM is full, or a plugin isn’t compatible, it can cause crashes. Turning off GPU acceleration is a quick way to check if the GPU is the problem.
Step 1: Open your project. Go to File, Project Settings, and General.
Step 2: Under Renderer, change Mercury Playback Engine GPU Acceleration to Mercury Playback Engine Software Only.
Step 3: Hit OK and restart the project. Premiere will now rely only on your CPU. It may run slower, but it can stop constant freeze frame crashes.
5. Repair Corrupted Video Files (Advanced Fix)
When a video file is partially damaged, it can cause Premiere Pro to freeze, skip frames, stutter, or fail to render properly. In these cases, repairing the file itself is often the most reliable solution before applying any freeze-frame effects or continuing with advanced edits.
A dedicated repair tool can help make corrupted clips usable again. Repairit Video Repair is designed to fix broken or unplayable videos from a wide range of devices and formats, helping editors maintain a smooth workflow.
Key Features:

-
Repairs videos that freeze mid-play, drop frames, or get stuck due to corrupted data or incomplete encoding.
-
Uses advanced analysis to detect damaged segments and reconstruct missing frame information.
-
Allows uploading a sample file to improve accuracy when repairing heavily corrupted clips.
-
Ensures repaired videos remain compatible with major NLEs such as Premiere Pro, DaVinci Resolve, and Final Cut Pro.
-
Addresses common issues like pixelation, flickering, grainy frames, audio-video sync errors, black screens, and export glitches.
Step-by-Step Guide:
Step 1: Run Repairit and click the +Add button to import the damaged file that is causing the freeze frame issue in Premiere.

Step 2: Once your clip is added, Repairit will display basic file information such as name, resolution, and size. Click Repair to begin processing the corrupted video that may be causing freeze-frame premiere playback errors.

Step 3: After the repair completes, double-click the file to preview the results. If the video plays normally without freezing, select Save and choose a new folder for your repaired file.

Repair Corrupted Video Files Now
 Security Verified. Over 7,302,189 people have downloaded it.
Part 4. Tips for Smooth Freeze Frame Editing
Edit efficiently and avoid glitches in Premiere Pro by following these essential tips.
- Adjust duration carefully. Extend or shorten your freeze frame by dragging its edges on the timeline for precise timing.
- Check sequence settings. Make sure your sequence matches your clip’s frame rate and resolution to prevent glitches.
- Clear media cache regularly. This keeps Premiere running smoothly and avoids freeze-frame errors.
- Add motion or effects if needed. Subtle zooms, text, or graphics can make freeze frames more dynamic.
- Organize your clips. Label freeze frames in the timeline or project bin for easy editing and reference.
- Save Frequently. Always save your project before adding freeze frames to prevent data loss in case of crashes.
- Use high-quality footage. Better resolution and less compression make freeze frames look clean and sharp.
Conclusion
Creating a freeze frame in Premiere Pro is an easy way to highlight key moments and add a clean visual pause to your edit. You can use Add Frame Hold, export a still image, or try time remapping for more control. If your freeze frame isn’t working, simple fixes like clearing the media cache, checking sequence settings, or repairing your footage usually solve the issue.
FAQs
-
How do I adjust the duration of a freeze frame in Premiere Pro?
Once the freeze frame appears as a clip in your timeline, you can change its length by dragging its edges. Drag outward to make it longer or inward to shorten it. This works for Add Frame Hold, Insert Frame Hold Segment, and exported still images. -
What’s the difference between Add Frame Hold and Frame Hold Options?
“Add Frame Hold” freezes the frame at your playhead and replaces the rest of the clip from that point onward. Meanwhile, “Frame Hold Options” gives you more control. You can pick the exact frame to freeze and decide where the freeze starts and ends. It’s more flexible and precise than Add Frame Hold. -
Can I export a freeze frame as an image?
Yes. Use the Export Frame (camera icon) in the Program or Source Monitor to save the frame as a JPEG, PNG, or other formats. You can name it, choose where to save it, and import it directly into your project. This is great for thumbnails, social posts, or use in other edits.
